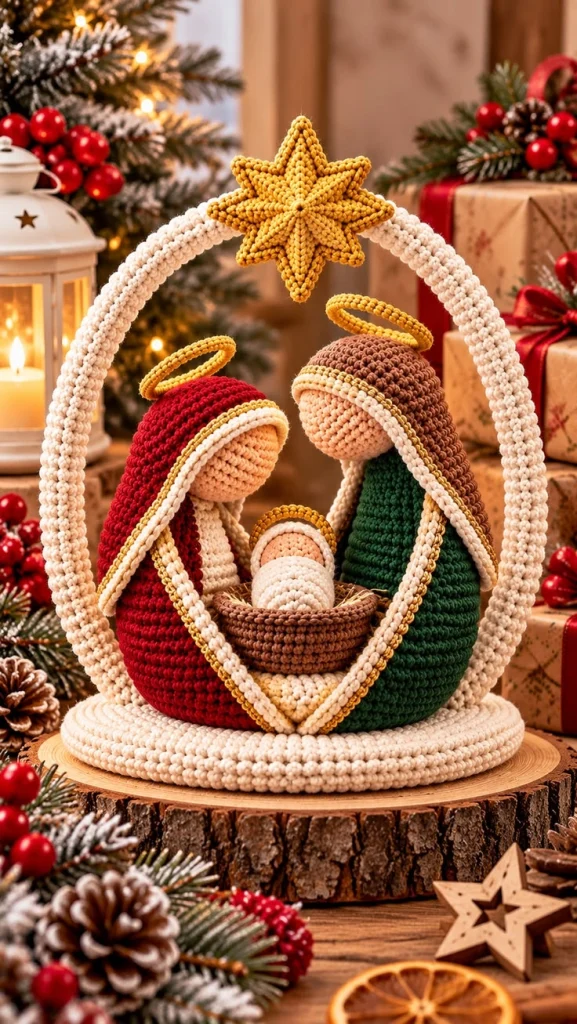
Crochet Nativity Scene – Free Advanced Amigurumi Christmas Pattern
Create a beautiful handmade Christmas keepsake with this elegant Crochet Nativity Scene. Featuring Mary in a deep red robe, Joseph in a forest-green robe, and Baby Jesus resting in a miniature brown manger, this intricate amigurumi display captures the warmth and peaceful beauty of the traditional Nativity story.
The design includes flowing cream-and-gold head coverings, delicate golden halos, a dimensional eight-point Bethlehem star, and a freestanding cream crochet arch. A textured oval base completes the display, making it a beautiful Christmas centerpiece, mantel decoration, or handmade holiday gift.
This advanced crochet pattern uses separate shaped components, invisible decreases, dimensional assembly, decorative embroidery, and structured construction to create a detailed Nativity scene inspired by the reference photograph.
Pattern Information
- Skill Level: Advanced
- Finished Height: Approximately 28–32 cm, including the arch and star
- Finished Width: Approximately 24 cm
- Mary Height: Approximately 15 cm
- Joseph Height: Approximately 16 cm
- Baby Jesus Length: Approximately 7 cm
- Construction: Multiple separately crocheted and assembled pieces
- Yarn Weight: Sport-weight or DK cotton yarn
- Hook Size: 2.5 mm and 3 mm
- Terminology: US crochet terms
Materials Needed
- Deep red cotton yarn – approximately 70 g
- Forest-green cotton yarn – approximately 60 g
- Warm cream cotton yarn – approximately 120 g
- Chocolate-brown cotton yarn – approximately 40 g
- Peach or light skin-tone cotton yarn – approximately 35 g
- Mustard-gold or metallic-gold yarn – approximately 25 g
- Small amount of ivory yarn for Baby Jesus
- 2.5 mm crochet hook
- 3 mm crochet hook
- Polyester fiberfill
- Stitch markers
- Tapestry needle
- Embroidery needle
- Scissors
- Flexible craft wire for the arch and halos
- Optional plastic canvas for the base
- Fabric-safe craft adhesive
- Rustproof blocking pins
Safety: This is a decorative collectible, not a toy. Wire supports and small components must remain inaccessible to children. Cover and secure all wire ends.
Crochet Abbreviations
- MR: Magic ring
- ch: Chain
- sc: Single crochet
- hdc: Half double crochet
- dc: Double crochet
- tr: Treble crochet
- sl st: Slip stitch
- inc: 2 sc in the same stitch
- dec: Invisible single crochet decrease
- BLO: Back loop only
- FLO: Front loop only
- FO: Fasten off
- st: Stitch
Special Techniques
- Invisible amigurumi decreases
- Continuous spiral crochet
- Back-loop shaping
- Dimensional cone construction
- Decorative surface crochet
- Layered fabric draping
- Structured wire-supported assembly
- Three-dimensional star shaping
- Invisible joining and finishing
1. Crochet Mary’s Deep Red Robe
Using deep red yarn and a 2.5 mm hook, begin at the neckline and work downward in continuous rounds.
Round 1: Make a MR and work 6 sc into the ring. (6)
Round 2: Inc in each stitch around. (12)
Round 3: *Sc 1, inc* repeat 6 times. (18)
Round 4: Sc around. (18)
Round 5: *Sc 2, inc* repeat 6 times. (24)
Rounds 6–7: Sc around. (24)
Round 8: *Sc 3, inc* repeat 6 times. (30)
Rounds 9–11: Sc around. (30)
Round 12: *Sc 4, inc* repeat 6 times. (36)
Rounds 13–16: Sc around. (36)
Round 17: *Sc 5, inc* repeat 6 times. (42)
Rounds 18–22: Sc around. (42)
Round 23: *Sc 6, inc* repeat 6 times. (48)
Rounds 24–28: Sc around. (48)
Round 29: Work sc in BLO around. (48)
Rounds 30–32: Sc around. (48)
Fasten off, leaving a long sewing tail.
Lightly stuff the upper portion while leaving the lower robe wide enough to stand upright.
2. Crochet Mary’s Head
Using peach yarn:
Round 1: 6 sc in MR. (6)
Round 2: Inc around. (12)
Round 3: *Sc 1, inc* repeat around. (18)
Round 4: *Sc 2, inc* repeat around. (24)
Rounds 5–9: Sc around. (24)
Round 10: *Sc 2, dec* repeat around. (18)
Round 11: *Sc 1, dec* repeat around. (12)
Stuff firmly.
Round 12: Dec around. (6)
Close the opening and weave in the end.
Keep the face simple and peaceful, without embroidered facial features, matching the reference image.
3. Crochet Mary’s Cream Head Covering
Using warm cream yarn, create a long flowing rectangular fabric.
Row 1: Ch 23, sc in the second chain from the hook and across. (22)
Rows 2–36: Ch 1, turn, sc across. (22)
Fasten off.
Using cream yarn, work one round of sc evenly around the rectangle.
Change to gold yarn.
Work one round of sl st around the outer edge to create a delicate golden trim.
Drape the fabric over Mary’s head, allowing both sides to fall naturally toward the base of her robe.
Secure discreetly with matching thread.
4. Crochet Mary’s Arms – Make 2
Using cream yarn:
Round 1: 6 sc in MR. (6)
Rounds 2–8: Sc around. (6)
Fasten off and lightly stuff.
Attach both arms to the upper sides of the red robe, positioning them toward the manger.
5. Crochet Joseph’s Forest-Green Robe
Using forest-green yarn, follow the same construction as Mary’s robe.
For a slightly taller figure, add four additional rounds of sc after Round 28.
Maintain the broad cone-shaped silhouette.
Stuff lightly and secure the bottom edge.
6. Crochet Joseph’s Head
Using peach yarn, follow Mary’s head pattern.
Stuff firmly and close.
Attach the head to the top of the green robe.
7. Crochet Joseph’s Brown Hood
Using chocolate-brown yarn:
Row 1: Ch 25, sc in the second chain from the hook and across. (24)
Rows 2–38: Ch 1, turn, sc across. (24)
Fasten off.
Add a cream sc border around the rectangle.
Using gold yarn, work a thin decorative line of slip stitches along the front edge.
Drape the hood over Joseph’s head and shoulders.
Allow the brown fabric to fall longer at the back than at the front.
Sew the fabric securely in place.
8. Crochet Joseph’s Arms – Make 2
Using forest-green yarn:
Round 1: 6 sc in MR. (6)
Rounds 2–9: Sc around. (6)
Fasten off.
Attach the arms toward the center of the display.
9. Crochet Baby Jesus
Head
Using peach yarn:
Round 1: 6 sc in MR. (6)
Round 2: Inc around. (12)
Rounds 3–5: Sc around. (12)
Round 6: Dec around. (6)
Stuff lightly and close.
Swaddled Body
Using ivory yarn:
Round 1: 6 sc in MR. (6)
Round 2: Inc around. (12)
Rounds 3–8: Sc around. (12)
Round 9: Dec around. (6)
Stuff lightly and close.
Sew the head securely to the upper end of the swaddled body.
Swaddling Wrap
Using cream yarn:
Row 1: Ch 17, sc in the second chain from the hook and across. (16)
Rows 2–12: Ch 1, turn, sc across. (16)
Fasten off.
Wrap the fabric diagonally around the baby’s body.
Secure with small invisible stitches.
10. Crochet the Brown Manger
Using chocolate-brown yarn:
Round 1: Ch 13, work 11 sc starting in the second chain from the hook, 3 sc in the last chain, continue along the opposite side with 10 sc, then 2 sc in the final chain. (26)
Round 2: Inc, sc 10, inc in each of the next 3 stitches, sc 10, inc in each of the last 2 stitches. (32)
Round 3: Sc around. (32)
Round 4: Sc in BLO around. (32)
Rounds 5–8: Sc around. (32)
Round 9: Sc around, then sl st to join. (32)
Fasten off.
Work one additional round of reverse single crochet around the upper rim for a raised woven-basket appearance.
Place a small amount of cream yarn inside the manger to represent soft bedding.
Position Baby Jesus in the center.
11. Crochet the Golden Halos – Make 2
Using mustard-gold yarn and a 2.5 mm hook:
Round 1: Ch 30 and join into a ring without twisting.
Round 2: Sc in each chain around. (30)
Round 3: Sc around. (30)
Fasten off.
For a firm circular shape, insert a covered flexible wire into the crocheted ring before closing.
Secure the wire ends completely.
Attach one halo above Mary’s head and one above Joseph’s head using discreet cream or gold thread supports.
12. Crochet the Oval Display Base
Using cream yarn and a 3 mm hook:
Round 1: Ch 31. Work 29 sc, 3 sc in the final chain, continue along the opposite side with 28 sc, then 2 sc in the final chain. (62)
Round 2: Inc, sc 28, inc in each of the next 3 stitches, sc 28, inc in each of the last 2 stitches. (68)
Rounds 3–8: Continue working evenly distributed increases at both rounded ends, adding 6 stitches per round. (104)
Rounds 9–11: Sc around. (104)
Fasten off.
Make a second matching oval base.
Insert a piece of plastic canvas cut slightly smaller than the crocheted base.
Join both pieces together with sc around the outer edge.
For additional texture, add one round of decorative bobble stitches around the border.
13. Crochet the Cream Nativity Arch
The large freestanding arch frames the figures and supports the Bethlehem star.
Using cream yarn and a 3 mm hook:
Round 1: Ch 7 and join into a ring. (7)
Round 2: Sc in each chain around. (7)
Rounds 3 onward: Continue working sc in continuous rounds until the tube measures approximately 75–85 cm, depending on the desired arch dimensions.
Fasten off, leaving a long tail.
Insert a smooth, flexible, covered craft wire through the center of the tube.
Bend the tube into a symmetrical arch.
Secure both ends into the reinforced base.
Add a second decorative row of surface slip stitches along the outer curve for a thicker, braided appearance.
Important: The arch must be firmly anchored to a rigid internal base. Crochet fabric alone will not support the arch in an upright position.
14. Crochet the Eight-Point Bethlehem Star
Using mustard-gold yarn:
Star Center
Round 1: 8 sc in MR. (8)
Round 2: Inc around. (16)
Round 3: *Sc 1, inc* repeat around. (24)
Fasten off.
Star Points
Divide the outer edge into eight groups of three stitches.
For each point:
Row 1: Join yarn and work 3 sc across the designated stitches. (3)
Row 2: Ch 1, turn, sc 3. (3)
Row 3: Ch 1, turn, sc3tog. (1)
Fasten off.
Repeat for all eight points.
Make a second matching star.
Place both stars together with wrong sides facing inward.
Join the edges using gold sc stitches, adding a small amount of fiberfill to create a raised center.
For extra dimension, embroider raised lines from the center toward each star point.
Attach the finished star to the highest point of the cream arch.
15. Assemble the Nativity Figures
- Position Mary on the left side of the base.
- Position Joseph on the right side.
- Place the manger in the center between both figures.
- Adjust the cream and gold head coverings so they frame the manger.
- Secure the figures to the base with strong yarn stitches.
- Attach the golden halos above the heads.
- Position the arch behind the figures.
- Secure the arch to the reinforced base.
- Attach the Bethlehem star at the top center.
- Check that the finished display stands upright and remains balanced.
16. Finishing Details
Weave in all loose yarn ends using a tapestry needle.
Gently shape the head coverings so they fall naturally over the shoulders.
Adjust Mary’s red robe and Joseph’s green robe to create soft folds.
Position Baby Jesus comfortably inside the manger.
Ensure the golden halos are evenly rounded.
Check that the Bethlehem star is centered above the figures.
For a polished finish, lightly steam-block the removable fabric pieces before final assembly, following the yarn manufacturer’s care recommendations.
Advanced Crochet Tips
- Use tightly worked cotton stitches to maintain clean amigurumi shapes.
- Keep all decreases invisible for a professional finish.
- Use stitch markers to track continuous rounds accurately.
- Shape the robes gradually to create a natural flowing silhouette.
- Use lightweight stuffing to avoid distorting the cone-shaped figures.
- Reinforce the arch with an internal support before attaching the star.
- Secure the head coverings with discreet stitches rather than visible knots.
- Use matching thread for decorative gold trims.
- Test the stability of the base before permanently attaching the figures.
- Keep the facial features minimal to preserve the peaceful, elegant design.
Creative Color Variations
- Traditional Nativity: Burgundy, forest green, cream, brown, and gold.
- Neutral Farmhouse: Oatmeal, taupe, ivory, and champagne gold.
- Winter White: Ivory, soft gray, beige, and silver.
- Vintage Christmas: Dusty rose, olive green, antique gold, and warm cream.
- Rustic Woodland: Terracotta, moss green, natural brown, and ivory.
- Elegant Holiday: Deep emerald, wine red, and metallic gold.
Frequently Asked Questions
Is this crochet Nativity pattern suitable for beginners?
This pattern is designed for advanced crocheters because it involves multiple shaped components, decorative fabric construction, wire-supported elements, and detailed assembly.
Can I make the Nativity scene without the arch?
Yes. Mary, Joseph, and Baby Jesus can be displayed together on the oval base without the arch or Bethlehem star.
What yarn works best for this project?
Sport-weight or DK cotton yarn provides good stitch definition and helps the figures retain their shape.
Can I make the figures larger?
Yes. Use thicker yarn and a larger crochet hook, or adjust the stitch counts proportionally.
Can I use safety eyes?
You can add embroidered eyes if desired, but the faceless design more closely matches the peaceful style of the reference image.
How should I store the finished Nativity scene?
Store it in a dry, sturdy box with protective tissue around the arch, star, and halos. Avoid placing heavy objects on top.
Can this Nativity scene be used as a toy?
No. This design contains structural supports and small decorative pieces and is intended for display only.
Final Thoughts
This Crochet Nativity Scene is a meaningful handmade Christmas decoration that combines traditional amigurumi techniques with elegant holiday craftsmanship.
With Mary’s rich red robe, Joseph’s forest-green clothing, Baby Jesus resting peacefully in a miniature manger, delicate golden halos, and a beautiful Bethlehem star, the finished piece creates a warm and timeless holiday display.
Whether displayed on a mantel, used as a Christmas centerpiece, or given as a thoughtful handmade gift, this Nativity scene is a wonderful project for experienced crochet lovers.
Save this free crochet Nativity pattern to Pinterest and share it with your crochet-loving friends!
Pattern note: This is an original, untested interpretation inspired by the reference image. Stitch counts, dimensions, and assembly have not been sample-crocheted or verified to reproduce the photographed scene exactly. Some shaping and fit adjustments may be required.

