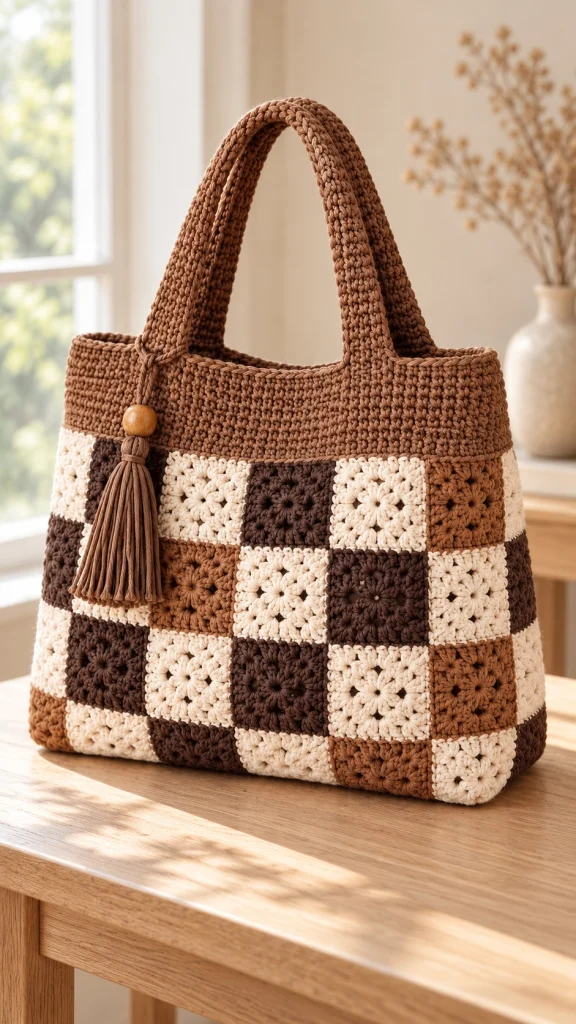
Crochet Patchwork Granny Square Tote Bag Pattern – A Beautiful Chocolate Brown & Cream Handmade Bag
There is something irresistible about a handmade crochet bag that combines vintage charm with modern everyday style. This gorgeous crochet patchwork granny square tote bag features a warm combination of chocolate brown, caramel, and creamy ivory, creating a timeless accessory that looks beautiful in every season.
With its textured floral granny squares, sturdy crocheted handles, structured shape, and decorative tassel, this bag brings together everything we love about cozy handmade fashion.
The alternating neutral-colored squares create a charming patchwork effect, while the thick crocheted upper section gives the handbag a polished, practical appearance.
Whether you’re looking for a stylish everyday tote, a thoughtful handmade gift, or a new crochet project to enjoy, this beautiful bag is sure to inspire you.
In this tutorial, you’ll learn how to create floral granny squares, arrange the colors, assemble the panels, crochet the upper band and handles, and add a finishing tassel.
Pattern note: This is an original, workable interpretation inspired by the photograph, not the original designer’s pattern. The exact stitches and construction of the photographed bag cannot be confirmed from the image alone.
Why You’ll Love This Crochet Tote Bag
- Beautiful chocolate brown, caramel, and cream color palette
- Vintage-inspired floral granny square motifs
- Stylish patchwork design
- Sturdy crocheted shoulder handles
- Spacious everyday tote silhouette
- Charming tassel and wooden bead decoration
- Perfect for autumn outfits and neutral wardrobes
- Easy to personalize with different colors
- A lovely handmade gift idea
Project Overview
- Project: Patchwork Granny Square Tote Bag
- Skill Level: Confident beginner to intermediate
- Style: Vintage, cozy, boho, neutral aesthetic
- Finished Size: Approximately 34 cm wide × 30 cm tall × 10 cm deep
- Yarn: Worsted-weight cotton yarn
- Hook: 4 mm or size needed for gauge
- Colors: Chocolate brown, caramel brown, cream
- Construction: Granny square panels, crocheted side gusset, upper band, two handles
- Optional Details: Tassel, wooden bead, fabric lining, magnetic snap
Materials You’ll Need
- Approximately 200 g chocolate brown cotton yarn
- Approximately 200 g caramel brown cotton yarn
- Approximately 250 g cream cotton yarn
- 4 mm crochet hook
- Yarn needle
- Stitch markers
- Scissors
- Measuring tape
- One large wooden bead
- Optional cotton fabric lining
- Optional magnetic snap closure
- Optional firm bag base insert
Yarn quantities are estimates. Your final requirements will depend on yarn thickness, gauge, and finished dimensions.
Crochet Abbreviations – US Terms
- ch: Chain
- sc: Single crochet
- hdc: Half double crochet
- dc: Double crochet
- sl st: Slip stitch
- st: Stitch
- sp: Space
- FO: Fasten off
- RS: Right side
- WS: Wrong side
Step 1 – Crochet the Floral Granny Squares
The most beautiful feature of this handbag is its collection of small floral granny squares.
Each square has a delicate flower-like center surrounded by a textured square border.
For a balanced patchwork design, create all squares in the same size using the same stitch pattern.
Round 1 – Create the Center
Make a magic ring.
Ch 3 (counts as the first dc).
Work 11 dc into the ring.
Pull the ring closed.
Join with a sl st into the top of the beginning ch-3.
You should have 12 dc.
Round 2 – Form the Flower Petals
Join yarn in any stitch.
Ch 1.
Work (sc, ch 2, sc) into the same stitch.
Skip the next stitch.
Repeat around to create six small petal loops.
Join with a sl st.
Round 3 – Build the Square Shape
Join yarn in one of the petal loops.
Work (3 dc, ch 2, 3 dc) into the first selected corner loop.
Work 3 dc into the next petal loop.
Continue arranging the stitches to form four corners and four sides.
Keep the stitch groups evenly distributed.
Round 4 – Finish the Square
Work dc groups along each side.
At each corner, work (2 dc, ch 2, 2 dc).
Join with a sl st.
FO and weave in the ends.
Construction note: The instructions above introduce the floral motif, but the transition from six petals to four corners is not a complete tested stitch chart. For a repeatable square, use the complete four-round motif below instead.
Complete Four-Round Granny Square Alternative
This simple solid-center granny square can be repeated consistently for the bag panels.
Round 1
Make a magic ring. Ch 3 (counts as dc), work 2 dc, ch 2. Repeat [3 dc, ch 2] three more times into the ring, omitting the final repeat’s extra corner group. Join with a sl st to the beginning ch-3. You should have four groups of 3 dc separated by four ch-2 corners.
Round 2
Sl st across to the first ch-2 corner. Ch 3, work (2 dc, ch 2, 3 dc) in the same corner. Ch 1. In each remaining corner, work (3 dc, ch 2, 3 dc), ch 1. Join to the beginning ch-3.
Round 3
Sl st to a corner space. Work (3 dc, ch 2, 3 dc) in the corner. Ch 1, work 3 dc in the next side ch-1 space, ch 1. Repeat around, working the same corner group in every corner. Join.
Round 4
Repeat Round 3, working 3 dc in each side ch-1 space and (3 dc, ch 2, 3 dc) in every corner. Join and fasten off.
Make one sample square, block it, and measure it. Adjust your hook or add another round if needed to achieve the desired dimensions.
Step 2 – Choose Your Color Combinations
The beautiful patchwork effect comes from alternating three warm neutral colors.
Use:
- Chocolate brown: Deep, rich contrast
- Caramel brown: Warm earthy tone
- Cream: Soft, bright neutral
For a visually balanced design, distribute the colors evenly rather than grouping all squares of the same color together.
Suggested Color Arrangement
Try alternating the squares in a checkerboard-inspired pattern.
For example:
Row 1: Cream – Chocolate – Cream – Caramel
Row 2: Chocolate – Caramel – Chocolate – Cream
Row 3: Cream – Chocolate – Cream – Caramel
Repeat or adjust this arrangement depending on your desired panel width.
Step 3 – Make the Front and Back Panels
For this construction, use 12 granny squares for the front and 12 for the back.
Arrange each panel as three rows of four squares.
All squares should be the same finished size.
Lay the squares on a flat surface before joining them.
Check the color arrangement and make any adjustments before sewing.
Step 4 – Join the Granny Squares
You can join the squares using a yarn needle or crochet hook.
Option 1 – Invisible Seam
Place two squares side by side with their right sides facing up.
Use a yarn needle to sew through corresponding edge stitches.
Keep the seam neat and consistent.
Option 2 – Slip Stitch Join
Place the squares with right sides together.
Insert your hook through matching edge stitches and work slip stitches along the seam.
Repeat until all squares are joined.
Option 3 – Single Crochet Join
Work single crochet stitches along the edges of adjoining squares.
This creates a slightly raised decorative seam.
For a clean patchwork appearance, the invisible seam is an excellent choice.
Step 5 – Crochet the Side and Bottom Gusset
To create a roomy tote, crochet a long rectangular strip that will form the bottom and sides of the bag.
Using chocolate brown or caramel yarn, chain enough stitches to make a strip approximately 10 cm wide.
Work single crochet rows until the strip is long enough to run from the top of one side, around the bottom, and up the opposite side.
Measure the outer edges of your front panel to determine the required strip length.
Join the strip to the front and back panels using a yarn needle or slip stitch seam.
Make sure the corners are aligned neatly.
Step 6 – Crochet the Upper Band
The upper section of the inspiration bag is worked in a beautiful solid caramel-brown color.
This creates a strong contrast with the patchwork squares and gives the handbag a structured appearance.
Round 1
Attach caramel yarn at the upper edge of the assembled bag.
Work single crochet stitches evenly around the opening.
Join with a sl st.
Rounds 2–8
Ch 1.
Work 1 sc in each stitch around.
Join at the end of each round.
Continue until the band reaches approximately 6–8 cm in height.
Maintain even tension throughout.
Step 7 – Crochet the Shoulder Handles
The thick, curved crochet handles are one of the most distinctive features of this tote bag.
They should be comfortable to hold and strong enough for everyday use.
Handle Instructions
Using caramel yarn, ch 9.
Row 1: Work 1 sc in the second chain from the hook and in each remaining chain. You should have 8 sc.
Rows 2 onward: Ch 1, turn, and work 1 sc in each stitch.
Continue until the strap reaches approximately 45–50 cm in length.
FO, leaving a long tail for sewing.
Make two identical straps.
Reinforce the Handles
For extra strength, fold each strap lengthwise and sew the long edges together to create a thicker handle.
You can also crochet a second layer and join the two layers together.
Attach the handles securely to the front and back upper bands.
Position them symmetrically and reinforce each attachment point with multiple stitches.
Step 8 – Add the Decorative Tassel
The long brown tassel with a wooden bead adds a charming handmade detail to the bag.
How to Make the Tassel
- Cut a piece of cardboard approximately 12–15 cm wide.
- Wrap caramel yarn around the cardboard 30–40 times.
- Slide a separate strand underneath the wrapped yarn and tie securely.
- Remove the bundle from the cardboard.
- Wrap another strand around the upper section to form the tassel head.
- Cut the loops at the bottom.
- Trim the strands evenly.
- Thread a wooden bead onto the hanging cord.
- Attach the tassel near one handle.
Choose a natural wooden bead to complement the warm brown color palette.
Step 9 – Add an Optional Fabric Lining
A fabric lining helps protect the crochet stitches and gives the tote bag a more professional finish.
Choose a neutral cotton fabric in beige, cream, or brown.
Simple Lining Instructions
- Measure the inside of your completed tote.
- Cut fabric panels with seam allowances.
- Sew the side and bottom seams.
- Create boxed corners to match the gusset depth.
- Fold the upper fabric edge inward.
- Place the lining inside the crochet bag.
- Hand-sew it neatly around the upper opening.
You can add a small internal pocket or magnetic snap closure if desired.
Step 10 – Final Finishing
Before using your handmade bag, check every detail.
- Weave in all loose yarn ends.
- Inspect the granny square seams.
- Make sure the upper band is even.
- Reinforce the shoulder straps.
- Check that the tassel is securely attached.
- Gently reshape the bag.
- Add an optional firm base insert for extra structure.
Your beautiful crochet patchwork tote is now ready to enjoy!
Creative Color Combinations
Chocolate Brown, Caramel & Cream
A cozy, timeless palette perfect for autumn.
Sage Green, Ivory & Taupe
Soft earthy colors for a fresh farmhouse-inspired look.
Dusty Rose, Cream & Beige
A romantic color combination for spring.
Black, White & Gray
A modern monochrome design with striking contrast.
Terracotta, Mustard & Olive
Warm bohemian colors with a vintage feel.
Baby Blue, White & Sand
A light and airy summer tote bag.
Styling Your Crochet Patchwork Tote
This beautiful handbag pairs effortlessly with:
- Cozy oversized sweaters
- Beige trench coats
- Neutral linen outfits
- Denim jeans
- Autumn dresses
- Brown leather boots
- Casual weekend outfits
The earthy patchwork colors make it especially beautiful with cream, beige, chocolate, and olive-green clothing.
Tips for a Professional Crochet Bag
- Use cotton yarn for durability and stitch definition.
- Keep every granny square the same size.
- Block the squares before assembly.
- Maintain consistent joining tension.
- Reinforce the handles carefully.
- Add a fabric lining if carrying small belongings.
- Use a firm base insert to prevent sagging.
- Keep the color arrangement balanced.
- Weave in all yarn ends securely.
- Avoid overloading the finished bag.
Frequently Asked Questions
Is this crochet granny square tote beginner-friendly?
Confident beginners can make this project if they are comfortable crocheting granny squares, joining motifs, and working basic single crochet stitches.
How many granny squares do I need?
This suggested construction uses 24 granny squares: 12 for the front and 12 for the back. The side and bottom gusset are crocheted separately.
What yarn is best for a crochet tote bag?
Worsted-weight cotton yarn is a great choice because it offers durability, stitch definition, and a comfortable handmade texture.
Can I make this bag larger?
Yes! Add more granny squares to the front and back panels or use a larger hook and thicker yarn.
Can I use different granny square patterns?
Absolutely. Floral, solid, sunflower, and classic granny squares can all be used as long as the finished motifs have matching dimensions.
How do I prevent the handles from stretching?
Use firm yarn, crochet tightly, reinforce the straps, and consider sewing cotton webbing inside the handles.
Can I wash the finished crochet bag?
Follow the yarn care instructions. Gentle hand washing and flat drying are usually good options for cotton crochet bags without delicate decorations.
Can I sell bags made using this design?
You can sell bags you make using your own construction and original creative choices, subject to any applicable pattern terms and local rules. Avoid presenting another designer’s original pattern or photographs as your own.
Final Thoughts
This gorgeous chocolate brown and cream crochet patchwork granny square tote bag is a beautiful combination of timeless crochet tradition and modern handmade fashion.
The warm neutral colors, floral granny square details, sturdy handles, and charming tassel create an accessory that feels cozy, stylish, and personal.
Whether you’re making it for yourself, gifting it to someone special, or simply looking for a relaxing creative project, this tote bag is a wonderful way to celebrate the beauty of handmade crochet.
Save this crochet inspiration, choose your favorite colors, and enjoy creating a bag that is uniquely yours.
Happy crocheting! 🧶🤎

