Crochet Poinsettia Christmas Cutlery Holder Pattern
Beginner Friendly
Perfect for those just starting their crochet journey, with clear instructions and simple techniques
Single-Day Project
A satisfying project you can complete in a single afternoon or evening.
Handmade Gift
A beautiful keepsake — free forever. Read online or print at home.
About This Crochet Poinsettia Christmas Cutlery Holder Pattern
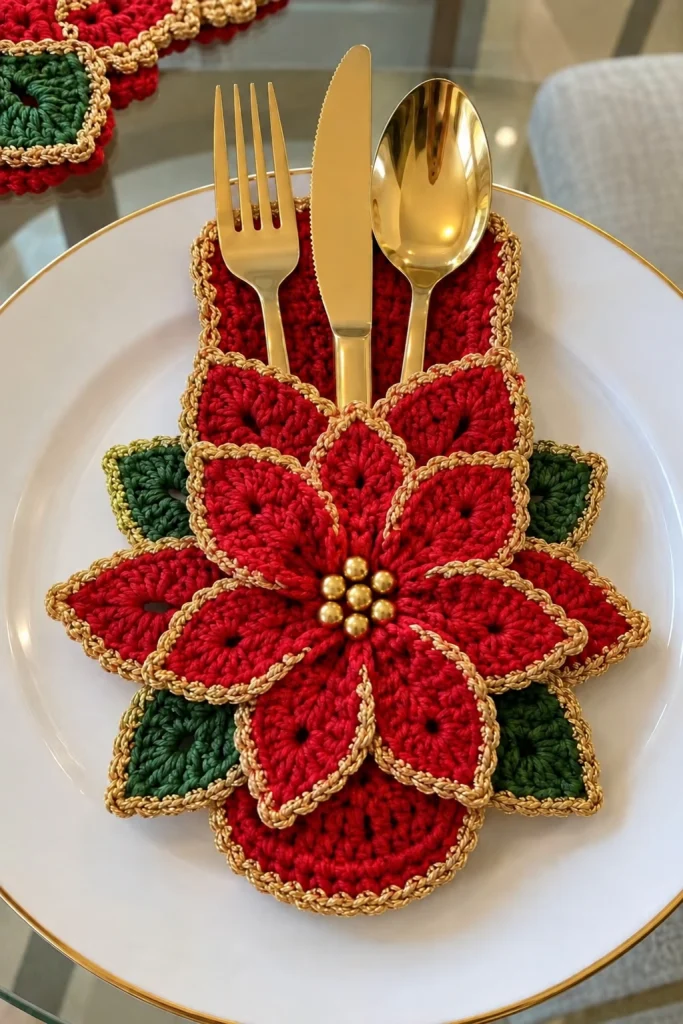
This crochet poinsettia cutlery holder pattern combines a practical silverware pocket with a large dimensional Christmas flower. Rich red petals, deep green leaves and a fine metallic-gold border give it an elegant holiday-table look.
Make one for every place setting and tuck a fork, knife and spoon inside the upper pocket. The same poinsettia motif can also be reused for placemats, napkin rings, wreaths and Christmas table centerpieces.
Materials
- Red cotton or cotton-blend yarn DK / light worsted
- Dark green yarn small amount
- Metallic gold crochet thread for edging
- Gold beads 6–7 for flower center
- 3–3.5 mm crochet hook adjust to yarn
- Yarn needle 1
- Scissors 1 pair
- Stitch markers optional
Abbreviations – US Terms
MRmagic ringchchainsl stslip stitchscsingle crochethdchalf double crochetdcdouble crochettrtreble crochetststitchFOfasten offPart 1 – Crochet the Main Red Base
Using red yarn, ch 21.
Row 1: sc in 2nd ch from hook and in each ch across. (20 sc)
Rows 2–31: ch 1, turn, sc in each st across.
The rectangle should be long enough to hold standard dinner cutlery while leaving the lower section visible beneath the flower.
FO.
Part 2 – Shape the Lower Decorative End
Rejoin red yarn along one short edge.
Work evenly across while gradually shaping the lower section into a soft rounded point.
Row 1: sc across.
Row 2: decrease once at each end.
Row 3: sc across.
Repeat the decrease sequence until the lower edge has a gentle rounded shape rather than a sharp triangle.
FO.
Part 3 – Make the Cutlery Pocket
Using red yarn, ch 21.
Row 1: sc in 2nd ch from hook and across. (20 sc)
Rows 2–13: ch 1, turn, sc across.
Place this smaller rectangle over the upper section of the main base.
Align the side and top edges carefully.
Leave the upper opening free so the fork, knife and spoon can slide inside.
Part 4 – Join the Pocket
Using red yarn, sc through both layers down the first side, around the bottom and up the opposite side.
Do not crochet across the pocket opening.
Test the opening with your cutlery before fastening off.
The pocket should hold three standard utensils comfortably without stretching excessively.
Part 5 – Gold Edge Around the Pocket
Join metallic gold thread at one upper corner of the cutlery pocket.
Work a neat round of sl sts or surface crochet around the visible edges.
Keep the gold stitches loose enough that the red fabric remains flat.
FO and weave in securely.
Part 6 – Crochet a Large Red Poinsettia Petal
Make a foundation ch 12.
Starting in 2nd ch from hook:
1 sc, 1 hdc, 2 dc, 4 tr, 2 dc, 1 hdc.
Work 3 sc into the final chain.
Continue down the opposite side of the foundation chain:
1 hdc, 2 dc, 4 tr, 2 dc, 1 hdc, 1 sc.
Join with sl st.
This produces one long pointed poinsettia petal.
Part 7 – Shape the Petal Tip
Work one additional edging round around the petal.
Sc evenly along the first side.
At the tip work:
sc, ch 2, sc into the center tip stitch.
Continue sc down the opposite side.
This small ch-2 point creates the characteristic sharp poinsettia shape.
Part 8 – Make the Large Petal Layer
Make 6 large red petals.
Arrange them in a circular flower shape with the narrow ends meeting at the center.
Overlap neighboring petals slightly.
Using red yarn and a yarn needle, sew the petal bases securely together.
Do not flatten the petals completely—the slight overlap gives the flower its dimensional appearance.
Part 9 – Crochet the Smaller Inner Petals
For each smaller petal, ch 9.
Starting in 2nd ch from hook:
1 sc, 1 hdc, 2 dc, 2 tr, 1 dc, 1 hdc.
Work 3 sc into the final chain.
Repeat corresponding stitches down the opposite side.
Finish the tip with sc, ch 2, sc.
Make 6 smaller petals.
Part 10 – Assemble the Second Flower Layer
Arrange the six smaller petals over the large petals.
Rotate this layer slightly so each smaller petal sits between two of the larger petals beneath it.
Sew through the center only.
Leave the outer portions of the petals free so they remain raised and dimensional.
Part 11 – Crochet the Green Leaves
Using dark green yarn, ch 11.
Starting in 2nd ch from hook work:
1 sc, 1 hdc, 2 dc, 3 tr, 2 dc, 1 hdc.
Work 3 sc in the final chain.
Repeat the corresponding stitches down the opposite side.
At the leaf tip work sc, ch 2, sc.
Make approximately 6 green leaves.
Part 12 – Gold Edging on the Red Petals
Join metallic gold thread at the base of one red petal.
Work sl sts loosely around the entire outer edge.
At the pointed tip, work into the ch-2 point without pulling tightly.
Repeat for every visible red petal.
The gold edging should look like a fine outline rather than a thick border.
Part 13 – Gold Edging on the Green Leaves
Repeat the same edging technique around each green leaf.
Work loose metallic-gold sl sts around the perimeter.
Keep the green leaf surface flat while crocheting.
FO and weave the metallic ends carefully into the back.
Part 14 – Position the Leaves
Lay the cutlery holder flat.
Arrange the green leaves around the lower section of the red base.
Allow the pointed tips to extend beyond the red flower.
Position approximately three leaves on each side.
Sew the lower half of each leaf securely to the base while leaving the tips slightly raised.
Part 15 – Attach the Large Poinsettia
Center the large red flower over the green leaves.
The flower should cover most of the lower half of the holder while leaving the upper pocket fully accessible.
Sew around the central section and several hidden points beneath the petals.
Avoid stitching the entire petals flat against the base.
Part 16 – Create the Gold Flower Center
Arrange 6–7 gold beads tightly in the center of the poinsettia.
Sew each bead individually using strong matching thread.
Pass through the flower center several times for additional strength.
The beads should form a small clustered center rather than a straight line.
Part 17 – Finish the Outer Holder Edge
Join metallic gold thread along the outer red edge.
Work loose sl sts evenly around the visible perimeter.
Skip areas completely hidden beneath the flower if desired.
Keep the edging consistent with the fine gold outline around the petals and leaves.
Part 18 – Final Shaping
Gently shape each red petal with your fingers.
Lift the smaller upper petals slightly.
Spread the larger lower petals evenly around the flower.
Arrange the green leaves so they remain visible between the red petals.
Lightly steam or block the holder if necessary, taking care not to apply direct heat to metallic yarn or beads.
Make a Complete Christmas Table Set
Repeat the pattern for the number of guests at your Christmas table.
For a coordinated setting, keep the same red, green and gold combination for every holder.
You can also alternate the main flower color:
Classic Christmas: red flower + green leaves + gold edge.
Elegant: ivory flower + deep green leaves + gold edge.
Winter: white flower + sage leaves + silver edge.
Traditional: burgundy flower + forest green leaves + antique gold.
Optional Matching Napkin Ring
Make one small poinsettia using only the inner petal pattern.
Crochet a band approximately 3 × 12 cm / 1.2 × 4.7 in.
Join the short ends to create a ring.
Sew the small poinsettia over the seam.
This creates a matching napkin ring using the same flower design.
Care Instructions
Hand wash gently in cool water.
Avoid soaking metallic thread for extended periods.
Do not wring.
Press between towels to remove excess moisture.
Reshape the flower while damp and dry flat.
If beads are used, avoid machine washing.
Frequently Asked Questions
Yes. The gold edging is decorative. You can use cream, white or the same red yarn for a simpler farmhouse-style Christmas look.
Yes. Reduce the foundation chain of both petal sizes by 2–3 chains and use shorter stitches toward the center of each petal.
Absolutely. The layered flower works beautifully as a Christmas ornament, wreath decoration, gift topper, placemat embellishment or holiday garland motif.
Sew only the inner portion of each petal to the holder. Leaving the outer half unattached allows the petals to lift naturally and creates the layered 3D appearance.
Yes. Add foundation chains to both the main panel and pocket panel until the width comfortably accommodates your flatware set.
The finished Crochet Poinsettia Christmas Cutlery Holder Pattern

