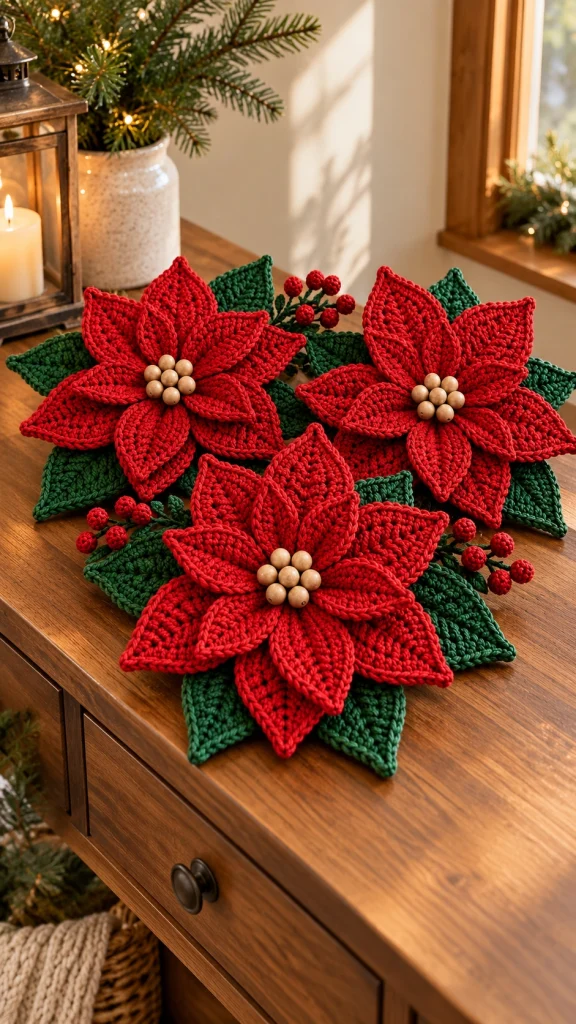
Crochet Poinsettia Pattern – Large Christmas Flower Decoration
Beginner Friendly
Perfect for those just starting their crochet journey, with clear instructions and simple techniques
Single-Day Project
A satisfying project you can complete in a single afternoon or evening.
Handmade Gift
A beautiful keepsake — free forever. Read online or print at home.
About This Crochet Poinsettia Pattern – Large Christmas Flower Decoration
This crochet poinsettia pattern creates a large, dimensional Christmas flower with rich red petals, deep green leaves and a beautiful raised center. The layered construction gives the flower a full, realistic shape that looks gorgeous as a holiday table decoration, wreath accent or handmade Christmas centerpiece.
The poinsettia is made from individual pointed petals arranged in two overlapping layers. Large green leaves sit underneath the flower, while optional crochet berry sprigs can be added around the edges for an even fuller festive arrangement.
Materials
- Christmas red worsted / Aran yarn 120–150 g
- Deep forest green yarn 70–90 g
- Red yarn for berries small amount
- Dark green yarn for berry stems small amount
- Natural wooden beads or gold beads 6–7
- 4.0–4.5 mm crochet hook 1
- Yarn needle 1
- Scissors 1 pair
- Stitch markers optional
- Optional floral wire for extra shaping
Abbreviations – US Terms
MRmagic ringchchainsl stslip stitchscsingle crochethdchalf double crochetdcdouble crochettrtreble crochetincincreasedecdecreaseFOfasten offFinished Size
One finished poinsettia measures approximately 28–32 cm / 11–12.5 in across, depending on yarn, hook size and how strongly the petals are shaped.
For a smaller flower, use DK yarn with a 3.0–3.5 mm hook.
Part 1 – Large Red Petal
Using red yarn:
Ch 18.
Starting in the 2nd ch from hook:
sl st, sc, hdc, 2 dc, 6 tr, 3 dc, 2 hdc, sc.
Work 3 sc into the final chain to turn around the tip.
Continue along the opposite side of the foundation chain in reverse:
sc, 2 hdc, 3 dc, 6 tr, 2 dc, hdc, sc, sl st.
FO, leaving a long tail for assembly.
Part 2 – Shape the Large Petal
Gently stretch the petal lengthwise with your fingers.
Pinch the final tip slightly so it becomes pointed rather than rounded.
The finished petal should have a broad lower section that gradually narrows toward a sharp tip.
Part 3 – Raised Petal Vein
Join red yarn at the lower center of the petal.
Surface slip stitch in a straight line toward the tip.
Keep the surface stitches slightly loose so the petal does not curl excessively.
This creates the strong raised central vein visible on each poinsettia petal.
Part 4 – Petal Border
Join red yarn at the petal base.
Work sl st or tightly worked sc evenly around the entire outer edge.
At the tip, work (sc, ch 1, sc) into the same stitch.
This makes the pointed shape more defined and gives the petal a neat raised border.
Part 5 – Make the Large Petals
Make 6 large red petals.
Arrange them in a circle before sewing.
The lower third of each petal should overlap the next one slightly.
Part 6 – Medium Red Petal
Using red yarn:
Ch 15.
Starting in 2nd ch:
sl st, sc, hdc, 2 dc, 5 tr, 2 dc, hdc, sc.
Work 3 sc in the final chain.
Continue along the opposite side using the same stitch progression in reverse.
FO.
Part 7 – Finish the Medium Petals
Add the same raised center vein used on the large petals.
Work a neat sc or slip-stitch border around each petal.
Make 6 medium petals.
Part 8 – Optional Small Inner Petals
For an extra-full poinsettia, make 3–5 smaller petals.
Ch 11.
Starting in 2nd ch:
sl st, sc, hdc, 2 dc, 3 tr, dc, hdc.
Work 3 sc at the tip and mirror the stitches along the opposite side.
FO.
Part 9 – Green Leaf
Using deep forest green yarn:
Ch 19.
Starting in 2nd ch:
sl st, sc, hdc, 2 dc, 7 tr, 3 dc, 2 hdc, sc.
Work 3 sc in the final chain.
Mirror the stitch sequence down the opposite side.
FO.
Part 10 – Define the Green Leaves
Surface crochet from the base toward the tip to create a raised central vein.
For additional detail, embroider two or three short diagonal veins on each side of the central line.
Work a final sc border around the leaf.
Part 11 – Make the Leaves
Make approximately 8–10 green leaves.
For a natural arrangement, make some slightly smaller by beginning with ch 16 instead of ch 19.
The leaves should extend beyond the red flower so they remain clearly visible underneath.
Part 12 – Crochet Berry
Using red yarn:
Round 1: MR, 6 sc into ring. (6)
Round 2: 2 sc in each stitch. (12)
Round 3: sc around. (12)
Round 4: sc2tog around. (6)
Stuff lightly with a tiny yarn scrap if desired.
Close the remaining opening and FO.
Part 13 – Berry Sprigs
Make approximately 12–18 small red berries.
Using dark green yarn, ch 10–15 for each berry stem.
Slip stitch back along the chain.
Attach several stems together to form small clusters of 3–5 berries.
Part 14 – Flower Base Circle
Using red yarn:
Round 1: MR, 8 sc. Join.
Round 2: 2 sc in each stitch. (16)
Round 3: *sc, inc* around. (24)
Round 4: *2 sc, inc* around. (32)
FO leaving a long sewing tail.
Part 15 – Attach the Large Petals
Place the six large petals evenly around the base circle.
The lower sections should meet near the center.
Overlap neighboring petals slightly.
Sew securely through approximately the lower third of each petal.
Leave the upper sections free so they can lift naturally.
Part 16 – Add the Second Petal Layer
Position the six medium petals over the first layer.
Place each medium petal between two large petals rather than directly over them.
This staggered arrangement fills the gaps and creates the full poinsettia shape.
Sew securely at the center.
Part 17 – Optional Third Layer
If you made the small petals, position them around the very center.
Allow the tips to point in slightly different directions.
Do not make the center perfectly symmetrical—the slight variation gives the flower a handmade botanical appearance.
Part 18 – Poinsettia Center
Arrange 6–7 wooden or gold beads tightly together at the center.
Sew each bead individually through the crochet base.
Pull the thread or yarn firmly so the beads sit close together like a small flower cluster.
Part 19 – Attach the Green Leaves
Turn the flower over.
Arrange 6–8 large green leaves around the back of the poinsettia.
Allow the pointed tips to extend beyond the red petals.
Sew the leaf bases securely to the flower base.
Part 20 – Add Extra Leaves
Place smaller green leaves between the larger leaves wherever additional fullness is needed.
Some leaves can remain mostly hidden behind the flower, with only their pointed tips visible.
This creates a more layered and natural arrangement.
Part 21 – Add Berry Sprigs
Position berry clusters between several green leaves.
Let the berries extend slightly beyond the flower rather than placing them directly on top of the red petals.
Sew the stems securely underneath the flower.
Part 22 – Shape the Flower
Use your fingers to gently curve the outer petals downward.
Lift the medium petals slightly upward.
Pinch each pointed tip lightly between your fingers.
This creates the dimensional layered appearance of a real poinsettia.
Part 23 – Optional Wire Shaping
For a decoration that needs to hold a very specific shape, thin floral wire can be incorporated behind the petals and leaves.
Cut a piece slightly shorter than the petal.
Secure it along the back center using matching yarn.
Do not allow the wire ends to remain exposed.
Part 24 – Make a Set of Three
For a Christmas arrangement similar to the reference style, make three complete poinsettias.
Vary the angle of the leaves and berry sprigs on each flower so the set feels handmade rather than perfectly duplicated.
Place them together on a console, Christmas table or mantel.
Part 25 – Table Centerpiece Option
Attach a felt or crochet circle to the back of each flower to hide the assembly stitches.
The flowers can then be placed flat on a table beneath candles, lanterns or holiday decorations.
Keep crochet pieces safely away from open flames and hot candle containers.
Part 26 – Wreath Option
Make 3–5 poinsettias and attach them to one section of a crochet or wrapped wreath.
Add additional green leaves and berry sprigs around the flowers.
For a traditional Christmas look, combine them with dark green foliage and a large red crochet bow.
Part 27 – Gift Topper Option
Use DK or sport-weight yarn to make a smaller version.
Attach one small poinsettia to a reusable crochet ribbon or gift tie.
After opening the gift, the flower can be reused as a Christmas ornament or home decoration.
Part 28 – Final Finishing
Weave in all remaining yarn ends on the back.
Check every petal, leaf, bead and berry to make sure it is firmly attached.
Gently reshape the flower by hand.
If necessary, lightly steam from a distance without pressing the petals flat.
Christmas Color Variations
Classic Christmas: bright red petals, forest green leaves and gold center.
Farmhouse Christmas: deep cranberry petals, olive leaves and natural wooden bead center.
White Christmas: ivory petals, sage leaves and champagne-gold center.
Vintage Christmas: burgundy petals, dark moss leaves and antique-brass beads.
Pink Christmas: dusty rose petals, eucalyptus green leaves and pearl center.
Ways to Use Your Crochet Poinsettias
- Christmas table centerpiece
- Holiday wreath decoration
- Fireplace mantel arrangement
- Christmas tree ornament
- Gift topper
- Holiday wall decor
- Festive garland accent
- Christmas basket decoration
Frequently Asked Questions
A full flower works beautifully with 6 large outer petals and 6 medium inner petals. You can add 3–5 smaller petals if you want an especially dense center.
Cotton, cotton-blend or a firm acrylic yarn works well because the petals need enough structure to hold their pointed shape.
Use a slightly smaller hook than you normally would for the yarn, keep the stitches firm and attach only the lower portion of each petal during assembly.
Yes. Replace the wooden or gold beads with small crochet bobbles in beige, mustard, cream or metallic-look yarn.
Yes. Use thinner yarn and a smaller hook, or reduce the starting chain lengths for the petals and leaves while keeping the same general shaping method.
If your yarn is washable, gently hand wash the flowers in cool water. Reshape every petal and leaf while damp and allow the piece to dry flat.
Place the flowers flat in a wide box with tissue paper between layers. Avoid crushing them under heavier decorations so the pointed petals and raised leaves keep their shape.
The finished Crochet Poinsettia Pattern – Large Christmas Flower Decoration

