Crochet Pumpkin Door Hanger with Bow – Free Autumn Decoration Pattern
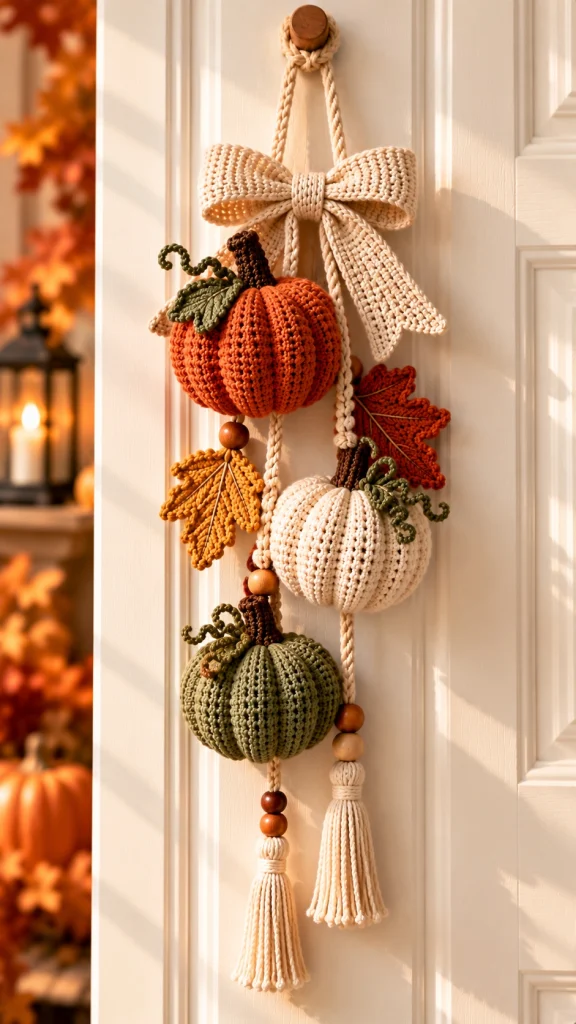
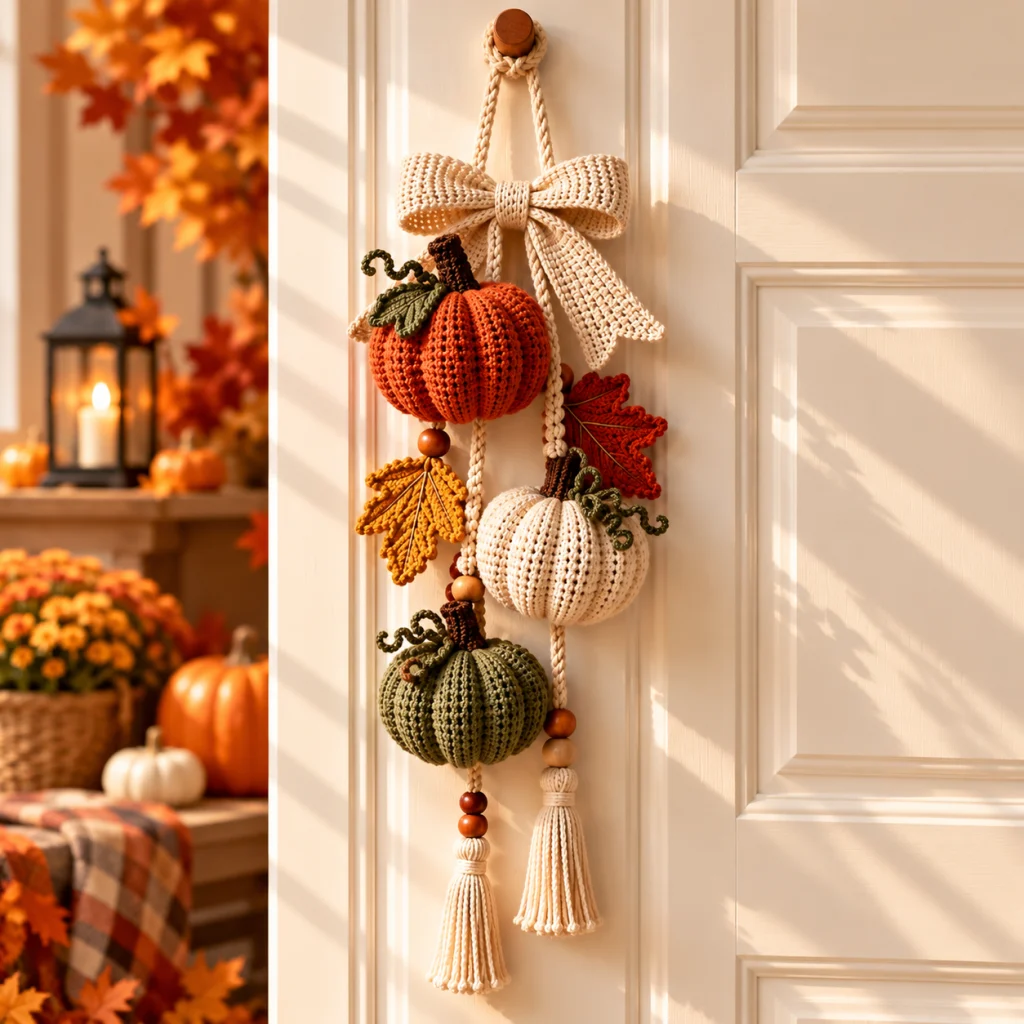
Bring the beauty of autumn into your home with this charming crochet pumpkin door hanger. Featuring three beautifully textured pumpkins in burnt orange, creamy ivory, and sage green, this handmade fall decoration is finished with a large cream crochet bow, colorful oak leaves, rustic wooden beads, and elegant dangling tassels.
The vertical design makes it perfect for decorating a front door, entryway, bedroom, or cozy farmhouse-inspired living space. Each pumpkin has deeply defined ribs, a dark brown stem, and delicate curling vines, creating a dimensional arrangement full of seasonal charm.
In this free crochet tutorial, you’ll learn how to make the ribbed pumpkins, decorative leaves, oversized bow, hanging cords, and tassels before assembling everything into one beautiful autumn decoration.
Pattern Information
- Skill Level: Intermediate
- Finished Length: Approximately 65–75 cm including tassels
- Finished Width: Approximately 22–28 cm
- Project Type: Autumn wall or door hanging
- Techniques: Ribbed crochet, amigurumi, appliqué, surface embroidery, and assembly
- Hook Sizes: 3.5 mm and 4 mm
- Terminology: US crochet terms
Finished dimensions depend on your yarn, hook size, tension, and the spacing between the decorations.
Materials Needed
- Worsted-weight yarn in burnt orange
- Worsted-weight yarn in creamy ivory
- Worsted-weight yarn in muted sage green
- Dark brown yarn for pumpkin stems
- Olive-green yarn for curling vines and leaves
- Mustard-yellow yarn for autumn oak leaves
- Rust or terracotta yarn for decorative leaves
- Cream cotton yarn for the bow, hanging cords, and tassels
- 3.5 mm and 4 mm crochet hooks
- Polyester fiberfill stuffing
- Yarn needle
- Scissors
- Stitch markers
- Natural wooden beads in different sizes
- Strong cotton cord or braided crochet cord
- Optional lightweight felt backing for stability
Crochet Abbreviations
- MR: Magic ring
- ch: Chain
- sc: Single crochet
- hdc: Half double crochet
- dc: Double crochet
- tr: Treble crochet
- sl st: Slip stitch
- inc: Increase
- dec: Decrease
- BLO: Back loop only
- FO: Fasten off
Part 1: Crochet the Large Burnt Orange Pumpkin
The upper pumpkin is the largest element of this design. It features deep vertical ribs, a thick brown stem, and small olive-green vines.
For a ribbed appearance, the pumpkin body is made as a flat rectangle worked in back-loop-only single crochet, then joined into a tube and gathered at both ends.
Ribbed Pumpkin Body
Using burnt orange yarn and a 4 mm hook:
- Row 1: Ch 29. Sc in the second chain from the hook and across. (28 sc)
- Row 2: Ch 1, turn, sc BLO in each stitch across. (28)
- Rows 3–48: Repeat Row 2.
- FO, leaving a long yarn tail for sewing.
The rectangle should have clearly defined horizontal ridges. When joined into a tube, these ridges will run vertically around the pumpkin.
Shape the Pumpkin
- Fold the rectangle so the first and last rows meet.
- Using the long yarn tail, sew the short edges together to form a tube.
- Run a gathering stitch around one open end.
- Pull tightly and secure the opening.
- Fill the pumpkin with polyester stuffing.
- Gather the remaining opening and close it securely.
- Pass a long strand of yarn through the center from top to bottom.
- Pull gently to flatten the pumpkin and create its rounded shape.
- Repeat the center pull if necessary to achieve a plump, compact appearance.
The finished pumpkin should have a rounded shape with deep vertical ridges, similar to the upper burnt orange pumpkin in the reference image.
Part 2: Crochet the Ivory Pumpkin
The ivory pumpkin hangs slightly lower on the right side, creating an elegant staggered arrangement.
Using creamy ivory yarn and a 4 mm hook:
- Row 1: Ch 25. Sc in the second chain and across. (24)
- Row 2: Ch 1, turn, sc BLO across. (24)
- Rows 3–42: Repeat Row 2.
- FO, leaving a long sewing tail.
Join the short edges to create a tube, gather one end, stuff the pumpkin, and close the second opening.
Pull yarn through the center to flatten and shape the pumpkin.
Use your fingers to distribute the stuffing evenly and accentuate the ribbed texture.
Part 3: Crochet the Sage-Green Pumpkin
The sage-green pumpkin sits toward the lower left, completing the three-pumpkin arrangement.
Using sage-green yarn and a 4 mm hook:
- Row 1: Ch 23. Sc in the second chain and across. (22)
- Row 2: Ch 1, turn, sc BLO across. (22)
- Rows 3–38: Repeat Row 2.
- FO, leaving a long sewing tail.
Join the rectangle into a tube and shape it using the same method as the previous pumpkins.
Stuff evenly and pull through the center to create a slightly flattened pumpkin with defined ribs.
Part 4: Make the Brown Pumpkin Stems
Each pumpkin has a textured dark brown stem.
Using brown yarn and a 3.5 mm hook:
- Round 1: MR, 6 sc. (6)
- Rounds 2–7: Sc in each stitch around. (6)
- FO, leaving a long sewing tail.
Make three stems. For the large orange pumpkin, add two extra rounds to create a taller stem.
Attach each stem securely to the center of its pumpkin.
Part 5: Crochet the Olive-Green Vines
The curling vines add movement and natural detail to the pumpkins.
Using olive-green yarn:
- Ch 25.
- Starting in the second chain from the hook, work 3 sc into each chain.
- Continue across the foundation chain.
- The strip will curl naturally as the stitches accumulate.
- FO, leaving a long tail.
Make approximately 5–6 vines in different lengths.
Sew them around the pumpkin stems, allowing the curls to extend outward.
Part 6: Crochet the Autumn Oak Leaves
The arrangement features three main oak leaves: mustard yellow, burnt orange, and olive green.
Oak Leaf Foundation
Using a 3.5 mm hook:
- Ch 19.
- Sc in the second chain from the hook.
- Sc in the next 2 chains.
- Hdc in the next 3 chains.
- Dc in the next 6 chains.
- Hdc in the next 3 chains.
- Sc in the next 2 chains.
- Work 3 sc in the last chain.
- Continue along the opposite side, mirroring the stitches.
Shape the Oak Leaf Lobes
Work along the outside edge to form the characteristic rounded oak-leaf points.
- Sl st into the next available edge stitch.
- Ch 5.
- Starting in the second chain, work sc, hdc, dc, hdc.
- Sl st into the next available edge stitch.
- Repeat this process to form 3–4 lobes on each side.
- Use shorter chains near the leaf tip for a tapered shape.
- FO and weave in the ends.
Make one mustard-yellow leaf, one terracotta leaf, and one olive-green leaf. Create additional smaller leaves if desired.
Embroider the Leaf Veins
Using a contrasting strand of cream or brown yarn, embroider one central vein and smaller diagonal branches along each leaf.
For a crisp decorative appearance, lightly block the leaves before assembly.
Part 7: Crochet the Oversized Cream Bow
The large cream bow is one of the most distinctive details in the design. It sits near the top of the hanger, directly beneath the hanging loop.
Bow Body
Using cream cotton yarn and a 4 mm hook:
- Ch 17.
- Row 1: Sc in the second chain and across. (16)
- Rows 2–50: Ch 1, turn, sc across. (16)
- FO, leaving a long tail.
Bring the two short ends together and sew them to form a continuous loop.
Flatten the loop so the seam sits at the center back.
Pinch the middle tightly to create two full bow loops.
Bow Center Wrap
- Ch 9.
- Sc in the second chain and across. (8)
- Work 8 rows of sc.
- FO, leaving a long tail.
Wrap this small rectangle around the pinched center of the bow and sew securely on the back.
Bow Tails
Make two cream crochet strips.
- Ch 13.
- Sc in the second chain and across. (12)
- Continue for approximately 28–35 rows.
- For a tapered tip, decrease one stitch at each end of the final rows.
- FO and weave in the ends.
Attach the two strips behind the bow center. Position one tail diagonally downward to the right and the other behind the pumpkin arrangement.
Part 8: Make the Hanging Cords
The pumpkins are suspended from cream braided cords at staggered heights.
For a strong handmade cord, crochet a Romanian cord or use a sturdy braided cotton cord.
Prepare:
- One main hanging loop, approximately 20–25 cm long before folding
- One cord for the upper orange pumpkin
- One longer cord for the ivory pumpkin
- One cord for the lower sage-green pumpkin
- Two additional cords for the dangling tassels
Secure the cords behind the bow and reinforce their attachment points with several stitches.
The pumpkin cords should hang at different lengths to create the cascading arrangement shown in the image.
Part 9: Create the Cream Tassels
Two long cream tassels finish the lower section of the door hanger.
Tassel Instructions
- Cut approximately 30 strands of cream yarn, each measuring 25–30 cm.
- Gather the strands into one bundle.
- Fold the bundle in half.
- Tie a strong cord around the folded center.
- Wrap additional cream yarn around the bundle approximately 2 cm below the top.
- Secure the wrap and hide the ends.
- Trim the bottom strands evenly.
- Repeat to make a second matching tassel.
For a polished appearance, use slightly different tassel lengths so they hang at staggered heights.
Part 10: Add the Wooden Beads
Natural wooden beads introduce a rustic farmhouse detail and complement the cream yarn beautifully.
- Thread one or two wooden beads onto each tassel cord.
- Use different bead sizes for a layered appearance.
- Secure the beads with small knots.
- Position a bead above the mustard-yellow oak leaf.
- Add additional beads above the two lower tassels.
Check that the beads cannot slide off the cords.
Part 11: Assemble the Autumn Door Hanger
Arrange all components before permanently attaching them.
- Position the large cream bow near the top of the hanging cords.
- Attach the burnt orange pumpkin beneath the bow, slightly toward the left.
- Position the ivory pumpkin lower on the right.
- Attach the sage-green pumpkin beneath the orange pumpkin.
- Place the mustard-yellow oak leaf below the orange pumpkin.
- Attach the terracotta oak leaf behind the ivory pumpkin.
- Arrange the olive-green leaves around the pumpkin stems.
- Add curling vines around the top of each pumpkin.
- Thread the wooden beads onto the decorative cords.
- Attach the two cream tassels at different lengths near the bottom.
- Secure all cords with reinforced knots and stitching.
- Adjust the arrangement until the pumpkins hang naturally without overlapping too heavily.
For additional stability, use a narrow felt backing or a lightweight hidden support behind the decorative elements.
Part 12: Final Finishing
- Weave in every loose yarn end.
- Adjust the pumpkin ribs to make them evenly spaced.
- Shape the oak leaves and curling vines.
- Fluff the bow loops and straighten the bow tails.
- Trim the tassels evenly.
- Check that every wooden bead is secured.
- Test the hanger on a hook before displaying it.
Your beautiful crochet pumpkin door hanger is now ready to bring autumn warmth to your home!
Autumn Color Variations
Classic Pumpkin Harvest
Combine burnt orange, cream, sage green, mustard yellow, and rustic brown for a traditional autumn look.
Neutral Farmhouse
Use ivory, oatmeal, taupe, beige, and muted olive green for an elegant neutral decoration.
Rustic Woodland
Try cinnamon, forest green, deep rust, and warm caramel.
Soft Cottage Autumn
Combine dusty peach, pale sage, cream, and soft terracotta.
Helpful Crochet Tips
- Use cotton yarn for excellent stitch definition and a structured appearance.
- Maintain consistent tension when crocheting the ribbed pumpkin rectangles.
- Stuff the pumpkins evenly to avoid distorted shapes.
- Pull the shaping yarn gently to create natural pumpkin proportions.
- Use strong cord for hanging rather than relying on decorative yarn alone.
- Reinforce the points where the pumpkins attach to the cords.
- Keep the tassels lightweight to prevent stretching.
- Block the decorative leaves before assembling the hanger.
Frequently Asked Questions
Is this pumpkin door hanger suitable for beginners?
The pumpkin bodies use simple stitches, but the complete project is best suited to intermediate crocheters because of the shaping, decorative leaves, bow construction, and assembly.
Can I make the pumpkins larger?
Yes. Increase the foundation-chain length to make the pumpkins taller and add more rows to increase their circumference.
Can I use acrylic yarn?
Yes. Acrylic yarn works well for this project, although cotton yarn generally provides firmer stitch definition.
How do I keep the pumpkins from sliding down the cords?
Attach each pumpkin securely with reinforced stitches and place supporting knots or hidden anchors beneath its attachment point.
Can this decoration hang outdoors?
It is best displayed indoors or on a protected porch. Moisture and prolonged sunlight may damage the yarn and wooden beads.
Can I make this without wooden beads?
Absolutely. You can replace the wooden beads with crocheted beads or decorative knots.
Care Instructions
- Spot-clean gently with a damp cloth.
- Avoid machine washing the assembled decoration.
- Do not soak the wooden beads.
- Air dry completely after cleaning.
- Store the hanger flat or loosely coiled in a dry container.
- Reshape the bow, leaves, and tassels before displaying it again.
Final Thoughts
This crochet pumpkin door hanger with bow is a lovely way to celebrate the autumn season through handmade creativity.
The combination of three ribbed pumpkins, colorful oak leaves, an oversized cream bow, natural wooden beads, and delicate tassels creates a beautiful decorative piece that looks wonderful in farmhouse, rustic, and cottage-inspired homes.
Make one for your own front door or give it as a thoughtful handmade fall gift.
Love this free crochet pattern? Save it to Pinterest and share it with your crochet friends for more cozy handmade autumn inspiration!

