Crochet Pumpkin Table Runner Pattern
Beginner Friendly
Perfect for those just starting their crochet journey, with clear instructions and simple techniques
Single-Day Project
A satisfying project you can complete in a single afternoon or evening.
Handmade Gift
A beautiful keepsake — free forever. Read online or print at home.
About This Crochet Pumpkin Table Runner Pattern
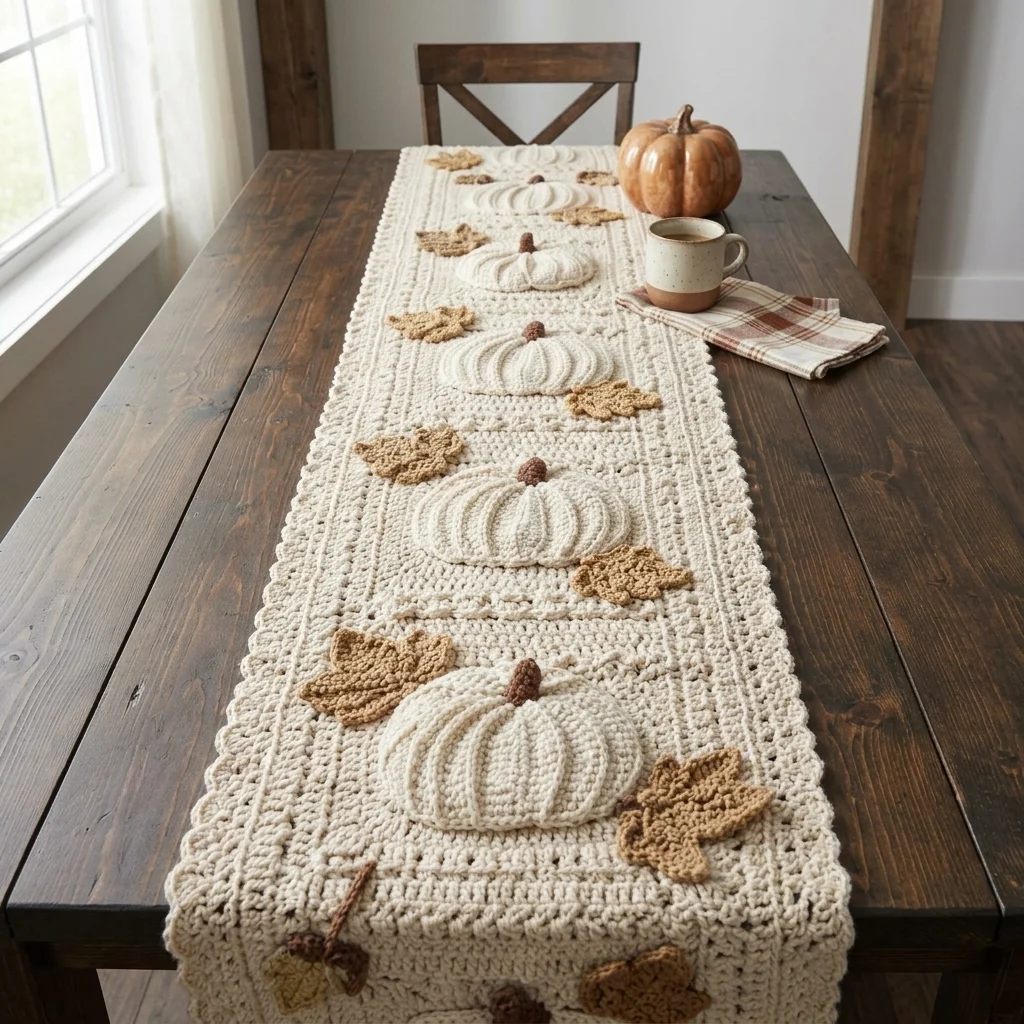
This crochet pumpkin table runner pattern creates a long farmhouse-style centerpiece with raised cream pumpkins, warm tan maple leaves, small brown stems, textured rectangular panels, and a detailed openwork border. The three-dimensional pumpkins are attached over the cream foundation so they stand clearly above the surface, giving the runner the sculpted appearance shown in the reference.
The runner is constructed as a long textured base with repeating decorative panels. Five separate pumpkins are crocheted with pronounced vertical ribs, lightly stuffed, shaped, and sewn onto the center line. Separate autumn leaves are worked in warm camel yarn and distributed around the pumpkins, while small brown stems add contrast without disturbing the soft neutral palette.
Allow approximately 14-18 hours for the complete runner. This advanced project is best for crocheters comfortable with long foundation rows, textured stitches, front-post work, increases and decreases, three-dimensional shaping, joining separate motifs, blocking, and maintaining accurate stitch counts across a large rectangular piece.
Materials
- Worsted / aran cotton or cotton-blend yarn in warm cream approximately 950-1100 m
- Worsted / aran yarn in camel or golden tan approximately 150 m for leaves
- Worsted / aran yarn in medium brown approximately 40 m for stems
- 4.5 mm crochet hook runner and pumpkin bodies
- 4.0 mm crochet hook leaves and finishing
- Polyester fiberfill approximately 100 g for lightly raised pumpkins
- Yarn needle 1
- Stitch markers 6-8
- Blocking mats large enough for runner sections
- Blocking pins approximately 40
- Scissors 1 pair
- Measuring tape 1
Abbreviations
MRmagic ringchchainsl stslip stitchscsingle crochethdchalf double crochetdcdouble crochettrtreble crochetFPdcfront post double crochetBPdcback post double crochetinc2 stitches in same stitchdecdecreaseskskipspspaceststitchstsstitchesFOfasten offMain Runner Foundation
- With cream yarn and 4.5 mm hook, ch 57.
- Row 1: Sc in second ch from hook and in each ch across. Turn. (56 sts)
- Row 2: Ch 2, dc in each st across. Turn. (56 sts)
- Row 3: Ch 1, sc in each st across. Turn. (56 sts)
- Row 4: Ch 2, dc in each st across. Turn. (56 sts)
- Row 5: Ch 1, sc in each st across. Turn. (56 sts)
- Rows 6-9: Repeat Rows 2-5 once.
First Textured Panel
- Row 10: Ch 2, dc in first 4 sts, FPdc around next 4 sts, dc in next 40 sts, FPdc around next 4 sts, dc in final 4 sts. Turn. (56 sts)
- Row 11: Ch 1, sc in each st across. Turn. (56 sts)
- Row 12: Ch 2, dc in first 4 sts, FPdc around next 4 sts, dc in next 40 sts, FPdc around next 4 sts, dc in final 4 sts. Turn. (56 sts)
- Row 13: Ch 1, sc across. Turn. (56 sts)
- Row 14: Ch 2, dc across. Turn. (56 sts)
- Row 15: Ch 1, sc across. Turn. (56 sts)
- Rows 16-25: Repeat Rows 10-15, then repeat Rows 10-13 once more.
First Pumpkin Display Panel
- Row 26: Ch 2, dc across. Turn. (56 sts)
- Row 27: Ch 1, sc across. Turn. (56 sts)
- Row 28: Ch 2, dc in first 5 sts, (FPdc around next st, dc in next st) 4 times, dc in next 30 sts, (FPdc around next st, dc in next st) 4 times, dc in final 5 sts. Turn. (56 sts)
- Row 29: Ch 1, sc across. Turn. (56 sts)
- Rows 30-39: Repeat Rows 26-29 twice, then Rows 26-27 once.
- Keep the central 30 stitches visually quieter; this is where the first raised pumpkin will later be attached.
Separator Band
- Row 40: Ch 1, sc across. Turn. (56 sts)
- Row 41: Ch 2, FPdc around each st across. Turn. (56 sts)
- Row 42: Ch 2, BPdc around each st across. Turn. (56 sts)
- Row 43: Ch 1, sc across. Turn. (56 sts)
- Row 44: Ch 2, dc across. Turn. (56 sts)
- Row 45: Ch 1, sc across. Turn. (56 sts)
Second Pumpkin Display Panel
- Rows 46-59: Repeat the construction of Rows 26-39. (56 sts each row)
- Keep the central area flat and maintain the textured vertical side columns.
Second Separator Band
- Rows 60-65: Repeat Rows 40-45. (56 sts each row)
Center Pumpkin Display Panel
- Rows 66-81: Work 16 rows following the same alternating dc, sc, and side-post texture established in the previous pumpkin panels. (56 sts each row)
- Mark the center between stitches 28 and 29 on Row 73. This marker will later help center the middle pumpkin.
Third Separator Band
- Rows 82-87: Repeat Rows 40-45. (56 sts each row)
Fourth Pumpkin Display Panel
- Rows 88-101: Repeat Rows 26-39. (56 sts each row)
Fourth Separator Band
- Rows 102-107: Repeat Rows 40-45. (56 sts each row)
Fifth Pumpkin Display Panel
- Rows 108-121: Repeat Rows 26-39. (56 sts each row)
Final Textured Runner Section
- Rows 122-137: Repeat the textured pattern from Rows 10-25. (56 sts each row)
- Row 138: Ch 2, dc across. Turn. (56 sts)
- Row 139: Ch 1, sc across. Turn. (56 sts)
- Row 140: Ch 2, dc across. Turn. (56 sts)
- Row 141: Ch 1, sc across. Turn. (56 sts)
- Do not FO. Continue directly into the perimeter border.
Runner Inner Border
- Round 1: Ch 1. Sc evenly around the entire runner, working 3 sc into each corner. Along each short end work 56 sc; along each long edge distribute stitches evenly at approximately 2 sc per 3 row ends. Join with sl st.
- Round 2: Ch 2, dc in each st around, working 3 dc into each corner stitch. Join with sl st.
- Round 3: Ch 1, sc in each st around, working 3 sc into each corner. Join with sl st.
Openwork Border
- Round 1: Ch 1, sc in first st, ch 3, sk 2 sts, sc in next st; repeat around, adjusting by one stitch near each corner if necessary.
- At each corner work (sc, ch 3, sc) into the corner space.
- Round 2: Sl st into first ch-3 sp, ch 1, work 4 sc in each ch-3 sp around.
- At each corner ch-3 sp work 6 sc.
- Join with sl st.
Scalloped Outer Border
- Round 1: Ch 1, sc in first st, sk next st, 5 dc in next st, sk next st, sc in next st; repeat around.
- At each corner, work 7 dc into the center corner stitch to create a fuller scallop.
- Continue evenly around all four sides.
- Join with sl st.
- FO and weave in the end.
Large Raised Pumpkin – Make 3
- With cream, ch 29.
- Row 1: Hdc in second ch from hook and each ch across. Turn. (28 sts)
- Row 2: Ch 1, working in BLO, hdc across. Turn. (28 sts)
- Rows 3-34: Repeat Row 2. (28 sts)
- FO leaving a long sewing tail.
- Fold the rectangle so Rows 1 and 34 meet.
- Whipstitch the short edges together to form a tube.
- Using a long yarn tail, weave through the row ends around one open edge.
- Pull tightly and secure to close the first end.
- Turn the piece so the seam is inside.
- Add fiberfill lightly, keeping the pumpkin broad and flattened rather than spherical.
- Weave yarn through the remaining open edge and pull closed.
- Pass the yarn needle through the center from top to bottom and pull firmly to flatten the pumpkin.
Large Pumpkin Sculpting
- Cut a cream yarn strand approximately 150 cm long.
- Pass the yarn through the pumpkin center from bottom to top.
- Wrap it around the outside following one existing BLO ridge.
- Pass through the center again and pull firmly.
- Repeat around the pumpkin to create 8 evenly spaced sculpted sections.
- Keep each strand centered between adjacent ribbed columns.
- Knot securely underneath.
- Shape the pumpkin into a wide oval approximately 20-22 cm across and 7-8 cm high.
Medium Raised Pumpkin – Make 2
- With cream, ch 25.
- Row 1: Hdc in second ch from hook and each ch across. Turn. (24 sts)
- Row 2: Ch 1, BLO hdc across. Turn. (24 sts)
- Rows 3-30: Repeat Row 2. (24 sts)
- FO leaving a long tail.
- Join the short edges to create a tube.
- Gather and close one end.
- Stuff lightly.
- Gather the second end.
- Pull yarn through the center to flatten the pumpkin.
- Use a separate long cream strand to sculpt 8 evenly spaced ribs.
- Shape to approximately 17-18 cm across.
Brown Pumpkin Stems – Make 5
- With brown, work 6 sc in MR. (6 sts)
- Round 2: Working in BLO, sc around. (6 sts)
- Rounds 3-7: Sc around. (6 sts)
- Stuff very lightly with a tiny amount of fiberfill.
- Round 8: (Sc in next st, inc) 3 times. (9 sts)
- FO leaving a long sewing tail.
- Flatten the wider bottom edge slightly before attachment.
Attaching Pumpkin Stems
- Insert the narrow end of each stem approximately 1 cm into the top center indentation of a pumpkin.
- Using the brown sewing tail, stitch around the 9-stitch lower edge.
- Pass the needle through the pumpkin center once to anchor the stem firmly.
- Angle each stem slightly rather than positioning every stem perfectly vertical.
- Secure the yarn underneath the pumpkin and hide the tail.
Large Autumn Leaf Center – Make 4
- With camel yarn, ch 11.
- Beginning in second ch from hook, sl st, sc, hdc, dc, tr, tr, dc, hdc, sc, sl st. (10 sts)
- Ch 2 at the end.
- Working along the opposite side of the foundation chain, sl st, sc, hdc, dc, tr, tr, dc, hdc, sc, sl st. (20 sts total around foundation)
- Sl st into the beginning stitch.
Large Autumn Leaf Lobes
- Ch 4, sl st in second ch from hook, sc in next ch, hdc in next ch, sl st into next available base st.
- Ch 5, sl st in second ch from hook, sc, hdc, dc down chain, sl st into next base st.
- Ch 6, sl st in second ch from hook, sc, hdc, dc, tr down chain, sl st into next base st.
- Ch 7, sl st in second ch from hook, sc, hdc, dc, tr, tr down chain, sl st into next base st to create the center point.
- Mirror the sequence with ch 6, ch 5, and ch 4 lobes along the remaining side.
- Continue with sc and sl st as needed to reach the leaf base.
- FO leaving a long sewing tail.
Small Autumn Leaf – Make 6
- With camel yarn, ch 9.
- Beginning in second ch from hook work sl st, sc, hdc, dc, dc, hdc, sc, sl st.
- Ch 2.
- Work along opposite side: sl st, sc, hdc, dc, dc, hdc, sc, sl st.
- Join with sl st.
- Create five pointed lobes around the upper perimeter using ch-3, ch-4, ch-5, ch-4, and ch-3 points.
- For each point, work progressively taller stitches down the chain before anchoring with sl st.
- FO leaving a long sewing tail.
Leaf Veins
- With camel yarn and 4.0 mm hook, join at the base of each leaf.
- Surface sl st along the center foundation chain toward the leaf tip.
- FO at the tip.
- Rejoin at two or three points along the center vein.
- Work short diagonal surface sl-st lines toward the outer lobes.
- Keep the stitches relaxed so the leaf remains flat.
- Weave all ends into the back of the motif.
Optional Small Leaf Stems
- Join camel yarn at the base of a leaf.
- Ch 7.
- Sl st in second ch from hook and each remaining ch. (6 sl sts)
- Sl st back into the leaf base.
- FO.
- Make stems only on selected leaves so the runner does not become visually crowded.
Blocking the Runner
- Lay the completed undecorated runner on blocking mats.
- Measure the width at several points and pin to approximately 38 cm.
- Stretch the length gently to approximately 180 cm.
- Pin every scallop along both long sides individually.
- Square both short ends.
- Lightly mist the runner with water or wet-block according to the yarn manufacturer’s instructions.
- Allow it to dry completely before removing the pins.
Pumpkin Placement
- Lay the blocked runner flat on a table.
- Place one large pumpkin approximately 22 cm from the first short end.
- Position one medium pumpkin approximately 31 cm farther along.
- Place the second large pumpkin in the exact center of the runner.
- Position the second medium pumpkin approximately 31 cm beyond the center pumpkin.
- Place the final large pumpkin approximately 22 cm from the opposite short end.
- Center every pumpkin across the runner width.
- Rotate the ribs slightly so the five pumpkins do not appear mechanically identical.
Sewing the Pumpkins to the Runner
- Pin each pumpkin securely in its final position.
- Thread a long cream yarn tail through the yarn needle.
- Sew the underside perimeter of the pumpkin to the runner using small hidden stitches.
- Leave approximately the outer 2 cm of each pumpkin free from the runner so the edges remain raised.
- Add several anchoring stitches through the underside center.
- Do not pull tightly enough to pucker the runner foundation.
- Repeat for all five pumpkins.
Leaf Placement
- Place one large camel leaf diagonally beside the first pumpkin.
- Position a small leaf on the opposite side approximately 8-10 cm away.
- Continue alternating large and small leaves between the pumpkins.
- Angle some leaves toward the runner center and others toward the border.
- Keep at least 2 cm between leaf tips and the scalloped outer edge.
- Use approximately two leaves around each large pumpkin and one or two around each medium pumpkin.
- Pin all leaves before sewing any permanently.
Sewing the Leaves
- Using the long camel tail, sew along the center vein of each leaf first.
- Add one hidden stitch near the base of each major lobe.
- Leave the final 1-2 cm of each pointed lobe unattached.
- This allows the tips to lift slightly from the runner and preserves the dimensional appearance.
- Secure the yarn on the wrong side of the runner.
- Weave the end through several stitches before trimming.
Optional End Decorations
- Make 2 additional small camel leaves using the Small Autumn Leaf instructions.
- Make 2 miniature brown stems by working 5 sc in MR and sc around for 4 rounds.
- Attach one leaf and one small stem near each short end of the runner.
- Keep these motifs flatter than the main decorations so the runner can drape over the table edge naturally.
Finishing
Lay the completed runner on a flat surface and check the alignment of all five pumpkins before hiding the final yarn tails. The pumpkins should follow the center line of the runner with roughly equal spacing, while the tan leaves should alternate from side to side rather than forming matching pairs. Adjust any leaf tips that became trapped beneath the pumpkins.
Gently reshape each pumpkin by pressing the center downward and pulling the ribbed sections outward. Straighten the brown stems and lift the outer edges of the leaves slightly with your fingers. The finished runner should remain flat around the border while the pumpkins rise clearly above the cream background, creating the soft sculpted farmhouse look of the reference.
Tips for Success
- Count all 56 foundation stitches regularly. A single accidental increase along the long runner can gradually create visibly wavy sides.
- Stuff the pumpkins lightly. Their dimension should come mainly from the ribbed crochet and sculpting strands rather than heavy stuffing.
- Block the base before attaching any three-dimensional pieces; blocking afterward is much harder once the pumpkins are sewn in place.
- Use strong hidden stitches beneath the center of every pumpkin so the weight of the raised motif does not pull only on its outer edge.
- Leave the tips of the camel leaves unattached so they cast small shadows and remain visibly separate from the cream background.
Common Mistakes to Avoid
- Do not overstuff the pumpkins. A round ball shape will look very different from the broad, flattened pumpkins in the reference. Remove stuffing and pull the center sculpting strand tighter if necessary.
- Avoid sewing pumpkins directly onto an unblocked runner. Their weight can lock existing waves and uneven edges permanently into the fabric.
- Do not pull surface vein stitches too tightly on the leaves. Tight veins make the motifs cup upward instead of lying naturally against the runner.
- Avoid placing every leaf at the same angle. Rotate them in different directions to create the scattered autumn-leaf effect.
- Do not stretch the scalloped border while sewing the decorations. Keep the runner flat and relaxed throughout assembly.
Ways to Customize This Pattern
- Replace the cream pumpkins with alternating rust, sage, mustard, and ivory pumpkins for a stronger traditional fall palette.
- Use olive-green leaves instead of camel for a softer botanical farmhouse version.
- Make only three pumpkins and shorten the runner to approximately 120 cm for a smaller dining table.
- Add tiny crocheted acorns between selected leaves for a woodland harvest variation.
- Work the entire runner in warm oatmeal yarn with white pumpkins for an even more neutral Thanksgiving centerpiece.
Frequently asked questions
Use only enough fiberfill to support the ribbed fabric, then pass a strong cream yarn strand repeatedly through the pumpkin center. Pulling the center downward while wrapping the yarn around the outside creates the broad, flattened pumpkin profile needed for this runner.
If you use washable yarn and polyester filling, hand washing is the safest option. Use cool water, support the pumpkins while lifting the wet runner, reshape all raised motifs by hand, and dry the runner flat. Check the care instructions for your specific yarn before washing.
Yes. Add another separator band and pumpkin display panel before the final textured section. Each additional display repeat adds roughly 25-30 cm depending on your gauge. You can then add another medium or large pumpkin to the new panel.
The most common causes are accidental increases along the edges, inconsistent turning chains, or a border worked too loosely. Confirm that every main row contains 56 stitches and reduce the border hook size by 0.5 mm if the outer rounds flare.
Yes. Instead of permanently sewing them down, attach small clear snaps to the underside of each pumpkin and corresponding positions on the runner. This allows the base to be washed and stored flat and also lets you replace the pumpkins with other seasonal motifs.
The finished Crochet Pumpkin Table Runner Pattern