Crochet Skeleton Pattern – Halloween Amigurumi Skeleton
Beginner Friendly
Perfect for those just starting their crochet journey, with clear instructions and simple techniques
Single-Day Project
A satisfying project you can complete in a single afternoon or evening.
Handmade Gift
A beautiful keepsake — free forever. Read online or print at home.
About This Crochet Skeleton Pattern – Halloween Amigurumi Skeleton
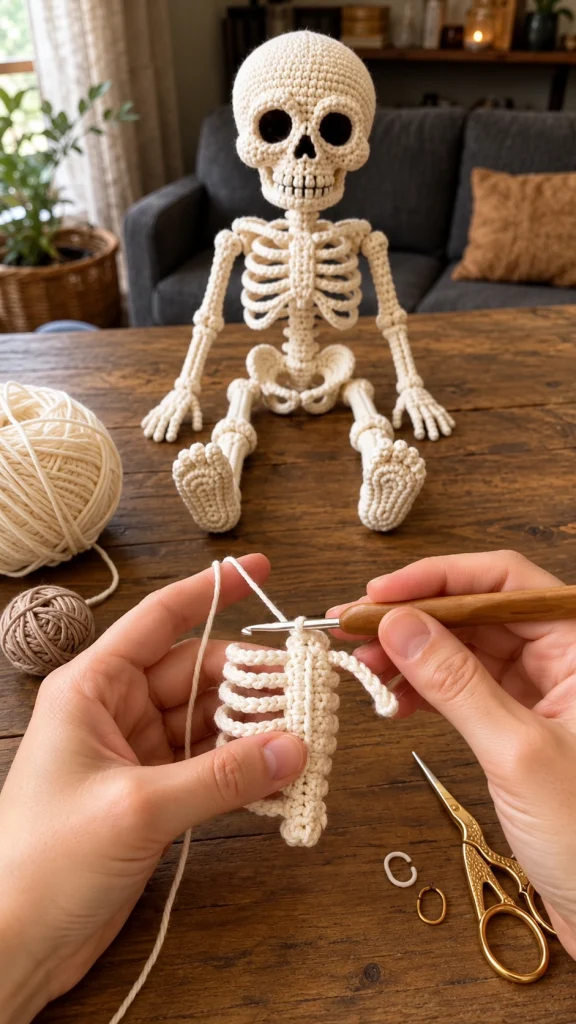
This crochet skeleton pattern creates a detailed handmade skeleton with a rounded skull, deep eye sockets, nose cavity, teeth, neck, rib cage, spine, pelvis, articulated-looking arms, hands, legs and feet.
The project is worked mainly in ivory or bone-colored yarn. Individual bones are crocheted separately and carefully assembled to preserve the open spaces that make the skeleton recognizable. It makes an unforgettable Halloween decoration and can be displayed sitting or standing with support.
Materials
- Ivory / bone-colored yarn main skeleton
- Black yarn eye sockets, nose and mouth details
- 2.5–3.5 mm crochet hook 1
- Polyester fiberfill light stuffing
- Yarn needle 1
- Scissors 1 pair
- Stitch markers optional
- Flexible craft wire or pipe cleaners optional internal support
- Small amount of fabric glue optional for tiny details
Abbreviations – US Terms
MRmagic ringchchainsl stslip stitchscsingle crochethdchalf double crochetdcdouble crochetincincreasedecdecreaseBLOback loop onlyFLOfront loop onlyFOfasten offFinished Size
Using DK or light worsted yarn with a 2.5–3.5 mm hook, the finished skeleton measures approximately 40–50 cm / 16–20 in tall.
You can make it smaller by using sport-weight cotton or larger by using thicker yarn.
Part 1 – Skull
Using ivory yarn:
Round 1: MR, 6 sc. (6)
Round 2: inc around. (12)
Round 3: *sc, inc* around. (18)
Round 4: *2 sc, inc* around. (24)
Round 5: *3 sc, inc* around. (30)
Round 6: *4 sc, inc* around. (36)
Round 7: *5 sc, inc* around. (42)
Round 8: *6 sc, inc* around. (48)
Rounds 9–18: sc around. (48)
Round 19: *6 sc, dec* around. (42)
Round 20: *5 sc, dec* around. (36)
Round 21: *4 sc, dec* around. (30)
Begin stuffing. Keep the upper skull rounded and firm.
Round 22: *3 sc, dec* around. (24)
Do not close yet.
Part 2 – Skull Cheek Structure
The lower half of the skull should be narrower than the cranium.
Continue in ivory:
Round 23: sc around. (24)
Round 24: *2 sc, dec* around. (18)
Rounds 25–27: sc around. (18)
Stuff lightly so the lower face remains narrower than the top of the skull.
FO, leaving a long tail.
Part 3 – Eye Socket Rings
Make two.
Using ivory yarn:
Ch 18.
Join with sl st to form a ring.
Round 1: sc around. (18)
Round 2: *2 sc, inc* around. (24)
FO, leaving a long tail.
Flatten each ring slightly into an oval and sew onto the front of the skull.
Part 4 – Dark Eye Cavities
Using black yarn:
Round 1: MR, 6 sc. (6)
Round 2: inc around. (12)
Round 3: *sc, inc* around. (18)
FO.
Make two and sew behind the ivory socket rings.
The black circles should sit slightly recessed to create the deep hollow-eye appearance.
Part 5 – Nose Cavity
Using black yarn:
Ch 5.
Starting in the second chain:
sl st, sc, hdc, sc.
FO.
Shape the piece into a small upside-down heart or triangular opening and sew between the eye sockets.
Part 6 – Upper Jaw
Using ivory:
Ch 15.
Row 1: Starting in 2nd ch, 14 sc.
Rows 2–4: ch 1, turn, 14 sc.
FO, leaving a long tail.
Curve the strip gently and sew beneath the nose cavity.
Part 7 – Teeth
Using ivory yarn, embroider approximately 8–10 vertical tooth divisions across the jaw.
Then use black yarn to add one thin horizontal mouth line.
Keep the teeth small and close together rather than creating separate bulky pieces.
Part 8 – Lower Jaw
Using ivory:
Ch 17.
Row 1: Starting in 2nd ch, 16 sc.
Row 2: ch 1, turn, 16 sc.
Row 3: ch 1, turn, 2 sc, dec, 8 sc, dec, 2 sc. (14)
Row 4: sc across.
FO.
Curve into a shallow U shape and sew below the upper jaw, leaving a narrow dark mouth gap.
Part 9 – Neck / Cervical Spine
Using ivory:
Round 1: MR, 6 sc. (6)
Round 2: BLO sc around. (6)
Rounds 3–10: sc around. (6)
Stuff very lightly or insert a flexible support.
FO leaving a long tail.
Part 10 – Central Spine
Using ivory:
Round 1: MR, 6 sc.
Rounds 2–28: sc around. (6)
Do not overstuff. The spine should remain narrow.
For the segmented appearance, wrap a short strand tightly around the tube approximately every 3 rounds and knot securely at the back.
Part 11 – Sternum
Using ivory:
Ch 18.
Starting in 2nd ch, work:
3 sl st, 4 sc, 4 hdc, 4 sc, 2 sl st.
FO.
Make a second identical piece and sew both together for a thicker central breastbone.
Part 12 – Collar Bones
Make two.
Ch 18.
Starting in 2nd ch, sl st across.
FO.
Curve each piece gently from the upper sternum toward the shoulder.
Sew them symmetrically.
Part 13 – Rib Bones
Make approximately 10 ribs — five on each side.
For the upper ribs:
Ch 25.
Starting in 2nd ch, sl st across.
For each lower pair, reduce the starting chain by approximately 2 stitches.
Suggested lengths:
Pair 1: ch 25
Pair 2: ch 23
Pair 3: ch 21
Pair 4: ch 19
Pair 5: ch 17
Part 14 – Shape the Rib Cage
Sew one end of each rib to the spine and the other end near the sternum.
Curve the upper ribs outward before bringing them forward.
The lower ribs should gradually become shorter.
Leave visible open spaces between every rib.
Part 15 – Shoulder Joint
Make two.
Round 1: MR, 6 sc.
Round 2: inc around. (12)
Rounds 3–4: sc around.
Round 5: dec around. (6)
Stuff lightly and close.
Part 16 – Upper Arm Bone
Make two.
Round 1: MR, 6 sc.
Rounds 2–16: sc around. (6)
Stuff extremely lightly.
FO leaving a long tail.
Part 17 – Elbow Joint
Make two.
Round 1: MR, 6 sc.
Round 2: inc around. (12)
Round 3: sc around.
Round 4: dec around. (6)
Stuff lightly and close.
Part 18 – Forearm Bones
Each forearm uses two narrow bones.
Make four total.
Round 1: MR, 5 sc.
Rounds 2–15: sc around. (5)
FO.
Place two bones parallel to one another between the elbow and wrist.
Part 19 – Palm
Make two.
Ch 7.
Row 1: Starting in 2nd ch, 6 sc.
Rows 2–6: ch 1, turn, 6 sc.
FO.
Make a second panel and sew together around three sides.
Stuff very lightly and close.
Part 20 – Crochet Fingers
For each hand make five fingers.
Thumb: ch 6, sl st back.
Index: ch 9, sl st back.
Middle: ch 10, sl st back.
Ring: ch 9, sl st back.
Little finger: ch 7, sl st back.
Sew the fingers individually along the end of the palm.
Part 21 – Pelvis Center
Using ivory:
Ch 14.
Row 1: 13 sc.
Row 2: ch 1, turn, inc, 11 sc, inc. (15)
Row 3: sc across.
Row 4: inc, 13 sc, inc. (17)
Rows 5–7: sc across.
FO.
Part 22 – Pelvic Wings
Make two.
Round 1: MR, 6 sc.
Round 2: inc around. (12)
Round 3: *sc, inc* around. (18)
Round 4: *2 sc, inc* around. (24)
FO.
Fold each circle slightly into a cupped oval and sew to each side of the pelvis center.
Part 23 – Pelvic Openings
Make two small rings:
Ch 15.
Join with sl st.
Work one round of sc.
FO.
Sew one ring onto each pelvic wing, keeping the center visibly open.
Part 24 – Hip Joints
Make two.
Round 1: MR, 6 sc.
Round 2: inc around. (12)
Rounds 3–4: sc around.
Round 5: dec around. (6)
Stuff lightly and close.
Part 25 – Thigh Bones
Make two.
Round 1: MR, 6 sc.
Rounds 2–21: sc around. (6)
FO.
Keep the thigh bones slightly longer and thicker than the lower-leg bones.
Part 26 – Knee Caps
Make two.
Round 1: MR, 6 sc.
Round 2: inc around. (12)
FO.
Flatten into a small oval and sew over the front of each knee joint.
Part 27 – Lower Leg Bones
Each lower leg uses two narrow bones.
Make four total.
Round 1: MR, 5 sc.
Rounds 2–19: sc around. (5)
FO.
Place two bones parallel between the knee and ankle.
Part 28 – Heel & Foot Base
Make two.
Ch 12.
Round 1: Starting in 2nd ch, 10 sc, 3 sc in final ch. Continue along opposite side with 9 sc, inc. (24)
Round 2: inc, 9 sc, 3 inc, 9 sc, 2 inc. (30)
Rounds 3–5: sc around.
Stuff lightly.
FO and flatten slightly.
Part 29 – Toes
For each foot make five small toes.
Big toe: ch 6, sl st back.
Second toe: ch 5, sl st back.
Middle toe: ch 5, sl st back.
Fourth toe: ch 4, sl st back.
Little toe: ch 3, sl st back.
Sew them side by side along the front edge of the foot.
Part 30 – Ankle Joints
Make two.
Round 1: MR, 6 sc.
Round 2: inc around. (12)
Round 3: dec around. (6)
Stuff lightly and close.
Part 31 – Assemble the Skull
Pin the eye sockets first.
Position the nose cavity exactly between them.
Place the upper jaw below the nose and the lower jaw beneath it.
Check the face from directly in front before sewing.
The skull should remain symmetrical with a large rounded cranium and narrower jaw.
Part 32 – Assemble the Torso
Attach the cervical spine beneath the skull.
Connect it to the long central spine.
Sew the sternum to the front.
Add the collar bones.
Then attach the ribs one pair at a time from top to bottom.
Part 33 – Assemble the Arms
For each arm, assemble in this order:
Shoulder → upper arm → elbow → two forearm bones → wrist/palm → fingers.
Use several strong stitches at each joint while keeping enough flexibility for natural positioning.
Part 34 – Assemble the Pelvis
Sew the two pelvic wings to the central pelvis piece.
Add the two open rings.
Attach the bottom of the spine securely to the upper center of the pelvis.
Position the hip joints at the lower outer edges.
Part 35 – Assemble the Legs
For each leg:
Hip → thigh bone → knee → two lower-leg bones → ankle → foot.
Keep both legs approximately equal in length.
Before fastening completely, place the skeleton on a flat surface and compare both sides.
Part 36 – Sitting Position
For a sitting skeleton like the reference image, attach the hips and knees with flexible yarn joints.
Bend the legs forward at the hips and knees.
Position the hands beside the body for extra visual balance.
The pelvis should rest flat on the display surface.
Part 37 – Standing Option
A standing version requires additional internal support.
Insert flexible craft wire through the legs and spine before final assembly.
Use a hidden display stand if necessary.
Do not rely on the crochet legs alone to support a large skeleton.
Part 38 – Bone Definition
Use a yarn needle and matching ivory yarn to create subtle shaping at the ends of long bones.
Wrap yarn once or twice around the ends of the upper arms, thighs and lower legs to suggest natural bone joints.
Do not pull so tightly that the pieces collapse.
Part 39 – Skull Shaping
Using a long yarn needle, pass ivory yarn from the back of the skull toward the lower cheek area.
Pull gently to create slight indentations beneath the eye sockets.
Repeat symmetrically on both sides.
Part 40 – Final Facial Details
Use black yarn to deepen the mouth line.
Add tiny vertical stitches between the teeth.
Check that both eye cavities are equally positioned.
Shape the nose opening into a small inverted heart or triangle.
Part 41 – Final Finishing
Weave in all loose yarn ends.
Check every joint for security.
Straighten the ribs and collar bones.
Shape the hands and feet gently with your fingers.
Adjust the skull so it sits naturally above the spine.
Color Variations
Classic Bone: warm ivory or cream.
Vintage Skeleton: oatmeal or antique beige.
Halloween: ivory bones with black eye and nose cavities.
Pastel Gothic: pale lavender, dusty pink or sage.
Glow Style: pale cream yarn paired with glow-in-the-dark accent yarn.
Display Ideas
- Sit the skeleton on a Halloween shelf.
- Place it beside pumpkins and candles.
- Use it as a spooky crochet-room decoration.
- Add a miniature witch hat.
- Make several sizes for a skeleton family display.
- Pose the hands around a tiny crochet pumpkin.
Frequently Asked Questions
This is better suited to intermediate or advanced crocheters because it includes many small pieces, detailed shaping and extensive assembly.
Shape them while sewing. For a decorative piece, a very thin flexible support can also be enclosed inside selected ribs if additional structure is needed.
Yarn-sewn joints can provide limited movement at the shoulders, hips, elbows and knees. It will not function like a fully articulated doll unless you redesign the joints specifically for articulation.
Use thinner yarn and a smaller hook while keeping the same stitch counts.
No. The skull can be firmly stuffed, but the long bones and spine should be only lightly stuffed so they remain slim.
The reference style uses hollow black eye cavities rather than normal amigurumi eyes, so flat black crochet inserts or embroidered black areas create a more convincing skull.
The finished Crochet Skeleton Pattern – Halloween Amigurumi Skeleton

