Crochet Snowflake Granny Square Pillow Pattern
Beginner Friendly
Perfect for those just starting their crochet journey, with clear instructions and simple techniques
Single-Day Project
A satisfying project you can complete in a single afternoon or evening.
Handmade Gift
A beautiful keepsake — free forever. Read online or print at home.
About This Crochet Snowflake Granny Square Pillow Pattern
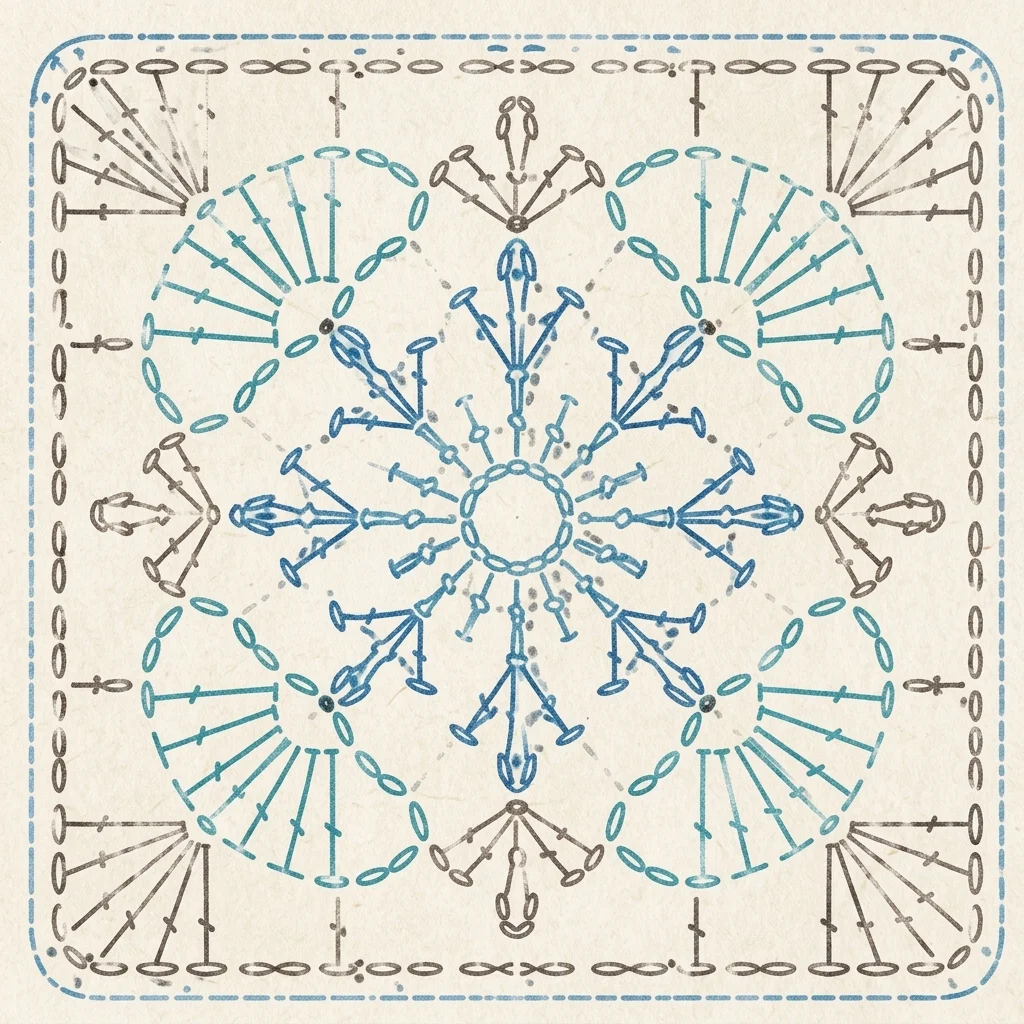
Create a cozy winter accent with this crochet snowflake pillow pattern. The front is made from nine soft blue granny squares arranged in a 3 × 3 layout, with a dimensional white crochet snowflake centered on every square.
The raised snowflakes give the cushion a beautiful handmade texture while the icy blue and white palette makes it perfect for winter and Christmas decorating without looking overly festive.
Materials
- Worsted weight #4 yarn – medium winter blue 300–350 g
- Worsted weight #4 yarn – white or soft ivory 100–130 g
- 4 mm crochet hook 1
- 45 × 45 cm / 18 × 18 in pillow insert 1
- Yarn needle 1
- Scissors 1 pair
- Stitch markers optional
Abbreviations – US Terms
MRmagic ringchchainsl stslip stitchscsingle crochethdchalf double crochetdcdouble crochettrtreble crochetspspacest(s)stitch(es)FOfasten offFinished Size
The finished pillow is approximately 45 × 45 cm / 18 × 18 in.
Each completed granny square should measure approximately 14–15 cm / 5.5–6 in before joining.
Make 9 identical blue squares for the front panel.
Gauge
Exact gauge is not essential, but all nine squares must finish at the same size.
Before joining, lightly block each square to approximately the same dimensions. This will help the finished pillow remain straight and symmetrical.
Part 1 – Blue Granny Square
With blue yarn, make a MR.
Round 1
Ch 3. This counts as the first dc.
Work 2 dc into the ring, ch 2.
Repeat [3 dc, ch 2] three more times.
Join with sl st to the top of beginning ch-3.
You should have 4 clusters and 4 corner spaces.
Round 2
Sl st across to the first corner space.
Ch 3, 2 dc, ch 2, 3 dc in the same corner.
In each remaining corner work:
3 dc, ch 2, 3 dc.
Join with sl st.
Round 3
Sl st to the first corner.
In the corner work:
Ch 3, 2 dc, ch 2, 3 dc.
Work 3 dc into the next side space.
In the next corner work:
3 dc, ch 2, 3 dc.
Continue around, working one 3-dc cluster into every side space and 3 dc, ch 2, 3 dc into every corner.
Join with sl st.
Round 4
Repeat the established granny-square pattern.
Work one 3-dc cluster into each side space.
In every corner work:
3 dc, ch 2, 3 dc.
Join with sl st.
Round 5 – Solid Blue Border
Ch 1.
Sc in every stitch and chain space around.
In each corner ch-2 space work:
2 sc, ch 1, 2 sc.
Join with sl st.
Round 6 – Final Square Border
Ch 2.
Hdc in every stitch around.
In each corner ch-1 space work:
2 hdc, ch 2, 2 hdc.
Join with sl st.
FO and weave in the ends.
Make 9 squares total.
Part 2 – White Crochet Snowflake
With white yarn, make a MR.
Snowflake Center
Round 1: Ch 1, work 12 sc into MR.
Pull the ring closed.
Join with sl st to first sc.
12 sts.
Snowflake Arms
The snowflake is formed from 6 identical arms.
Each arm uses 2 stitches from the center.
From the first stitch:
Ch 7.
Starting in the 2nd chain from hook:
Sl st in next 2 chains.
Ch 3, sl st in 2nd ch from hook, sl st in next ch.
Sl st back into the main chain.
Sl st in the next chain of the main branch.
Repeat the small ch-3 branch once more.
Continue with sl sts down toward the center.
Sl st into the next stitch of the center ring.
Snowflake Tip
At the top of each main arm, create a pointed tip:
Ch 4.
Sl st in 2nd chain from hook.
Sc in next chain.
Hdc in next chain.
Sl st back into the top of the main arm.
This creates the small pointed end visible on each snowflake branch.
Repeat the Snowflake Arms
Skip to the next pair of center stitches and repeat the same arm sequence.
Continue until you have 6 evenly spaced arms.
FO, leaving a long tail for sewing.
Gently stretch and shape each arm with your fingers.
Make 9 white snowflakes.
Part 3 – Attach the Snowflakes
Place one white snowflake exactly in the center of each blue square.
Pin the six arms temporarily if necessary.
Using white yarn and a yarn needle, sew around the center ring first.
Then secure each arm with several small stitches.
Avoid pulling the yarn too tightly. The snowflake should remain slightly raised from the blue background to preserve its dimensional appearance.
Repeat for all nine squares.
Part 4 – Arrange the Pillow Front
Arrange the completed squares into a 3 × 3 grid:
3 squares across × 3 squares down.
Rotate the squares if necessary so every snowflake appears evenly centered.
Check that the finished grid is square before joining.
Part 5 – Join the Granny Squares
Place two squares with their edges touching.
Using blue yarn, join through both corresponding edge stitches with a slip stitch seam.
Continue evenly across the entire edge.
Join the squares into three horizontal rows first.
Then join the three rows vertically.
Keep your tension relaxed so the seams do not pull the squares inward.
Part 6 – Front Panel Border
Join blue yarn in any outer corner of the completed 3 × 3 panel.
Round 1: Ch 1 and sc evenly around the entire panel.
Work 3 sc in each corner.
Join with sl st.
Round 2: Ch 2 and hdc in every stitch around.
Work 3 hdc in each corner stitch.
Join with sl st.
FO.
Part 7 – Crochet the Pillow Back
For a simple solid back, crochet one large blue square or rectangle matching the exact dimensions of your finished front panel.
A straightforward option is to work rows of hdc.
Ch enough stitches to match the width of the front panel.
Row 1: Hdc in 2nd ch from hook and across.
Row 2 onward: Ch 1, turn, hdc across.
Continue until the back panel matches the height of the front panel.
FO.
Optional Envelope Back
If you want the pillow cover to be removable, make two overlapping back panels instead of one solid panel.
Each panel should measure the full width of the pillow and approximately 60–65% of its height.
Overlap the panels in the center by approximately 10–12 cm / 4–5 in.
This creates an envelope opening without needing buttons or a zipper.
Part 8 – Assemble the Pillow
Place the front and back panels together with wrong sides facing each other.
Join blue yarn in one corner.
Sc through both layers around the edges.
Work 3 sc in each corner.
If using a solid back, stop before closing the final side and insert the pillow form.
Continue crocheting the final edge closed.
Join with sl st and FO.
Optional White Edge
For a subtle snowy finish, join white yarn after assembling the pillow.
Work one round of sc around the entire outer edge.
Use 3 sc in each corner.
Keep this border narrow so it does not compete with the snowflake motifs.
Blocking and Finishing
- Weave in every remaining yarn end.
- Gently shape each snowflake arm.
- Check the seams between all nine squares.
- Lightly steam or wet block the cover if your yarn allows it.
- Insert the pillow form and gently shape the corners.
Color Variations
Winter Blue: medium blue + snowy white.
Icy Winter: pale blue + bright white.
Christmas: deep forest green + cream snowflakes.
Elegant Neutral: oatmeal squares + ivory snowflakes.
Nordic Style: deep red squares + soft white snowflakes.
Night Snow: navy blue squares + crisp white snowflakes.
Care Instructions
Hand wash or machine wash on a gentle cycle according to the yarn label.
If possible, remove the pillow insert before washing.
Use cool water and reshape the snowflake arms while damp.
Lay flat to dry.
Avoid high heat, which may distort the raised snowflake appliques.
Frequently Asked Questions
You need nine squares for the front, arranged in a 3 × 3 grid.
In this version, the white snowflakes are crocheted separately and sewn onto the finished blue squares. This creates a more dimensional raised effect.
Yes. You can use 16 squares in a 4 × 4 arrangement or enlarge each individual granny square before joining.
Yes. Using several related snowflake designs can create a beautiful sampler-style winter pillow while keeping the same blue-and-white color palette.
Yes. Simply continue making snowflake squares and join them into the desired blanket dimensions. Add several rounds around the outside for a finished border.
Yes. The snowflake design works beautifully for Christmas, but the simple blue-and-white palette also allows the pillow to stay on display throughout the winter season.
The finished Crochet Snowflake Granny Square Pillow Pattern