Crochet Spiral Christmas Tree Ornament Pattern
Beginner Friendly
Perfect for those just starting their crochet journey, with clear instructions and simple techniques
Single-Day Project
A satisfying project you can complete in a single afternoon or evening.
Handmade Gift
A beautiful keepsake — free forever. Read online or print at home.
About This Crochet Spiral Christmas Tree Ornament Pattern
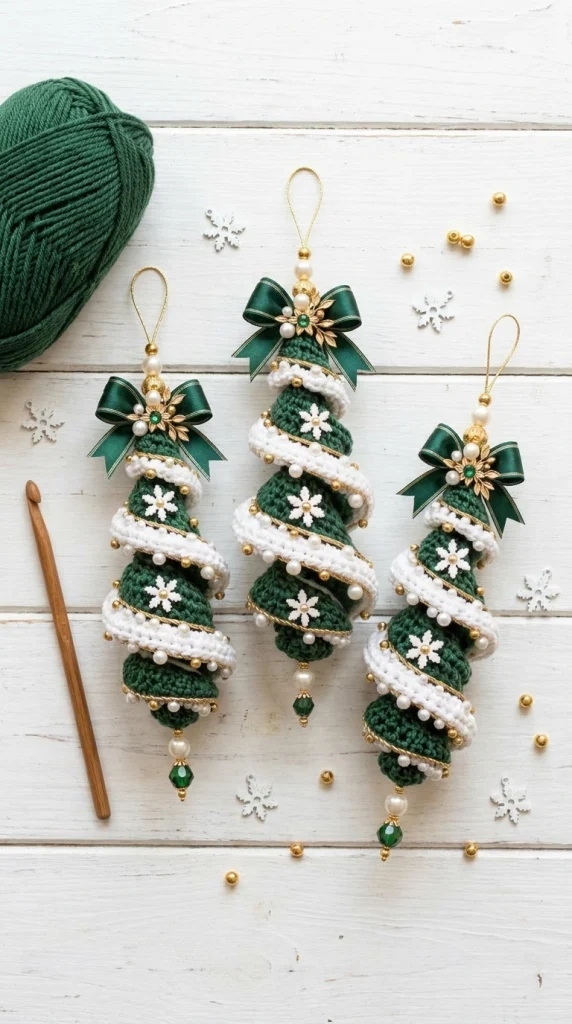
This crochet Christmas tree ornament pattern creates an elegant hanging tree with a sculptural spiral shape, deep forest-green crochet, soft white edging, tiny snowflake details and delicate pearl-and-gold accents.
The ornament is finished with a decorative bow and beaded hanging loop at the top, plus a pearl and green bead drop at the bottom. Make one as a statement ornament or crochet a matching set for your Christmas tree.
Materials
- Deep forest-green cotton yarn main color
- White cotton yarn spiral trim
- 2.5–3.5 mm crochet hook 1
- Gold metallic cord or crochet thread small amount
- White pearl beads assorted small and medium
- Small gold beads assorted
- Green decorative bead 1
- Small snowflake appliqués 3–4
- Dark green ribbon for bow
- Thin hanging cord 1
- Yarn needle 1
- Scissors 1 pair
- Optional craft wire for extra structure
Abbreviations – US Terms
MRmagic ringchchainsl stslip stitchscsingle crochethdchalf double crochetdcdouble crochetincincreaseststitchFOfasten offPart 1 – Crochet the Green Tree Base
Using forest-green yarn, begin at the narrow top of the tree.
Round 1: MR, 6 sc into ring. Pull closed.
Round 2: sc around. (6 sts)
Round 3: *sc in next st, inc in next st*. Repeat around. (9 sts)
Round 4: sc around.
Round 5: *sc in next 2 sts, inc*. Repeat around. (12 sts)
Round 6: sc around.
Round 7: *sc in next 3 sts, inc*. Repeat around. (15 sts)
Continue increasing gradually every second round until the tree reaches the desired width.
Part 2 – Shape the Tree
Continue working in continuous rounds while maintaining the cone shape.
A useful progression is:
Next increase round: *sc 4, inc* around.
Following increase round: *sc 5, inc* around.
Following increase round: *sc 6, inc* around.
Place one plain sc round between increase rounds.
Stop increasing when the lower part measures approximately 8–10 cm / 3–4 in across.
Part 3 – Form the Lower Tree Edge
When the tree reaches approximately 16–19 cm / 6–7.5 in long, work one final round of sc.
For a slightly flared base:
Final Round: *sc in next 4 sts, inc*. Repeat around.
FO, leaving a long tail.
Part 4 – Give the Ornament Structure
The tree should remain light but hold its tapered shape.
You can lightly stuff the inside with fiberfill or insert a small cone-shaped piece of felt.
For a flatter hanging ornament, use only a very small amount of stuffing.
If you prefer a more structured spiral silhouette, a thin piece of flexible craft wire can be hidden inside the outer edge.
Part 5 – Crochet the White Spiral Garland
Using white yarn, ch approximately 90–120, depending on the finished tree size.
Row 1: Starting in 2nd ch from hook, work 2 sc into every ch across.
The strip will naturally begin to curl.
Row 2: ch 1, turn. Work 2 sc into each st across for a fuller spiral.
FO and leave a long sewing tail.
Part 6 – Wrap the White Spiral
Place the narrow end of the white strip close to the top of the green tree.
Wrap it diagonally around the tree, moving downward in a loose spiral.
Leave sections of green visible between each white turn.
Continue until the strip reaches the lower edge.
Pin the spiral temporarily before sewing.
Part 7 – Secure the Spiral
Using white yarn and a yarn needle, tack the white strip to the green tree every few centimeters.
Keep the stitches hidden underneath the white crochet.
Do not sew the entire strip flat. Allow the outer edge to remain slightly raised for a dimensional snowy effect.
Part 8 – Add Gold Cord
Thread a thin metallic-gold cord alongside one edge of the white spiral.
Secure it with tiny hidden stitches.
The gold should appear as a delicate accent rather than a thick border.
Part 9 – Add Pearl and Gold Beads
Sew small white pearls and gold beads at irregular intervals along the spiral.
Alternate the bead sizes for a handmade appearance.
Keep most beads positioned close to the outer white edge.
Secure each bead individually so that one loose thread does not release the entire decoration.
Part 10 – Crochet Mini Snowflakes
Using white thread or very fine yarn:
Round 1: MR, ch 1, 6 sc into ring. Join with sl st.
Round 2: *ch 4, sl st in 2nd ch from hook, ch 2, sl st into next base st.* Repeat 6 times.
FO.
Make approximately 3–4 snowflakes for each ornament.
Part 11 – Attach the Snowflakes
Arrange the snowflakes on the exposed green sections between the white spiral.
Position them at different heights rather than in one straight line.
Sew through the center of each snowflake.
Add one tiny gold bead or pearl to the center if desired.
Part 12 – Make the Decorative Bow
Use dark emerald-green ribbon approximately 2–2.5 cm / ¾–1 in wide.
Create two loops and two tails.
Wrap matching thread tightly around the center.
Trim the tails into neat V-shaped ends.
Part 13 – Decorate the Bow Center
Sew the bow securely to the top of the tree.
Add a small decorative arrangement at the center using:
- 1 green bead
- Several tiny white pearls
- Small gold leaf charms or gold thread accents
Keep the embellishment centered so the ornament hangs evenly.
Part 14 – Create the Beaded Top
Above the bow, thread the hanging cord through:
1 small gold bead → 1 medium pearl → 1 decorative gold bead → 1 medium pearl.
Adjust the combination depending on the beads available.
Knot securely behind the bow.
Part 15 – Add the Hanging Loop
Cut approximately 20–25 cm / 8–10 in of thin gold cord.
Fold it in half.
Thread both ends through the top bead arrangement and secure them inside the ornament.
The finished loop should be large enough to hang comfortably from a Christmas tree branch.
Part 16 – Bottom Beaded Drop
Thread a strong piece of matching cord through the bottom center of the tree.
Add:
1 small gold bead → 1 medium pearl → 1 small gold spacer → 1 faceted green bead → 1 small gold bead.
Knot securely and hide the thread inside the tree.
Part 17 – Final Shaping
Hold the ornament vertically by its hanging loop.
Gently reposition the white spiral so each turn is evenly spaced.
Adjust the bow, pearls and snowflakes until the ornament looks balanced from the front.
Lightly shape the green tree with your fingers.
Color Variations
Classic Christmas: forest green + white + gold.
Traditional: forest green + red + gold.
Winter: emerald + ivory + silver.
Vintage: dark green + antique cream + champagne gold.
Elegant: burgundy + cream + gold.
Snowy: white + pale sage + pearl accents.
Finishing & Care
Weave in all yarn ends securely.
Check that every pearl, bead and appliqué is firmly attached.
Store the ornaments flat or loosely wrapped in tissue paper after Christmas.
Avoid crushing the spiral trim and bow under heavier decorations.
If the crochet becomes flattened during storage, gently reshape it by hand before hanging.
Frequently Asked Questions
Yes. The crochet tree and white spiral are decorative enough on their own. You can replace the beads with tiny embroidered French knots if you prefer an entirely yarn-based ornament.
Yes. Crochet a small rectangle in green, pinch the center and wrap yarn around it. Add two narrow crochet strips underneath for the bow tails.
Use thinner yarn and a smaller hook, or stop the green cone several increase rounds earlier. Shorten the white spiral proportionally.
Use tightly worked stitches and a small hook. Light stuffing, felt or a thin internal support can also help the ornament maintain its tapered silhouette.
Yes. They work beautifully as handmade Christmas gifts, stocking decorations, gift toppers or coordinated ornaments for a holiday tree.
The finished Crochet Spiral Christmas Tree Ornament Pattern

