Crochet Striped Hobo Bag Pattern – Boho Shoulder Bag
Beginner Friendly
Perfect for those just starting their crochet journey, with clear instructions and simple techniques
Single-Day Project
A satisfying project you can complete in a single afternoon or evening.
Handmade Gift
A beautiful keepsake — free forever. Read online or print at home.
About This Crochet Striped Hobo Bag Pattern – Boho Shoulder Bag
Crochet Striped Hobo Bag Pattern – Beautiful Boho Shoulder Bag
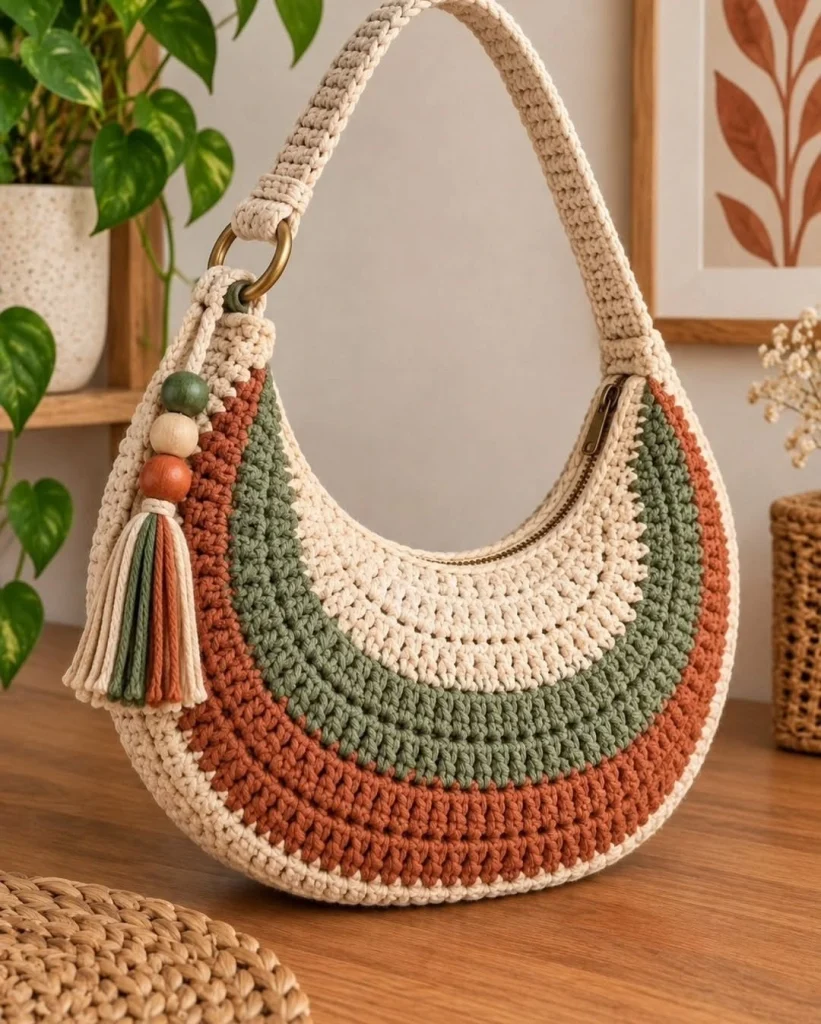
This beautiful crochet striped hobo bag pattern combines warm terracotta, soft sage green and natural cream into a stylish handmade shoulder bag. Its rounded crescent silhouette, sturdy crochet strap and decorative tassel create a relaxed bohemian look that is perfect for everyday wear.
The curved color stripes follow the shape of the bag, giving it a unique layered appearance. A zipper closure, antique-gold ring and coordinating wooden beads complete the design.
In this tutorial, you’ll learn how to crochet the rounded bag panels, create the curved opening, add the colorful stripes, assemble the body and finish the bag with a comfortable strap and decorative tassel.
Materials You’ll Need
- Bulky cotton yarn – natural cream 200 g
- Bulky cotton yarn – terracotta 150 g
- Bulky cotton yarn – sage green 120 g
- 5 mm crochet hook 1
- Antique-gold metal rings 2
- Handbag zipper, approximately 30 cm 1
- Large wooden beads 3
- Matching fabric lining optional
- Yarn needle 1
- Stitch markers 4
- Scissors and measuring tape 1 each
Crochet Abbreviations – US Terms
chchainsl stslip stitchscsingle crochethdchalf double crochetdcdouble crochetincincreasedecdecreaseBLOback loop onlyststitchFOfasten offPart 1 – Prepare Your Yarn and Colors
Choose three coordinating colors:
- Cream: for the outer border, inner upper section and strap.
- Sage green: for the middle curved stripe.
- Terracotta: for the wider lower stripe.
Use yarns of the same weight to maintain consistent stitch size.
Make a small swatch of half double crochet and adjust the hook size until the fabric feels firm but flexible.
Part 2 – Create the Crescent Panel Foundation
Begin with cream yarn.
Row 1: Ch 31. Starting in the second chain from the hook, work 30 sc. Turn.
Row 2: Ch 1, work 2 sc in the first stitch, sc across to the final stitch, work 2 sc in the last stitch. Turn. (32 sts)
Row 3: Ch 1, sc across. Turn.
Row 4: Repeat Row 2. (34 sts)
Continue alternating one increase row and one plain row until the foundation reaches approximately 36 cm across.
This establishes a broad, gently curved lower section.
Part 3 – Build the Rounded Lower Body
Continue working in rows of hdc.
Increase at both ends of every second row to create a fuller shape.
As the panel grows, lay it flat regularly and check that both sides remain symmetrical.
Stop increasing once the panel reaches your desired width.
Part 4 – Crochet the Cream Outer Border
Work approximately 2–3 additional rows using cream yarn.
Maintain the rounded lower shape without excessive increases.
The cream border should form a narrow band along the bottom and sides of the bag.
Keep your stitches firm to provide structure.
Part 5 – Add the Terracotta Stripe
Join terracotta yarn at the beginning of the next row.
Ch 2 and work hdc across.
Continue for approximately 5–7 rows, adjusting the stitch count at the edges to maintain the curved silhouette.
The terracotta stripe should be wider than the outer cream border.
Change colors at the final yarn-over of the previous stitch for a clean transition.
Part 6 – Crochet the Sage Green Stripe
Join sage green yarn.
Work hdc evenly across each row.
Continue for approximately 4–5 rows.
Begin reducing the width slightly as you approach the upper section.
This helps create the distinctive crescent shape.
Part 7 – Create the Inner Cream Section
Switch back to cream yarn.
Work approximately 4–6 rows of hdc.
Decrease gradually near the center-facing ends to create a softly curved upper opening.
The upper cream section should remain narrower than the lower body.
Part 8 – Shape the Crescent Opening
Lay the panel flat and mark the center of the upper edge.
The middle of the opening should sit lower than the two side corners.
Use short rows or gradual shaping along the upper section to establish the curved opening.
Avoid abrupt decreases that would create sharp corners.
Check the curve against a paper template before fastening off.
Part 9 – Make the Second Bag Panel
Repeat Parts 2–8 to create an identical second panel.
Use the same number of rows and color changes.
Place both panels together to confirm that the edges match.
Adjust the final rows if necessary before joining.
Part 10 – Join the Two Panels
Place the panels together with the right sides facing outward.
Join cream yarn at one upper side.
Work sc through both layers around the outer sides and bottom edge.
Leave the curved top opening unjoined.
For extra strength, work an additional row of slip stitches along the bottom seam.
Part 11 – Create the Rounded Bottom
Turn the bag inside out.
Gently push the bottom seam outward to establish the rounded shape.
If desired, add a narrow crocheted gusset between the panels for extra capacity.
Keep the gusset approximately 5–7 cm wide and sew it evenly around the lower curve.
Part 12 – Reinforce the Upper Opening
Join cream yarn at one side of the opening.
Work one round of sc evenly around the entire upper edge.
Work a second round of sc if additional firmness is needed.
Keep the stitches relaxed enough to preserve the curved shape.
Part 13 – Prepare the Zipper
Choose a zipper approximately 30 cm long.
Position it along the inside upper curve.
Pin or clip the zipper tape in place, making sure both sides align evenly.
Check that the zipper opens and closes smoothly before sewing.
Part 14 – Attach the Zipper
Using a sewing needle and strong matching thread, sew the zipper tape to the inside crochet edge.
Use small, evenly spaced stitches.
Keep the zipper teeth free from the crochet fabric.
Repeat on the opposite side.
Test the zipper several times after attaching.
Part 15 – Crochet the Shoulder Strap
Using cream yarn, ch 9.
Row 1: Sc in the second chain from the hook and across. (8 sts)
Row 2: Ch 1, turn, sc across.
Repeat Row 2 until the strap measures approximately 55–65 cm.
For a textured appearance, work every other row in BLO.
Part 16 – Reinforce the Strap
Work a row of slip stitches along both long edges of the strap.
This reduces stretching and creates a neat finish.
For a stronger strap, sew a narrow cotton webbing strip to its underside.
Part 17 – Attach the Metal Rings
Position one antique-gold metal ring at each upper side of the bag.
Create two short cream crochet tabs, approximately 4 cm wide and 8 cm long.
Fold each tab through a ring and sew both ends securely to the bag.
Reinforce the attachment points with several passes of yarn.
Part 18 – Attach the Shoulder Strap
Thread one end of the strap through the first metal ring.
Fold approximately 4 cm of the strap back onto itself.
Sew securely.
Repeat at the opposite end.
Make sure the strap is not twisted.
Part 19 – Make the Decorative Tassel
Cut approximately 25–30 strands of yarn, each measuring 22–25 cm.
Use cream, sage green and terracotta yarn.
Fold the strands in half.
Tie a separate strand tightly around the folded center to form the tassel head.
Wrap another strand around the upper section to create a neat neck.
Part 20 – Add the Wooden Beads
Create a hanging cord using a short crochet chain.
Thread three wooden beads onto the cord:
- One sage green bead
- One natural wooden bead
- One terracotta bead
Secure the beads with knots.
Attach the tassel beneath the beads.
Part 21 – Attach the Tassel Charm
Loop the tassel cord around one of the metal rings.
Adjust the length so the tassel hangs naturally along the side of the bag.
Trim the tassel strands evenly.
The tassel should complement the bag without extending below its base.
Part 22 – Optional Fabric Lining
Place the finished bag flat on folded lining fabric.
Trace its shape, allowing approximately 1.5 cm seam allowance.
Cut two matching pieces.
Sew the sides and bottom together.
Insert the lining into the crochet bag and hand-sew around the zipper tape.
Part 23 – Optional Interior Pocket
Cut a small rectangle of lining fabric approximately 18 × 14 cm.
Fold the raw edges inward and stitch them.
Sew the pocket to the lining before inserting it into the bag.
This creates a convenient compartment for small essentials.
Part 24 – Final Shaping
Stuff the bag lightly with clean towels.
Gently shape the bottom into a rounded crescent.
Adjust the upper sides so they rise naturally toward the strap attachment points.
Allow the bag to rest in shape overnight.
Part 25 – Final Finishing
Weave in all yarn ends securely.
Check the zipper stitching and strap attachments.
Trim loose fibers and adjust the tassel.
Lightly steam-block if recommended for your yarn.
Your handmade striped crochet hobo bag is ready to use!
Beautiful Color Combinations
Earthy Boho: cream, sage green and terracotta.
Coastal: ivory, dusty blue and navy.
Autumn: oatmeal, mustard and chocolate brown.
Soft Feminine: cream, dusty rose and mauve.
Modern Neutral: beige, taupe and charcoal.
Care Instructions
Hand wash gently in cool water with mild detergent.
Avoid soaking the wooden beads or metal hardware for long periods.
Do not twist or wring the bag.
Press out excess moisture using a towel.
Reshape the bag and allow it to dry flat.
Store it loosely stuffed to preserve the crescent silhouette.
Frequently Asked Questions
This project is best for intermediate beginners who are comfortable with single crochet, half double crochet, increases, decreases and basic sewing.
Firm cotton yarn or cotton cord is ideal because it provides structure, stitch definition and durability. Avoid overly stretchy yarn.
Yes. You can leave the top open or add a magnetic snap or crocheted button-loop closure.
Absolutely. Keep the same stripe widths and replace the colors with any combination that suits your personal style.
Use firm cotton yarn, crochet with tight tension and reinforce the underside with cotton webbing if you plan to carry heavier items.
Yes. Increase the width of the foundation and extend the panel shaping, using a larger paper template to maintain the crescent proportions.
The finished Crochet Striped Hobo Bag Pattern – Boho Shoulder Bag

