Crochet Winter Snowflake Door Swag – Free Christmas Decoration Pattern
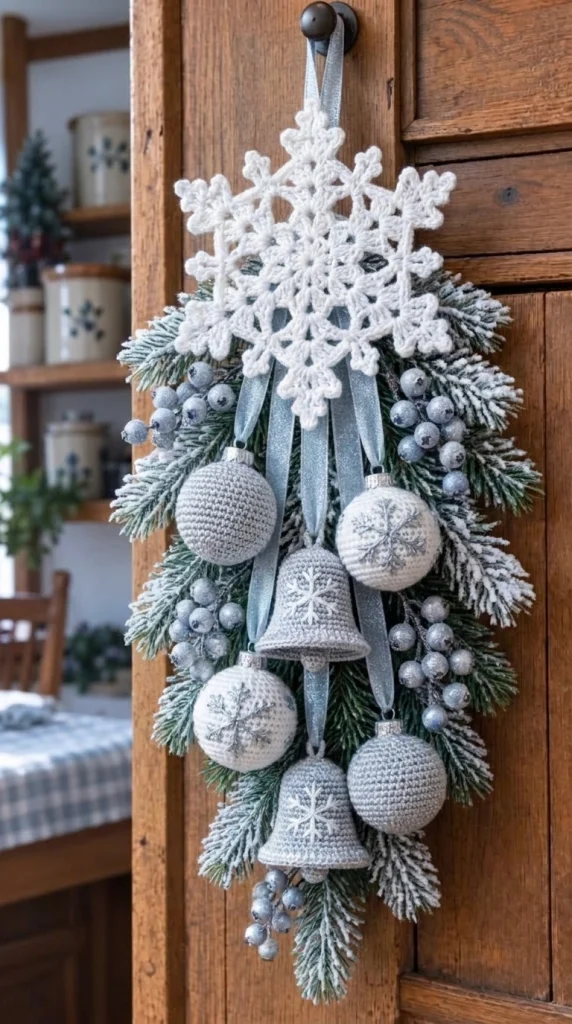
Bring a touch of winter elegance to your home with this beautiful crochet winter snowflake door swag. Featuring a large white crocheted snowflake, delicate silver-blue Christmas baubles, embroidered snowflake ornaments, soft crochet bells, and frosted evergreen branches, this handmade decoration creates a magical holiday atmosphere.
The arrangement combines traditional Christmas greenery with soft icy colors and intricate crochet details. A large lace snowflake crowns the design, while crocheted ornaments hang from shimmering pale-blue ribbons. Frosted pine branches and silver berry clusters complete the elegant winter-inspired look.
This free crochet pattern explains how to make the decorative snowflake, round ornaments, Christmas bells, and hanging arrangement.
Pattern Information
- Skill Level: Intermediate to Advanced
- Finished Length: Approximately 55–70 cm
- Finished Width: Approximately 25–35 cm
- Snowflake Diameter: Approximately 20–24 cm
- Bauble Diameter: Approximately 7–9 cm
- Bell Height: Approximately 8–10 cm
- Hook Sizes: 2.5 mm, 3 mm, and 3.5 mm
- Terminology: US crochet terms
Finished measurements may vary depending on the yarn, hook size, and tension.
Materials Needed
- White cotton yarn for the large snowflake
- Light silver-gray yarn for Christmas baubles and bells
- Ivory yarn for embroidered ornament details
- Small amount of metallic silver embroidery thread
- 2.5 mm crochet hook for the lace snowflake
- 3 mm or 3.5 mm crochet hook for ornaments
- Polyester fiberfill
- Yarn needle
- Scissors
- Stitch markers
- Pale-blue satin or velvet ribbon
- Small silver ornament caps or crocheted caps
- Artificial evergreen branches
- Artificial frosted berries
- Floral wire
- Floral tape
- Optional silver decorative bells
- Fabric stiffener for the snowflake
- Strong hanging cord or ribbon
Crochet Abbreviations
- MR: Magic ring
- ch: Chain
- sc: Single crochet
- hdc: Half double crochet
- dc: Double crochet
- tr: Treble crochet
- sl st: Slip stitch
- inc: Increase
- dec: Decrease
- st: Stitch
- sp: Space
- FO: Fasten off
Part 1: Crochet the Large White Snowflake
The large white snowflake is the focal point of this winter door decoration. Use firm cotton yarn to create crisp, defined lace stitches.
Round 1: Center Ring
- Using white yarn, make a magic ring.
- Ch 3 (counts as first dc).
- Work 11 dc into the ring.
- Pull the ring closed.
- Sl st into the top of the beginning ch 3. (12 dc)
Round 2: Six Foundation Points
- Ch 1, sc in the same stitch.
- Ch 5, skip the next stitch.
- Sc in the following stitch.
- Repeat around to create six ch-5 loops.
- Sl st to join.
Round 3: Lace Sections
- Sl st into the first ch-5 loop.
- Ch 3, work 4 dc into the loop.
- Ch 3.
- Work 5 dc into the same loop.
- Ch 2.
- Repeat in each remaining ch-5 loop.
- Sl st to join.
Round 4: Extended Snowflake Arms
- Sl st to the center ch-3 space of the first point.
- Work (3 dc, ch 5, 3 dc) into the space.
- Ch 3.
- Sc into the next ch-2 space.
- Ch 3.
- Repeat around all six points.
- Sl st to join.
Round 5: Decorative Branches
- Sl st to the first ch-5 point.
- Ch 5.
- Sl st into the second chain from the hook to form a small picot.
- Ch 4 and sl st into the base of the branch.
- Repeat to create small decorative branches.
- Work matching branches around all six snowflake points.
- FO and weave in the ends.
For a larger snowflake, add additional chain branches and picot details while maintaining six evenly spaced arms.
Part 2: Block and Stiffen the Snowflake
Blocking is essential for creating the crisp, symmetrical appearance of the snowflake.
- Soak the finished snowflake briefly in lukewarm water.
- Gently squeeze out excess water.
- Lay it flat on a blocking mat.
- Pin all six main points evenly.
- Arrange the smaller branches symmetrically.
- Apply a suitable fabric stiffener.
- Allow the snowflake to dry completely.
The finished snowflake should hold its shape when hanging vertically.
Part 3: Crochet the Silver-Blue Christmas Baubles
Make four round crochet ornaments using light silver-gray yarn. Two can remain plain, while the others feature embroidered snowflakes.
Round 1
MR, 6 sc. (6)
Round 2
Inc in each stitch around. (12)
Round 3
(1 sc, inc) repeat 6 times. (18)
Round 4
(2 sc, inc) repeat 6 times. (24)
Round 5
(3 sc, inc) repeat 6 times. (30)
Round 6
(4 sc, inc) repeat 6 times. (36)
Round 7
(5 sc, inc) repeat 6 times. (42)
Rounds 8–14
Sc in each stitch around. (42)
Round 15
(5 sc, dec) repeat 6 times. (36)
Round 16
(4 sc, dec) repeat 6 times. (30)
Round 17
(3 sc, dec) repeat 6 times. (24)
Begin stuffing the ornament firmly with polyester fiberfill.
Round 18
(2 sc, dec) repeat 6 times. (18)
Round 19
(1 sc, dec) repeat 6 times. (12)
Round 20
Dec around. (6)
FO, close the opening, and weave in the yarn tail.
Repeat to make four matching baubles.
Part 4: Embroider the Snowflake Designs
Two of the ornaments feature delicate embroidered snowflake motifs.
Using white yarn or silver embroidery thread:
- Mark the center of the ornament.
- Embroider six straight lines radiating from the center.
- Add short diagonal branches to each line.
- Keep the spacing even.
- Secure the embroidery thread inside the ornament.
For a softer winter look, use white embroidery on pale-gray ornaments. Metallic silver thread creates a more festive finish.
Part 5: Crochet the Ornament Caps
Small crochet caps give the baubles a traditional Christmas ornament appearance.
Using silver-gray yarn:
Round 1
MR, 6 sc. (6)
Round 2
Inc around. (12)
Round 3
Sc in each stitch through the back loops only. (12)
Round 4
Sc around. (12)
FO, leaving a long tail.
Sew the cap securely to the top of the bauble and attach a pale-blue hanging ribbon.
Part 6: Crochet the Christmas Bells
Make two soft silver-blue crochet bells with slightly flared lower edges.
Round 1
MR, 6 sc. (6)
Round 2
Inc around. (12)
Round 3
(1 sc, inc) repeat 6 times. (18)
Round 4
Sc in each stitch through the back loops only. (18)
Rounds 5–7
Sc around. (18)
Round 8
(2 sc, inc) repeat 6 times. (24)
Rounds 9–10
Sc around. (24)
Round 11
(3 sc, inc) repeat 6 times. (30)
Round 12
Sc around. (30)
Round 13
(4 sc, inc) repeat 6 times. (36)
Round 14: Decorative Bell Rim
Work 1 sc in each stitch around, then finish with a round of reverse single crochet for a neat textured edge.
FO and weave in the ends.
Repeat to make the second bell.
Part 7: Add Snowflake Embroidery to the Bells
Using white embroidery thread:
- Mark the center of the front of each bell.
- Embroider one vertical line.
- Add one horizontal line crossing the center.
- Add two diagonal lines.
- Embroider small branches along the lines.
- Secure the thread on the inside.
Keep the snowflake design centered on the bell for a balanced decorative finish.
Part 8: Add the Bell Clappers
To make each bell more realistic, add a small hanging clapper.
- Using gray yarn, make a magic ring.
- Work 6 sc into the ring.
- Increase to 12 sc.
- Work one round of 12 sc.
- Decrease to 6 sc.
- Stuff lightly and close.
- Attach the small ball inside the bell with a short yarn cord.
Make sure the clapper hangs slightly below the bell opening.
Part 9: Prepare the Frosted Evergreen Arrangement
The greenery provides structure and creates the natural winter backdrop for the crochet ornaments.
Arrange several artificial evergreen branches in a downward-facing teardrop shape.
- Choose one long central evergreen branch.
- Add shorter branches to each side.
- Layer the greenery to create a full, balanced arrangement.
- Secure the stems together using floral wire.
- Wrap the connection points with floral tape.
- Add frosted silver berry clusters between the branches.
For an icy appearance, choose greenery with artificial snow or lightly frosted tips.
Part 10: Attach the Large Crochet Snowflake
Position the large white snowflake at the top of the arrangement.
- Place the snowflake over the upper greenery.
- Center it carefully.
- Attach it using small loops of strong thread or floral wire.
- Keep the six snowflake points clearly visible.
- Check that the snowflake sits flat against the greenery.
The snowflake should extend beyond the greenery slightly to create an elegant focal point.
Part 11: Arrange the Hanging Ornaments
Cut several lengths of pale-blue satin or velvet ribbon.
Use different ribbon lengths to create a cascading arrangement.
Suggested Placement
- One plain silver-blue bauble near the upper left.
- One embroidered bauble near the upper right.
- One crochet bell in the center.
- One embroidered bauble toward the lower left.
- One plain bauble toward the lower right.
- One additional crochet bell near the bottom center.
Attach the ribbons securely behind the large snowflake and among the evergreen branches.
Adjust the lengths until the ornaments hang naturally without covering one another.
Part 12: Add Frosted Berry Clusters
Silver berries add dimension and help fill small gaps in the greenery.
- Divide the berry stems into small clusters.
- Place them on both sides of the arrangement.
- Secure them with floral wire.
- Keep the berries visible around the hanging ornaments.
- Distribute the clusters evenly.
Avoid overcrowding the decoration so the crochet details remain the main attraction.
Part 13: Make the Hanging Loop
Use strong ribbon or braided cotton cord to create a secure hanging loop.
- Cut approximately 25–30 cm of sturdy ribbon.
- Fold it in half.
- Attach both ends securely to the top of the arrangement.
- Reinforce the attachment with floral wire.
- Cover the wire with floral tape.
- Test the hanging loop before placing the decoration on a door.
The completed swag should hang vertically with the snowflake at the top and the ornaments cascading below.
Part 14: Final Finishing
- Weave in all loose yarn ends.
- Check the ornament caps and ribbons.
- Adjust the position of the bells and baubles.
- Ensure the snowflake remains flat and symmetrical.
- Fluff the evergreen branches.
- Spread the frosted berries evenly.
- Trim any visible floral wire.
- Test the balance of the hanging arrangement.
Your elegant crochet winter snowflake door swag is complete!
Beautiful Color Variations
Classic Winter White
Combine white snowflakes, ivory ornaments, and frosted evergreen branches for a soft snowy look.
Silver and Ice Blue
Use pale-blue baubles, silver bells, and white lace snowflakes for an elegant winter wonderland theme.
Traditional Christmas
Replace the silver-gray ornaments with red and green crochet baubles and add a red velvet ribbon.
Champagne Gold
Choose ivory, champagne, and soft-gold yarn for a warm and sophisticated holiday decoration.
Rustic Woodland
Combine cream snowflakes, natural beige ornaments, brown accents, and pinecones.
Helpful Crochet Tips
- Use mercerized cotton for the large snowflake to create crisp lace details.
- Block the snowflake carefully before assembling the swag.
- Stuff the round ornaments evenly to maintain their shape.
- Use matching embroidery thread for delicate snowflake motifs.
- Choose ribbons that complement the yarn colors.
- Keep the hanging ornaments at slightly different heights.
- Use sturdy floral wire to support the arrangement.
- Hang the decoration in a sheltered location to protect the yarn.
Frequently Asked Questions
Can beginners make this crochet Christmas door swag?
The individual baubles and bells use basic crochet stitches, making them suitable for confident beginners. The lace snowflake and final arrangement require more experience.
What yarn is best for crochet Christmas ornaments?
Cotton yarn is ideal for decorative snowflakes because it holds detailed stitches well. Soft acrylic or cotton-blend yarn also works for stuffed ornaments and bells.
How do I keep the large snowflake stiff?
Use a fabric stiffener and block the snowflake carefully. Allow it to dry completely before attaching it to the arrangement.
Can I hang this decoration outdoors?
It is best displayed indoors or on a covered porch protected from rain and strong wind. Moisture can affect the yarn, stuffing, and stiffened snowflake.
Can I make the arrangement smaller?
Yes. Use fewer ornaments, shorter evergreen branches, and a smaller crochet snowflake to create a compact version.
Can I use real evergreen branches?
Fresh evergreen branches can be used for temporary indoor displays, but artificial greenery is better for a reusable decoration that can be stored and displayed year after year.
Care and Storage Instructions
- Dust the crochet ornaments gently with a soft brush.
- Spot-clean yarn decorations when necessary.
- Avoid soaking the stiffened snowflake.
- Keep the arrangement away from direct moisture.
- Store it in a large protective box.
- Use tissue paper to support the hanging ornaments.
- Keep the snowflake flat during storage.
- Store in a cool, dry location until the next holiday season.
Final Thoughts
This crochet winter snowflake door swag is a beautiful way to combine delicate crochet craftsmanship with traditional Christmas greenery.
The large white snowflake, softly textured silver-blue baubles, embroidered bells, pale-blue ribbons, and frosted evergreen branches create an elegant handmade decoration that looks wonderful on wooden doors, interior walls, or covered entryways.
Whether you follow the classic icy color palette or create your own festive variation, this free Christmas crochet pattern is a lovely project for decorating your home or making a thoughtful handmade holiday gift.
Love this winter crochet decoration? Save the pattern to Pinterest and share it with your crochet friends for more beautiful handmade Christmas inspiration!

