Dusty Blue Hexagon Lace Crochet Bedspread: Free Crochet Pattern
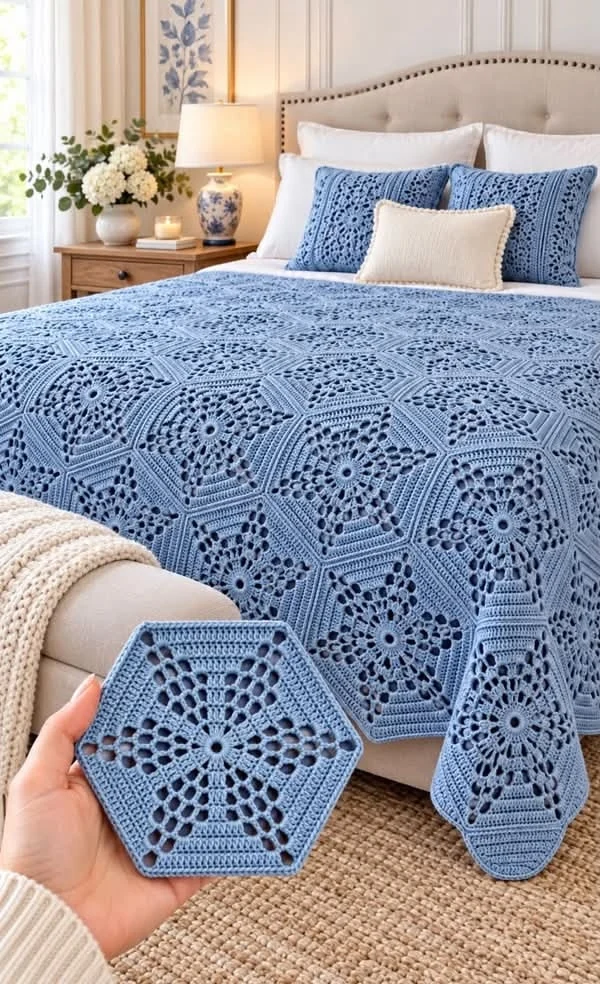
Bring timeless elegance and delicate handmade texture into your bedroom with this beautiful dusty blue hexagon lace crochet bedspread. Featuring intricate floral hexagon motifs, airy openwork stitches, and a graceful draped finish, this romantic crochet coverlet transforms an ordinary bed into a stunning centerpiece.
The design is inspired by traditional heirloom crochet lace, combining geometric hexagonal shapes with delicate floral rosettes and decorative openwork. Each individual motif features a circular flower-like center surrounded by radiating lace details and structured outer borders.
When joined together, the hexagons create an elegant repeating pattern that flows beautifully across the bed. The soft dusty-blue color enhances the lace texture while maintaining a calm, sophisticated appearance.
Matching crochet pillow covers complete the coordinated bedroom look, making this project ideal for farmhouse, cottagecore, vintage, coastal, and romantic interiors.
This tutorial explains how to create the individual floral hexagon motifs, join them into a full bedspread, customize the size, crochet matching pillow covers, and finish the project with a delicate decorative border.
Pattern at a Glance
All measurements are approximate and should be adjusted according to your yarn, gauge, mattress size, and preferred drape.
Materials and Supplies
- Approximately 2,500–3,500 g of DK-weight cotton or cotton-blend yarn in dusty powder blue for a large bedspread.
- Additional 400–600 g of matching yarn for two pillow covers, depending on pillow size and motif layout.
- 3.5 mm or 4 mm crochet hook, depending on yarn weight and desired lace texture.
- Yarn needle for joining motifs and weaving in ends.
- Stitch markers.
- Sharp scissors.
- Measuring tape.
- Blocking mats and rustproof pins.
- Optional pillow inserts measuring approximately 45 × 45 cm or 50 × 50 cm.
- Optional fabric backing for pillow covers.
- Optional decorative buttons or zipper closures.
Yarn recommendation: Mercerized cotton or a soft cotton-blend yarn is ideal for this lace bedspread because it provides clear stitch definition and allows the floral motifs to retain their shape after blocking.
Gauge and Finished Measurements
Using DK-weight yarn and a 3.5 mm hook, aim for a finished hexagon measuring approximately 20 cm from point to opposite point after blocking.
For this pattern, the six-sided motifs are designed to create a repeating geometric lace arrangement.
Suggested Bedspread Sizes
- Single bed: approximately 150 × 220 cm.
- Double bed: approximately 200 × 230 cm.
- Queen bed: approximately 230 × 250 cm.
- King bed: approximately 260 × 270 cm.
These measurements include decorative drape and may be adjusted to suit your mattress dimensions.
Abbreviations
All instructions use US crochet terminology. Beginning chains count as stitches only when specifically indicated.
Part 1: Crochet the Floral Center of the Hexagon
The center of each hexagon features a delicate circular rosette surrounded by openwork stitches.
Begin the floral center
Using dusty-blue yarn and a 3.5 mm crochet hook, make a magic ring.
Round 1: Ch 3 (counts as first dc), work 11 dc into the ring. Join with a sl st to the top of the beginning ch 3. 12 dc.
Round 2: Ch 3, dc in the same stitch, then work 2 dc in each stitch around. Join. 24 dc.
Round 3: Ch 4 (counts as dc and ch 1), skip the next stitch, dc in the following stitch, ch 1. Repeat around and join. 12 dc and 12 ch-1 spaces.
Round 4: Sl st into the first ch-1 space. Ch 3, work 2 dc into the same space, ch 2. Repeat (3 dc, ch 2) in each remaining ch-1 space. Join. 12 clusters.
The center should now resemble a small circular flower surrounded by evenly spaced lace openings.
Part 2: Create the Radiating Lace Spokes
The next rounds introduce the radiating openwork details that give the motif its elegant floral geometry.
Round 5: Openwork arches
Sl st into the next ch-2 space.
Ch 5, sc into the next ch-2 space.
Repeat around, creating twelve evenly spaced chain arches.
Join with a sl st.
Round 6: Lace fans
Sl st into the first ch-5 space.
Work (3 dc, ch 2, 3 dc) into the same space.
Ch 1, sc into the next ch-5 space.
Repeat around, alternating lace fans and anchoring stitches.
Join with a sl st.
Round 7: Expand the openwork
Sl st into the center ch-2 space of the first fan.
Work (3 dc, ch 3, 3 dc) into the same space.
Ch 2, sc into the next anchoring stitch, ch 2.
Repeat around.
Join with a sl st.
The motif should begin developing a delicate star-like appearance with open spaces between the lace fans.
Part 3: Shape the Six Hexagon Corners
To transform the circular floral center into a hexagon, the following rounds emphasize six evenly spaced corner points.
Round 8: Establish the corners
Identify six evenly spaced fan centers around the motif.
Work (3 dc, ch 3, 3 dc) into each designated corner space.
Between corners, work ch-2 spaces and small dc groups to maintain the lace structure.
Join with a sl st.
Round 9: Expand the sides
Work dc stitches along each hexagon side.
At each corner, work (2 dc, ch 3, 2 dc) into the corner space.
Continue evenly around all six sides.
Join with a sl st.
Round 10: Decorative openwork band
Work alternating dc groups and ch-2 spaces along each side.
At every corner, work (2 dc, ch 3, 2 dc).
Join with a sl st.
Check that the six corners are evenly spaced and the motif lies flat.
Part 4: Crochet the Textured Outer Hexagon Border
The outer border gives each lace motif a structured geometric outline and helps create neat joins between neighboring hexagons.
Round 11: Solid border foundation
Work dc stitches evenly along each side, placing one dc into each stitch and appropriate stitches into chain spaces.
At each corner, work (2 dc, ch 2, 2 dc).
Join with a sl st.
Round 12: Raised decorative band
Work hdc stitches around the motif.
At each corner, work (2 hdc, ch 2, 2 hdc).
Join with a sl st.
Round 13: Final edging
Work sc evenly around all six sides.
At each corner, work (sc, ch 2, sc).
Join with a sl st and FO.
Weave in the ends carefully and prepare the motif for blocking.
Part 5: Block the Finished Hexagon Motif
Blocking is especially important for lace crochet because it opens the decorative spaces and defines the geometric shape.
Blocking instructions
- Lightly dampen the finished hexagon.
- Place it on a blocking mat.
- Arrange the six corners into a symmetrical hexagon.
- Pin each corner securely.
- Adjust the lace openings and outer edges.
- Allow the motif to dry completely.
- Measure the finished hexagon.
Use the blocked motif dimensions to calculate the number of hexagons needed for your bedspread.
Part 6: Calculate the Number of Hexagon Motifs
The number of motifs depends on the finished motif size, desired bedspread dimensions, and arrangement.
Planning the layout
Lay several blocked hexagons on a flat surface to test the arrangement.
For a traditional honeycomb layout, position the hexagons in staggered rows.
Measure the width and height of the joined sample section.
Use these measurements to estimate the number of rows and columns needed.
Suggested motif quantities
- Single bed: approximately 70–90 motifs.
- Double bed: approximately 100–130 motifs.
- Queen bed: approximately 130–160 motifs.
- King bed: approximately 160–190 motifs.
These quantities are planning estimates only. The actual number depends on the blocked motif dimensions, layout, edge treatment, and desired bedspread size.
Part 7: Arrange the Hexagon Motifs
Before joining, arrange all finished motifs on a clean floor or large table.
Layout instructions
- Place the first row of hexagons side by side.
- Position the second row in a staggered arrangement.
- Continue alternating the rows to create a honeycomb pattern.
- Align the outer corners carefully.
- Check that the floral centers face the same direction.
- Adjust the layout until the desired width and length are achieved.
Take a photograph of the final arrangement before joining. This makes it easier to maintain the correct placement as you work.
Part 8: Join the Hexagon Motifs
The motifs can be joined using an invisible sewing method or a decorative crochet seam.
Method 1: Invisible mattress stitch
- Place two hexagons with right sides facing upward.
- Align the matching edges.
- Thread a yarn needle with matching dusty-blue yarn.
- Work small mattress stitches through the outer loops of both motifs.
- Pull the yarn gently to close the seam.
- Continue until the entire shared edge is joined.
- Secure the yarn and weave in the ends.
Method 2: Slip-stitch crochet join
- Place two hexagons with wrong sides together.
- Insert the hook through corresponding edge stitches.
- Join the yarn with a slip stitch.
- Continue slip stitching along the shared edge.
- Keep the stitches loose enough to prevent puckering.
- FO and weave in the ends.
Continue joining motifs row by row until the full bedspread is assembled.
Part 9: Fill the Outer Edges
A hexagon arrangement naturally creates staggered outer edges. You can preserve this shape for a decorative scalloped effect or fill selected spaces for a straighter border.
Option 1: Keep the hexagon outline
Leave the outer edges in their natural staggered shape.
This creates a soft geometric scallop that highlights the individual motifs.
Option 2: Add partial motifs
Create half-hexagon motifs to fill selected gaps along the sides.
Join the partial motifs to the main bedspread using the same joining method.
Block the edges to create a more rectangular finished shape.
For a romantic lace bedspread similar to the reference image, a softly shaped outer edge is especially attractive.
Part 10: Crochet the Decorative Bedspread Border
A delicate lace border provides a polished finishing touch and helps unify the joined hexagon motifs.
Border Round 1: Foundation
Join dusty-blue yarn at any outer edge.
Work sc evenly around the entire bedspread.
Place additional stitches at corners and reduce stitches where necessary to prevent rippling.
Join with a sl st.
Border Round 2: Openwork lace
Ch 4, skip two stitches, sc in the next stitch.
Repeat around the entire border.
Adjust the spacing at corners to maintain an even appearance.
Border Round 3: Scalloped edging
Work 5 dc into each ch-4 space.
Sc into the next anchoring stitch.
Repeat around the entire border.
Join with a sl st and FO.
Block the completed border gently to define the scalloped edge.
Part 11: Crochet the Matching Lace Pillow Covers
Matching dusty-blue crochet pillow covers create a coordinated bedroom look and complement the floral hexagon bedspread.
Prepare the pillow motifs
Make enough hexagon motifs to cover the front of your chosen pillow insert.
For a 45 × 45 cm pillow, arrange approximately four to six motifs depending on their finished dimensions.
Join the motifs using the same invisible seam or slip-stitch method.
Shape the pillow front
Use partial motifs or small crochet filler sections to create a square or rectangular panel.
Block the completed panel to match the pillow insert dimensions.
Part 12: Crochet the Pillow Back Panels
A simple solid crochet back provides structure and allows the decorative lace front to remain the focal point.
Solid pillow back
Using dusty-blue yarn, ch 81.
Row 1: Sc in the second chain from the hook and across. 80 sc.
Rows 2 onward: Ch 1, turn, and sc across.
Continue until the panel matches the size of the pillow front.
FO and weave in the ends.
Adjust the foundation chain and row count according to your gauge and pillow insert size.
Part 13: Assemble the Pillow Covers
Pillow assembly
- Place the lace front and solid back together with right sides facing outward.
- Align the outer edges.
- Join three sides using sc or slip stitches.
- Insert the pillow form.
- Close the final side using matching yarn.
- Weave in the ends securely.
For a removable pillow cover, add a zipper or button closure along one side instead of sewing it permanently closed.
Part 14: Create a Coordinated Bedroom Set
The finished bedspread and matching pillows can be styled in several beautiful ways.
Romantic cottage bedroom
Pair the dusty-blue crochet bedspread with crisp white bedding, cream accent pillows, natural wood furniture, and soft floral decorations.
Coastal-inspired bedroom
Combine the blue lace with white linen, pale oak furniture, woven baskets, and subtle seaside accents.
Vintage farmhouse bedroom
Style the bedspread with antique-inspired furniture, botanical artwork, ceramic lamps, and neutral textiles.
Elegant classic bedroom
Use upholstered headboards, soft lighting, white bedding, and coordinated blue decorative accessories.
Part 15: Final Blocking and Finishing
Once the bedspread and pillow covers are assembled, complete the finishing process carefully.
- Weave in all remaining yarn ends.
- Inspect the seams between hexagon motifs.
- Check that all motifs lie flat.
- Gently block the entire bedspread in sections if necessary.
- Adjust the outer border into an even shape.
- Allow the crochet fabric to dry completely.
- Check the pillow cover seams.
- Insert the pillow forms and adjust the corners.
- Lay the bedspread over the bed and inspect the drape.
- Make any final adjustments to the border.
Customization Ideas
1. Create a classic ivory lace bedspread
Use warm ivory or cream cotton yarn for a timeless heirloom-style crochet coverlet.
2. Make a two-tone floral design
Crochet the floral centers in white and the outer hexagon borders in dusty blue.
3. Create a pastel bedroom collection
Use soft lavender, blush pink, sage green, or pale blue yarn for a romantic pastel-inspired bedspread.
4. Make a lightweight summer coverlet
Choose thinner cotton yarn and a slightly larger hook for a lighter, airier lace fabric.
5. Add decorative tassels
Attach small matching tassels along selected corners of the bedspread for a bohemian finishing touch.
6. Create a matching throw blanket
Use the same hexagon motifs to make a smaller coordinating throw for a chair, sofa, or reading nook.
Care Instructions
- Follow the care instructions on the yarn label.
- Wash gently using cool water and mild detergent when appropriate.
- Avoid harsh bleach and aggressive agitation.
- Support the weight of the bedspread when lifting it while wet.
- Do not wring or twist the lace fabric.
- Lay flat to dry whenever possible.
- Reshape the motifs while damp.
- Store the bedspread folded in a cool, dry location.
- Avoid hanging heavy lace crochet for long periods, as the weight may stretch the fabric.
Frequently Asked Questions
Is this hexagon crochet bedspread suitable for beginners?
The project is best suited to intermediate or advanced crocheters because it involves lace motifs, geometric shaping, joining techniques, and a large number of repeated pieces.
What yarn works best for a crochet lace bedspread?
Cotton or cotton-blend yarn is recommended for clear stitch definition and durability. DK-weight yarn creates a substantial coverlet, while thinner cotton yarn produces a more delicate lace appearance.
How many hexagon motifs do I need for a queen-size bedspread?
A queen-size bedspread may require approximately 130–160 motifs, but the exact quantity depends on the blocked motif dimensions and desired finished measurements.
Can I make the bedspread in a different color?
Absolutely. Ivory, cream, sage green, lavender, blush pink, and soft gray are beautiful alternatives for this floral hexagon design.
Can I use this pattern to make a smaller blanket?
Yes. Simply reduce the number of hexagon motifs and arrange them into the desired blanket dimensions.
How do I keep the hexagon motifs the same size?
Maintain consistent crochet tension, use the same hook and yarn throughout the project, and block every motif to matching dimensions before joining.
Final Thoughts
This dusty blue hexagon lace crochet bedspread combines traditional crochet artistry with elegant modern bedroom styling. The intricate floral motifs, airy geometric lace, and delicate scalloped edges create a beautiful handmade coverlet that feels both timeless and luxurious.
The repeating hexagon design makes the project enjoyable to work on gradually, while the matching crochet pillow covers create a coordinated and sophisticated finished look.
Whether you make this bedspread for your own bedroom, as a meaningful handmade gift, or as a special heirloom project, the finished piece will showcase the beauty and craftsmanship of handmade crochet.
Enjoyed this pattern? Save it to your crochet inspiration board and share your finished hexagon lace bedspread with fellow crochet lovers.

