Skip to content
✨ FREE Pattern 🎯 Beginner Friendly ⏱️ Single-Day Project

Dusty Pink and Ivory Chunky Crochet Blanket 

⏱️ 3–4 hours
↓ Jump to Pattern
Dusty Pink and Ivory Chunky Crochet Blanket 
✨ FREEBeginner Friendly
🪝

Beginner Friendly

Perfect for those just starting their crochet journey, with clear instructions and simple techniques

⏱️

Single-Day Project

A satisfying project you can complete in a single afternoon or evening.

🎀

Handmade Gift

A beautiful keepsake — free forever. Read online or print at home.

About This Dusty Pink and Ivory Chunky Crochet Blanket 

Dusty Pink and Ivory Chunky Crochet Blanket – Free Pattern

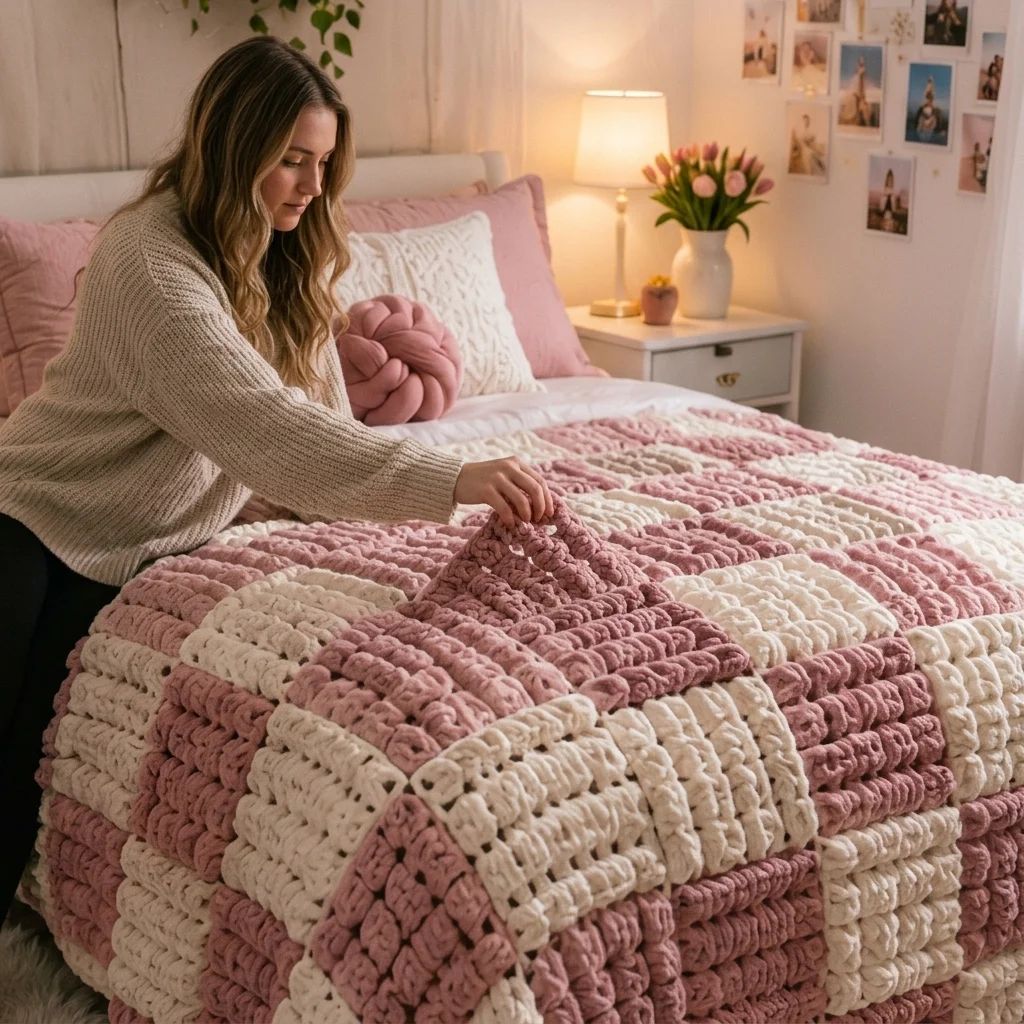
Wrap yourself in softness with this beautiful dusty pink and ivory chunky crochet blanket. Featuring plush raised stitches, thick cozy yarn, and alternating bands of muted pink and creamy ivory, this handmade blanket creates a warm and inviting bedroom atmosphere.

The oversized texture gives the blanket a luxurious appearance, while the gentle color combination makes it perfect for feminine bedrooms, cozy winter evenings, thoughtful handmade gifts, and elegant home decoration.

This free crochet blanket pattern uses a combination of basic stitches and textured puff-style rows to create a thick, soft fabric with plenty of dimension.

Pattern at a Glance

Skill levelConfident beginner
ProjectChunky crochet blanket
Suggested size140 × 180 cm
Yarn weightSuper bulky / jumbo
Hook size10–12 mm
ColorsDusty pink and ivory
ConstructionFlat rows
TerminologyUS crochet terms

Materials and Supplies

  • Approximately 1,400–1,800 m of super bulky chenille or plush blanket yarn, depending on gauge and finished size.
  • Dusty pink yarn: approximately half the total yardage.
  • Ivory yarn: approximately half the total yardage.
  • 10–12 mm crochet hook, adjusted to suit your yarn.
  • Large-eye yarn needle suitable for plush yarn.
  • Scissors.
  • Stitch markers.
  • Measuring tape.
Important: Plush yarn varies greatly in thickness and yardage. Purchase yarn based on your measured swatch rather than relying only on skein counts. The reference photograph shows a very thick raised texture; this pattern recreates a similar cozy effect using staggered puff stitches.

Abbreviations

ch – Chain
sc – Single crochet
hdc – Half double crochet
dc – Double crochet
sl st – Slip stitch
st – Stitch
sp – Space
yo – Yarn over
RS – Right side
WS – Wrong side
FO – Fasten off

Special Stitch: Chunky Puff Stitch

How to Make a Chunky Puff Stitch

  1. Yarn over and insert the hook into the indicated stitch.
  2. Yarn over and pull up a long loop to approximately double crochet height.
  3. Repeat the yarn-over and pull-up motion three more times in the same stitch.
  4. You should now have 9 loops on the hook.
  5. Yarn over and carefully pull through all 9 loops.
  6. Chain 1 to secure the puff.

Keep the loops relaxed and even. Plush yarn can make tight puff stitches difficult to complete.

In this pattern, each puff stitch and its securing chain together count as one stitch position.

Gauge and Sizing

Before beginning the full blanket, crochet a sample swatch using the stitch repeat described below.

Suggested gauge

Approximately 8 stitch positions and 8 rows = 15 cm after gentle measuring.

This is a target gauge, not a guaranteed result. Your yarn and hook may produce a different measurement.

For a blanket approximately 140 cm wide, the sample instructions begin with 74 foundation chains, producing 73 stitches.

Adjust the foundation chain in multiples of 4, plus 2 chains, to maintain the staggered texture repeat.

Part 1: Crochet the Foundation Chain

Begin with dusty pink yarn.

Foundation instructions

Foundation: Ch 74.

Row 1: Hdc in the second chain from the hook and in every chain across. (73 hdc)

Row 2: Ch 1, turn. Hdc in every stitch across. (73 hdc)

These two rows create a stable foundation for the textured blanket.

Part 2: Begin the Raised Puff Texture

The blanket’s signature appearance comes from raised puff stitches arranged in alternating rows.

First textured row

Row 3: Ch 1, turn.

  1. Work 1 hdc in the first stitch.
  2. Repeat the following sequence 18 times: puff stitch in the next stitch, then 1 hdc in each of the next 3 stitches.
  3. You will have 18 puff stitches and 73 stitch positions across the row.

Work the puff stitches with consistent height to create an even raised surface.

Part 3: Work the Return Row

Return row

Row 4: Ch 1, turn.

Work 1 hdc into each stitch position across, working into the top of each puff stitch and skipping its securing chain.

Total: 73 hdc.

This row stabilizes the textured stitches and creates a foundation for the next raised row.

Part 4: Create the Staggered Texture

Second textured row

Row 5: Ch 1, turn.

  1. Work 1 hdc in each of the first 3 stitches.
  2. Repeat 17 times: puff stitch in the next stitch, then hdc in each of the next 3 stitches.
  3. Work 1 puff stitch in the next stitch.
  4. Work 1 hdc in the final stitch.

Total: 73 stitch positions, including 18 puff stitches.

The puffs are offset from the previous textured row to create a staggered pattern.

Row 6: Ch 1, turn. Hdc in each stitch position across, skipping puff securing chains. (73 hdc)

Part 5: Repeat the Textured Pattern

Continue working the four-row texture repeat:

Four-row repeat

  1. Repeat Row 3: first puff placement.
  2. Repeat Row 4: plain hdc return row.
  3. Repeat Row 5: staggered puff placement.
  4. Repeat Row 6: plain hdc return row.

Continue until your first dusty pink stripe reaches approximately 20–25 cm in height.

Complete the stripe after a plain hdc row.

Part 6: Change to Ivory Yarn

Changing colors between textured sections creates the beautiful striped design.

Color change instructions

  1. On the final hdc of the dusty pink section, stop before the last yarn-over.
  2. Drop the dusty pink yarn.
  3. Yarn over with ivory and pull through the remaining loops.
  4. Turn and continue the established texture repeat using ivory.
  5. Leave a yarn tail long enough to weave in securely.

Keep color transitions on plain rows whenever possible for a neat finish.

Part 7: Follow the Stripe Sequence

Alternate dusty pink and ivory bands to recreate the soft bedroom color palette.

StripeColorApproximate height
1Dusty pink22 cm
2Ivory22 cm
3Dusty pink22 cm
4Ivory22 cm
5Dusty pink22 cm
6Ivory22 cm
7Dusty pink22 cm
8Ivory22 cm

This sequence gives an approximate blanket length of 176 cm before adding the border.

Measure the actual height of each section, and adjust the number of rows to achieve the desired finished size.


Part 8: Complete the Final Rows

Top finishing rows

After completing the final ivory stripe:

Finishing Row 1: Ch 1, turn. Hdc in every stitch across. (73 hdc)

Finishing Row 2: Ch 1, turn. Hdc in every stitch across. (73 hdc)

FO, leaving a tail long enough to weave in.

These finishing rows help the upper edge lie flat.

Part 9: Crochet the Blanket Border

A simple border gives the chunky blanket a polished finish while allowing the raised texture to remain the main feature.

Border instructions

Join ivory yarn at any corner.

Border Round 1:

  1. Work sc evenly along the first edge.
  2. At each corner, work 3 sc into the corner space.
  3. Continue around all four sides.
  4. Join with a sl st to the first sc.

Border Round 2:

Ch 1. Sc in each stitch around, working 3 sc in the center stitch of each corner group.

Join and FO.

Do not crowd the stitches along the sides, as this may cause the border to ripple.

Part 10: Weave in the Yarn Ends

Finishing instructions

  1. Thread a large-eye yarn needle with the yarn tail.
  2. Weave the tail through several stitches on the wrong side.
  3. Change direction and weave back through neighboring stitches.
  4. Repeat to secure the tail.
  5. Trim the excess yarn carefully.
  6. Repeat for all color changes.

For slippery chenille yarn, secure ends especially carefully according to the yarn manufacturer’s recommendations.

Part 11: Shape the Finished Blanket

Blocking and shaping

  1. Lay the finished blanket on a clean, flat surface.
  2. Gently straighten the edges and corners.
  3. Check that the stripes lie evenly.
  4. Allow the blanket to relax naturally.
  5. If the yarn label permits, use a gentle washing and drying method to settle the stitches.

Avoid high heat, aggressive steaming, or stretching delicate plush yarn.

How to Customize the Blanket Size

Baby blanket

Suggested size: 75 × 95 cm. Reduce the foundation width and number of stripe repeats.

Lap blanket

Suggested size: 100 × 130 cm. Ideal for relaxing on the sofa.

Large throw

Suggested size: 140 × 180 cm. Follow the main pattern measurements.

Bed blanket

Suggested size: 180 × 220 cm. Increase the foundation chain and work additional rows.

To resize, maintain the stitch repeat by using a foundation chain in multiples of four plus two.

Tips for a Beautiful Chunky Blanket

  • Choose soft chenille yarn with consistent thickness.
  • Use a hook large enough to prevent stiff fabric.
  • Keep puff stitch loops loose and even.
  • Count stitches frequently to maintain straight edges.
  • Use stitch markers at the first and last stitches.
  • Change colors at the end of a plain row.
  • Measure stripe height rather than relying only on row counts.
  • Avoid pulling tightly when weaving in ends.
  • Lay the blanket flat regularly to check its shape.

Creative Color Combinations

Dusty pink and ivory

A soft, romantic combination perfect for feminine bedrooms.

Sage green and cream

A calm, natural palette inspired by modern cottage-style interiors.

Beige and white

A timeless neutral combination that complements minimalist decor.

Lavender and ivory

A delicate pastel pairing for a dreamy bedroom atmosphere.

Mocha and oatmeal

A warm, sophisticated option for cozy autumn and winter interiors.

Frequently Asked Questions

Is this chunky crochet blanket beginner-friendly?

Yes. Confident beginners who understand basic crochet stitches can learn the puff stitch repeat with a little practice.

What type of yarn creates the softest blanket?

Super bulky chenille or plush blanket yarn creates a soft, thick fabric. Choose a yarn that feels comfortable against the skin and is suitable for blankets.

Can I make this blanket without puff stitches?

Yes. Replace puff stitch rows with regular half double crochet rows for a simpler striped blanket, although the raised texture will be different.

How much yarn will I need?

For a large chunky blanket, approximately 1,400–1,800 m is a starting estimate. Actual consumption depends heavily on yarn thickness, gauge, stitch height, and finished dimensions.

Can I use three colors instead of two?

Absolutely. Add a third shade, such as warm beige, muted mauve, or light gray, to create a personalized stripe sequence.

How do I keep the blanket edges straight?

Count your stitch positions at the end of every row, mark the edge stitches, and avoid accidentally working into the securing chains of the puff stitches.

Care Instructions

  • Always follow the yarn manufacturer’s washing instructions.
  • Use a gentle wash cycle only if the yarn is machine washable.
  • Wash with cool water and mild detergent.
  • Avoid fabric treatments that may damage plush fibers.
  • Dry flat or use a permitted low-temperature drying method.
  • Avoid high heat.
  • Store folded rather than hanging to prevent stretching.

Final Thoughts

This dusty pink and ivory chunky crochet blanket brings softness, warmth, and beautiful handmade texture into any bedroom.

The alternating pastel stripes and raised puff stitches create a cozy, luxurious look that works beautifully as a bed throw, sofa blanket, or thoughtful handmade gift.

Whether you choose romantic dusty pink, calming sage green, or classic neutrals, this textured crochet blanket is a rewarding project that can be enjoyed for years.

Love this free chunky crochet blanket pattern? Save it to Pinterest and share it with your crochet friends for your next cozy handmade project!

Dusty Pink and Ivory Chunky Crochet Blanket 

The finished Dusty Pink and Ivory Chunky Crochet Blanket 

🧶
Cozy Amigurumi

All our free patterns are tested multiple times by real makers before publishing. We believe clear, beautiful patterns should be free for everyone.

Read Our Story →
🎁

Get Free Patterns in Your Inbox

New free amigurumi patterns every week — no spam, unsubscribe anytime.

🔒 No spam · Unsubscribe anytime · 100% free patterns only

Made this? Share it! 📸 Tag #CozyCrochetPatterns on Instagram or Pinterest

Want More?

372 Free Patterns Waiting for You 🎀

Instant PDF delivery. All tested. All beautiful.

Browse More Free Patterns →
Stay in the Loop

Free patterns + tips every week 📬

Join 1270 crocheters — no spam, just yarny goodness.

We respect your privacy. Unsubscribe anytime. Privacy Policy