Dusty Rose Basketweave Crochet Tote Bag
Advanced
For experienced crocheters who enjoy complex shaping, fine detail, and ambitious construction
Weekend Project
A satisfying weekend make — start Friday, finish Sunday, enjoy forever.
Handmade Gift
A beautiful keepsake — free forever. Read online or print at home.
About This Dusty Rose Basketweave Crochet Tote Bag
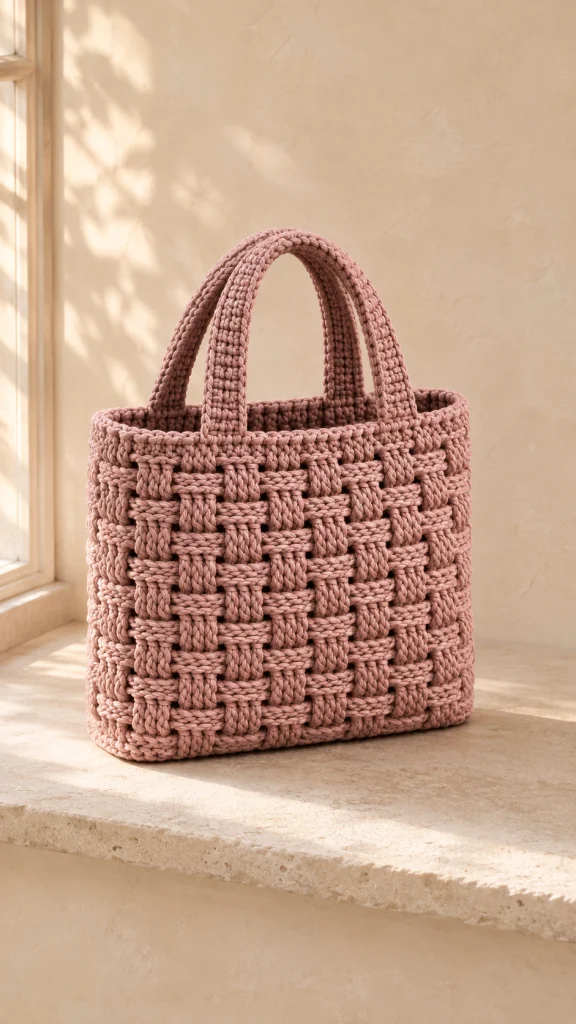
This basketweave crochet tote bag pattern pairs dusty rose cotton cord with raised blocks of post stitches for a compact, structured everyday bag. Two textured panels, a flat base, narrow side gussets, and broad handles give it the upright shape and woven appearance that distinguish the design.
The basketweave alternates groups of three front and back post stitches over two-row bands. Firm single crochet supports the base and sides, while sewn handle tabs and an optional fitted lining help the bag carry its shape. Allow approximately 18–24 hours for crocheting, careful assembly, and lining.
This advanced project suits crocheters comfortable identifying stitch posts from both sides, maintaining dense fabric, and joining pieces with different row gauges. The finished bag measures approximately 32 cm wide, 31 cm high, and 6 cm deep, with a handle drop of about 14 cm.
Materials
- Approximately 850–1,000 m of bulky cotton cord, about 3 mm diameter, in dusty rose; purchase the same dye lot throughout.
- 5 mm crochet hook for the basketweave panels, or size needed for gauge.
- 4.5 mm crochet hook for the single crochet pieces and edging, or size needed for gauge.
- Large blunt tapestry needle suitable for cotton cord.
- Locking stitch markers and removable seam markers.
- Measuring tape and scissors.
- Approximately 70 × 90 cm of medium-weight cotton fabric for the optional lining.
- Two lengths of 25 mm cotton webbing, each 42 cm long, for handle reinforcement.
- Matching strong sewing thread and a sharp hand-sewing needle.
- Optional removable base insert, approximately 30 × 5 cm, with rounded corners.
Abbreviations
chchainscsingle crochetdcdouble crochetFPdcfront post double crochetBPdcback post double crochetsl stslip stitchststitchRSright sideWSwrong sideUS crochet terminology is used throughout. Turning chains never count as stitches. Work ordinary stitches through both top loops unless directed otherwise.
Basketweave Technique and Gauge Swatch
- For FPdc, yarn over, insert the hook from front to back to front around the next stitch post, draw up a loop, then complete a dc. For BPdc, insert from back to front to back around the next post and complete a dc. Each post stitch replaces one stitch; do not also work into its top loops.
- Swatch foundation: with the larger hook, ch 22. Work dc in the third ch from the hook and each remaining ch. Turn. You have 20 stitches: one edge stitch, 18 pattern stitches, and one edge stitch.
- Swatch Row 2: ch 2, dc in the first st; repeat FPdc around each of the next 3 posts, BPdc around each of the next 3 posts, three times; dc in the final st. Turn. 20 stitches.
- Swatch Row 3: ch 2, dc in the first st; repeat BPdc around each of the next 3 posts, FPdc around each of the next 3 posts, three times; dc in the final st. Turn. 20 stitches.
- Swatch Row 4: repeat Swatch Row 3. Turn. 20 stitches.
- Swatch Row 5: repeat Swatch Row 2. Turn. 20 stitches.
- Swatch Rows 6–13: repeat Swatch Rows 2–5 twice. Finish the swatch, let it relax, and measure the central texture without stretching. Each block is 3 stitches wide and 2 texture rows high.
- Make a separate single crochet swatch at least 15 cm square with the smaller hook. Measure a central 10 cm section to confirm 12 stitches and 14 rows.
Front and Back Panels — Make Two
- Foundation and Row 1: with the larger hook, ch 40. Dc in the third ch from the hook and each remaining ch. Turn. 38 stitches. Mark this face as the RS; all odd-numbered rows face the RS while being worked.
- Row 2: ch 2, dc in the first st; repeat FPdc around each of the next 3 posts, BPdc around each of the next 3 posts, six times; dc in the final st. Turn. 38 stitches.
- Row 3: ch 2, dc in the first st; repeat BPdc around each of the next 3 posts, FPdc around each of the next 3 posts, six times; dc in the final st. Turn. 38 stitches.
- Row 4: work as Row 3. Turn. 38 stitches.
- Row 5: work as Row 2. Turn. 38 stitches.
- Rows 6–21: repeat Rows 2–5 four times. Turn after each row. 38 stitches in every row.
- Row 22: work as Row 2. Turn. 38 stitches.
- Row 23: work as Row 3. Turn. 38 stitches.
- Row 24: work as Row 4. Fasten off with a generous sewing tail. 38 stitches. The panel should measure approximately 32 × 30 cm.
- Make the second panel identically. Lay both pieces flat and gently shape them to the same dimensions without pressing the raised texture.
Flat Base
- Row 1: with the smaller hook, ch 39. Sc in the second ch from the hook and each remaining ch. Turn. 38 stitches.
- Rows 2–7: ch 1, sc in every st, turn. 38 stitches in each row.
- Row 8: ch 1, sc in every st. Fasten off. 38 stitches. The base should measure approximately 32 cm long and 5.7 cm deep.
- Mark the midpoint of each long edge between stitches 19 and 20. Mark the midpoint of each short edge between Rows 4 and 5.
Side Gussets — Make Two
- Row 1: with the smaller hook, ch 8. Sc in the second ch from the hook and each remaining ch. Turn. 7 stitches.
- Rows 2–41: ch 1, sc in every st, turn. 7 stitches in each row.
- Row 42: ch 1, sc in every st. Fasten off with a long sewing tail. 7 stitches. Each gusset should measure approximately 5.8 × 30 cm.
- Make a second gusset. On both long edges of each gusset, place markers after Rows 7, 14, 21, 28, and 35, dividing the height into six equal sections.
- On both side edges of each basketweave panel, place markers after Rows 4, 8, 12, 16, and 20. Each 4-row panel section will join to one 7-row gusset section.
Body Assembly
- Keep all seam allowances inside the bag. With RS facing outward, place the base against the lower edge of the front panel. Match the corners and midpoint. Whipstitch through the unused foundation-chain loops of the panel and the corresponding stitches along one long edge of the base, matching all 38 stitches.
- Join the back panel to the other long base edge in the same way. Match 38 stitches to 38 stitches. Keep the seams firm enough to close gaps without drawing in the base.
- Join the 7 foundation stitches of one gusset to one 8-row short edge of the base. Work one seam stitch through each foundation stitch and distribute these seven attachments evenly across the eight row ends. Match the corners first and ease the small difference through the center.
- Attach the second gusset to the opposite short base edge using the same seven evenly spaced attachments.
- Join one long edge of a gusset to the adjacent front-panel side. Match all six marked sections. Within each section, distribute seven seam stitches along the four basketweave row ends, taking secure bites of the edge dc fabric. Do not pull the panel shorter.
- Repeat the measured side seam for the remaining three vertical edges. Each seam joins 42 gusset row ends to 24 panel row ends, organized as six sections of seven rows to four rows.
- Secure all four lower corners with an additional small stitch through the seam intersection. Check that the top edges meet at the same height before weaving in the body assembly tails.
Upper Edge
- Round 1: with the smaller hook and RS facing, join cord in a back-panel top stitch. Ch 1 and sc once in each top stitch around: 38 across the back, 7 across the first gusset, 38 across the front, and 7 across the second gusset. Add no stitches at the seams. Join with sl st to the first sc. 90 stitches.
- Round 2: ch 1, sc in each st around, join with sl st to the first sc. 90 stitches. Fasten off and weave in the tail on the inside.
Reinforced Handles — Make Two
- Row 1: with the smaller hook, ch 7. Sc in the second ch from the hook and each remaining ch. Turn. 6 stitches.
- Rows 2–55: ch 1, sc in every st, turn. 6 stitches in each row.
- Row 56: ch 1, sc in every st. Fasten off with a long sewing tail. 6 stitches. Each handle should measure approximately 5 cm wide and 40 cm long.
- Make the second handle identically. Rest both handles flat and confirm that they have equal lengths before adding reinforcement.
- Center a 42 cm length of cotton webbing along the underside of each handle. Turn under 1 cm at each webbing end so the finished reinforcement is approximately 40 cm long. Sew along both webbing edges with matching thread, catching the crochet securely without showing stitches prominently on the outer face.
- Mark a 4 cm attachment tab at each handle end. Approximately 32 cm of handle remains free between the tabs.
Handle Placement and Attachment
- Number the front-panel top stitches 1–38 from left to right as viewed from the outside. Center the first handle end over stitches 6–11 and the other end over stitches 28–33. Both attachment zones contain 6 stitches.
- Place the 4 cm tabs against the outside of the front panel, with the handle ends pointing toward the base and the free handle rising above the opening. Keep the webbing facing toward the panel at the attachment tabs.
- Using strong sewing thread, sew each tab around its perimeter and add a diagonal cross through the rectangle. Stitch through the webbing and crochet, catching several structural strands rather than isolated loops. Use the cord tails for a discreet additional securing pass around each tab edge.
- Attach the second handle to the corresponding stitch positions on the back panel. Set the bag upright and confirm equal handle height, an untwisted grip, and a drop of approximately 14 cm before securing the final thread ends.
Optional Fitted Lining
- Measure the assembled bag inside without stretching it. For the nominal size, cut two lining panels 34 × 32 cm, two side panels 8 × 32 cm, and one base 34 × 8 cm. These dimensions include 1 cm seam allowances and a 2 cm upper hem allowance; the sewn lining body is approximately 32 × 29 × 6 cm.
- With fabric right sides together, sew each main panel to a long base edge using a 1 cm seam allowance. Stop each seam 1 cm before both corners.
- Sew the lower edge of each side panel to a short base edge with a 1 cm seam allowance, again stopping 1 cm before the corners.
- Sew the four vertical seams with 1 cm allowances, carefully meeting the base seam endpoints. Press the seams and turn the upper edge 1 cm to the wrong side, then another 1 cm; stitch the hem.
- Place the lining inside the bag with its wrong side toward the crochet. Align corners and side seams. Slipstitch the folded upper edge just below the crochet rim, covering the handle-attachment stitching inside. Let the lining base rest on the bag base so its upper seam does not carry the contents.
Finishing
Work all remaining cord tails through several sturdy stitches on the inside, reversing direction once before trimming. Smooth the base corners by hand and let the bag rest upright with a folded towel inside. Keep the basketweave raised; heavy pressing will flatten its texture.
If using a removable base insert, round its corners and cover it with a fabric sleeve before placing it inside the lining. Check every handle tab and seam with a light load before regular use. The finished tote should stand with a level rim and handles that meet comfortably in your hand.
Tips for Success
- Read the post stitches from the side currently facing you. The row sequence accounts for turning; changing it by eye can interrupt the two-row blocks.
- Keep the edge dc stitches easy to identify. They provide a stable sewing margin beside the raised texture.
- Pin all six sections of each vertical seam before sewing. This distributes the difference between the two row gauges evenly.
- Reinforce handles before attachment so the webbing lies flat and reaches into both sewn tabs.
- Measure the actual interior before cutting fabric if your gauge differs from the stated dimensions.
Common Mistakes to Avoid
- Adding stitches above the post stitches creates a flared panel. Each post stitch uses one stitch position; leave its top loops unworked.
- Counting the turning chain as a stitch changes the 38-stitch panel width. Work the first and last dc into the actual edge stitches.
- Matching one gusset row to one panel row puckers the body. Use seven gusset rows for every four panel rows.
- Adding corner stitches to the upper edging makes the opening ripple. Round 1 contains exactly 90 stitches.
- Attaching handles only along their upper edge allows them to peel away. Sew the full 4 cm tabs with perimeter stitching and a diagonal cross.
Ways to Customize This Pattern
- Choose cocoa, oatmeal, or muted terracotta cord of the same diameter while retaining the dusty rose version’s sculpted texture.
- Add a fabric pocket to one lining panel before assembling the lining. Keep the pocket clear of the upper hem and side seam allowances.
- For a wider tote, add 6 stitches to each main panel and 6 stitches to the base width. At the stated gauge, each addition increases width by approximately 5 cm and adds 12 stitches to the rim count.
- For a taller tote, add 4 basketweave rows to each panel and 7 single crochet rows to each gusset. This adds approximately 5 cm of height while preserving the seam ratio.
- Use a contrasting lining and matching webbing for a subtle color detail visible when the bag opens.
Frequently asked questions
The basket effect comes from alternating front and back post double crochet. The fabric is crocheted in rows; there are no separate strips to weave through it.
Single crochet rows are shorter than the basketweave rows at the specified gauges. Both pieces measure approximately 30 cm high. Joining seven gusset rows to four panel rows keeps their edges aligned.
You can, but its thickness and elasticity vary widely. Make both gauge swatches, check the weight of the fabric, and reinforce the handles. Cut the lining from the assembled bag’s measurements.
The bag can be used without one, although the post-stitch texture has small openings and cotton cord can relax under load. A fitted lining helps contain small belongings; handle reinforcement remains useful with either finish.
The finished Dusty Rose Basketweave Crochet Tote Bag

