Earthtone Ripple Crochet Blanket with Tassels
Advanced
For experienced crocheters who enjoy complex shaping, fine detail, and ambitious construction
Weekend Project
A satisfying weekend make — start Friday, finish Sunday, enjoy forever.
Handmade Gift
A beautiful keepsake — free forever. Read online or print at home.
About This Earthtone Ripple Crochet Blanket with Tassels
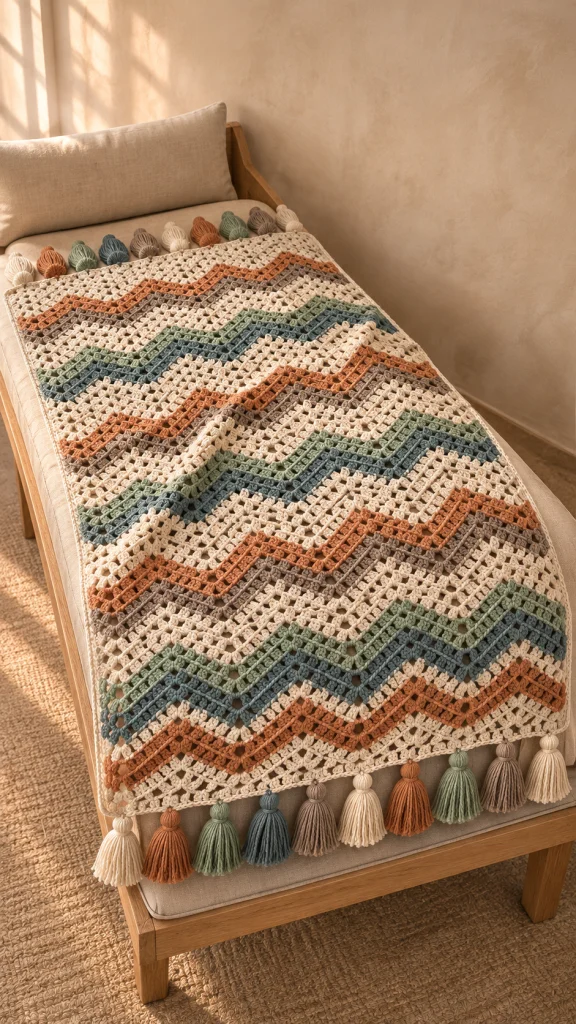
This Earthtone ripple crochet blanket pattern brings together creamy openwork, raised stitches and bands of terracotta, warm taupe, sage and dusty blue. The finished throw has a flowing chevron surface and substantial tassels at both short ends, echoing the relaxed proportions of a blanket draped over a favorite chair.
The blanket is worked in one piece, with carefully placed increases and skipped stitches forming the waves. Eyelet rows lighten the cream bands, while bobbles and back-loop rows give the colored stripes extra definition. A narrow border follows the rippled ends instead of filling them into straight edges.
Allow approximately 65–85 hours for the crochet and tassels, followed by blocking and drying. This advanced project suits crocheters who are comfortable reading their stitches, maintaining a shaped repeat and checking counts across long rows. The instructions are an original interpretation of the pictured blanket concept; they have not been physically tested.
Materials
- DK / light weight 3 yarn in a smooth cotton–acrylic blend, approximately 5,000 yards total, including tassels and a working allowance.
- Cream: approximately 2,800 yards.
- Terracotta: approximately 600 yards.
- Warm taupe: approximately 550 yards.
- Sage: approximately 550 yards.
- Dusty blue: approximately 500 yards.
- 4.5 mm crochet hook, or size needed for gauge.
- Twenty-one locking stitch markers for repeat and edge tracking.
- Tapestry needle.
- Scissors.
- Measuring tape.
- Blocking mats and rustproof pins.
- A rigid card approximately 6 inches tall for making tassels.
Abbreviations
chchainscsingle crochetdcdouble crochetsl stslip stitchststitchstsstitchesBLOback loop onlyRSright sideWSwrong sideyoyarn overUS crochet terminology is used throughout. Turning chains never count as stitches. Each ch-1 space counts as one stitch position when checking the 221-position row count.
Gauge, Repeat and Special Stitches
- Target blocked gauge: four horizontal ripple repeats measure approximately 11 inches; eight pattern rows measure approximately 4 inches. Measure away from the foundation and outside edges.
- The blanket has 20 horizontal repeats and 221 stitch positions per row. The foundation formula is 11 × the desired number of repeats + 1 sc; chain one more than that number to begin.
- For a four-repeat swatch, ch 46 and sc in the second ch from the hook and every remaining ch: 45 sc. Work Rows 1–20 below, using three interior repeat groups instead of nineteen. Every pattern row has 45 positions. The swatch should measure approximately 11 inches across and 10 inches along its center after blocking.
- Bobble: yo, insert the hook into the indicated st, yo and draw up a loop, yo and draw through two loops; repeat that partial dc four more times in the same st. There are six loops on the hook. Yo and draw through all six loops. Do not add a closing chain. One bobble counts as one st.
- A plain slope uses four consecutive stitches: dc in each of the next four sts.
- An eyelet slope uses four consecutive positions: dc in the next st, ch 1, skip the next st, dc in each of the next two sts. This produces three dc and one ch-1 space.
- A textured slope uses four consecutive stitches: dc in the next st, bobble in the next st, dc in each of the next two sts. This produces three dc and one bobble.
- On the row after an eyelet row, work one dc into each ch-1 space whenever the instructions reach that position. Treat the space as one position when counting a slope or a valley skip.
- For BLO rows, insert the hook into the back loop of each stitch, including each stitch used for a peak or edge increase. When the preceding row contains a ch-1 space, work into the space itself.
Foundation and Ripple Construction
- With cream, ch 222 loosely. Sc in the second ch from the hook and in every remaining ch: 221 sc. This foundation row is separate from the 140 numbered pattern rows.
- Plain ripple row: ch 2 and turn. Work 2 dc in the first st, work one plain slope, skip the next two sts, work one plain slope. Repeat the following group nineteen times: 3 dc in the next st, work one plain slope, skip the next two sts, work one plain slope. Work 2 dc in the final st: 221 dc.
- Eyelet ripple row: ch 2 and turn. Work 2 dc in the first st, work one eyelet slope, skip the next two sts, work one eyelet slope. Repeat the following group nineteen times: 3 dc in the next st, work one eyelet slope, skip the next two sts, work one eyelet slope. Work 2 dc in the final st: 181 dc and forty ch-1 spaces, totaling 221 positions.
- Textured ripple row: ch 2 and turn. Work 2 dc in the first st, work one textured slope, skip the next two sts, work one textured slope. Repeat the following group nineteen times: 3 dc in the next st, work one textured slope, skip the next two sts, work one textured slope. Work 2 dc in the final st: 181 dc and forty bobbles, totaling 221 sts.
- BLO ripple row: work the complete plain ripple row through back loops as described above: 221 dc.
- Count check for every row: the two edge increases add two stitches, nineteen interior peaks add thirty-eight stitches, and twenty valley skips remove forty stitches. The row therefore remains at 221 positions.
- Designate odd-numbered pattern rows as RS rows and even-numbered rows as WS rows. Bobbles are worked on WS rows; push them toward the RS before working the following row.
Twenty-Row Stripe Sequence
- Row 1, cream: work the plain ripple row: 221 dc.
- Row 2, cream: work the textured ripple row: 181 dc and forty bobbles.
- Row 3, cream: work the eyelet ripple row: 181 dc and forty ch-1 spaces.
- Row 4, cream: work the BLO ripple row, working into each ch-1 space as encountered: 221 dc.
- Row 5, terracotta: work the plain ripple row: 221 dc.
- Row 6, terracotta: work the textured ripple row: 181 dc and forty bobbles.
- Row 7, warm taupe: work the plain ripple row: 221 dc.
- Row 8, warm taupe: work the BLO ripple row: 221 dc.
- Row 9, cream: work the plain ripple row: 221 dc.
- Row 10, cream: work the textured ripple row: 181 dc and forty bobbles.
- Row 11, cream: work the eyelet ripple row: 181 dc and forty ch-1 spaces.
- Row 12, cream: work the BLO ripple row: 221 dc.
- Row 13, sage: work the plain ripple row: 221 dc.
- Row 14, sage: work the textured ripple row: 181 dc and forty bobbles.
- Row 15, dusty blue: work the plain ripple row: 221 dc.
- Row 16, dusty blue: work the BLO ripple row: 221 dc.
- Row 17, cream: work the plain ripple row: 221 dc.
- Row 18, cream: work the textured ripple row: 181 dc and forty bobbles.
- Row 19, cream: work the eyelet ripple row: 181 dc and forty ch-1 spaces.
- Row 20, cream: work the BLO ripple row: 221 dc.
Blanket Layout and Color Changes
- Work the twenty-row sequence seven times in total: 140 pattern rows above the foundation. The body measures approximately 55 × 70 inches at the stated blocked gauge.
- The complete layout uses 84 cream rows and fourteen rows each of terracotta, warm taupe, sage and dusty blue. Cream separates the warm and cool stripe pairs.
- At each color change, complete the final dc of the preceding row up to its last pull-through. Draw the new color through the remaining two loops, then make the turning ch with the new color.
- Cut the old color, leaving a 6-inch tail. Do not carry unused colors along the side; the narrow border is intended to cover a clean edge rather than a bundle of strands.
- After Row 140, fasten off. There is no motif assembly or joining seam: the full blanket is a single continuous panel.
- For another width, use the foundation formula and change the nineteen interior groups to one fewer than your chosen repeat count. For another length, add or remove complete twenty-row sequences; each sequence adds approximately 10 inches.
Narrow Cream Border
- With the RS facing, join cream in the first stitch of Row 140 at a short-end corner. Mark all four outside corners. The internal ripple peaks and valleys are not border corners.
- Round 1, first short end: ch 1, work 3 sc in the joining stitch and one sc in each of the next 219 sts, then 3 sc in the final st: 225 sc along this end. Follow the ripple contour without adding extra stitches at its internal peaks.
- Round 1, first long side: work 2 sc around the end of each of the 140 pattern rows: 280 sc. Do not add a separate stitch around the foundation-row end.
- Round 1, foundation short end: work into the unused foundation-chain loops below the sc. Work 3 sc in the first loop, one sc in each of the next 219 loops, and 3 sc in the final loop: 225 sc.
- Round 1, second long side: work 2 sc around the end of each of the 140 pattern rows: 280 sc. Join with a sl st to the first sc: 1,010 sc around. Mark the middle sc of each three-stitch outside corner.
- Round 2: ch 1. Sc in every stitch around, working 3 sc in each of the four marked corner stitches. Move each marker into the middle stitch of its new corner group. Join with a sl st to the first sc: 1,018 sc. Fasten off.
- Lay the border flat before weaving in its tails. If a long edge ruffles or draws inward, adjust the border hook size and sample the edge again; the stated counts assume the supplied row gauge.
Twenty Full Tassels
- Make twenty tassels, ten for each short end. For each end, use this color order from left to right with the RS facing: cream, terracotta, sage, dusty blue, warm taupe, cream, terracotta, sage, warm taupe, cream. Overall quantities are six cream, four terracotta, four sage, two dusty blue and four warm taupe tassels.
- For each tassel, wrap its yarn around the 6-inch card forty times at an even, relaxed tension. Slide a separate 16-inch strand beneath the wraps at one end and tie firmly around the bundle.
- Slide the bundle from the card and cut through all loops at the opposite end. Fold the bundle at its top tie so the cut strands hang together.
- Wrap an 18-inch strand tightly around the bundle approximately ¾ inch below the top. Make eight close wraps, secure the ends with a firm knot and bury them inside the tassel head.
- Trim the tassel to approximately 5 inches from its attachment point. Repeat until all twenty tassels are made.
- On each short end, mark ten attachment positions approximately evenly along the border, placing the first and last about 1 inch inward from the outside corners. Measure along the relaxed ripple contour and divide the distance between those two marks into nine equal intervals.
- Use the top tie strands to sew each tassel through the border and the underlying blanket edge at its mark. Pass through twice, secure the strands on the WS and bury their ends through several stitches. Ten tassels are attached to each end.
Finishing
- Before attaching the tassels, weave each yarn tail through the backs of several matching-color stitches. Reverse direction once to help secure it without tightening the fabric.
- Wash the blanket according to the yarn label. Support its weight when lifting it, press out water gently and lay it flat. Shape the body to approximately 55 × 71 inches including the border, measured along the center of the blanket.
- Ease each ripple into a regular wave. Keep the long sides parallel and let the short ends retain their chevron outline. Leave the blanket flat until completely dry.
- Attach the tassels after the blanket dries. Smooth the strands by hand and trim any uneven ends. The finished length is approximately 81 inches including the tassels.
The cream spaces should open gently while the bobbles remain rounded. Give the blanket a final check for loose tails and secure tassel ties before folding it over a chair or laying it across a bed.
Tips for Success
- Place a marker in the center dc of each interior three-dc peak. Move it as you work the next row to catch sideways drift early.
- Count each four-position slope separately on eyelet rows. A chain space replaces one stitch; it does not add a fifth position.
- Push every WS bobble toward the RS before the next row encloses its top.
- Check width after the first complete twenty-row sequence. Early blocking gives a better size estimate than measuring freshly crocheted fabric.
- Wrap every tassel with the same card and number of turns so the fringe hangs evenly.
Common Mistakes to Avoid
- Adding stitches into the turning chain widens the blanket. Work the final two dc into the last actual stitch only.
- Skipping three positions at a valley narrows the row. Skip exactly two positions at every valley.
- Working two dc into a ch-1 space changes the count. Work one dc into that space on the following row.
- Adding a closing chain after a bobble creates an extra position. Close the bobble by drawing through all six loops and move directly to the next stitch.
- Putting corner increases at every ripple peak makes the border flare. Use three-sc increases only at the four outside corners.
Ways to Customize This Pattern
- For a narrower throw, use sixteen repeats: ch 178, make 177 foundation sc and use fifteen interior groups per ripple row. Expected body width is approximately 44 inches.
- For a longer blanket, work eight complete stripe sequences for 160 pattern rows and approximately 80 inches of body length. Recalculate long-edge border counts at two sc per pattern row.
- Swap terracotta for muted rose and dusty blue for charcoal while keeping the cream bands and existing row order.
- Replace tassels with a clean edge by omitting the entire tassel component. The blanket then finishes at approximately 55 × 71 inches.
- For a quieter texture, replace each textured row with a plain ripple row. Keep the same shaping and 221-stitch count; reswatch because the row gauge and yarn use may change.
Frequently asked questions
The straight foundation must settle into the newly formed waves. A little movement is expected, but a tight foundation can cause persistent puckering. Make the starting chain with a larger hook if necessary, then return to the gauge hook for the foundation sc and pattern rows.
Count each dc as one position and each ch-1 space as one position. A full-width eyelet row contains 181 dc and forty spaces, giving the same 221 positions as a plain row.
The supplied border follows the chevrons. Straightening the ends requires a separate graduated-height fill pattern, so additional plain border rounds will not achieve that shape. Keep the rippled ends for this version.
Yes, but make and block the four-repeat swatch first. Multiply its measured width by five to estimate this blanket’s width, and multiply its twenty-row height by seven to estimate body length. Expect different yarn requirements and a heavier finished blanket.
The finished Earthtone Ripple Crochet Blanket with Tassels

