Easy Crochet Hobo Bag Pattern
Beginner Friendly
Perfect for those just starting their crochet journey, with clear instructions and simple techniques
Single-Day Project
A satisfying project you can complete in a single afternoon or evening.
Handmade Gift
A beautiful keepsake — free forever. Read online or print at home.
About This Easy Crochet Hobo Bag Pattern
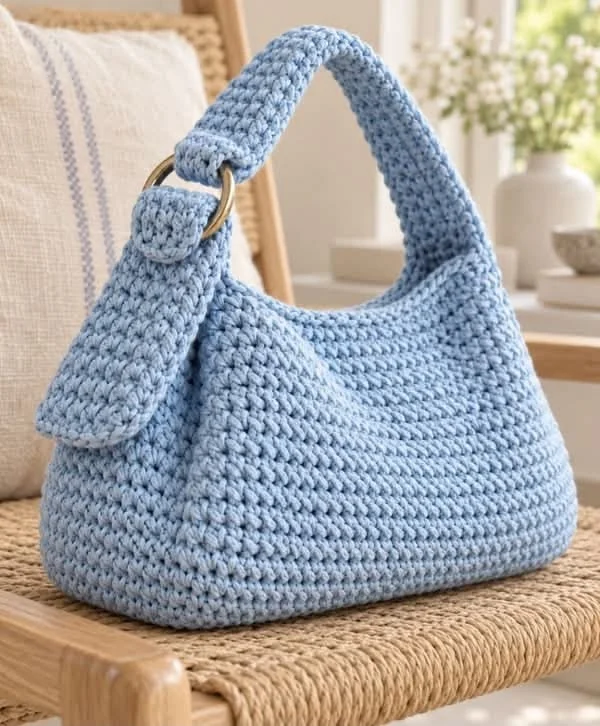
This crochet hobo bag pattern creates a soft, structured shoulder bag with a beautifully curved silhouette. The simple textured stitches give the bag a modern handmade finish, while the wide crochet strap makes it comfortable enough for everyday use.
A decorative metal ring and small crochet tab add a polished detail without making the construction complicated. The finished bag can be made in soft blue like the reference design or customized in any color.
Materials
- Bulky cotton yarn or cotton cord approx. 400–500 g
- 5–6 mm crochet hook adjust to yarn
- Metal ring 30–40 mm diameter
- Yarn needle 1
- Scissors 1 pair
- Stitch markers 4
- Magnetic snap optional
- Fabric lining optional
Abbreviations – US Terms
chchainsl stslip stitchscsingle crochethdchalf double crochetincincreasedecdecreaseBLOback loop onlyststitchFOfasten offPart 1 – Crochet the Foundation
Using light-blue yarn, ch 31.
Round 1: Starting in the 2nd ch from hook, sc in each chain across.
Work 3 sc into the final chain.
Continue along the opposite side of the foundation chain, working 1 sc in each stitch.
Work 2 additional sc into the first chain and join with sl st.
This creates the beginning of an oval base.
Part 2 – Expand the Oval Base
Round 2: ch 1, sc across the straight section.
At the curved end, work increases evenly through the 3 corner stitches.
Continue sc along the opposite side and repeat the increases at the second curve.
Rounds 3–6: Continue increasing only around both curved ends.
The center sections should remain straight while the ends become smoothly rounded.
Part 3 – Establish the Bag Body
Once the base measures approximately 30–32 cm / 12–12.5 in, stop increasing.
Work one round of sc in BLO.
This creates a subtle turning line between the base and the sides.
Continue working sc in both loops for the following rounds.
Part 4 – Build the Lower Body
Work approximately 8–10 rounds of sc without increases.
Keep your tension firm and consistent.
The sides will begin rising vertically from the oval base.
Part 5 – Create the Rounded Hobo Shape
To create the characteristic fuller middle section, add a few gradual increases.
Place a stitch marker at each side of the bag.
Every second round, work:
2 sc in the stitch before the marker, sc in marked stitch, 2 sc in next stitch.
Repeat at the opposite side.
Work approximately 4 increase rounds.
Part 6 – Work the Main Body
Continue crocheting evenly without increases.
Work until the bag measures approximately 20–22 cm / 8–8.5 in from the bottom.
The body should now have a softly rounded, roomy silhouette.
Part 7 – Begin Shaping the Upper Edge
Place markers approximately one-quarter of the way around from each side.
Begin decreasing gradually toward the center front and center back.
On a shaping round, work:
sc across, sc2tog at each marked shaping point.
Work one plain round between decrease rounds.
Part 8 – Form the Curved Opening
Continue the gradual decreases for approximately 5–7 rounds.
The upper opening should become narrower while the lower body remains full.
Do not decrease too quickly—the bag should have a gentle curved shoulder rather than a sharp triangular shape.
Part 9 – Strengthen the Top Edge
Work one complete round of tight sc around the upper opening.
Work a second round if your yarn is particularly soft.
FO and weave in the yarn end.
Part 10 – Crochet the Main Shoulder Strap
Ch 9.
Row 1: sc in 2nd ch from hook and across. (8 sts)
Row 2: ch 1, turn, sc across.
Repeat Row 2 until the strap measures approximately 55–65 cm / 22–26 in.
For a more textured appearance, work the rows in BLO.
Part 11 – Strengthen the Strap
Work one row of sl sts along each long side of the strap.
This helps reduce stretching.
If using very soft yarn, make the strap slightly shorter because it will naturally lengthen with use.
Part 12 – Attach the First Strap End
Position one end of the strap approximately 5–7 cm / 2–3 in below the upper edge of the bag.
Sew through several rows of the bag body.
Use multiple passes of yarn to create a strong attachment.
The strap should appear to flow naturally from the side of the bag.
Part 13 – Add the Metal Ring
Thread the opposite end of the crochet strap through the metal ring.
Fold approximately 4–5 cm / 1.5–2 in of the strap back onto itself.
Sew the folded section securely.
The ring should sit near the upper side of the bag.
Part 14 – Crochet the Decorative Side Tab
Ch 7.
Row 1: sc in 2nd ch from hook and across. (6 sts)
Continue in rows until the tab measures approximately 15–18 cm / 6–7 in.
For a rounded end, decrease once at each side over the final two rows.
Part 15 – Make the Ring Loop
At the upper end of the decorative tab, continue crocheting a narrower extension.
Wrap this section through the metal ring.
Fold it back toward the tab and sew securely.
The decorative tab should hang naturally against the side of the bag.
Part 16 – Attach the Decorative Tab
Position the bottom portion of the tab against the side of the bag.
Sew only the upper section firmly to the bag.
Leave the lower portion slightly loose so it maintains the relaxed layered appearance of the original design.
Part 17 – Shape the Bag
Place a folded towel inside the bag.
Gently shape the bottom corners outward.
Curve the upper sides inward toward the opening.
Allow the bag to rest overnight so the crochet fabric settles into its final shape.
Part 18 – Optional Magnetic Closure
For additional security, attach a magnetic snap inside the center opening.
Reinforce the area with a small piece of felt or fabric before installing the snap.
Position the closure low enough that it remains invisible from the outside.
Part 19 – Optional Fabric Lining
Trace the finished bag body onto folded fabric.
Add approximately 1.5 cm / ½ in seam allowance.
Cut two pieces and sew the sides and bottom together.
Fold the upper raw edge inward.
Insert the lining and hand-sew it around the inside upper edge of the bag.
Part 20 – Optional Interior Pocket
Cut a small fabric rectangle approximately 18 × 14 cm / 7 × 5.5 in.
Fold and stitch the raw edges.
Sew the pocket onto the lining before inserting the lining into the bag.
This creates a useful compartment for keys, cards or a phone.
Part 21 – Reinforce the Strap Attachments
Turn the bag inside out.
Using matching yarn, sew several additional passes through each strap attachment point.
Work through a wide section rather than concentrating all stitches in one small area.
This distributes the weight more evenly.
Part 22 – Final Edge Finish
Join yarn at the bag opening.
Work one final round of sl sts around the entire upper edge.
Keep the stitches relaxed enough that the opening does not pucker.
FO invisibly.
Part 23 – Final Finishing
Weave in every yarn end securely.
Check the metal ring attachment.
Gently stretch and shape the strap.
Adjust the side tab so it falls naturally over the bag.
Lightly steam-block the bag if permitted by your yarn label.
Suggested Color Variations
Soft classic: powder blue like the reference design.
Natural: oatmeal, cream or warm beige.
Autumn: chocolate brown, caramel or burgundy.
Modern: black, charcoal or olive green.
Spring: sage green, dusty pink or lavender.
Care Instructions
Hand wash in cool water using a mild detergent.
Do not twist or wring the bag.
Press excess water gently between towels.
Stuff the bag lightly with clean towels and allow it to dry naturally in shape.
Avoid hanging the bag while wet because the strap may stretch.
Frequently Asked Questions
A firm cotton, cotton-blend or braided cotton cord works best. The yarn should have enough structure to hold the rounded silhouette while remaining flexible.
Yes. Begin with a longer foundation chain and continue increasing the oval base until it reaches your desired width. Add additional body rounds to increase the height.
Yes. Continue repeating the strap row until it reaches your preferred length. Remember that crochet straps can stretch slightly after the bag is filled.
No. The strap can be sewn directly to both sides of the bag. The ring is primarily a decorative detail that gives the design a more polished handbag appearance.
A lining is optional, but it is recommended if the bag will carry small or heavy items. It also helps prevent the crochet body from stretching over time.
The finished Easy Crochet Hobo Bag Pattern

