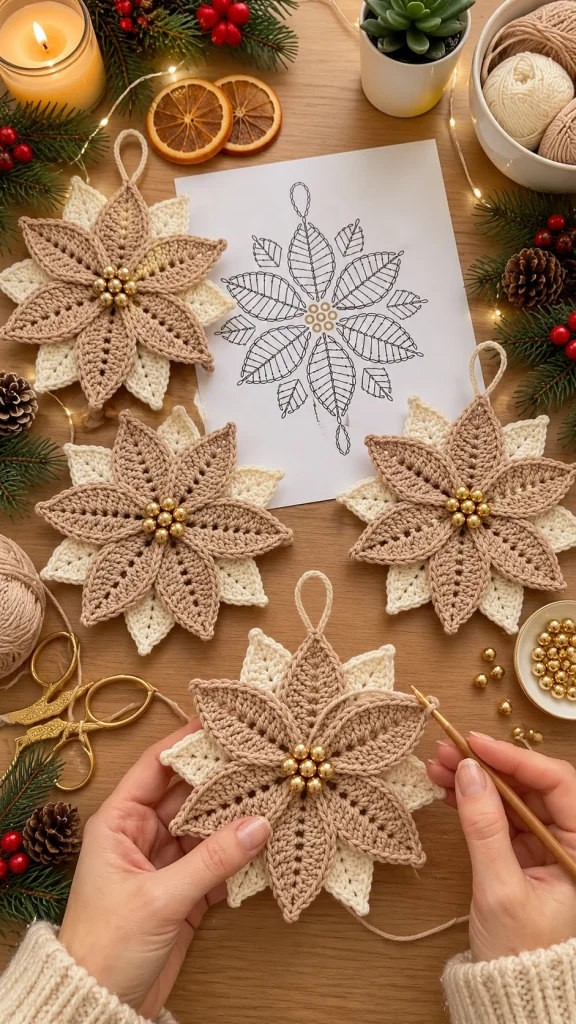
Elegant Beige & Ivory Crochet Poinsettia Ornament – Free Christmas Pattern
Add a touch of timeless elegance to your Christmas decorations with this beautiful beige and ivory crochet poinsettia ornament. Inspired by delicate winter flowers, this handmade decoration features two layers of pointed crochet petals, a sparkling golden pearl center, and a matching hanging loop.
The combination of warm beige and soft ivory creates a sophisticated neutral Christmas decoration that looks beautiful on traditional trees, rustic wreaths, wrapped gifts, and festive garlands.
This free crochet poinsettia pattern will guide you through creating the individual petals, assembling the layered flower, adding decorative gold beads, and finishing the ornament with a hanging loop.
Pattern at a Glance
Materials and Supplies
- DK-weight cotton yarn in warm beige or light taupe.
- DK-weight cotton yarn in soft ivory or cream.
- 3 mm crochet hook.
- Yarn needle.
- Scissors.
- Stitch markers.
- 7 small golden pearl-style beads for the flower center.
- Strong sewing thread for attaching beads.
- Optional fabric stiffener.
- Blocking mat and rustproof pins.
Color Palette
Abbreviations
Unless otherwise stated, turning chains do not count as stitches.
Understanding the Poinsettia Construction
The ornament is assembled from two separate flower layers:
- Front layer: Six pointed beige petals.
- Back layer: Six pointed ivory petals.
- Center: A cluster of seven golden pearl-style beads.
- Hanging loop: A matching crocheted cord.
The beige petals sit over the ivory petals, with the lower layer rotated so its pointed tips appear between the front petals.
Part 1: Crochet the Beige Front Petals
Make six matching pointed petals using warm beige yarn.
Each petal is worked in rows from the narrow tip toward the wider base. A decorative border is added afterward to define its pointed shape.
Beige petal instructions – make 6
Row 1: Ch 2. Work 2 sc in the second chain from the hook. (2)
Row 2: Ch 1, turn. Inc in both stitches. (4)
Row 3: Ch 1, turn. Sc across. (4)
Row 4: Ch 1, turn. Inc, 2 sc, inc. (6)
Row 5: Ch 1, turn. Sc across. (6)
Row 6: Ch 1, turn. Inc, 4 sc, inc. (8)
Row 7: Ch 1, turn. Sc across. (8)
Row 8: Ch 1, turn. Inc, 6 sc, inc. (10)
Row 9: Ch 1, turn. Sc across. (10)
Row 10: Ch 1, turn. Inc, 8 sc, inc. (12)
Rows 11–12: Ch 1, turn. Sc across. (12)
FO, leaving a 20 cm sewing tail at the wide base.
Part 2: Create the Raised Petal Veins
The photograph features textured central veins and diagonal stitch lines that give each petal a realistic poinsettia appearance.
Surface crochet detailing
- Place one beige petal with the right side facing upward.
- Insert the hook near the wide base of the petal.
- Join a strand of matching beige yarn.
- Work a line of surface slip stitches along the center toward the pointed tip.
- Keep the stitches loose enough to avoid puckering.
- Add two or three short diagonal lines on each side of the central vein using surface slip stitches or embroidery.
- Secure the yarn ends on the wrong side.
Repeat for all six beige petals.
Part 3: Crochet the Ivory Back Petals
The ivory layer creates a beautiful starburst effect behind the beige poinsettia.
Make six pointed ivory petals, slightly larger than the front petals.
Ivory petal instructions – make 6
Row 1: Ch 2. Work 2 sc in the second chain from the hook. (2)
Row 2: Ch 1, turn. Inc in both stitches. (4)
Row 3: Ch 1, turn. Sc across. (4)
Row 4: Ch 1, turn. Inc, 2 sc, inc. (6)
Row 5: Ch 1, turn. Sc across. (6)
Row 6: Ch 1, turn. Inc, 4 sc, inc. (8)
Row 7: Ch 1, turn. Sc across. (8)
Row 8: Ch 1, turn. Inc, 6 sc, inc. (10)
Row 9: Ch 1, turn. Sc across. (10)
Row 10: Ch 1, turn. Inc, 8 sc, inc. (12)
Row 11: Ch 1, turn. Sc across. (12)
Row 12: Ch 1, turn. Inc, 10 sc, inc. (14)
Rows 13–14: Ch 1, turn. Sc across. (14)
FO, leaving a long sewing tail.
Part 4: Add a Decorative Border to Each Petal
A neat crochet border helps the petals maintain their shape and creates a more polished ornament.
Petal border instructions
- Join matching yarn at one corner of the wide base.
- Work evenly spaced sc stitches along the first sloping edge toward the pointed tip.
- At the tip, work (sc, ch 2, sc) into the tip space to emphasize the point.
- Continue working sc stitches down the opposite edge.
- Work 1 sc into each stitch across the wide base.
- Sl st to the first edging stitch.
- FO and weave in the ends, keeping the original sewing tail available.
Repeat for all twelve petals.
Part 5: Crochet the Flower Center Base
A small circular center holds the petals together and provides a secure foundation for the decorative golden beads.
Center base – make 2
Using beige yarn:
Round 1: 6 sc in MR. (6)
Round 2: Inc in each stitch. (12)
Round 3: (1 sc, inc) × 6. (18)
Round 4: (2 sc, inc) × 6. (24)
Sl st to the first stitch and FO.
Make a second identical circle for the back of the ornament.
Part 6: Assemble the Ivory Flower Layer
Back layer assembly
- Place the six ivory petals on a flat surface with their pointed tips facing outward.
- Arrange the petals evenly in a circular flower shape.
- Overlap their wide bases at the center.
- Position one crochet center circle over the overlapping bases.
- Using a yarn needle, sew each petal securely to the circle.
- Check that all six petals are evenly spaced.
- Secure the thread ends on the back.
Part 7: Assemble the Beige Flower Layer
Front layer assembly
- Arrange the six beige petals in a circular formation.
- Position their wide bases together at the center.
- Overlap the bases slightly to create a full poinsettia shape.
- Sew the petal bases together with matching beige yarn.
- Keep the outer sections of the petals free so they retain their natural shape.
Part 8: Join the Two Poinsettia Layers
This step creates the elegant layered appearance shown in the reference image.
Layering instructions
- Place the ivory flower layer on a flat surface.
- Rotate the beige flower layer approximately 30 degrees relative to the ivory layer.
- Position the beige layer directly over the ivory layer.
- Make sure the ivory petal tips remain visible between the beige petals.
- Use a yarn needle and matching thread to sew the two layers together through their central bases.
- Keep the stitches concentrated near the center to preserve the three-dimensional effect.
- Secure the yarn ends on the back.
Part 9: Add the Golden Pearl Center
The golden pearl cluster gives the ornament its luxurious Christmas finish.
Golden center instructions
- Prepare seven small golden pearl-style beads.
- Position one bead in the center of the flower.
- Arrange the remaining six beads around it in a circular cluster.
- Use strong sewing thread to attach each bead individually.
- Pass the needle through each bead several times for additional security.
- Keep the beads close together to form a compact floral center.
- Knot the thread securely on the back.
Part 10: Crochet the Hanging Loop
The hanging loop allows the poinsettia to be displayed on a Christmas tree, wreath, garland, or decorative hook.
Hanging loop instructions
Using beige yarn:
- Ch 30.
- Sl st into the first chain to form a loop.
- FO, leaving a long sewing tail.
- Position the loop behind the top petal.
- Sew the loop securely to the back of the flower center and upper petal base.
- Reinforce the attachment with several additional stitches.
The finished hanging loop should measure approximately 5–6 cm when folded.
Part 11: Add the Back Cover
The second crochet circle conceals the assembly stitches and creates a neat back.
Back finishing
- Turn the ornament over.
- Position the second beige crochet circle over the central sewing area.
- Use matching yarn to stitch around the circle’s edge.
- Keep the hanging loop attachment accessible and secure.
- Weave in all remaining yarn ends.
Part 12: Block and Shape the Petals
Blocking helps the pointed petals maintain their shape and makes the ornament look more refined.
Blocking instructions
- Lightly dampen the crochet petals, avoiding the bead cluster.
- Place the ornament on a blocking mat.
- Gently stretch each petal toward its pointed tip.
- Use rustproof pins to hold the tips in place.
- Adjust the beige and ivory layers so both colors remain visible.
- Allow the ornament to dry completely before removing the pins.
Part 13: Optional Fabric Stiffening
If you prefer a firmer Christmas ornament, lightly stiffen the petals.
Stiffening instructions
- Choose a fabric stiffener suitable for cotton yarn.
- Apply a small amount to the back of each petal.
- Avoid saturating the central bead cluster.
- Shape the petals carefully.
- Allow the ornament to dry completely on a flat surface.
Part 14: Create a Coordinated Ornament Set
The beige and ivory color combination is perfect for creating a coordinated collection of elegant handmade Christmas decorations.
Color variations
- Classic neutral: Beige front petals, ivory back petals, and gold center.
- Winter white: White front petals, ivory back petals, and pearl center.
- Champagne gold: Champagne front petals, cream back petals, and gold center.
- Rustic Christmas: Natural cotton front petals, warm brown back petals, and wooden bead center.
- Traditional Christmas: Deep red front petals, forest green back petals, and gold center.
Creative Ways to Display Crochet Poinsettias
Christmas tree ornaments
Hang the poinsettias among warm white lights and neutral ribbons for an elegant holiday look.
Christmas wreath decorations
Attach several poinsettias to a greenery wreath for a soft handmade accent.
Gift wrapping decorations
Use a crochet poinsettia as a reusable gift topper with kraft paper and satin ribbon.
Holiday garlands
Combine multiple poinsettias with crochet stars and snowflakes to create a festive garland.
Table decorations
Place poinsettias on a holiday table as decorative accents, keeping them away from candles and open flames.
Handmade gift sets
Create matching poinsettias in several neutral colors and package them as a thoughtful Christmas gift.
Tips for Professional-Looking Crochet Poinsettias
- Use cotton yarn for crisp, well-defined petals.
- Maintain consistent tension throughout the project.
- Make all six petals in each layer the same size.
- Use a smaller hook if the petals appear too loose.
- Block the petals before final assembly when possible.
- Keep the beige petals centered over the ivory petals.
- Use strong thread to secure decorative beads.
- Keep the hanging loop centered behind the top petal.
- Weave in yarn ends carefully for a neat finish.
Frequently Asked Questions
Is this crochet poinsettia pattern suitable for beginners?
This pattern is best suited to intermediate crocheters or confident beginners who are comfortable with increases, working in rows, surface crochet, and sewing pieces together.
How big is the finished ornament?
Using DK cotton yarn and a 3 mm hook, the ornament is designed to measure approximately 15–18 cm across, depending on your tension and blocking.
Can I make the poinsettia without beads?
Yes. Replace the golden beads with crocheted bobbles, French knots, or a small gold-colored crochet circle.
Can I use acrylic yarn?
Yes, although cotton yarn generally produces firmer petals and sharper stitch definition.
How do I make the petals stiffer?
Use tightly crocheted cotton yarn, block the petals carefully, and apply a small amount of fabric stiffener if needed.
Can I change the ornament size?
Yes. Use thicker yarn and a larger hook for a bigger poinsettia, or thinner yarn and a smaller hook for a miniature ornament.
Can I use this design for a Christmas wreath?
Absolutely. The layered poinsettia shape works beautifully as a decorative accent on wreaths, garlands, and festive wall hangings.
Care Instructions
- Spot-clean gently with a damp cloth.
- Avoid soaking ornaments with beads or fabric stiffener.
- Allow to air dry completely.
- Store flat in a dry container.
- Place tissue paper between ornaments to protect the petals.
- Avoid crushing the pointed tips during storage.
- Keep away from direct flames and excessive heat.
Final Thoughts
This beige and ivory crochet poinsettia ornament is a beautiful handmade decoration that combines traditional Christmas floral inspiration with an elegant neutral color palette.
Its layered pointed petals, textured crochet details, golden pearl center, and delicate hanging loop make it a charming addition to Christmas trees, wreaths, festive garlands, and handmade gift wrapping.
Make one as a special holiday keepsake or crochet a coordinated collection to decorate your home throughout the Christmas season.
Love this free crochet poinsettia pattern? Save it to Pinterest and share it with fellow crochet lovers who enjoy elegant handmade Christmas decorations!

