Elegant Bow Crochet Handbag Pattern
Beginner Friendly
Perfect for those just starting their crochet journey, with clear instructions and simple techniques
Single-Day Project
A satisfying project you can complete in a single afternoon or evening.
Handmade Gift
A beautiful keepsake — free forever. Read online or print at home.
About This Elegant Bow Crochet Handbag Pattern
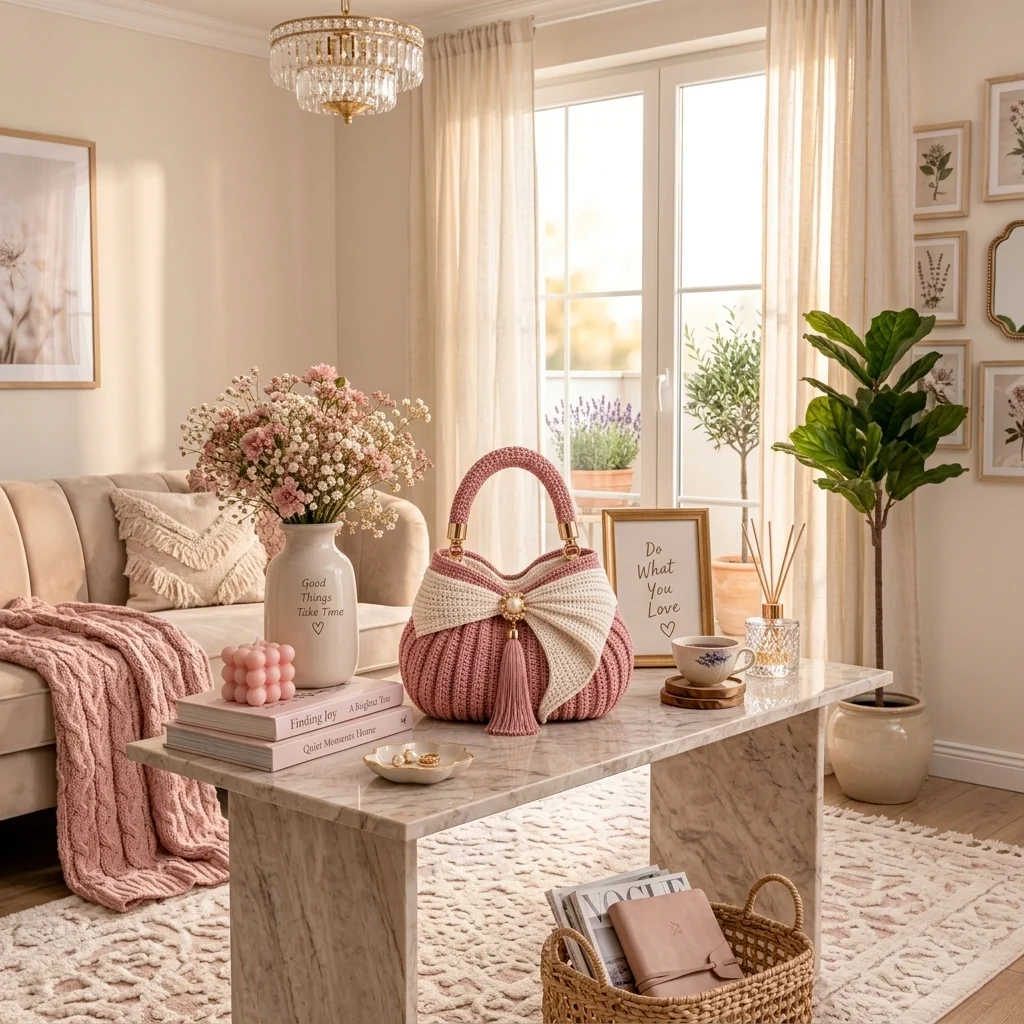
This elegant crochet handbag pattern creates a softly rounded blush-pink purse with pronounced vertical ribbing, a structured ivory bow, a padded top handle, polished gold hardware and a long decorative tassel. The contrast between the sculpted crochet texture and jewelry-style center brooch gives the bag the dressed-up appearance shown in the reference.
The construction is designed for an advanced crocheter and takes roughly 12-16 hours, depending on your speed and the amount of reinforcement added. The body is worked from a firm oval base before being shaped upward, while front-post stitches create the raised ribs. The bow, handle tabs, padded handle and tassel are made separately and assembled after the main bag is complete.
This project is especially suited to crocheters who enjoy handbag construction and careful finishing. A lining and interfacing are optional, but they are strongly recommended if you want the finished purse to hold the rounded shape instead of collapsing when it is carried.
Materials
- Blush pink DK cotton cord or firm cotton yarn approximately 450-500 m
- Ivory DK cotton cord or firm cotton yarn approximately 180-220 m
- 3.5 mm crochet hook main body and bow
- 4.0 mm crochet hook padded handle
- Gold-tone handle rings 2, approximately 25-30 mm
- Gold-tone handle end caps 2, sized to fit finished handle
- Pearl-style decorative brooch 1, approximately 35-40 mm
- Gold-tone tassel cap 1
- Cotton cord or soft rope approximately 45 cm for handle core
- Matching sewing thread for hardware and lining
- Fabric lining approximately 45 × 70 cm
- Medium-weight interfacing approximately 45 × 70 cm
- Magnetic snap 1 set
- Stitch markers 4-6
- Yarn needle 1
- Scissors 1 pair
Abbreviations
chchainsl stslip stitchscsingle crochethdchalf double crochetdcdouble crochetFPdcfront post double crochetinc2 sc in the same stitchdecsingle crochet 2 stitches togetherBLOback loop onlyststitchstsstitchesFOfasten offOval Base
- With blush pink and the 3.5 mm hook, ch 31.
- Round 1: Starting in second ch from hook, sc in next 29 ch, 3 sc in final ch. Continue along opposite side of foundation chain, sc in next 28 ch, 2 sc in final ch. (62 sts)
- Round 2: Inc, 28 sc, inc in next 3 sts, 28 sc, inc in next 2 sts. (68 sts)
- Round 3: (Sc, inc), 28 sc, (sc, inc) 3 times, 28 sc, (sc, inc) 2 times. (74 sts)
- Round 4: (2 sc, inc), 28 sc, (2 sc, inc) 3 times, 28 sc, (2 sc, inc) 2 times. (80 sts)
- Round 5: (3 sc, inc), 28 sc, (3 sc, inc) 3 times, 28 sc, (3 sc, inc) 2 times. (86 sts)
- Round 6: Sc around. (86 sts)
- Round 7: BLO sc around. (86 sts)
Lower Ribbed Body
- Round 8: Ch 2, *FPdc around next st, dc in next st* around. Join. (86 sts)
- Round 9: Ch 2, FPdc around each previous FPdc and dc in each dc around. Join. (86 sts)
- Rounds 10-22: Repeat Round 9. (86 sts)
- Keep the FPdc columns directly above one another. These columns form the strong vertical ribs visible across the pink body.
- Do not turn between rounds.
Rounded Side Shaping
- Round 23: Ch 1, (19 sc, dec) 4 times, 2 sc. (82 sts)
- Round 24: Sc around. (82 sts)
- Round 25: (18 sc, dec) 4 times, 2 sc. (78 sts)
- Round 26: Sc around. (78 sts)
- Round 27: (17 sc, dec) 4 times, 2 sc. (74 sts)
- Round 28: Sc around. (74 sts)
- Round 29: (16 sc, dec) 4 times, 2 sc. (70 sts)
- Round 30: Sc around. (70 sts)
- This gradual reduction pulls the upper body inward while keeping the lower section full and rounded.
Ivory Upper Band
- Change to ivory.
- Round 31: Sc around. (70 sts)
- Rounds 32-35: Sc around. (70 sts)
- Round 36: BLO sc around. (70 sts)
- Round 37: Sc around. (70 sts)
- FO ivory.
Blush Top Edge
- Join blush pink into any stitch of Round 37.
- Round 38: Sc around. (70 sts)
- Rounds 39-41: Sc around. (70 sts)
- Round 42: Sl st loosely around. (70 sts)
- FO and weave in securely.
Ivory Bow Center Panel
- With ivory, ch 65.
- Row 1: Hdc in second ch from hook and across. (64 sts)
- Rows 2-12: Ch 1, turn, BLO hdc across. (64 sts)
- Row 13: Ch 1, turn, hdc across through both loops. (64 sts)
- FO leaving a long sewing tail.
- The finished rectangle should be long enough to sweep broadly across the upper front of the handbag.
Shaping the Large Bow
- Lay the ivory rectangle horizontally.
- Pin its center to the center front of the handbag.
- Fold the left side inward to create a broad bow loop approximately 12-13 cm wide.
- Repeat on the right side.
- Allow the lower right portion to fall diagonally downward to reproduce the asymmetrical draped bow in the reference.
- Pin the folds firmly before sewing.
- Using ivory yarn, secure the hidden folds to the handbag while leaving the visible outer sections slightly raised.
Bow Center Wrap
- With ivory, ch 11.
- Row 1: Sc in second ch from hook and across. (10 sts)
- Rows 2-8: Ch 1, turn, sc across. (10 sts)
- FO leaving a long tail.
- Wrap this piece vertically around the pinched center of the bow.
- Sew securely at the back.
- The decorative brooch will cover most of this wrap.
Padded Handle
- With blush pink and 4.0 mm hook, ch 73.
- Row 1: Sc in second ch from hook and across. (72 sts)
- Rows 2-8: Ch 1, turn, sc across. (72 sts)
- FO leaving a long sewing tail.
- Cut cotton cord approximately 42-45 cm long.
- Place the cord lengthwise in the center of the crochet rectangle.
- Fold the crochet around the cord and mattress-stitch the long edges together.
- Shape the covered cord into a smooth arch.
Handle End Tabs – Make 2
- With blush pink, ch 9.
- Row 1: Sc in second ch from hook and across. (8 sts)
- Rows 2-9: Ch 1, turn, sc across. (8 sts)
- FO leaving a long tail.
- Thread each tab through a gold handle ring and fold it in half.
- Sew the folded ends firmly together.
- Attach the two tabs symmetrically to the inside upper edge of the handbag.
Handle Hardware Assembly
- Insert one end of the padded handle into the first gold-tone end cap.
- Secure according to the hardware design using stitching and/or the supplied fastener.
- Repeat with the opposite handle end.
- Connect each handle end cap to its corresponding gold ring.
- Check that both attachment points sit at equal height.
- Pull firmly on the handle before using the finished bag.
Decorative Tassel
- Cut 45-55 lengths of blush yarn approximately 30 cm long.
- Arrange the strands evenly into a bundle.
- Fold the bundle exactly in half.
- Secure tightly at the folded center with matching yarn.
- Insert the folded top into the gold tassel cap.
- Secure according to the cap style.
- Trim the bottom strands evenly so the finished tassel measures approximately 17-19 cm.
Pearl Brooch and Tassel Placement
- Center the pearl-style brooch directly over the bow’s center wrap.
- Sew or fasten the brooch securely through the bow and into the firm bag fabric behind it.
- Attach the tassel beneath the brooch so its cap begins immediately below the ornament.
- Check that the tassel hangs vertically down the center front.
- Reinforce the attachment from inside the bag if the brooch or tassel is heavy.
Optional Fabric Lining
- Measure the finished interior width, height and base depth.
- Cut two lining pieces with approximately 1.5 cm seam allowance on all sides.
- Apply medium-weight interfacing to the wrong side of both lining pieces.
- Place the pieces right sides together and sew the side and bottom seams.
- Box the lower corners to match the oval crochet base.
- Fold the upper raw edge inward approximately 1.5 cm and press.
- Insert the lining into the handbag.
- Hand-sew it approximately 1 cm below the crochet top edge.
Optional Magnetic Closure
- Mark the center front and center back of the lining.
- Install one half of the magnetic snap approximately 2.5 cm below the lining edge.
- Install the matching half directly opposite.
- Add a small square of interfacing behind each snap component.
- Check alignment before sewing the lining permanently into the handbag.
Finishing
Weave in every yarn end and inspect the ribbed body for any loose joins. Shape the oval base by hand and gently push outward from inside the handbag to emphasize the rounded lower silhouette. The front ribs should remain vertical and evenly spaced.
Arrange the ivory bow only after the bag has reached its final shape. The left and right loops should look full rather than tightly flattened, while the long ivory section on the right should sweep downward naturally. Center the pearl brooch over the gathered bow and let the blush tassel hang freely beneath it. Finish by checking the handle hardware, lining and closure before carrying the bag.
Tips for Success
- Keep the FPdc columns perfectly aligned; even a one-stitch shift will make the ribbing visibly spiral.
- Use a non-stretch cotton core inside the handle so the arch remains rounded after the bag is loaded.
- Block the ivory bow before attaching it, but do not stretch it wider than the front of the handbag.
- Attach the brooch through both the bow and underlying bag fabric so its weight does not pull the bow forward.
- Use interfacing in the lining if you want the body to retain the structured boutique-style shape shown in the reference.
Common Mistakes to Avoid
- Using very soft yarn can make the bag collapse. Choose firm cotton or cotton cord and work at a tight gauge.
- Do not make the bow too narrow. Its oversized width is what creates the dramatic front detail.
- A loosely sewn handle can pull through the upper edge. Reinforce every attachment point through several rows of crochet.
- Do not make the tassel before checking the bag proportions. Trim it only after attachment so you can judge the correct finished length.
- A crooked brooch immediately makes the bow look uneven. Mark the exact center front with a stitch marker before attaching it.
Ways to Customize This Pattern
- Make the body in chocolate brown with a cream bow and antique-brass hardware for a warmer vintage version.
- Use black cotton cord, an ivory bow and gold hardware for an evening handbag.
- Replace the pearl brooch with a removable vintage-style flower brooch so the ornament can be changed.
- Make the tassel in ivory instead of blush for stronger contrast against the pink body.
- Add a detachable crossbody strap using two additional rings hidden at the side seams.
Frequently asked questions
Use firm cotton yarn, maintain tight tension, reinforce the base and add an interfaced fabric lining. The lining is especially useful because the large bow and metal ornament add weight to the front.
Yes. Crochet two small attachment loops at the top edges and sew the padded handle directly to them. The bag will remain functional, although it will have a softer handmade appearance than the jewelry-style finish shown here.
Use firm cotton, work the bow at a tight gauge and lightly block the finished rectangle before folding it. Sew the center and hidden inner folds securely while leaving the outer loops slightly raised.
Yes. Lengthen the foundation chain for a wider base and add increases evenly around both curved ends. Maintain the same shaping proportions and enlarge the bow and handle so they remain visually balanced with the body.
A smooth, tightly twisted cotton or cotton-blend cord in DK to light-worsted thickness will produce the clearest ribs and the most structured bow. Avoid very fuzzy yarn because it will soften the stitch definition.
The finished Elegant Bow Crochet Handbag Pattern