Elegant Christmas Poinsettia Crochet Candle Centerpiece: Free Crochet Pattern
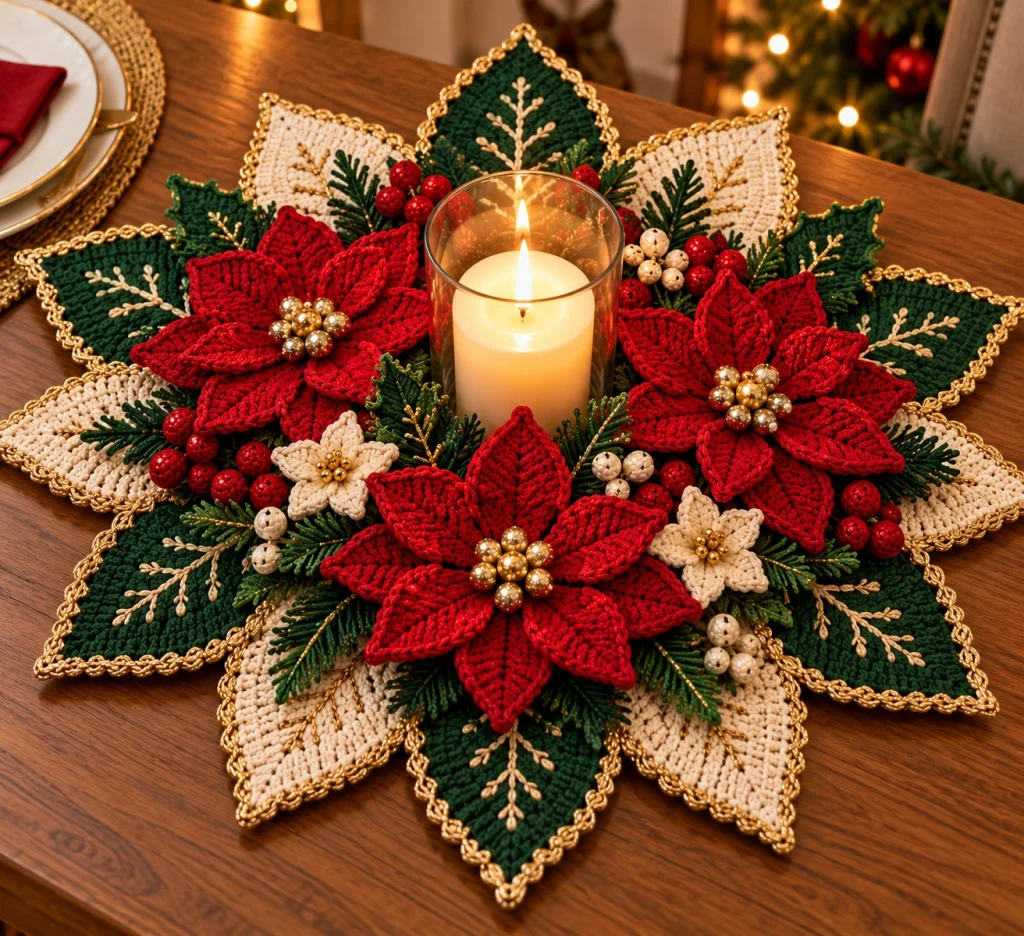
Bring timeless Christmas elegance to your holiday table with this beautiful Christmas poinsettia crochet candle centerpiece pattern. Featuring richly textured red poinsettias, dramatic forest-green and ivory pointed leaves, delicate golden edging, festive berry clusters, and miniature flowers, this handmade centerpiece creates a stunning seasonal display.
The design features a large star-shaped crochet foundation made from alternating dark-green and warm-ivory pointed leaves. Each leaf is decorated with golden embroidery and surrounded by a delicate metallic-gold crochet border.
Three magnificent red poinsettia flowers surround the center of the arrangement. Their layered pointed petals and golden bead centers create beautiful dimension, while miniature ivory flowers, red berries, cream berries, and dark-green evergreen branches fill the spaces between the larger flowers.
At the center sits a clear glass candle holder containing a warm glowing candle. For safe display, use a flameless LED candle rather than a real flame.
This project is ideal for experienced crocheters who enjoy detailed floral work, decorative embroidery, dimensional crochet petals, and elegant handmade Christmas decorations.
In this complete tutorial, you will learn how to create the pointed base leaves, crochet dimensional poinsettias, make miniature flowers and berries, add evergreen details, assemble the centerpiece, and finish it with decorative golden accents.
Pattern at a Glance
Finished measurements depend on yarn thickness, hook size, tension, blocking, and the arrangement of the decorative components.
Materials and Supplies
- Approximately 200–250 g of DK-weight cotton yarn in dark forest green.
- Approximately 150–200 g of DK-weight cotton yarn in warm ivory.
- Approximately 150–200 g of DK-weight cotton yarn in rich Christmas red.
- Small amounts of metallic-gold crochet thread.
- Small amounts of cream yarn for decorative flowers.
- Small amounts of red yarn for berries.
- Small amounts of dark-green yarn for evergreen branches.
- 3.5 mm crochet hook for the large base leaves.
- 3 mm crochet hook for poinsettia petals.
- 2.5 mm crochet hook for miniature decorations.
- Gold-colored decorative beads for flower centers.
- Small pearl-colored beads for berry accents, optional.
- Polyester fiberfill for miniature berries.
- Yarn needle and embroidery needle.
- Stitch markers.
- Sharp scissors.
- Measuring tape.
- Optional fabric backing for added stability.
- Optional clear glass LED candle holder.
- Flameless battery-operated LED candle.
Yarn recommendation: Mercerized cotton yarn is ideal for this project because it provides crisp stitch definition, a subtle sheen, and enough structure to support the decorative pointed leaves and dimensional flowers.
Gauge and Finished Measurements
Using DK-weight cotton yarn and a 3.5 mm crochet hook, aim for approximately 18 single crochet stitches and 20 rows per 10 cm.
The completed centerpiece should measure approximately 50–60 cm across, depending on the size of the pointed leaves and the arrangement of the poinsettias.
Each large poinsettia should measure approximately 14–18 cm across.
The central opening should accommodate a flameless LED candle holder approximately 8–10 cm wide.
Abbreviations
All instructions use US crochet terminology.
Part 1: Crochet the Central Foundation Circle
The centerpiece begins with a flat circular foundation that supports the decorative leaves and poinsettias.
Begin the center
Using dark forest-green yarn and a 3.5 mm hook, make a magic ring.
Round 1: Ch 3 (counts as first dc), work 11 dc into the ring. Join with a sl st. 12 dc.
Round 2: Ch 3, dc in the same stitch, work 2 dc in each remaining stitch. Join. 24 dc.
Round 3: Ch 3, dc in the next stitch, work 2 dc in the following stitch. Repeat around. 36 dc.
Round 4: Ch 3, dc in the next two stitches, work 2 dc in the following stitch. Repeat around. 48 dc.
Round 5: Ch 1, sc in every stitch around. Join. 48 sc.
FO, leaving a long tail for assembly.
The foundation circle should lie flat without curling or ruffling.
Part 2: Crochet the Large Forest-Green Pointed Leaves
The dark-green pointed leaves create the dramatic star-shaped foundation of the centerpiece.
Leaf foundation
Using forest-green yarn and a 3.5 mm hook, ch 31.
Row 1: Sc in the second chain from the hook and across. 30 sc.
Row 2: Ch 1, turn, sc in each stitch across.
Row 3: Ch 1, turn, dec, sc across until two stitches remain, dec.
Row 4: Ch 1, turn, sc across.
Repeat Rows 3–4 until only two stitches remain.
Work one final decrease and FO.
This creates a long triangular leaf with a pointed tip.
Make six forest-green leaves, or adjust the number to suit your preferred centerpiece arrangement.
Part 3: Crochet the Warm-Ivory Pointed Leaves
The ivory leaves alternate with the dark-green leaves to create a luxurious layered star design.
Ivory leaf instructions
Using ivory yarn, ch 31.
Row 1: Sc in the second chain from the hook and across. 30 sc.
Row 2: Ch 1, turn, sc across.
Row 3: Ch 1, turn, dec, sc across until two stitches remain, dec.
Row 4: Ch 1, turn, sc across.
Repeat Rows 3–4 until only two stitches remain.
Work one final decrease and FO.
Make six ivory leaves.
Block the green and ivory leaves gently to create smooth edges and clearly defined points.
Part 4: Add Decorative Gold Edging
Metallic-gold edging gives the pointed leaves their elegant festive finish.
Gold border instructions
Join metallic-gold crochet thread at the base of a finished leaf.
Work sc evenly along the first side.
At the pointed tip, work (sc, ch 2, sc).
Continue working sc along the opposite side.
Join with a sl st and FO.
Repeat around every green and ivory leaf.
For a more decorative appearance, work a second border round using small chain loops separated by slip stitches.
Part 5: Embroider the Golden Leaf Veins
Fine golden embroidery adds delicate botanical details to the leaves.
Leaf embroidery instructions
- Thread an embroidery needle with metallic-gold thread.
- Begin near the base of the leaf.
- Embroider a central vein toward the pointed tip.
- Add short diagonal branches on both sides.
- Keep the branches symmetrical but slightly organic.
- Secure the thread neatly on the back.
Use the same embroidery technique for both the forest-green and ivory leaves.
Part 6: Assemble the Star-Shaped Base
The pointed leaves are arranged around the central foundation circle to create a large decorative Christmas star.
Base assembly
- Place the central foundation circle on a flat surface.
- Arrange the six forest-green leaves evenly around the circle.
- Position the ivory leaves between the green leaves.
- Overlap the leaf bases slightly.
- Adjust the points until the arrangement looks balanced.
- Sew each leaf base securely to the central circle.
- Reinforce the overlapping sections with additional stitches.
The finished base should resemble a large layered star with alternating dark-green and ivory points.
Part 7: Crochet the Large Red Poinsettia Petals
The red poinsettias are the main floral feature of the centerpiece.
Large petal instructions
Using Christmas-red yarn and a 3 mm hook, ch 19.
Row 1: Sc in the second chain from the hook and across. 18 sc.
Row 2: Ch 1, turn, sc across.
Row 3: Ch 1, turn, dec, sc across until two stitches remain, dec.
Row 4: Ch 1, turn, sc across.
Repeat Rows 3–4 until only two stitches remain.
Work one final decrease and FO.
Make approximately six large petals for each poinsettia.
For three flowers, make approximately 18 large petals.
Part 8: Crochet the Smaller Inner Poinsettia Petals
Smaller petals create the layered dimensional appearance of each flower.
Small petal instructions
Using red yarn, ch 13.
Row 1: Sc in the second chain from the hook and across. 12 sc.
Row 2: Ch 1, turn, sc across.
Row 3: Ch 1, turn, dec, sc across until two stitches remain, dec.
Row 4: Ch 1, turn, sc across.
Repeat Rows 3–4 until only two stitches remain.
Work one final decrease and FO.
Make approximately six smaller petals for each poinsettia.
Part 9: Assemble the Red Poinsettia Flowers
Each poinsettia is assembled in two layers to create a full, realistic floral appearance.
Flower assembly
- Arrange six large petals in a circular formation.
- Overlap the petal bases slightly.
- Sew the petal bases together using matching red yarn.
- Arrange six smaller petals over the first layer.
- Rotate the smaller petals so they sit between the larger petals.
- Sew the inner layer securely in place.
- Gently lift the petal tips to create dimension.
Make three complete poinsettia flowers.
Part 10: Add the Golden Poinsettia Centers
Clusters of gold-colored beads create the sparkling centers of the red poinsettias.
Golden center instructions
- Thread a strong sewing needle with matching thread.
- Position several gold-colored beads in the center of the poinsettia.
- Arrange the beads in a compact circular cluster.
- Sew each bead securely through the flower layers.
- Repeat until the center looks full and balanced.
- Secure the thread on the back.
Use approximately five to nine small beads per flower, depending on their size.
For an entirely crocheted version, replace the beads with small golden bobble stitches.
Part 11: Crochet the Miniature Ivory Flowers
Small ivory flowers add contrast between the larger red poinsettias.
Miniature flower pattern
Using ivory yarn and a 2.5 mm hook, make a magic ring.
Work 6 sc into the ring and join with a sl st.
Repeat six times:
Sl st into the next stitch, ch 3, work 2 dc into the same stitch, ch 3, and sl st into the same stitch.
FO and weave in the ends.
Make three to five miniature flowers.
Add a small golden bead cluster to the center of each flower.
Part 12: Crochet the Red Berry Clusters
Small red berries create a festive botanical detail around the poinsettias.
Red berry instructions
Using red yarn, make a magic ring.
Round 1: Work 6 sc into the ring. 6 sc.
Round 2: Inc in every stitch. 12 sc.
Rounds 3–4: Sc around. 12 sc.
Round 5: Dec six times. 6 sc.
Add a small amount of stuffing.
FO and close the opening.
Make approximately 15–20 red berries.
Arrange the berries into small clusters of three to five.
Part 13: Crochet the Ivory Berry Clusters
Ivory berries add a softer decorative contrast to the red berries and dark-green foliage.
Ivory berry instructions
Using ivory yarn, repeat the red berry pattern.
Make approximately 10–15 small ivory berries.
Arrange them in clusters between the poinsettias and evergreen branches.
Part 14: Crochet the Evergreen Branches
Dark-green evergreen branches fill the spaces between the flowers and create a realistic Christmas botanical arrangement.
Evergreen branch foundation
Using forest-green yarn and a 2.5 mm hook, ch 25.
Starting in the second chain from the hook, work sl st along the foundation chain.
Create the branch needles
Along the central stem, create short side branches using chains of varying lengths.
For each branch, ch 5–7, sl st back toward the main stem, and continue to the next attachment point.
Alternate the branches from side to side.
FO, leaving a long sewing tail.
Make approximately eight to twelve evergreen branches.
Use slightly different branch lengths to create a natural appearance.
Part 15: Add Golden Evergreen Embroidery
Fine golden embroidery adds subtle sparkle to the evergreen branches.
Embroidery instructions
- Thread an embroidery needle with metallic-gold thread.
- Embroider a thin central vein along each evergreen branch.
- Add short diagonal golden stitches between the green needles.
- Keep the embroidery delicate and evenly spaced.
- Secure the thread ends on the back.
Part 16: Arrange the Poinsettias Around the Center
The three large red poinsettias should be arranged around the central LED candle holder.
Flower placement
- Place the star-shaped crochet base on a flat surface.
- Position the LED candle holder in the center.
- Arrange the three red poinsettias around the candle holder.
- Space the flowers evenly to create a balanced triangular composition.
- Angle the petals outward toward the pointed base leaves.
- Adjust the arrangement until the flowers look symmetrical.
Leave enough space around the central holder so it can be removed easily.
Part 17: Add the Miniature Flowers and Berry Clusters
The smaller decorative elements fill the gaps between the larger poinsettias.
Decorative placement
- Position the ivory flowers between the red poinsettias.
- Arrange red berry clusters near the outer flower petals.
- Add ivory berry clusters beside the evergreen branches.
- Distribute the decorations evenly around the centerpiece.
- Adjust the spacing to create a full botanical appearance.
Part 18: Attach the Evergreen Branches
The evergreen branches create a layered background behind the flowers and berries.
Evergreen placement
- Position several evergreen branches beneath each poinsettia.
- Allow the branch tips to extend beyond the flower petals.
- Arrange additional branches between the ivory flowers and berry clusters.
- Sew each branch securely to the crochet base.
- Adjust the branches to create a natural layered appearance.
Part 19: Secure All Decorative Components
Once the arrangement is complete, attach every decorative element permanently to the base.
Final assembly instructions
- Remove the LED candle holder temporarily.
- Sew the three poinsettias securely to the base.
- Attach the miniature ivory flowers.
- Secure the red and ivory berry clusters.
- Sew the evergreen branches into position.
- Check that the golden bead centers are firmly attached.
- Reinforce any loose decorative pieces.
- Weave in all remaining yarn ends.
Part 20: Final Blocking and Finishing
Careful finishing helps the centerpiece maintain its elegant star-shaped appearance.
- Check that all pointed leaves lie flat.
- Adjust the alternating green and ivory points.
- Straighten the golden edging.
- Shape the red poinsettia petals.
- Lift the inner flower petals slightly for dimension.
- Inspect the golden bead centers.
- Adjust the miniature ivory flowers.
- Reposition the berry clusters if necessary.
- Shape the evergreen branches.
- Check that the center opening remains clear.
- Weave in all loose yarn ends.
How to Display Your Christmas Crochet Centerpiece
Place the completed centerpiece on a clean, flat dining table or sideboard.
Position a flameless LED candle inside a clear glass holder at the center of the arrangement.
Choose a warm-white LED candle to create a soft festive glow that complements the red poinsettias and golden decorative details.
For an elegant Christmas tablescape, pair the centerpiece with cream dinnerware, gold cutlery, burgundy napkins, and natural woven placemats.
Customization Ideas
1. Create a white Christmas version
Replace the red poinsettias with ivory flowers and use silver edging instead of gold.
2. Make a traditional red-and-green centerpiece
Use only forest-green base leaves and bright-red poinsettias for a classic Christmas appearance.
3. Create a luxury gold version
Add more metallic-gold embroidery and use gold-colored beads throughout the floral arrangement.
4. Make a smaller centerpiece
Reduce the number of pointed leaves and use one large poinsettia instead of three.
5. Add personalized decorations
Include miniature crochet stars, bells, or snowflakes between the poinsettias.
6. Create a matching Christmas table set
Make coordinating crochet placemats, napkin rings, and small poinsettia coasters using the same colors.
Care Instructions
- Dust gently with a soft brush.
- Spot-clean the crochet fabric when necessary.
- Follow the yarn manufacturer’s washing recommendations.
- Avoid machine washing if decorative beads are attached.
- Do not twist or wring the centerpiece.
- Reshape the pointed leaves while damp.
- Lay flat to dry completely.
- Keep away from direct heat and open flames.
- Store flat in a protective box.
- Use tissue paper to protect the raised flowers and decorative branches.
Frequently Asked Questions
Is this Christmas crochet centerpiece beginner-friendly?
This project is best suited to advanced crocheters because it includes shaped leaves, dimensional poinsettias, decorative embroidery, miniature amigurumi berries, and detailed assembly.
What yarn works best for a crochet Christmas centerpiece?
Mercerized cotton yarn is recommended because it provides excellent stitch definition, maintains its shape, and creates a polished decorative finish.
Can I use a real candle with this centerpiece?
No. Use only flameless LED candles. Crochet yarn and decorative embellishments are combustible and should never be placed near an open flame.
Can I make the centerpiece smaller?
Yes. Use thinner yarn, a smaller crochet hook, fewer pointed leaves, and smaller poinsettias to create a compact version.
Can I change the colors?
Absolutely. This centerpiece looks beautiful in red and gold, ivory and silver, burgundy and champagne, or classic Christmas red and forest green.
Can I make this centerpiece as a handmade gift?
Yes. This elegant crochet Christmas centerpiece makes a thoughtful handmade gift for family members, friends, teachers, and anyone who enjoys festive home decorations.
Final Thoughts
This Christmas poinsettia crochet candle centerpiece combines traditional holiday colors, elegant floral textures, and luxurious golden details into a stunning handmade decoration.
The dramatic forest-green and ivory pointed leaves, richly layered red poinsettias, sparkling golden centers, miniature flowers, festive berries, and delicate evergreen branches create a beautiful centerpiece that celebrates the warmth and joy of Christmas.
Whether you display it on your holiday dining table, use it as part of a festive sideboard arrangement, or create it as a special handmade gift, this project is a wonderful way to showcase your crochet skills and love of seasonal decorating.
Enjoyed this pattern? Save it to your Christmas crochet inspiration board and share your finished poinsettia centerpiece with fellow crochet lovers.

