Elegant Crochet Christmas Wreath Pattern
Beginner Friendly
Perfect for those just starting their crochet journey, with clear instructions and simple techniques
Single-Day Project
A satisfying project you can complete in a single afternoon or evening.
Handmade Gift
A beautiful keepsake — free forever. Read online or print at home.
About This Elegant Crochet Christmas Wreath Pattern
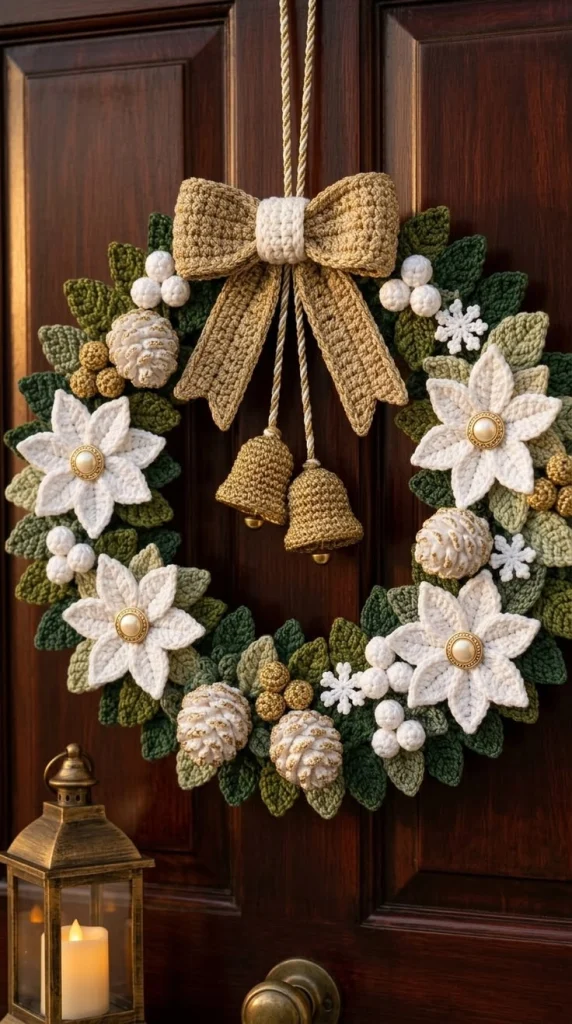
This crochet Christmas wreath pattern creates an elegant handmade holiday decoration filled with layered greenery, dimensional white poinsettias, winter berries, textured pinecones, tiny snowflakes and a beautiful golden crochet bow.
Two crochet bells hang from the center beneath the bow, giving the wreath a classic Christmas finish. The combination of forest green, sage, warm gold and creamy white makes this design festive without looking overly bright or crowded.
Materials
- DK #3 yarn – dark forest green 100-120 g
- DK #3 yarn – olive green 60-80 g
- DK #3 yarn – sage green 40-60 g
- DK #3 yarn – cream or soft white 80-100 g
- DK #3 yarn – antique gold / camel 70-90 g
- Gold embroidery thread optional
- 3.5 mm crochet hook 1
- 30-35 cm wreath ring 1
- Yarn needle 1
- Scissors 1 pair
- Stitch markers optional
- Pearl-style buttons or beads 4
- Small gold beads or bells optional
- Fiberfill small amount
Abbreviations
MRmagic ringchchainsl stslip stitchscsingle crochethdchalf double crochetdcdouble crochettrtreble crochetinc2 sc in same stitchdecsingle crochet decreaseBLOback loop onlyFOfasten offFinished Size
The finished wreath measures approximately 38-42 cm / 15-16.5 in across when made on a 30-35 cm wreath base.
The bow and hanging bells add approximately 15-18 cm / 6-7 in to the center decoration.
Wreath Base
You can use a foam, wooden, metal or sturdy vine wreath ring.
If the ring will remain visible between the leaves, wrap it first with dark green yarn.
- Secure the dark green yarn around the ring.
- Wrap the yarn tightly around the entire base.
- Push each wrap close to the previous one.
- Continue until the base is completely covered.
- Tie securely and hide the yarn end.
Basic Crochet Leaf
Make approximately 35-45 leaves in several shades of green.
Ch 10.
Beginning in the second chain from hook:
Sl st, sc, hdc, dc, tr, dc, hdc, sc.
Work 3 sc in the final chain.
Continue along the opposite side of the foundation chain:
sc, hdc, dc, tr, dc, hdc, sc, sl st.
Fasten off, leaving a long tail for attaching.
Pointed Large Leaf
For the longer leaves visible around the outside of the wreath:
Ch 13.
Beginning in second chain:
Sl st, sc, hdc, dc, tr, tr, dc, hdc, sc.
Work (sc, ch 2, sc) into the final chain to create a pointed tip.
Mirror the stitches along the opposite side.
Fasten off.
Raised Leaf Vein
To create more realistic foliage, surface crochet along the center of selected leaves.
Join yarn at the bottom of the leaf.
Work surface slip stitches toward the pointed end.
Keep the tension relaxed so the leaf remains flat.
Fasten off at the tip.
White Poinsettia – Center
Make 4 large poinsettias.
Using white yarn, make a MR.
Work 8 sc into the ring.
Join with a sl st.
Poinsettia Petals
Each flower uses eight pointed petals.
Repeat the following into each stitch around:
Ch 8.
Beginning in second chain from hook:
sl st, sc, hdc, dc, tr, dc, hdc.
Sl st back into the same base stitch.
Sl st into the next stitch and repeat.
Continue until you have 8 petals.
Layered Poinsettia
For a fuller dimensional flower, crochet a second smaller layer.
Make a MR and work 6 sc into the ring.
For each petal:
Ch 6, sl st, sc, hdc, dc, hdc back down the chain.
Attach the smaller flower directly over the larger flower.
Sew a pearl-style button or bead into the center.
White Berry Clusters
Make approximately 18-24 small berries.
Using white yarn:
Round 1: 6 sc in MR.
Round 2: inc around – 12 sts.
Round 3: sc around – 12 sts.
Add a tiny amount of fiberfill.
Round 4: dec around – 6 sts.
Fasten off and close the opening.
Arrange berries in clusters of three.
Golden Berry Clusters
Repeat the berry pattern using antique-gold yarn.
Make approximately 12-15 berries.
Arrange them into small groups of three near the pinecones and greenery.
Crochet Pinecone – Base
Make approximately 4-5 pinecones in cream.
Round 1: 6 sc in MR.
Round 2: inc around – 12 sts.
Round 3: (sc, inc) around – 18 sts.
Rounds 4-8: sc around.
Begin lightly stuffing as you work.
Round 9: (sc, dec) around – 12 sts.
Round 10: dec around – 6 sts.
Close the opening.
Pinecone Scales
Join cream yarn near the bottom of the pinecone.
Working upward in a spiral, create small raised shells:
Sl st, ch 2, 3 dc in next stitch, sl st in next stitch.
Repeat around the pinecone.
Stagger the shells on each row so the scales overlap naturally.
For a festive finish, lightly embroider selected edges with gold thread.
Small Crochet Snowflake
Make approximately 3-5 snowflakes.
Using white yarn:
Make a MR and work 6 sc.
For each arm:
Ch 5, sl st into second ch, ch 3, sl st into same chain, ch 2, sl st into next chain, then sl st back toward center.
Repeat six times around.
Fasten off and gently block.
Large Crochet Bow – First Loop
Using antique-gold or camel yarn:
Ch 16.
Starting in second chain, sc across.
Ch 1 and turn.
Continue working sc rows until the rectangle measures approximately 22-24 cm / 8.5-9.5 in.
Fasten off.
Shape the Bow
Bring the two short ends of the rectangle toward the center and overlap them slightly.
Sew the ends together securely.
Flatten the loop with the seam positioned at the back center.
Pinch the middle firmly to create two rounded bow loops.
Bow Center Band
Ch 7.
Sc across.
Work approximately 8-10 rows.
Wrap the strip tightly around the pinched center of the bow.
Sew securely at the back.
Bow Tails
Make 2 identical pieces.
Ch 11.
Sc across and continue in rows until each tail measures approximately 18 cm / 7 in.
For the pointed end, decrease one stitch at each side over the final few rows.
Fasten off.
Sew both tails behind the bow so they hang downward in a soft V shape.
Crochet Bell – Make 2
Using antique-gold yarn:
Round 1: 6 sc in MR.
Round 2: inc around – 12 sts.
Round 3: (sc, inc) around – 18 sts.
Rounds 4-7: sc around.
Round 8: (2 sc, inc) around – 24 sts.
Round 9: sc around.
Round 10: work in BLO – sc around.
Round 11: (3 sc, inc) around – 30 sts.
Sl st and fasten off.
Bell Clapper
Using gold yarn:
Make 6 sc in MR.
Work 1 round of sc.
Decrease around and close.
Attach the tiny ball inside the bell using a short strand of yarn.
If desired, replace the crochet clapper with a small gold bead.
Bell Hanging Cords
Make two cords of slightly different lengths.
For the first:
Ch approximately 35.
For the second:
Ch approximately 42.
Slip stitch back along each chain for a stronger cord.
Attach one bell to each cord.
Arrange the Greenery
Before sewing anything permanently, place all leaves around the wreath base.
- Begin with the darkest green leaves.
- Angle them slightly outward around the entire ring.
- Add olive leaves between them.
- Fill remaining gaps with sage leaves.
- Overlap approximately one-third of each leaf.
- Keep the inner opening of the wreath clearly visible.
Attach the Poinsettias
Position the four large white flowers approximately around the lower-left, upper-left, upper-right and lower-right areas.
Leave enough space between the flowers for pinecones, berries and snowflakes.
Sew each flower through its center and several petals so it stays firmly attached.
Add Pinecones and Berries
Place the cream pinecones between the larger flowers.
Group white and gold berries around them.
Use clusters rather than evenly distributing individual berries.
This creates the rich botanical arrangement visible in the finished wreath.
Add the Snowflakes
Place the small white snowflakes in open spaces between the foliage.
Sew only the center of each snowflake to the wreath.
Allow the arms to remain free so they retain their delicate shape.
Attach the Bow
Position the large golden bow at the very top center of the wreath.
The bow should slightly overlap the greenery but should not cover the inner opening.
Sew the back of the center band firmly to the wreath base.
Allow the two tails to point downward toward the center opening.
Attach the Bells
Position the two hanging cords behind the center of the bow.
Make one bell hang approximately 2-3 cm / 1 in lower than the other.
Sew both cords firmly behind the bow.
The bells should hang freely in the center opening.
Hanging Cord
Using gold or beige yarn, make a strong hanging cord.
Ch approximately 60.
Slip stitch back through every chain.
Fold the cord in half and attach both ends securely behind the top of the wreath.
Adjust the length depending on the hook or door hanger you plan to use.
Final Shaping
- Lay the completed wreath flat.
- Spread the leaves outward with your fingers.
- Shape each poinsettia petal.
- Rotate the pinecones so their textured sides face forward.
- Separate the berry clusters.
- Straighten the bow loops and tails.
- Check that the bells hang at slightly different heights.
- Steam-block individual motifs lightly if necessary.
Suggested Placement Guide
For a balanced wreath similar to the reference:
- 12 o’clock: large golden bow
- Center: two hanging golden bells
- 2 o’clock: white poinsettia + berries + pinecone
- 4 o’clock: white poinsettia + white berries
- 6 o’clock: two cream pinecones + gold berries
- 8 o’clock: white poinsettia + berry cluster
- 10 o’clock: white poinsettia + pinecone
- Throughout: small white snowflakes and layered green leaves
Alternative Color Palettes
- Traditional Christmas: forest green + red + cream + gold
- Elegant neutral: sage + ivory + champagne + beige
- Winter woodland: dark green + brown + cream + copper
- Vintage Christmas: olive + burgundy + antique gold + ivory
- Snowy Christmas: sage + white + silver + pale gold
Make It More Luxurious
For an even richer wreath, crochet additional leaves and overlap them more densely around the base.
Add fine metallic-gold embroidery to the pinecones, leaf veins and edges of the bow.
You can also sew small pearl beads into some of the white berry clusters for an elegant handmade finish.
Finishing
Check the back of the wreath and weave in all loose ends.
Make sure every large decoration is attached directly to the wreath base rather than only to another crochet motif.
Trim visible yarn tails and reshape the flowers and greenery before hanging.
For storage, lay the wreath flat in a large box instead of compressing it beneath other decorations.
Frequently Asked Questions
DK cotton or cotton-blend yarn works especially well because it gives the leaves, flowers and bow enough structure to hold their shapes.
Approximately 35-45 leaves create a full wreath in this size. Make more if your wreath base is larger or if you prefer very dense greenery.
A firm wreath base is recommended because the large number of crochet motifs adds weight. A wooden, foam, vine or sturdy metal ring will help the finished wreath keep its round shape.
Yes. Deep red poinsettias with gold centers create a more traditional Christmas version while keeping the same construction.
It is best used indoors or on a well-protected covered door. Yarn can absorb moisture, and prolonged exposure to rain or snow may distort the motifs.
Use a smaller wreath base, reduce the number of leaves and flowers, and crochet the motifs with sport-weight yarn and a smaller hook.
The finished Elegant Crochet Christmas Wreath Pattern

