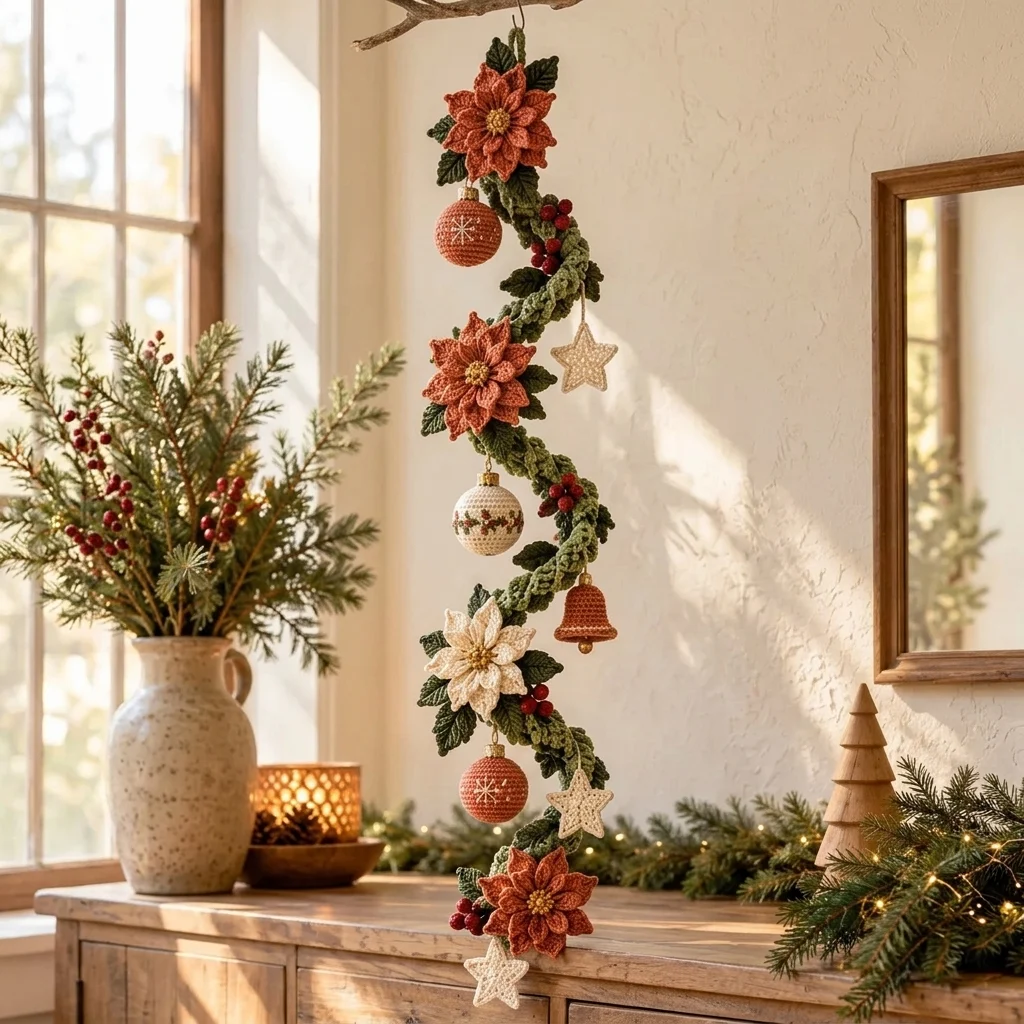
Elegant Crochet Hanging Christmas Garland – Free Poinsettia, Ornaments & Star Pattern
Bring warmth and handmade charm into your home with this beautiful crochet hanging Christmas garland. Featuring a graceful spiral of olive-green crochet foliage, layered terracotta poinsettia flowers, tiny red berries, miniature hanging baubles, delicate stars, and a charming little bell, this decorative garland creates an elegant festive atmosphere.
Its soft earthy colors and detailed crochet textures make it a lovely alternative to traditional Christmas decorations. Hang it from a ceiling hook, decorative branch, doorway, or near a sunny window to create a beautiful seasonal display.
This free crochet Christmas garland pattern is designed for intermediate to advanced crocheters who enjoy combining floral motifs, small amigurumi ornaments, and decorative crochet techniques into one unique handmade project.
Pattern Information
- Skill Level: Intermediate to Advanced
- Finished Length: Approximately 90–110 cm
- Garland Width: Approximately 15–20 cm at the widest points
- Yarn Weight: Sport or DK cotton yarn
- Hook Sizes: 2.5 mm and 3 mm
- Terminology: US crochet terms
- Construction: Braided spiral foundation, individual leaves, layered poinsettias, berries, baubles, stars, and a miniature bell
- Estimated Time: 15–22 hours
Materials Needed
- 150 g olive-green cotton yarn
- 80 g dark forest-green cotton yarn
- 100 g terracotta or burnt-orange cotton yarn
- 50 g ivory cotton yarn
- 30 g burgundy or berry-red cotton yarn
- 20 g mustard-gold cotton yarn
- 2.5 mm crochet hook
- 3 mm crochet hook
- Polyester fiberfill
- Yarn needle
- Scissors
- Stitch markers
- Floral wire or flexible craft wire (optional)
- Gold embroidery thread
- Small decorative gold beads
- Small hanging hook or metal ring
- Measuring tape
Crochet Abbreviations
- MR: Magic ring
- ch: Chain
- sc: Single crochet
- hdc: Half double crochet
- dc: Double crochet
- tr: Treble crochet
- sl st: Slip stitch
- st: Stitch
- inc: Increase
- dec: Decrease
- sk: Skip
- FO: Fasten off
- BLO: Back loop only
Part 1: Crochet the Main Spiral Garland
The main foundation creates the elegant curved shape of the hanging decoration. A long, flexible crochet cord forms the central structure, while attached foliage adds fullness and texture.
Step 1: Make the Foundation Cord
Using olive-green yarn and a 3 mm crochet hook, ch 260.
Starting in the second chain from the hook, work 1 sc in each chain across.
Ch 1 and turn.
Work 1 sc in each stitch across for another 3 rows.
FO, leaving a long tail for assembly.
Step 2: Reinforce the Cord
Fold the strip lengthwise and join the long edges using slip stitches.
For additional structure, insert a flexible cotton cord or craft wire before closing.
Shape the cord into a gentle spiral approximately 90–110 cm long.
Step 3: Create the Hanging Loop
Ch 35 using olive-green yarn.
Join with a sl st to form a loop.
Work sc around the loop for reinforcement.
Attach securely to the top of the garland.
Part 2: Crochet the Decorative Green Leaves
The garland features textured crochet leaves in several shades of green. Make approximately 18–24 leaves in different sizes.
Foundation
Using dark-green yarn and a 2.5 mm hook, ch 15.
Round 1
Sc in the second chain from the hook.
Hdc in the next 2 stitches.
Dc in the next 7 stitches.
Hdc in the next 2 stitches.
Work 3 sc in the final chain.
Continue along the opposite side of the foundation chain.
Hdc in the next 2 stitches.
Dc in the next 7 stitches.
Hdc in the next 2 stitches.
Sc in the final stitch.
Join with a sl st.
Round 2: Leaf Edging
Ch 1.
Work sc evenly around the leaf.
At the pointed tip, work (sc, ch 2, sc).
Continue along the opposite edge.
Join with a sl st.
Leaf Veins
Using a contrasting green strand, embroider a central vein from the base to the tip.
Add two or three diagonal veins on each side.
FO and weave in ends.
Repeat to create the remaining leaves.
Part 3: Crochet the Layered Terracotta Poinsettias
The garland features three large layered poinsettia flowers in a beautiful burnt-orange shade.
Each flower consists of two layers of pointed petals and a textured golden center.
Flower Center
Using mustard-gold yarn, make a magic ring.
Work 6 sc into the ring.
Join with a sl st.
Round 2
Work 2 sc in each stitch around. (12 sc)
Join with a sl st.
First Petal Layer
Change to terracotta yarn.
*Ch 9.
Sc in the second chain from the hook.
Hdc in the next stitch.
Dc in the next 4 stitches.
Hdc in the next stitch.
Sc in the last stitch.
Sl st into the next available center stitch.*
Repeat to create six pointed petals, spacing them evenly around the center.
Second Petal Layer
Attach terracotta yarn behind the first petal layer.
*Ch 11.
Sc in the second chain from the hook.
Hdc in the next 2 stitches.
Dc in the next 5 stitches.
Hdc in the next stitch.
Sc in the final stitch.
Sl st into the flower base.*
Repeat to create six larger petals.
Flower Finishing
Arrange the larger petals behind the smaller petals.
Secure each layer with a few stitches.
Embroider fine petal veins using matching yarn.
Add several small gold beads or French knots to the center.
Repeat to make three complete poinsettias.
Part 4: Crochet the Red Berry Clusters
Small red crochet berries add contrast and natural-looking detail to the green foliage.
Make approximately 18–24 individual berries.
Round 1
Using berry-red yarn and a 2.5 mm hook, make a magic ring.
Work 6 sc into the ring. (6 sc)
Round 2
Work 2 sc in each stitch. (12 sc)
Rounds 3–4
Sc in each stitch around. (12 sc)
Round 5
Work 6 decreases evenly around. (6 sc)
Add a small amount of fiberfill.
FO, leaving a long tail.
Close the opening securely.
Berry Clusters
Arrange berries in groups of three.
Attach each group to a short green crocheted stem.
Make six to eight berry clusters.
Part 5: Crochet the Miniature Hanging Baubles
The garland includes small spherical ornaments in terracotta and ivory, decorated with delicate embroidered motifs.
Make three miniature baubles.
Round 1
Using your chosen yarn color, make a magic ring.
Work 6 sc into the ring. (6 sc)
Round 2
Inc in each stitch. (12 sc)
Round 3
*Sc 1, inc.* Repeat around. (18 sc)
Round 4
*Sc 2, inc.* Repeat around. (24 sc)
Rounds 5–8
Sc in each stitch around. (24 sc)
Round 9
*Sc 2, dec.* Repeat around. (18 sc)
Round 10
*Sc 1, dec.* Repeat around. (12 sc)
Stuff firmly with fiberfill.
Round 11
Dec around. (6 sc)
FO and close the opening.
Decorative Embroidery
Using ivory or green embroidery thread, add small snowflake motifs, dots, or delicate floral bands.
Create a small hanging loop with matching yarn.
Attach the loop securely to the top of each bauble.
Part 6: Crochet the Miniature Stars
Three delicate ivory stars add a soft decorative contrast to the garland.
Round 1
Using ivory yarn and a 2.5 mm hook, make a magic ring.
Work 10 sc into the ring.
Join with a sl st.
Round 2: Star Points
*Ch 5.
Sl st in the second chain from the hook.
Sc in the next chain.
Hdc in the next chain.
Dc in the final chain.
Skip one stitch on the center ring.
Sl st into the next stitch.*
Repeat five times to create five star points.
Finishing
FO and weave in ends.
Block the star gently to sharpen its points.
Add a small hanging loop.
Repeat to make three stars.
Part 7: Crochet the Miniature Bell
A tiny terracotta crochet bell adds a charming detail to the center of the hanging garland.
Round 1
Using terracotta yarn, make a magic ring.
Work 6 sc into the ring. (6 sc)
Round 2
Inc in each stitch. (12 sc)
Rounds 3–5
Sc in each stitch around. (12 sc)
Round 6
*Sc 1, inc.* Repeat around. (18 sc)
Round 7
Sc in each stitch around. (18 sc)
Round 8: Bell Rim
Work 2 hdc in each stitch around. (36 hdc)
Join with a sl st.
FO and weave in ends.
Bell Finishing
Attach a small gold bead inside the bell using strong thread.
Create a hanging loop at the top.
Shape the bell gently with your fingers.
Part 8: Assemble the Hanging Garland
Arrange all crochet elements before attaching them permanently.
Step 1: Shape the Spiral
Lay the main green cord on a large flat surface.
Shape it into a loose vertical spiral.
Maintain even spacing between the curves.
Step 2: Attach the Leaves
Arrange the green leaves along both sides of the main cord.
Alternate leaf sizes and colors for a natural appearance.
Sew each leaf securely to the cord.
Step 3: Position the Poinsettias
Attach one terracotta poinsettia near the top.
Place the second flower around the upper-middle section.
Attach the third flower near the lower end.
Angle the flowers slightly outward so they remain visible when the garland hangs.
Step 4: Add the Berry Clusters
Position red berry clusters between the leaves and flowers.
Distribute them evenly without overcrowding the design.
Step 5: Attach the Baubles
Hang one terracotta bauble near the upper section.
Attach an ivory bauble around the middle.
Place the remaining terracotta bauble lower down.
Use short crochet hanging loops to create different hanging lengths.
Step 6: Add the Stars
Attach three ivory stars at different points along the garland.
Allow them to hang freely beside the spiral.
Step 7: Attach the Bell
Position the miniature terracotta bell near the center of the garland.
Secure it using a short crocheted cord.
Step 8: Final Balance
Lift the garland by its hanging loop.
Allow the decoration to hang naturally.
Adjust the flower positions, leaves, and ornaments until the arrangement looks balanced.
Part 9: Final Finishing
- Weave in all remaining yarn ends.
- Check every flower attachment.
- Reinforce the berry clusters.
- Secure all hanging ornament loops.
- Check the main hanging loop.
- Gently shape the poinsettia petals.
- Arrange the green leaves naturally.
- Adjust the spacing between ornaments.
- Remove any visible loose threads.
- Hang the completed garland and check its overall balance.
Beautiful Color Variations
This crochet hanging garland can be customized to match many different decorating styles.
- Rustic Terracotta: Burnt-orange poinsettias, olive-green leaves, and ivory ornaments.
- Classic Christmas: Deep-red flowers, forest-green leaves, and gold decorations.
- Winter White: Ivory flowers, sage-green foliage, and champagne-gold ornaments.
- Vintage Burgundy: Burgundy poinsettias, muted-green leaves, and cream stars.
- Soft Pastels: Dusty-pink flowers, pale-green leaves, and pearl-white baubles.
- Elegant Gold: Cream flowers, dark-green foliage, and mustard-gold accents.
- Woodland Style: Copper flowers, moss-green leaves, and natural beige ornaments.
Helpful Crochet Tips
- Use cotton yarn for defined stitches and firm decorative shapes.
- Keep the flower petals consistent in size.
- Block the leaves and stars before assembly.
- Use a flexible internal support if you want a more defined spiral.
- Arrange all decorations before sewing them permanently.
- Distribute heavier ornaments evenly.
- Reinforce the top hanging loop.
- Use small amounts of fiberfill for the baubles and berries.
- Keep the garland away from open flames.
- Use lightweight ornaments to prevent stretching.
- Secure all beads carefully, especially if decorating around children or pets.
- Store the garland flat or loosely coiled to preserve its shape.
Frequently Asked Questions
Is this crochet garland suitable for beginners?
This pattern is best suited for intermediate to advanced crocheters because it combines several decorative techniques, including floral motifs, shaped leaves, small amigurumi ornaments, and assembly.
How long does the finished garland measure?
The finished decoration measures approximately 90–110 cm, depending on yarn tension and the final spiral arrangement.
Can I make the garland longer?
Yes. Extend the foundation cord and add more leaves, flowers, and ornaments to fill the extra length.
Can I make a shorter version?
Yes. Reduce the foundation cord length and use fewer decorative elements.
What yarn is best for this project?
Sport-weight or DK cotton yarn is recommended because it provides good stitch definition and helps the flowers and leaves maintain their shape.
Do I need to use craft wire?
No. Craft wire is optional, but it can help maintain the spiral shape. If using wire, cover the ends securely and keep them inaccessible to children and pets.
Can I hang this garland on a door?
Yes. You can hang it from a suitable door hook, although a protected indoor location is recommended to prevent damage from weather or frequent movement.
Can I use different flower designs?
Absolutely. You can replace the poinsettias with roses, daisies, or other crochet flowers while keeping the same basic garland structure.
Can I add fairy lights?
Yes, but use only cool-running, battery-powered LED lights suitable for decorative textiles. Avoid hot bulbs and exposed wiring.
Can I sell finished garlands made from this pattern?
Yes. You may sell finished handmade garlands created from this original pattern. Credit to the pattern designer is appreciated.
Care Instructions
- Dust gently using a soft brush.
- Spot clean with a damp cloth when necessary.
- Use mild detergent for small stains.
- Avoid soaking ornaments containing beads or internal wire.
- Do not wring or twist the flowers.
- Reshape the petals and leaves while slightly damp.
- Allow the garland to air dry completely.
- Store in a clean, dry container.
- Place tissue paper between delicate decorative elements.
- Avoid placing heavy objects on top during storage.
Final Thoughts
This elegant crochet hanging Christmas garland is a beautiful way to celebrate the art of handmade seasonal decorating. Its graceful spiral shape, rich terracotta poinsettias, textured olive-green leaves, delicate stars, miniature baubles, red berries, and charming bell create a warm and sophisticated display.
Whether you hang it near a window, above a console table, from a decorative branch, or beside a doorway, this crochet garland adds a unique handcrafted touch to your home.
Love this free crochet Christmas garland pattern? Save it to Pinterest and share it with your crochet-loving friends for more beautiful handmade decoration ideas!

