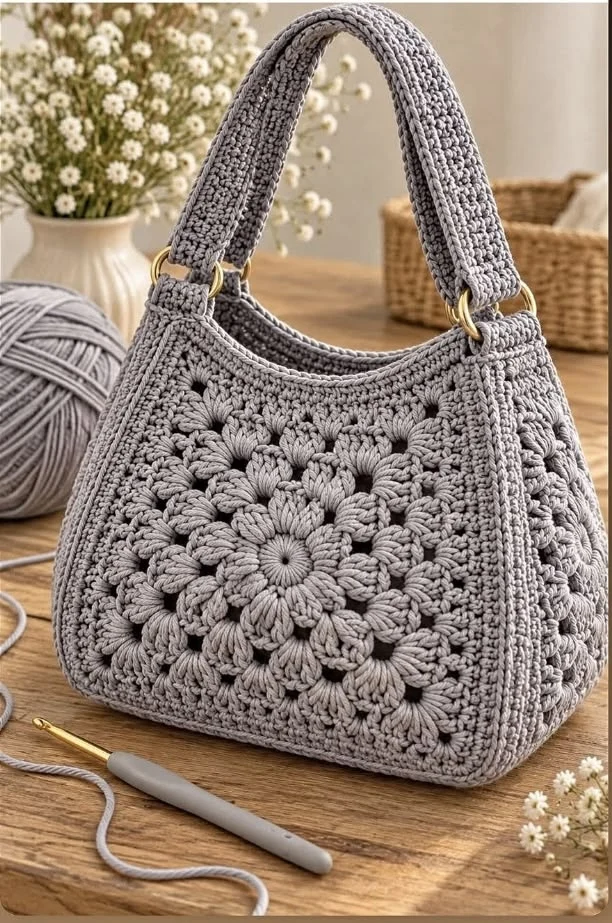
Elegant Gray Floral Granny Square Crochet Handbag – Free Advanced Pattern
Create a beautiful handmade accessory with this Elegant Gray Floral Granny Square Crochet Handbag. Featuring dimensional flower motifs, raised puff-stitch petals, textured borders, structured side panels, and a thick crocheted shoulder strap, this sophisticated handbag combines traditional crochet artistry with modern everyday style.
The soft stone-gray color gives the bag a timeless, elegant appearance, while the sculptural floral panels add texture and personality. Gold-tone rings connect the sturdy crocheted strap to the body, completing this charming handmade design.
Pattern Information
- Skill Level: Advanced
- Finished Size: Approximately 30 cm wide × 25 cm high × 10 cm deep
- Strap Length: Approximately 55–60 cm
- Construction: Separate floral panels, gusset, reinforced upper edge, strap tabs, and shoulder strap
- Yarn Weight: Worsted-weight cotton or cotton-blend yarn
- Hook Sizes: 3.5 mm and 4 mm
- Color: Stone gray
- Terminology: US crochet terms
Materials Needed
- Approximately 500–650 g stone-gray worsted-weight cotton yarn
- 3.5 mm crochet hook for the floral motifs and borders
- 4 mm crochet hook for the gusset and shoulder strap
- Four gold-tone metal rings, approximately 25–30 mm diameter
- Optional cotton fabric lining
- Optional lightweight bag stabilizer
- Magnetic snap or zipper closure
- Tapestry needle
- Stitch markers
- Scissors
- Measuring tape
- Sewing needle and matching thread
Crochet Abbreviations
- MR: Magic ring
- ch: Chain
- sl st: Slip stitch
- sc: Single crochet
- hdc: Half double crochet
- dc: Double crochet
- tr: Treble crochet
- BLO: Back loop only
- FPdc: Front post double crochet
- BPdc: Back post double crochet
- puff: Puff stitch
- FO: Fasten off
Special Stitch: Raised Puff Stitch
Yarn over, insert hook into the indicated stitch or space, yarn over and pull up a long loop. Repeat four more times in the same location. Yarn over and pull through all loops on the hook, then ch 1 to secure the puff.
Keep the loops evenly elongated to create rounded, dimensional flower petals.
1. Crochet the Floral Center Motif
Use stone-gray yarn and a 3.5 mm hook.
The central flower forms the focal point of each large textured handbag panel.
Flower Center
- Round 1: MR, ch 1, work 12 sc into the ring. Join with sl st. (12 sc)
- Round 2: Ch 3, work 1 dc in the same stitch and 2 dc in each remaining stitch. Join. (24 dc)
- Round 3: Ch 1, work 1 sc in each stitch around. Join. (24 sc)
First Layer of Flower Petals
- Round 4: *Puff in next stitch, ch 2, skip 1 stitch*. Repeat around to create 12 raised petals.
- Round 5: Work 1 sc into each ch-2 space, separated by ch 3.
- Round 6: Work a puff stitch into each ch-3 space, separated by ch 2.
Spread the petals outward gently to create a full, layered floral center.
2. Expand the Flower Into a Textured Square
The flower motif is expanded into a square using puff-stitch clusters and chain spaces.
- Round 7: Work groups of 3 dc between the outer petals.
- Round 8: Establish four evenly spaced corners using (3 dc, ch 2, 3 dc).
- Round 9: Work puff-stitch clusters along each side, keeping the corner spaces open.
- Round 10: Work 3 dc into each side space and (3 dc, ch 2, 3 dc) into each corner.
- Round 11: Add a decorative round of raised puff stitches along the square edges.
- Round 12: Work 1 sc into each stitch, with (2 sc, ch 2, 2 sc) in each corner.
Continue expanding the square as needed until it measures approximately 22–24 cm across.
Keep all four corners symmetrical and ensure that the floral center remains flat.
3. Make the Front and Back Floral Panels
Create two matching large floral squares using the instructions above.
For the reference-inspired design, each panel should feature:
- A tightly crocheted circular flower center
- Several layers of rounded puff-stitch petals
- Raised floral clusters radiating outward
- Small openwork spaces between the textured motifs
- A structured square border
Once both panels are complete, block them gently to ensure they are identical in size.
4. Crochet the Structured Panel Borders
Using the 3.5 mm hook, join yarn at any corner.
- Round 1: Work sc evenly around the panel, with 3 sc in each corner.
- Round 2: Work sc around, maintaining the corner increases.
- Round 3: Work FPdc and BPdc alternately along the edges to create a raised ribbed border.
- Round 4: Work sc evenly around the panel.
Fasten off and weave in the ends.
Repeat for the second panel.
5. Crochet the Side and Bottom Gusset
The gusset gives the handbag its rounded, structured shape and generous interior space.
Using stone-gray yarn and a 4 mm hook:
- Ch 22, or enough chains to create a strip approximately 10 cm wide.
- Row 1: Sc in the second chain from the hook and across. Turn.
- Row 2: Ch 1, sc in BLO across. Turn.
- Repeat Row 2 until the strip is long enough to extend down one side of the handbag, across the bottom, and up the opposite side.
- Work one round of sc around the entire strip to strengthen the edges.
- Fasten off, leaving a long sewing tail.
The gusset should be approximately 10 cm wide and long enough to fit the three outer edges of the front and back panels.
6. Assemble the Handbag Body
- Place the front floral panel and gusset together with the right sides facing outward.
- Align the upper corner of the panel with the upper edge of the gusset.
- Join the pieces using a firm slip-stitch seam or mattress stitch.
- Continue along the side, bottom, and opposite side.
- Attach the back floral panel to the remaining gusset edge using the same method.
- Check that both panels are aligned and that the bag sits evenly.
Use stitch markers to hold the pieces together before joining.
7. Crochet the Reinforced Upper Edge
Join yarn at the top opening of the assembled handbag.
- Round 1: Work sc evenly around the entire opening.
- Round 2: Work sc in BLO around.
- Round 3: Work alternating FPdc and BPdc for a decorative ribbed edge.
- Round 4: Work sc evenly around.
- Round 5: Work reverse single crochet around the top edge for a neat finish.
Fasten off and weave in the ends.
The finished upper edge should be firm enough to support the shoulder strap without excessive stretching.
8. Crochet the Shoulder Strap
Use a 4 mm hook and stone-gray yarn.
The reference handbag features a thick, softly curved crocheted shoulder handle attached with gold-tone rings.
- Ch 13.
- Row 1: Sc in the second chain from the hook and across. (12 sc)
- Row 2: Ch 1, sc in BLO across. Turn.
- Repeat Row 2 until the strap measures approximately 55–60 cm.
- Fold the strap lengthwise.
- Join the long edges using slip stitches to form a thick, rounded strap.
- Fasten off and weave in the ends.
For additional durability, insert a narrow cotton webbing strip inside the folded strap before closing the seam.
9. Crochet the Gold-Ring Attachment Tabs
Make four attachment tabs using the 3.5 mm hook.
- Ch 9.
- Row 1: Sc in the second chain from the hook and across. (8 sc)
- Rows 2–10: Ch 1, sc across. Turn.
- Fasten off, leaving a long sewing tail.
Fold each tab around a gold-tone ring and sew the ends securely together.
Attach two ring tabs to the upper corners of the handbag and the remaining two to the shoulder strap ends, creating the gold-ring connection shown in the reference image.
Reinforce all attachment points with several rows of tight stitches.
10. Add the Optional Fabric Lining
A fabric lining helps maintain the handbag’s shape and prevents smaller belongings from slipping through the decorative crochet openings.
- Measure the inside dimensions of the assembled handbag.
- Cut two fabric panels matching the front and back dimensions, adding seam allowances.
- Cut a fabric gusset matching the side and bottom strip.
- Sew the fabric pieces together to create the lining.
- Fold the upper raw edge inward.
- Insert the lining into the handbag.
- Hand-sew the lining just below the crocheted upper edge.
Add a magnetic snap or zipper if desired.
11. Final Shaping and Finishing
- Weave in all remaining yarn ends.
- Check the front and back panels for symmetry.
- Adjust the puff-stitch flowers so the raised petals are evenly distributed.
- Shape the gusset gently to create the rounded handbag silhouette.
- Inspect and reinforce all gold-ring attachments.
- Place a lightweight bag organizer or removable insert inside if additional structure is desired.
- Allow the handbag to rest flat before use.
Advanced Crochet Tips
- Use tightly twisted cotton yarn for excellent stitch definition.
- Keep puff-stitch loops consistent to create uniform dimensional flowers.
- Use stitch markers to maintain symmetrical corners.
- Block both floral panels to the same dimensions before assembly.
- Reinforce the handle attachment points to prevent stretching.
- Use a fabric lining to protect the delicate openwork.
- Choose strong, smooth metal rings that will not snag the yarn.
- Maintain a firm tension along the gusset to help the bag hold its shape.
Creative Color Variations
- Classic Stone Gray: Elegant monochromatic gray with gold hardware.
- Soft Ivory: Cream-colored floral motifs with champagne-gold rings.
- Dusty Rose: Romantic pink with antique-brass hardware.
- Forest Green: Deep green floral texture with gold accents.
- Chocolate Brown: Warm brown with bronze hardware.
- Midnight Blue: Dark navy with polished gold rings.
Frequently Asked Questions
Is this handbag suitable for beginners?
This is an advanced crochet project because it combines dimensional puff-stitch motifs, square shaping, a separate gusset, reinforced borders, and structured bag assembly.
What yarn works best for this handbag?
Worsted-weight cotton or a firm cotton-blend yarn is ideal because it provides good stitch definition and helps the handbag maintain its shape.
Can I make the handbag larger?
Yes. Increase the number of outer rounds on the floral panels and adjust the gusset length accordingly.
Can I make the strap longer?
Yes. Continue crocheting the strap until it reaches your preferred length before folding and joining it.
Does the handbag need a lining?
A lining is optional but recommended because the floral design contains decorative openwork spaces.
Can I sell finished handbags made from this pattern?
Yes. You may sell finished handmade bags created using these original instructions.
Final Thoughts
This Elegant Gray Floral Granny Square Crochet Handbag is a sophisticated combination of traditional crochet techniques and contemporary accessory design.
The dimensional floral panels, raised puff stitches, structured shape, thick crocheted strap, and gold-tone hardware create a timeless handmade bag that looks beautiful with casual and elegant outfits alike.
Whether you make it for yourself, give it as a thoughtful handmade gift, or add it to your crochet collection, this advanced handbag is a rewarding project for anyone who enjoys detailed textured crochet.
Save this free floral crochet handbag pattern to Pinterest and share it with your crochet-loving friends!

