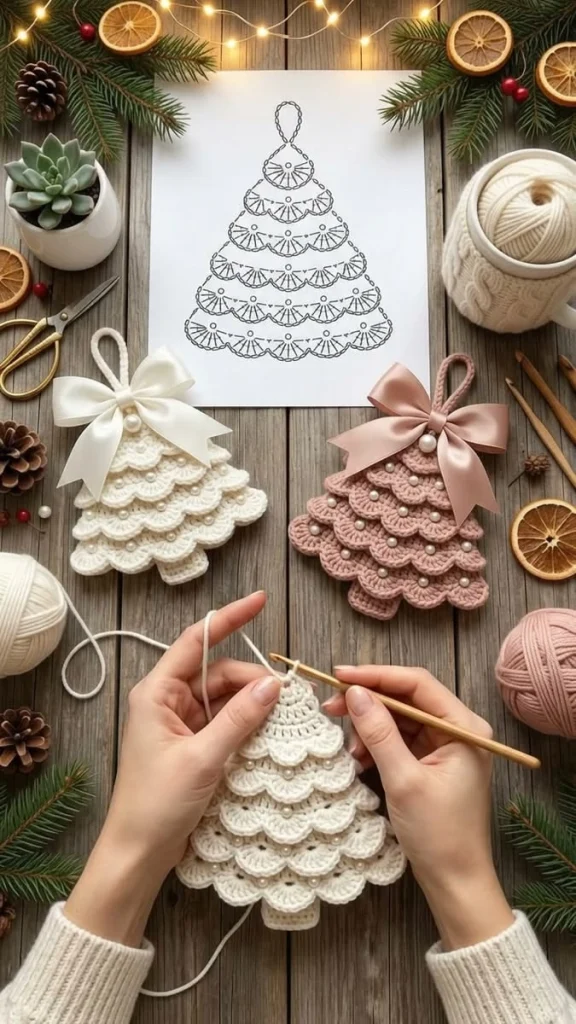
Elegant Ruffled Crochet Christmas Tree Ornaments: Free Crochet Pattern
Create charming handmade holiday decorations with this beautiful ruffled crochet Christmas tree ornament pattern. Featuring delicate scalloped branches, softly layered crochet textures, elegant pearl accents, and romantic satin bows, these Christmas tree ornaments bring timeless handmade charm to your festive decorations.
Inspired by vintage lace ornaments and soft pastel Christmas decor, this design combines a triangular crochet tree foundation with overlapping rows of shell-stitch ruffles. Each scalloped layer resembles a tier of snowy evergreen branches, creating a beautifully textured tree silhouette.
The ornaments are especially lovely in warm ivory and dusty pink, although you can easily customize the colors to match your holiday decorating style.
Small pearl beads are sewn along the scalloped branches, while an oversized satin bow decorates the top of each tree. A simple crochet hanging loop makes the ornaments easy to display on Christmas trees, wreaths, garlands, wall hooks, or decorative branches.
In this complete tutorial, you will learn how to crochet the triangular foundation, create layered scalloped ruffles, make the tree trunk, attach pearl decorations, add satin bows, and finish the ornaments with elegant hanging loops.
Pattern at a Glance
Finished measurements depend on yarn thickness, hook size, tension, blocking, and the number of scalloped layers.
Materials and Supplies
- Approximately 30–40 g of DK-weight cotton yarn in warm ivory for one ornament.
- Approximately 30–40 g of DK-weight cotton yarn in dusty pink for a second ornament.
- 3 mm crochet hook.
- 2.5 mm crochet hook for smaller details.
- Small white or ivory pearl beads, approximately 4–6 mm in diameter.
- Ivory satin ribbon, approximately 2–3 cm wide.
- Dusty pink satin ribbon, approximately 2–3 cm wide.
- Yarn needle.
- Fine sewing needle and strong matching thread.
- Sharp scissors.
- Stitch markers.
- Measuring tape.
- Optional fabric stiffener suitable for crochet.
- Optional felt backing for additional structure.
Yarn recommendation: Mercerized cotton yarn is an excellent choice because it provides crisp stitch definition, holds the scalloped edges beautifully, and creates an elegant finish.
Gauge and Finished Measurements
Using DK-weight cotton yarn and a 3 mm crochet hook, aim for approximately 20 single crochet stitches and 22 rows per 10 cm.
The finished ornament should measure approximately 14–18 cm tall, including the small tree trunk but excluding the hanging loop.
The widest scalloped layer should measure approximately 10–13 cm across.
Adjust the number of foundation rows and ruffle layers to create smaller or larger ornaments.
Abbreviations
All instructions use US crochet terminology.
Part 1: Crochet the Triangular Tree Foundation
The ornament begins with a flat triangular crochet base that supports the decorative ruffled branches.
Begin the foundation
Using ivory or dusty pink yarn and a 3 mm hook, ch 31.
Row 1: Sc in the second chain from the hook and across. 30 sc.
Row 2: Ch 1, turn, sc in every stitch across. 30 sc.
Row 3: Ch 1, turn, dec, sc across until two stitches remain, dec. 28 sc.
Row 4: Ch 1, turn, sc across. 28 sc.
Row 5: Ch 1, turn, dec, sc across until two stitches remain, dec. 26 sc.
Row 6: Ch 1, turn, sc across. 26 sc.
Continue repeating the two-row sequence, decreasing one stitch at each end of every alternate row.
When only two stitches remain, work one final decrease.
FO, leaving a long tail for assembly.
The finished foundation should form a neat triangular Christmas tree silhouette.
Part 2: Crochet the First Scalloped Ruffle Layer
The scalloped branches are created using decorative shell stitches worked across the front surface of the tree.
Bottom ruffle instructions
Position the tree with the right side facing upward.
Join matching yarn near the lower-left edge of the foundation.
Work the following sequence across the lower section:
Skip one stitch, work 5 dc into the next stitch, skip one stitch, and sl st into the following stitch.
Repeat across the width of the tree.
FO and weave in the ends.
The bottom ruffle should create a row of rounded scallops that extends slightly beyond the triangular foundation.
Part 3: Crochet the Second Ruffle Layer
The second layer overlaps the first and creates the beginning of the cascading Christmas tree texture.
Second ruffle instructions
Count approximately four rows upward from the first ruffle.
Join yarn near the left edge of the triangular foundation.
Work shell stitches across the row using the same sequence:
Skip one stitch, work 5 dc into the next stitch, skip one stitch, and sl st into the following stitch.
Continue across the available stitches.
FO and weave in the ends.
Allow the second ruffle to overlap the upper edge of the first layer slightly.
Part 4: Continue the Layered Scalloped Branches
Additional ruffle layers gradually become narrower as the tree approaches its pointed top.
Layering instructions
- Move approximately three to four foundation rows upward.
- Join yarn near the left edge.
- Work shell stitches across the available width.
- Keep the scallops evenly spaced.
- FO and weave in the ends.
- Repeat until the entire triangular foundation is covered.
Most ornaments will require approximately five to seven scalloped layers, depending on the desired height.
The finished tree should have a cascading arrangement of rounded shell-stitch branches.
Part 5: Shape the Upper Tree Point
The uppermost section should taper neatly beneath the satin bow.
Top shaping instructions
Join yarn near the upper tip of the triangular foundation.
Work a small shell of 3 dc into the available center stitch.
Secure the shell with a slip stitch.
FO and weave in the ends.
This creates a softly rounded finishing detail at the top of the tree.
Part 6: Crochet the Small Tree Trunk
A miniature rectangular trunk completes the Christmas tree silhouette.
Tree trunk instructions
Using matching yarn, ch 7.
Row 1: Sc in the second chain from the hook and across. 6 sc.
Rows 2–5: Ch 1, turn, sc across. 6 sc.
FO, leaving a long sewing tail.
Position the trunk behind the center of the bottom tree edge and sew securely.
Part 7: Crochet the Decorative Hanging Loop
A simple crochet loop allows the finished ornament to hang from a Christmas tree branch, wreath, or decorative hook.
Hanging loop instructions
Using matching yarn, ch 31.
Sl st into the second chain from the hook and across.
FO, leaving a long sewing tail.
Fold the cord into a loop and sew both ends to the upper back of the tree.
Adjust the loop length to suit your preferred display.
Part 8: Add the Pearl Decorations
Small pearl beads give the scalloped branches their delicate vintage appearance.
Pearl placement instructions
- Lay the finished tree flat with the right side facing upward.
- Arrange small pearl beads along the scalloped layers.
- Place one pearl near the center of selected shell stitches.
- Space the pearls evenly across the branches.
- Thread a fine sewing needle with strong matching thread.
- Sew each pearl securely through the crochet fabric.
- Secure the thread ends on the back.
Use approximately 12–20 pearls per ornament, depending on its size.
Part 9: Create the Elegant Satin Bow
The satin bow is one of the most distinctive details of this Christmas tree ornament.
Bow instructions
- Cut approximately 35–45 cm of satin ribbon.
- Form two large symmetrical loops.
- Cross the loops at the center.
- Secure the middle using matching sewing thread.
- Adjust the loops until they are full and balanced.
- Trim the ribbon tails diagonally.
- Optional: Add a small pearl bead to the center of the bow.
Use ivory ribbon for the cream ornament and dusty pink ribbon for the pink ornament.
Part 10: Attach the Satin Bow
The bow should sit just below the hanging loop at the top of the tree.
Bow attachment
- Position the bow near the upper tip of the tree.
- Arrange the ribbon tails so they extend over the upper scalloped branches.
- Sew the bow securely to the crochet foundation.
- Check that the hanging loop remains visible above the bow.
- Adjust the ribbon tails for a balanced appearance.
Part 11: Make the Ivory Christmas Tree Ornament
The ivory version creates a classic vintage Christmas appearance with soft cream crochet and delicate pearl accents.
Ivory ornament details
- Use warm ivory cotton yarn for the entire tree.
- Create approximately six scalloped branch layers.
- Add small white pearl beads along the ruffles.
- Attach a large ivory satin bow.
- Use a matching cream crochet hanging loop.
- Finish with a small rectangular ivory trunk.
This version looks especially beautiful with natural greenery, gold ornaments, and warm Christmas lights.
Part 12: Make the Dusty Pink Christmas Tree Ornament
The dusty pink version creates a romantic pastel holiday decoration.
Dusty pink ornament details
- Use dusty pink cotton yarn for the foundation and ruffles.
- Create approximately six scalloped branch layers.
- Decorate the scallops with small ivory pearls.
- Attach a large dusty pink satin bow.
- Use a matching pink crochet hanging loop.
- Finish with a small rectangular pink trunk.
The dusty pink ornament pairs beautifully with champagne gold, cream, blush, and soft white Christmas decorations.
Part 13: Optional Crochet Backing
A second triangular crochet panel can be added to make the ornament more structured.
Backing instructions
- Crochet a second triangular foundation using the same pattern.
- Place the backing behind the decorated tree.
- Align the edges carefully.
- Join the two layers using slip stitches or mattress stitch.
- Leave the scalloped ruffles free on the front.
- Weave in the ends neatly.
The backing helps the ornament maintain its shape and creates a cleaner reverse side.
Part 14: Optional Fabric Stiffening
If you prefer a firmer ornament, use a fabric stiffener suitable for cotton crochet.
Stiffening instructions
- Protect the satin bow and pearl decorations.
- Apply a small amount of fabric stiffener to the crochet foundation.
- Shape the triangular edges carefully.
- Arrange the scalloped layers evenly.
- Allow the ornament to dry completely.
- Reattach any decorations removed before stiffening.
Always test the stiffener on a small yarn sample before applying it to the finished ornament.
Part 15: Final Assembly and Finishing
Inspect the ornament carefully before displaying it.
- Check that the triangular foundation is symmetrical.
- Adjust the overlapping scalloped layers.
- Secure any loose shell stitches.
- Inspect the pearl decorations.
- Check the satin bow attachment.
- Adjust the ribbon tails.
- Reinforce the hanging loop.
- Check the small tree trunk.
- Weave in all remaining yarn ends.
- Gently reshape the finished ornament.
Customization Ideas
1. Create a snowy white Christmas tree
Use pure white cotton yarn, silver ribbon, and crystal-colored beads for a winter-inspired ornament.
2. Make a classic green Christmas tree
Use forest-green yarn, red ribbon, and gold-colored beads for a traditional holiday look.
3. Create a champagne gold ornament
Use beige or champagne-colored yarn with metallic-gold thread and cream satin ribbon.
4. Make a miniature version
Use thinner yarn and a smaller hook to create tiny ornaments suitable for gift wrapping or small Christmas trees.
5. Replace pearls with embroidery
Use small French knots in contrasting yarn colors instead of pearl beads.
6. Create a matching ornament set
Make several trees in ivory, dusty pink, sage green, and champagne for a coordinated pastel Christmas collection.
Care Instructions
- Dust gently with a soft brush.
- Spot-clean the crochet fabric when necessary.
- Avoid soaking the satin bows.
- Do not machine wash ornaments decorated with pearls.
- Allow the ornament to dry completely before storing.
- Keep away from direct heat and open flames.
- Store flat in a protective box.
- Use tissue paper to protect the scalloped layers and ribbon bows.
Frequently Asked Questions
Is this ruffled crochet Christmas tree pattern beginner-friendly?
This project is best suited to intermediate crocheters because it includes shaping, surface crochet, layered shell stitches, and decorative finishing.
What yarn works best for these Christmas tree ornaments?
DK-weight cotton yarn is recommended because it provides excellent stitch definition and helps the scalloped branches maintain their shape.
Can I make these ornaments without pearl beads?
Yes. You can leave the scalloped layers undecorated or replace the pearls with embroidered French knots.
Can I use different ribbon colors?
Absolutely. Ivory, blush pink, burgundy, champagne, gold, and sage green ribbons all work beautifully with this design.
Can I make the ornaments larger?
Yes. Increase the foundation width and height, then add additional scalloped layers to create a larger tree.
Are these ornaments suitable for handmade gifts?
Yes. These elegant crochet Christmas trees make lovely handmade gifts, stocking fillers, gift toppers, and seasonal decorations.
Final Thoughts
These ruffled crochet Christmas tree ornaments combine delicate shell-stitch texture, romantic pastel colors, elegant satin bows, and timeless pearl details into beautiful handmade holiday decorations.
The cascading scalloped branches create a soft, dimensional Christmas tree silhouette, while the pearl accents and satin ribbons add a refined vintage-inspired finish.
Whether you make them in classic ivory, romantic dusty pink, traditional green, or festive red, these ornaments are a wonderful way to bring handmade charm to your Christmas celebrations.
Enjoyed this pattern? Save it to your Christmas crochet inspiration board and share your finished ruffled tree ornaments with fellow crochet lovers.

