Emerald Green Crochet Floral Handbag – Free Advanced 3D Puff Flower Pattern
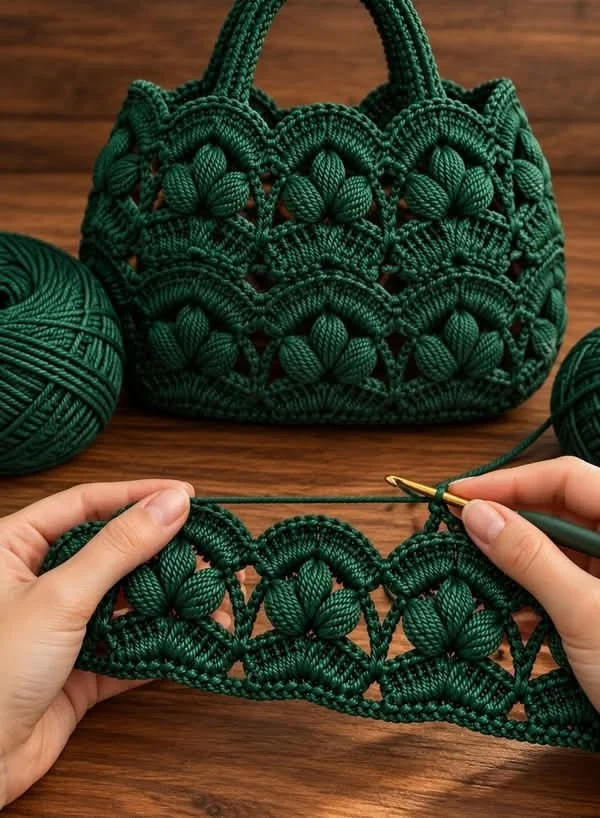
Create an elegant statement accessory with this emerald green crochet floral handbag. Featuring dimensional puff-stitch flowers, beautifully sculpted arches, delicate openwork, and sturdy crocheted handles, this sophisticated handbag combines intricate craftsmanship with a timeless design.
The deep forest-green color highlights every raised stitch and decorative detail. The handbag features two horizontal rows of three-dimensional floral motifs, separated by textured scalloped bands. Each flower has five plump petals, while the surrounding arches and fan stitches create an intricate lace-inspired structure.
This free advanced crochet handbag pattern is designed for experienced crocheters who enjoy textured stitches, modular construction, detailed shaping, and carefully assembled accessories.
Pattern Overview
- Skill Level: Advanced
- Finished Width: Approximately 32 cm
- Finished Height: Approximately 25 cm, excluding handles
- Depth: Approximately 10 cm
- Handle Drop: Approximately 15 cm
- Construction: Separate floral panels, structured base, side gussets, top edging, and reinforced handles
- Yarn Weight: Worsted-weight mercerized cotton
- Hook Sizes: 3 mm, 3.5 mm, and 4 mm
- Terminology: US crochet terms
- Estimated Time: 18–26 hours
Materials
- 550–650 g deep emerald-green worsted-weight cotton yarn
- 3 mm crochet hook for flower details
- 3.5 mm crochet hook for body motifs
- 4 mm crochet hook for handles
- Stitch markers
- Tapestry needle
- Sharp scissors
- Measuring tape
- Matching green sewing thread
- Optional matching cotton lining fabric
- Optional lightweight bag stabilizer
- Optional magnetic snap closure
- Optional removable base insert
Yarn Recommendation: Choose a firm, smooth cotton yarn with excellent stitch definition. Mercerized cotton is especially suitable because it enhances the dimensional flowers and helps the handbag retain its shape.
Crochet Abbreviations
- MR: Magic ring
- ch: Chain
- sc: Single crochet
- hdc: Half double crochet
- dc: Double crochet
- tr: Treble crochet
- sl st: Slip stitch
- inc: Increase
- dec: Decrease
- FLO: Front loop only
- BLO: Back loop only
- FPdc: Front post double crochet
- BPdc: Back post double crochet
- FO: Fasten off
- YO: Yarn over
- puff: Puff stitch
Special Stitch: Five-Loop Puff Stitch
The raised floral petals are created using an elongated puff stitch.
YO, insert the hook into the indicated stitch, and pull up a long loop.
Repeat this process four more times in the same stitch, keeping all elongated loops at an equal height.
YO and pull through all loops on the hook.
Ch 1 to secure the puff.
For fuller petals, repeat the yarn-over and pull-up movement six times instead of five.
Part 1: Crochet the Raised Five-Petal Flowers
The handbag features prominent three-dimensional flowers surrounded by curved decorative arches.
Make 12 floral motifs: six for the front panel and six for the back panel.
Round 1: Flower Center
Using emerald-green yarn and a 3 mm hook, create a magic ring.
Work 10 sc into the ring.
Pull the ring closed.
Join with a sl st to the first sc. (10)
Round 2: Petal Foundations
Ch 1.
*Sc in the next stitch, ch 3, skip 1 stitch.*
Repeat around.
Join with a sl st.
You should have five ch-3 spaces.
Round 3: Dimensional Puff Petals
Sl st into the first ch-3 space.
Ch 2.
Work one five-loop puff stitch into the same space.
Ch 2.
Sl st into the same space.
Move to the next ch-3 space.
Repeat until five raised petals are complete.
Join with a sl st.
Keep the petals rounded and evenly spaced.
Round 4: Rear Foundation
Working behind the flower petals, attach yarn to a space between two petals.
Ch 5.
Sl st into the space between the next two petals.
Repeat around.
You should have five rear chain arches.
Round 5: Openwork Frame
Sl st into the first ch-5 arch.
Work (2 sc, 3 hdc, 2 sc) into the arch.
Ch 2.
Repeat in each remaining arch.
Join with a sl st.
FO, leaving a long sewing tail.
Block each motif lightly to maintain the raised flower shape.
Part 2: Crochet the Sculpted Scalloped Arches
The photograph features prominent raised arches above each floral motif. These arches create the distinctive ornamental structure of the handbag.
Step 1: Foundation Chain
Using emerald-green yarn and a 3.5 mm hook, ch 18.
Step 2: First Arch Row
Sc in second ch from hook.
Hdc in next 2 ch.
Dc in next 3 ch.
Tr in next 5 ch.
Dc in next 3 ch.
Hdc in next 2 ch.
Sc in final ch.
Step 3: Raised Border
Ch 1 and turn.
Work one sc in each stitch across, crocheting around a second strand of yarn to create a raised corded edge.
FO.
Make 12 arches to frame the floral motifs.
Position the highest point of each arch above the flower center.
Part 3: Crochet the Textured Fan Stitch Bands
The textured fan sections provide depth between the flower rows and help create the handbag’s structured appearance.
Foundation
Ch a multiple of 8 plus 2 to match the width of the assembled flower panel.
Row 1
Sc in second ch from hook.
Sc in each remaining chain.
Row 2
Ch 3 and turn.
*Skip 3 stitches, work 7 dc in the next stitch, skip 3 stitches, sc in the next stitch.*
Repeat across.
Row 3
Ch 1 and turn.
Work sc into the first stitch.
Ch 3.
Sc into the center dc of the next fan.
Ch 3.
Repeat across.
Row 4
Ch 3 and turn.
Work 7 dc into each ch-3 space, separating the fans with sc stitches.
Repeat Rows 3–4 until the band reaches approximately 5 cm in height.
FO.
Make two matching decorative bands.
Part 4: Assemble the Front Floral Panel
The front panel is constructed from six dimensional floral motifs arranged in two horizontal rows.
Step 1: Arrange the Flowers
Lay three floral motifs side by side.
Place the remaining three motifs directly beneath them.
Align the flowers so the petals form a consistent repeating pattern.
Step 2: Connect the Motifs
Using emerald-green yarn, join neighboring motifs with short ch-3 bridges.
Work through the rear foundation stitches rather than the raised petals.
This keeps the flowers three-dimensional.
Step 3: Add the Upper Scalloped Arches
Position one sculpted arch above each upper flower.
Sew the ends of the arches into the connecting points between motifs.
Allow the raised edges to curve naturally.
Step 4: Add the Center Decorative Band
Position one fan-stitch band between the two flower rows.
Attach it using mattress stitch.
Keep the fan stitches facing outward.
Step 5: Add the Lower Decorative Band
Attach the second textured band beneath the lower flower row.
Adjust the panel until it measures approximately 32 cm wide and 25 cm high.
Part 5: Crochet the Back Panel
Repeat the front-panel construction to create the back of the handbag.
Use the remaining six floral motifs.
Maintain the same placement of scalloped arches and decorative bands.
Check that both panels have identical dimensions.
Block lightly if necessary.
Part 6: Crochet the Structured Oval Base
The base gives the handbag its rounded rectangular shape and supports the dimensional floral panels.
Round 1
Using emerald-green yarn and a 3.5 mm hook, ch 37.
Sc in second ch from hook.
Sc in next 34 ch.
Work 3 sc in final chain.
Continue along the opposite side of the foundation chain.
Sc in next 34 ch.
Work 2 sc in the final chain.
Join with a sl st. (74)
Round 2
Ch 1.
Sc in next 35 stitches.
Inc in each of the next 3 stitches.
Sc in next 34 stitches.
Inc in each of the final 2 stitches.
Join with a sl st. (79)
Round 3
Work sc around, distributing increases evenly around the curved ends.
Continue increasing only at the ends until the base measures approximately 32 cm long and 10 cm wide.
Final Base Round
Work one round of sc in BLO.
This creates a defined fold line for attaching the side panels.
FO.
Part 7: Crochet the Side Gussets
Make two matching side gussets to connect the front and back panels.
Foundation
Using emerald-green yarn, ch 13.
Row 1
Sc in second ch from hook and across. (12)
Rows 2–45
Ch 1, turn.
Sc in each stitch across. (12)
Continue until the gusset matches the side height of the floral panels.
FO, leaving a long sewing tail.
Repeat for the second gusset.
Assembly
Attach each gusset between the front and back panels using mattress stitch.
Align the bottom edges carefully.
Attach the assembled body to the oval base.
Work through both loops for a strong seam.
Part 8: Crochet the Reinforced Top Border
The upper edge of the handbag features a thick, sculpted border that frames the floral motifs.
Round 1
Attach yarn to the upper edge.
Work sc evenly around the entire opening.
Adjust the stitch count to avoid puckering.
Round 2
Ch 1.
Work sc in BLO around.
Round 3
Work alternating FPdc and BPdc stitches around to create a ribbed texture.
Round 4
Work one round of reverse single crochet for a firm decorative finish.
FO and weave in ends.
Part 9: Crochet the Thick Rounded Handles
The handbag features two matching rounded handles made with dense crochet stitches.
Handle Foundation
Using emerald-green yarn and a 4 mm hook, make a magic ring.
Work 8 sc into MR.
Rounds 2–90
Sc in each stitch around. (8)
Continue until the handle measures approximately 45 cm.
For additional firmness, crochet around a strong cotton cord.
FO, leaving a long tail.
Repeat for the second handle.
Attach the Handles
Mark two attachment points on the front panel, approximately 18 cm apart.
Attach the first handle securely using repeated sewing stitches.
Repeat on the back panel.
Reinforce the attachment points from the inside of the handbag.
Check that both handles are symmetrical.
Part 10: Add the Optional Fabric Lining
A fabric lining helps prevent small items from slipping through the decorative openwork.
Step 1: Measure
Measure the completed interior of the handbag.
Cut two matching lining panels and a bottom section, allowing approximately 1 cm for seam allowances.
Step 2: Sew
Sew the lining pieces together with right sides facing.
Turn the lining right side out.
Step 3: Insert
Place the lining inside the crochet handbag.
Fold the upper edge inward.
Hand-stitch the lining to the inner top border using matching thread.
Step 4: Optional Closure
Install a magnetic snap closure in the lining near the center of the bag opening.
Reinforce the snap area with a small fabric patch.
Part 11: Final Shaping and Finishing
- Inspect all motif connections.
- Secure any loose yarn tails.
- Adjust the puff flowers so their petals face outward.
- Shape the scalloped arches evenly.
- Check the symmetry of the front and back panels.
- Reinforce the handle attachment points.
- Insert a removable base stabilizer if desired.
- Gently steam-block the non-dimensional sections.
- Avoid flattening the raised flower petals.
- Allow the handbag to dry completely before use.
Advanced Crochet Techniques Used
- Magic-ring construction
- Dimensional puff stitches
- Layered floral motifs
- Openwork chain bridges
- Textured fan stitches
- Front-post and back-post stitches
- Raised corded edging
- Scalloped arch shaping
- Modular panel construction
- Oval base shaping
- Side gusset construction
- Continuous spiral crochet
- Reinforced handle construction
- Invisible mattress-stitch assembly
- Optional fabric lining
Color Variations
- Emerald Elegance: Deep emerald green for a luxurious monochromatic handbag.
- Classic Ivory: Warm ivory yarn for a delicate, romantic appearance.
- Chocolate Brown: Rich brown cotton for a timeless everyday accessory.
- Dusty Rose: Muted pink for a feminine floral design.
- Midnight Blue: Deep navy yarn for an elegant evening handbag.
- Terracotta: Warm earthy orange for a bohemian-inspired accessory.
- Sage Green: Soft green for a fresh, understated look.
- Black: Solid black cotton for a dramatic textured statement bag.
Tips for a Professional Finish
- Use smooth cotton yarn to emphasize the flower details.
- Keep the puff stitches consistently elongated.
- Use the same hook size for all floral motifs.
- Block the motifs before joining them.
- Join motifs through their rear stitches to preserve the raised petals.
- Maintain consistent tension in the scalloped arches.
- Reinforce the bottom corners.
- Use firm stitches for the side gussets.
- Choose a sturdy lining for everyday use.
- Reinforce the handles with cotton cord.
- Avoid excessive steaming on the dimensional flowers.
- Store the handbag with tissue paper inside to preserve its shape.
Frequently Asked Questions
Is this crochet handbag suitable for beginners?
This is an advanced crochet pattern featuring dimensional flowers, raised arches, textured stitches, and modular assembly. It is best suited to crocheters who are comfortable with shaping and joining complex motifs.
What yarn works best for this handbag?
Worsted-weight mercerized cotton is recommended because it offers excellent stitch definition, durability, and structure.
How many floral motifs are needed?
The pattern uses 12 raised floral motifs, with six on the front panel and six on the back panel.
Can I make the handbag larger?
Yes. Add more floral motifs to increase the width or height, then adjust the base and gussets to match.
Can I make the handles longer?
Yes. Continue crocheting the handle tubes until they reach your preferred length.
Does the handbag need a lining?
A lining is optional but recommended because the decorative openwork may allow small belongings to slip through.
How do I keep the puff flowers raised?
Use firm yarn tension, avoid excessive blocking, and join the motifs through the rear foundation stitches.
Can I use acrylic yarn?
Yes, although cotton generally provides better structure and durability for handbags.
How can I prevent the handles from stretching?
Crochet around strong cotton cord and reinforce the handle attachment points with multiple rows of stitching.
Can I sell handbags made from this pattern?
Yes. You may sell handmade finished bags created using this original pattern. Credit to the designer is appreciated.
Care Instructions
- Spot clean with mild detergent.
- Hand wash gently if necessary.
- Use cool water.
- Do not wring or twist.
- Reshape while damp.
- Lay flat to dry.
- Avoid direct heat.
- Do not tumble dry.
- Store with light stuffing inside.
- Avoid overloading the handbag.
Final Thoughts
This emerald green crochet floral handbag is a beautiful combination of dimensional crochet flowers, sculpted scalloped arches, textured fan stitches, and practical handbag construction. Its rich monochromatic color allows the intricate crochet details to stand out, creating an elegant handmade accessory with a distinctive boutique-inspired appearance.
Whether styled with a casual outfit or carried as a statement accessory, this sophisticated floral handbag showcases the beauty of advanced crochet craftsmanship.
Love this free crochet handbag pattern? Save it to Pinterest and share it with your crochet-loving friends for more beautiful handmade bag inspiration!

