Floral Crochet Shoulder Bag Pattern
Beginner Friendly
Perfect for those just starting their crochet journey, with clear instructions and simple techniques
Single-Day Project
A satisfying project you can complete in a single afternoon or evening.
Handmade Gift
A beautiful keepsake — free forever. Read online or print at home.
About This Floral Crochet Shoulder Bag Pattern
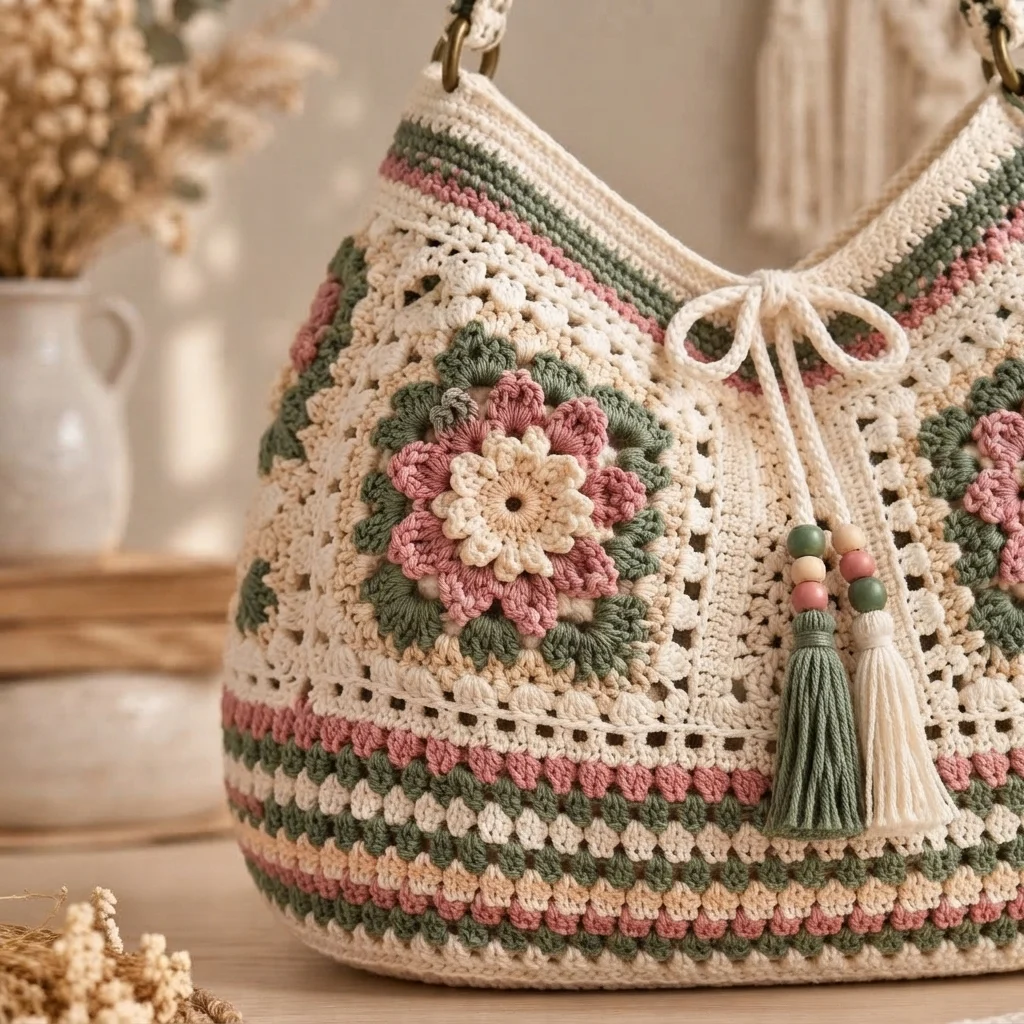
This boho floral crochet bag pattern creates a roomy shoulder bag with a softly rounded base, open textured body, sage green and dusty rose stripes, raised floral medallions, a drawstring-style center tie, beaded tassels, and a substantial two-color shoulder handle. The layered flowers are the main feature, combining cream centers with dusty rose petals and muted sage leaves to reproduce the romantic botanical look of the reference bag.
The construction mixes dense crochet with decorative openwork so the finished bag keeps its shape without losing the relaxed bohemian drape. A reinforced oval base supports the contents, alternating stripe rounds build the lower body, and the upper section transitions into cream lace. The floral medallions are crocheted separately and sewn securely to the front, allowing their petals and leaves to remain dimensional.
This is an advanced project requiring approximately 18-24 hours. It is best suited to crocheters comfortable with oval shaping, color changes, cluster stitches, openwork, layered flowers, surface details, long reinforced straps, drawstrings, tassel making, bead placement, and assembling decorative motifs onto a functional bag.
Materials
- DK / light worsted cotton in warm cream approximately 450-500 m
- DK / light worsted cotton in muted sage green approximately 180 m
- DK / light worsted cotton in dusty rose approximately 140 m
- DK / light worsted cotton in soft peach approximately 60 m
- DK / light worsted cotton in pale beige approximately 50 m
- 3.5 mm crochet hook main bag and motifs
- 3.0 mm crochet hook optional for firmer handle and cords
- Antique brass rings 2 rings, approximately 30-35 mm
- Decorative antique-brass medallion 1 optional, approximately 35-40 mm
- Wooden or ceramic beads in cream, sage, and dusty rose 8-10 beads with holes large enough for cord
- Yarn needle for assembly
- Stitch markers 6-8
- Scissors 1 pair
- Cotton lining fabric optional, approximately 55 × 90 cm
- Plastic canvas or firm bag-base insert optional, approximately 32 × 10 cm
- Matching sewing thread for optional lining and hardware reinforcement
Abbreviations
MRmagic ringchchainsl stslip stitchscsingle crochethdchalf double crochetdcdouble crochettrtreble crochetinc2 single crochet in same stitchdecsingle crochet decreaseststitchstsstitchesspspaceskskipBLOback loop onlyRSright sideWSwrong sideCL3-dc cluster: work 3 dc in same spacepuffyarn over, insert hook and pull up loop 4 times, yarn over and pull through all loopsOval Base
- Round 1: With cream, ch 41. Work 2 sc in second ch from hook, sc in next 38 ch, 4 sc in final ch. Continue along the opposite side of the foundation chain, sc in next 38 ch, then 2 sc in the first foundation ch. Join with sl st. (84 sts)
- Round 2: Ch 1. 2 sc in each of next 2 sts, sc in next 38 sts, 2 sc in each of next 4 sts, sc in next 38 sts, 2 sc in each of final 2 sts. Join. (92 sts)
- Round 3: Ch 1. (Sc in next st, inc) twice, sc in next 38 sts, (sc in next st, inc) 4 times, sc in next 38 sts, (sc in next st, inc) twice. Join. (100 sts)
- Round 4: Ch 1. (Sc in next 2 sts, inc) twice, sc in next 38 sts, (sc in next 2 sts, inc) 4 times, sc in next 38 sts, (sc in next 2 sts, inc) twice. Join. (108 sts)
- Round 5: Ch 1. (Sc in next 3 sts, inc) twice, sc in next 38 sts, (sc in next 3 sts, inc) 4 times, sc in next 38 sts, (sc in next 3 sts, inc) twice. Join. (116 sts)
- Round 6: Sc in each st around. Join. (116 sts)
- Round 7: Working in BLO, sc in each st around. Join. (116 sts)
- Round 8: Sc in each st around. Join. (116 sts)
Solid Lower Body
- Round 1: With cream, ch 1 and sc in each st around. Join. (116 sts)
- Round 2: Hdc in each st around. Join. (116 sts)
- Round 3: Sc in each st around. Join. (116 sts)
- Round 4: Hdc in each st around. Join. (116 sts)
- The solid lower body should measure approximately 4-5 cm above the base before beginning the striped texture.
Lower Textured Stripe Section
- Round 1: Change to sage. Ch 1, sc in each st around. Join. (116 sts)
- Round 2: With sage, ch 3, dc in same st, sk next st, 2 dc in next st; repeat (sk next st, 2 dc in next st) around. Join.
- Round 3: Change to cream. Ch 1, work 1 sc in each dc around. Join. (116 sts)
- Round 4: Change to dusty rose. Ch 3, dc in same st, sk next st, 2 dc in next st; repeat around. Join.
- Round 5: Change to cream. Sc in each dc around. Join. (116 sts)
- Round 6: Change to soft peach. Work the same paired-dc texture around. Join.
- Round 7: Change to cream. Sc in each dc around. Join. (116 sts)
- Round 8: Change to sage. Work paired dc groups around. Join.
- Round 9: Change to cream. Sc in each dc around. Join. (116 sts)
- Round 10: Change to dusty rose. Work paired dc groups around. Join.
- Round 11: Change to cream. Sc in each dc around. Join. (116 sts)
- Round 12: Change to sage. Work paired dc groups around. Join.
- Round 13: Change to cream. Sc in each dc around. Join. (116 sts)
Openwork Main Body
- Round 1: With cream, ch 3, 2 dc in same st, ch 2, sk next 3 sts, 3 dc in next st; repeat (ch 2, sk next 3 sts, 3 dc in next st) around, spacing the final repeat evenly. Join.
- Round 2: Sl st to center dc of first group. Ch 3, 2 dc in same position, ch 2, then 3 dc in center dc of next group; repeat around. Join.
- Rounds 3-5: Repeat Round 2, keeping the groups vertically aligned.
- Round 6: Ch 1. Work sc in each dc and 2 sc in each ch-2 sp around, distributing stitches evenly to return to 116 sts. Join.
- Round 7: Change to dusty rose. Ch 1, sc in each st around. Join. (116 sts)
- Round 8: Change to cream. Sc in each st around. Join. (116 sts)
- Round 9: Change to sage. Sc in each st around. Join. (116 sts)
- Round 10: Change to cream. Sc in each st around. Join. (116 sts)
- Round 11: Resume the openwork pattern: ch 3, 2 dc in same st, ch 2, sk next 3 sts, 3 dc in next st; repeat around. Join.
- Rounds 12-18: Continue the openwork cluster pattern, maintaining the same vertical alignment.
- Round 19: Convert back to solid fabric by working sc evenly around and restoring 116 sts. Join.
Upper Color Accent Bands
- Round 1: Change to dusty rose. Sc in each st around. Join. (116 sts)
- Round 2: Change to cream. Sc in each st around. Join. (116 sts)
- Round 3: Change to sage. Hdc in each st around. Join. (116 sts)
- Round 4: With sage, sc in each st around. Join. (116 sts)
- Round 5: Change to cream. Hdc in each st around. Join. (116 sts)
- Round 6: Sc in each st around. Join. (116 sts)
Upper Cream Openwork
- Round 1: Ch 3, 2 dc in same st, ch 2, sk next 3 sts, 3 dc in next st; repeat around. Join.
- Round 2: Sl st to center of first dc group. Ch 3, 2 dc in same position, ch 2, 3 dc in center of next group; repeat around. Join.
- Rounds 3-6: Repeat Round 2.
- Round 7: Work sc evenly around, returning to 116 sts. Join.
Top Rim
- Round 1: Ch 1, sc in each st around. Join. (116 sts)
- Round 2: Hdc in each st around. Join. (116 sts)
- Round 3: Sc in each st around. Join. (116 sts)
- Round 4: Working in BLO, sc in each st around. Join. (116 sts)
- Round 5: Sc in each st around. Join. (116 sts)
- Fasten off and weave the end into the inside of the rim.
Large Floral Medallion Centers – Make 2
- Round 1: With cream, make 8 sc in MR. Join. (8 sts)
- Round 2: Ch 1, inc in each st around. Join. (16 sts)
- Round 3: Ch 1, (sc in next st, inc) 8 times. Join. (24 sts)
- Round 4: (Sl st in next st, ch 3, 3 dc in next st, ch 3, sl st in next st) 8 times around to create 8 cream center petals.
- Fasten off and leave the center petals slightly raised rather than blocking them completely flat.
Dusty Rose Flower Petal Layer – Make 2
- Turn one cream flower center to the WS. Join dusty rose around the base of a cream petal.
- Ch 5, sl st around the base between the next two cream petals; repeat around to create 8 rear ch-5 loops.
- In each ch-5 loop work (sc, hdc, 4 dc, hdc, sc) to form one rounded dusty rose petal.
- Repeat in all 8 loops. Join with sl st.
- Fasten off, leaving a long tail for later assembly.
Sage Outer Petal Layer – Make 2
- Join sage to the WS behind the dusty rose layer.
- Ch 7, sl st between the next dusty rose petals; repeat around to create 8 ch-7 loops.
- In each ch-7 loop work (sc, hdc, dc, 3 tr, dc, hdc, sc).
- Repeat around to form 8 broad sage petals.
- Join and fasten off, leaving a long sewing tail.
Small Cream Accent Petals – Make 16
- Join cream between two sage petals of a completed floral medallion.
- Ch 4.
- Work 2 dc in second ch from hook, hdc in next ch, sc in final ch.
- Sl st back into the medallion between the next sage petals.
- Repeat between each pair of sage petals so each medallion receives 8 small cream accents.
- Fasten off and weave ends into the back of the motif.
Small Sage Leaves – Make 12
- Ch 9.
- Beginning in second ch from hook work sl st, sc, hdc, dc, tr, dc, hdc, sc.
- Work 3 sc in final ch and continue along opposite side of foundation chain.
- Work sc, hdc, dc, tr, dc, hdc, sc, sl st.
- Ch 2 at the tip and sl st into the first ch to make a tiny point.
- Surface sl st through the center foundation chain from base to tip to create a raised vein.
- Fasten off leaving a sewing tail.
Small Peach Buds – Make 6
- Round 1: With soft peach, make 6 sc in MR. Join. (6 sts)
- Round 2: Work 2 hdc in each st around. Join. (12 sts)
- Round 3: (Sl st in next st, 3 dc in next st, sl st in next st) 4 times to create 4 small rounded petals.
- Fasten off leaving a long tail.
- Pinch the flower slightly at its center before sewing so it resembles a small dimensional bud rather than a flat motif.
Assembling the Floral Medallions
- Place one completed layered flower flat with the sage petals spread evenly around the outside.
- Arrange 5-6 sage leaves beneath the outer petals, allowing their pointed ends to extend beyond the flower.
- Sew the leaf bases securely to the WS of the flower without stitching through their outer tips.
- Add 2-3 small peach buds between selected outer petals.
- Repeat for the second medallion, varying the leaf positions slightly so the motifs look handmade rather than mechanically identical.
- Lightly steam or damp-block only the outer leaves. Keep the flower petals dimensional.
Attaching the Floral Medallions
- Lay the bag flat with the front facing upward.
- Position the first medallion approximately 8 cm below the upper color bands and 8-9 cm left of the center line.
- Position the second medallion at the same height approximately 8-9 cm right of center.
- Pin both motifs in place and confirm that the central drawstring area remains unobstructed.
- Sew each medallion through the center and around the inner edges of the sage petals.
- Add several hidden stitches beneath the dusty rose petals for additional stability.
- Leave the outer edges of the sage leaves and several flower petals free so the motifs retain their raised appearance.
Center Drawstring Cord
- With cream and the 3.0 mm hook, ch 145 or until the chain measures approximately 90 cm.
- Beginning in second ch from hook, sl st in each ch back to the beginning.
- Turn and surface sl st along the opposite side of the foundation chain to create a rounded cord.
- Fasten off securely.
- Locate the center front of the upper openwork section.
- Weave the cord horizontally through approximately 10-12 cm of openwork at the center front so both ends emerge symmetrically.
- Pull gently to create a subtle center gather and tie into a loose bow.
Center Tassels – Make 2
- Cut approximately 30 strands of yarn, each 24 cm long. Use sage for one tassel and cream for the second.
- Lay the strands evenly together and fold them in half.
- Pass a strong 25 cm yarn strand through the folded center and tie securely.
- Wrap matching yarn tightly around the tassel approximately 1.5 cm below the fold 8-10 times.
- Tie securely and hide the wrapping ends inside the tassel.
- Trim the lower edge evenly so the finished tassel measures approximately 10-11 cm.
Beaded Center Tassel Cords – Make 2
- Ch 18 with cream and sl st back along the chain to create a firm narrow cord.
- Thread one sage bead, one cream bead, and one dusty rose bead onto the cord above the tassel.
- For the second cord, reverse the bead color order so the pair coordinates without being identical.
- Attach one tassel securely to the bottom of each beaded cord.
- Sew the upper ends of both cords to the center-front drawstring area beneath the bow.
Shoulder Handle Foundation
- With sage and 3.0 mm hook, ch 9.
- Row 1: Sc in second ch from hook and in each remaining ch. Ch 1, turn. (8 sts)
- Rows 2-125: Sc in each st across. Ch 1, turn. (8 sts)
- Continue until the strip measures approximately 72-75 cm.
- Fasten off sage and join cream at one long edge.
- Work sc evenly along the entire long edge, 3 sc across the short end, sc along the opposite long edge, and 3 sc across the second short end. Join.
- Work one additional cream edging round around the complete strap, placing 2 sc in each corner.
- Fasten off and lightly block the strap straight.
Textured Handle Overlay
- With cream, join at one end of the sage center strip.
- Working along the strap length, ch 3, sk approximately 1 cm of edge, sc around the edge stitch; repeat evenly to create small raised loops.
- Repeat along the opposite long edge.
- Join sage at the inside of one cream loop row.
- Work sl st through the center of each cream loop to create a narrow contrasting sage line.
- Repeat on the opposite side.
- Fasten off and weave all ends into the WS of the handle.
Handle Ring Tabs – Make 2
- With cream and 3.0 mm hook, ch 11.
- Row 1: Sc in second ch from hook and across. Ch 1, turn. (10 sts)
- Rows 2-12: Sc in each st across. Ch 1, turn. (10 sts)
- Fasten off leaving a 50 cm sewing tail.
- Pass the rectangle through one antique-brass ring and fold it in half.
- Sew the two halves together through all layers, leaving the ring free to rotate.
- Repeat for the second ring.
Attaching the Handle Hardware
- Lay the bag flat and identify the upper left and upper right side points.
- Position one ring tab approximately 2 cm below the rim at the left side.
- Sew the tab to the dense upper fabric using a rectangle of small stitches.
- Sew a diagonal X through the attachment area for additional strength.
- Repeat with the second ring tab on the opposite side.
- Pass one end of the finished shoulder handle through the first ring by approximately 4 cm.
- Fold the end back against the WS of the handle and sew securely through multiple rows.
- Repeat with the opposite handle end and second ring.
- Lift the empty bag by the handle and check that both sides bear weight evenly before weaving in the attachment tails.
Decorative Side Charm Cord
- With sage, ch 28 and sl st back along the chain.
- Thread one cream bead, one sage bead, one dusty rose bead, and a second cream bead onto the lower portion of the cord.
- Attach the decorative antique-brass medallion beneath the beads using a short doubled strand of strong yarn.
- Make a small two-color tassel using cream and dusty rose strands approximately 15 cm long before folding.
- Attach the tassel beneath the medallion.
- Tie or sew the upper end of the charm cord around the right-side handle ring.
Optional Bottom Insert
- Trace the interior oval base onto plastic canvas.
- Reduce the traced shape by approximately 5 mm around all edges.
- Cut the insert and round every corner.
- Place the insert inside the bag and confirm that it lies completely flat.
- If adding a fabric lining, position the insert underneath the lining so it cannot shift during use.
Optional Fabric Lining
- Measure the finished interior circumference and height of the bag.
- Cut a fabric body piece using the circumference plus 2 cm seam allowance and the interior height plus 3 cm.
- Trace the oval crochet base onto fabric and add a 1 cm seam allowance.
- Sew the short sides of the body fabric together with RS facing.
- Pin and sew the oval fabric base to the bottom of the fabric tube.
- Turn the upper lining edge 1.5 cm toward the WS and press.
- Insert the lining into the bag and position its top edge below the decorative upper openwork.
- Hand sew the lining to a dense cream round using small invisible stitches.
- Keep all floral motif stitches, handle tabs, and drawstring openings free from the lining.
Finishing
Weave all remaining ends into dense sections on the inside of the bag. Reinforce the handle tabs and floral medallion centers with matching yarn or sewing thread if the bag will be used regularly. Straighten the lower color bands, gently open the cream lace sections, and shape the oval base by hand. Avoid aggressively flattening the raised flowers because their layered petals are meant to remain dimensional.
Arrange the center drawstring into a loose bow and let the two beaded tassels hang at slightly different heights. Position the side charm near the right handle ring and turn the decorative medallion forward. The finished bag should have a relaxed teardrop silhouette: broad and rounded at the base, gently narrowing toward the upper handle attachments rather than forming perfectly vertical sides.
Tips for Success
- Keep the cream openwork slightly looser than the base but do not increase the stitch count. The relaxed gauge creates the soft boho drape without making the bag wider at the top.
- Block the two floral medallions before sewing them on, but pin only the sage outer leaves. Leaving the rose and cream petals unflattened preserves their layered texture.
- Attach the handle rings only through dense upper rounds. The decorative openwork is not strong enough to carry the weight of a filled shoulder bag.
- Place the two large floral medallions while the bag is lightly stuffed with towels. This shows how the motifs will sit when the bag is actually being carried.
- Use beads with generous holes or thread them onto a separate strong cord before attaching them to the crocheted tassel cords. Forcing thick cotton yarn through a small bead can fray it.
Common Mistakes to Avoid
- Do not make the lower oval too soft. If the empty base folds under its own weight, use a smaller hook or add the optional insert before continuing.
- Avoid pulling color-change joins tightly. Tight joins can make the striped rounds visibly narrower than the cream body. Match the tension of the previous round when introducing each new color.
- Do not sew every outer flower petal to the bag. This removes the dimensional effect. Secure the centers and inner petal sections while leaving selected outer edges free.
- Avoid attaching the handle rings too close to the front. They should sit near the side edges so the bag hangs evenly rather than tipping forward.
- Do not make both center tassels exactly identical in hanging length. A small difference of 1-2 cm gives the embellishment the relaxed handmade appearance visible in the reference design.
Ways to Customize This Pattern
- Create a warmer desert palette by replacing sage with olive or terracotta and dusty rose with muted clay pink.
- Make a cleaner everyday version by omitting the side medallion charm while keeping the two floral motifs and center tassels.
- Turn the design into a summer beach bag by increasing the base by one oval round and adding 4-6 extra openwork rounds before the upper stripes.
- Add wooden beads to the flower centers for a more rustic botanical look, making sure they are sewn securely through the dense center stitches.
- Create a matching small pouch using one floral medallion, the same sage-and-rose stripe sequence, and a simple cream zipper lining.
Frequently asked questions
Sew each flower through its dense center and around several inner sage petal bases. Do not rely on a single center stitch. If your cotton is particularly heavy, add several hidden stitches beneath the dusty rose layer while leaving the outer petals free.
Yes. Extend each handle end by approximately 8 cm, overlap it directly onto the dense upper side of the bag, and sew a reinforced rectangle with a diagonal X through the center. The rings are decorative and convenient, but they are not essential to the construction.
Use firm cotton for the base, maintain an even stitch count through the body, and avoid over-blocking the upper openwork. An oval plastic-canvas insert and lightweight fabric lining provide additional structure while preserving the softer upper silhouette.
You can, but acrylic generally stretches more under weight and gives the flowers a softer appearance. If using acrylic, choose a firm low-stretch yarn, reduce the hook size if necessary, reinforce the handle, and add both a lining and a base insert.
Hand wash it gently in cool water using mild detergent. Do not wring or twist the bag. Press excess water out with towels, reshape the base and flower petals by hand, straighten the tassels, and dry the bag flat. Keep antique-finish hardware as dry as possible if its care instructions do not specify that it is washable.
The finished Floral Crochet Shoulder Bag Pattern