Floral Crochet Water Bottle Holder Pattern
Beginner Friendly
Perfect for those just starting their crochet journey, with clear instructions and simple techniques
Single-Day Project
A satisfying project you can complete in a single afternoon or evening.
Handmade Gift
A beautiful keepsake — free forever. Read online or print at home.
About This Floral Crochet Water Bottle Holder Pattern
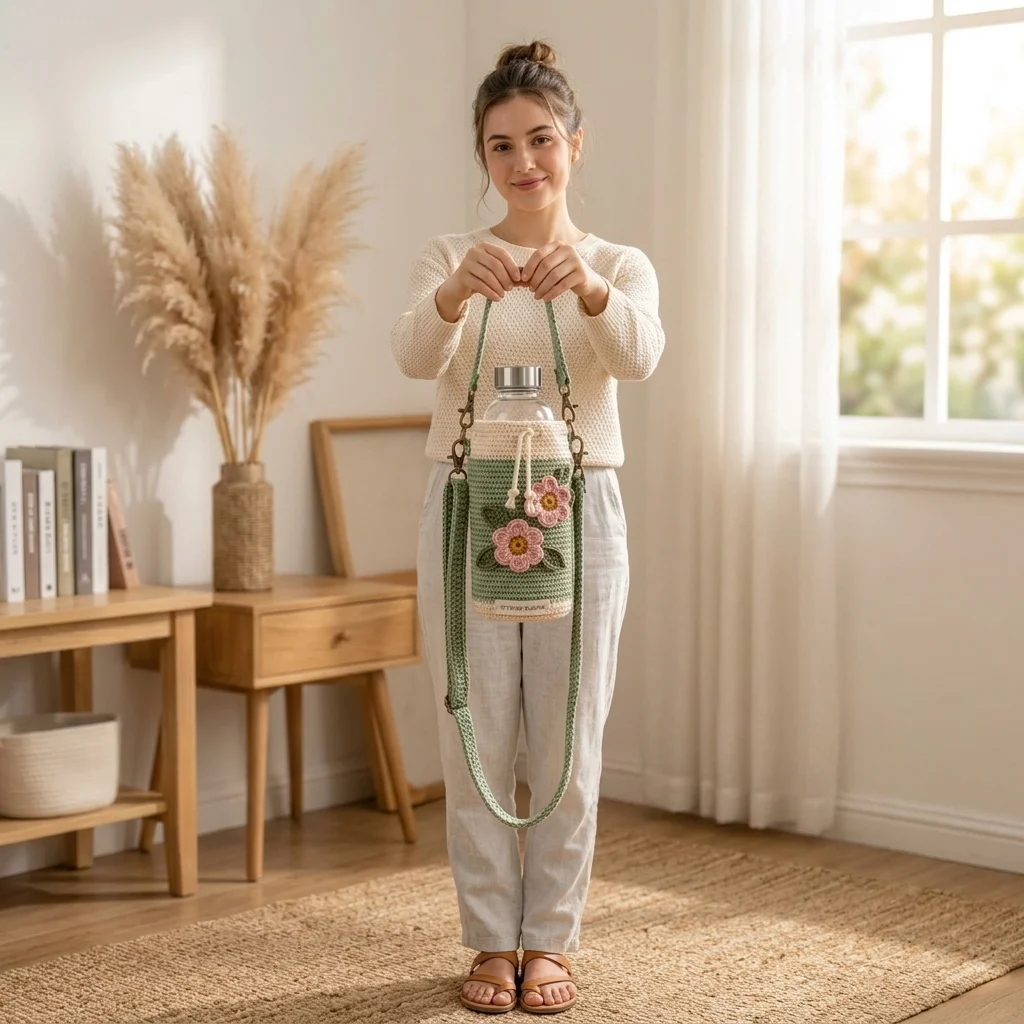
This crochet water bottle holder pattern creates a structured sage-green carrier with cream trim, dimensional pink flowers, olive leaves, a functional drawstring closure, and a removable shoulder strap. The close-fitting cylindrical body protects a glass or reusable bottle while the botanical appliqués give the practical carrier the soft handmade look shown in the reference.
The holder begins with a dense circular base and grows upward in continuous rounds for a smooth, sturdy body. Cream color changes frame the sage center, while a reinforced upper casing supports two cream drawstrings. The flowers are crocheted separately with raised petals and mustard centers, and the shaped leaves include surface-stitched veins before being sewn to the carrier.
This advanced project takes approximately 7-9 hours. It is designed for crocheters comfortable with circular shaping, invisible color changes, working through specific loops, surface crochet, dimensional appliqués, cord construction, hardware attachment, reinforced straps, precise assembly, and adapting circumference to fit a particular bottle.
Materials
- DK / light worsted cotton yarn in muted sage green approximately 180-220 m
- DK / light worsted cotton yarn in warm cream approximately 70-90 m
- DK cotton yarn in dusty blush pink approximately 35 m
- DK cotton yarn in mustard gold approximately 10 m
- DK cotton yarn in deep olive green approximately 25 m
- 3.5 mm crochet hook main holder and strap
- 3.0 mm crochet hook flowers, leaves, and cords
- 2 antique-brass swivel lobster clasps approximately 20-25 mm
- 2 antique-brass D-rings approximately 20-25 mm
- 2 small antique-brass rings optional, for layered hardware attachment
- Yarn needle for assembly and surface details
- Stitch markers 3-4
- Scissors 1 pair
- Flexible measuring tape for checking bottle fit
- Reusable bottle approximately 7.5-8.5 cm diameter and 22-25 cm tall
Abbreviations
MRmagic ringchchainsl stslip stitchscsingle crochethdchalf double crochetdcdouble crochettrtreble crochetinc2 single crochet in same stitchBLOback loop onlyFLOfront loop onlyspspaceskskipststitchstsstitchesRSright sideWSwrong sideRound Cream Base
- Round 1: With cream and 3.5 mm hook, work 6 sc in MR. (6 sts)
- Round 2: Inc in each st around. (12 sts)
- Round 3: (Sc in next st, inc) 6 times. (18 sts)
- Round 4: (Sc in next 2 sts, inc) 6 times. (24 sts)
- Round 5: (Sc in next 3 sts, inc) 6 times. (30 sts)
- Round 6: (Sc in next 4 sts, inc) 6 times. (36 sts)
- Round 7: (Sc in next 5 sts, inc) 6 times. (42 sts)
- Round 8: (Sc in next 6 sts, inc) 6 times. (48 sts)
- Check the circle against the bottom of your bottle. It should be approximately equal to the bottle base or 2-3 mm smaller.
- Round 9: Working in BLO, sc in each st around. (48 sts)
- The unused front loops form a crisp turning ridge between the flat base and vertical carrier wall.
Cream Lower Band
- Round 10: Sc in each st around. (48 sts)
- Round 11: Sc in each st around. (48 sts)
- Round 12: Sc in each st around. (48 sts)
- Round 13: Sc in each st around. (48 sts)
- Round 14: Sc in each st around. (48 sts)
- At the final yarn-over of Round 14, change from cream to sage green.
- Cut cream leaving a 12 cm tail and secure it neatly on the WS.
Sage Green Main Body
- Round 15: With sage, sc in each st around. (48 sts)
- Rounds 16-20: Sc in each st around. (48 sts per round)
- Round 21: BLO sc in each st around. (48 sts)
- Rounds 22-28: Sc in each st around. (48 sts per round)
- Round 29: BLO sc in each st around. (48 sts)
- Rounds 30-36: Sc in each st around. (48 sts per round)
- Round 37: BLO sc in each st around. (48 sts)
- Rounds 38-43: Sc in each st around. (48 sts per round)
- Insert the bottle and check the fit. The sage section should reach approximately three-quarters of the way up the straight-sided portion of the bottle.
- Round 44: Sc in each st around. At the final yarn-over, change to cream. (48 sts)
Cream Upper Band
- Round 45: With cream, BLO sc in each st around. (48 sts)
- Rounds 46-48: Sc in each st around. (48 sts per round)
- Round 49: (Sc in next 6 sts, ch 2, sk 2 sts) 6 times. This creates 6 evenly spaced drawstring openings while preserving a 48-stitch round structure.
- Round 50: Sc in each sc and work 2 sc into each ch-2 sp. (48 sts)
- Round 51: Sc in each st around. (48 sts)
- Round 52: BLO sc in each st around. (48 sts)
- Rounds 53-55: Sc in each st around. (48 sts per round)
- Round 56: Sl st loosely in each st around to reinforce the upper rim. (48 sts)
- Fasten off and weave in the cream tail.
First Cream Drawstring Cord
- With cream and 3.0 mm hook, ch 72.
- Beginning in second ch from hook, sl st in each ch across. (71 sl sts)
- Fasten off leaving approximately 10 cm at each end.
- Thread the cord alternately through the six openings in Round 49.
- Bring both ends to the front center of the holder.
- Tie a compact overhand knot approximately 2 cm from each cord end.
- Separate the yarn plies beneath each knot slightly to create the short tassel effect visible in the reference.
Second Cream Drawstring Cord
- With cream, ch 72.
- Beginning in second ch from hook, sl st in each ch across. (71 sl sts)
- Fasten off.
- Thread this cord through the same openings from the opposite direction so the two cords can cinch the upper band evenly.
- Bring both ends to the front center beside the first cord.
- Add an overhand knot approximately 2 cm from each end.
- Trim the ends evenly and gently separate the final yarn plies.
Large Pink Flower Center
- Round 1: With mustard gold and 3.0 mm hook, work 6 sc in MR. (6 sts)
- Round 2: Inc in each st around. (12 sts)
- Round 3: (Sc in next st, inc) 6 times. (18 sts)
- Join with sl st and fasten off mustard.
- Join dusty blush pink through the FLO of any stitch from Round 3.
Large Pink Flower Petals
- Petal 1: Ch 2, work 3 dc in same FLO, tr in next FLO, 3 dc in next FLO, ch 2, sl st in same FLO.
- Sl st into the next available FLO.
- Repeat the petal sequence around, distributing 6 rounded petals evenly around the mustard center.
- Join with sl st behind the first petal.
- Fasten off leaving a 35 cm sewing tail.
- Use your fingers to curve each petal slightly forward so the flower remains dimensional rather than lying completely flat.
Small Pink Flower Center
- Round 1: With mustard gold, work 6 sc in MR. (6 sts)
- Round 2: Inc in each st around. (12 sts)
- Join with sl st and fasten off mustard.
- Join dusty blush pink in any stitch.
Small Pink Flower Petals
- Petal 1: In first 2 sts work (sl st, ch 2, 2 dc in first st, 2 dc, ch 2, sl st in second st).
- Repeat over each following pair of stitches.
- Continue until 6 petals have been formed around the center.
- Join behind the first petal with sl st.
- Fasten off leaving a 30 cm sewing tail.
- Shape the petals gently with your fingers.
Large Olive Leaf – Make 2
- With olive green and 3.0 mm hook, ch 13.
- Beginning in second ch from hook work sl st, sc, hdc, dc in next 2 ch, tr in next 4 ch, dc in next 2 ch, hdc, sc.
- Work 3 sc in the final chain to turn around the tip.
- Continue down the opposite side of the foundation chain: sc, hdc, dc in next 2 ch, tr in next 4 ch, dc in next 2 ch, hdc, sc, sl st.
- Join at the base with sl st.
- Ch 1 and sc evenly around the complete leaf.
- At the tip work (sc, ch 2, sl st in second ch from hook, sc) to sharpen the point.
- Join at the base and fasten off leaving a 30 cm sewing tail.
Small Olive Leaf – Make 2
- With olive green, ch 10.
- Beginning in second ch from hook work sl st, sc, hdc, dc, tr in next 3 ch, dc, hdc.
- Work 3 sc in the final chain.
- Continue down the opposite side: hdc, dc, tr in next 3 ch, dc, hdc, sc, sl st.
- Join at the base.
- Sc around the complete outer edge, adding a ch-2 point at the leaf tip.
- Fasten off leaving a sewing tail.
Leaf Veins
- Place each leaf RS upward.
- Using matching olive yarn, insert the hook at the leaf base.
- Surface sl st along the original foundation chain toward the tip.
- Keep each surface stitch relaxed so the leaf remains flat.
- For the large leaves, add one short diagonal surface stitch toward each side approximately halfway up the central vein.
- Fasten off on the WS and secure all ends.
Left Strap Attachment Tab
- With sage and 3.5 mm hook, ch 9.
- Row 1: Sc in second ch from hook and across. Ch 1, turn. (8 sts)
- Rows 2-7: Sc in each st across. Ch 1, turn. (8 sts)
- Fold the tab around one D-ring.
- Align Row 7 with the foundation edge.
- Working through both layers, sc across to close the tab around the D-ring. (8 sts)
- Fasten off leaving a 45 cm sewing tail.
Right Strap Attachment Tab
- Repeat the Left Strap Attachment Tab instructions exactly.
- Before closing the tab, confirm that the second D-ring faces the same direction as the first.
- Fasten off leaving a 45 cm sewing tail.
Reinforcing the Side Attachments
- Position the first D-ring tab on the left side of the holder with its upper edge approximately level with Round 48.
- Sew the tab to the holder through at least 6 body rounds, using a box-shaped seam.
- Add a diagonal line of stitches through the box to distribute pulling force.
- Repeat on the right side, checking that both rings sit at exactly the same height.
- Pass the yarn through the dense body fabric several times before knotting securely on the inside.
- Do not attach strap hardware only through one crochet round; the weight of a full bottle requires a reinforced multi-round attachment.
Sage Shoulder Strap
- With sage and 3.5 mm hook, ch 5.
- Row 1: Sc in second ch from hook and across. Ch 1, turn. (4 sts)
- Row 2: BLO sc in each st across. Ch 1, turn. (4 sts)
- Rows 3-210: Repeat Row 2, or continue until the strap measures approximately 105 cm unstretched.
- Do not fasten off yet.
- Fold approximately 3 cm of the first end around the base of one swivel clasp.
- Using the working yarn and yarn needle, stitch through both strap layers several times.
- Fasten securely and weave the yarn through at least 5 cm of strap.
- Attach the second swivel clasp to the opposite end in the same manner.
Decorative Strap Edge
- Join sage at one short end of the strap.
- Work sl st evenly along the entire long edge, placing approximately one sl st per row end.
- At the opposite end, work 2 sl sts around the corner.
- Continue along the second long edge.
- Keep the edging loose enough that the strap remains flat.
- Fasten off and weave the tail securely into the strap.
Attaching the Large Flower
- Lay the holder flat with the drawstrings centered at the front.
- Position the large pink flower slightly left of center and approximately one-third of the way up from the cream lower band.
- Place one large olive leaf diagonally behind the flower toward the upper left.
- Place the second large olive leaf diagonally behind the flower toward the lower right.
- Sew each leaf first, securing the center vein and base while leaving the outer edges free.
- Place the flower over the leaf bases.
- Sew around the mustard center and through the inner base of every petal.
- Do not sew down the outer petal edges.
Attaching the Small Flower
- Position the small pink flower above and to the right of the large flower.
- Place one small olive leaf behind its upper-left side.
- Place the second small olive leaf behind its lower-right side.
- Sew the leaf bases and center veins securely to the sage body.
- Place the small flower over the leaf bases.
- Sew around its mustard center and the inner base of each petal.
- Check that neither flower interferes with the drawstrings or side hardware.
Optional Surface Stems
- Thread approximately 40 cm of olive yarn onto the yarn needle.
- Beginning beneath the large flower, embroider a gently curved stem toward its upper leaf using short backstitches.
- Add a second curved stem toward the lower leaf.
- Repeat beneath the smaller flower if desired.
- Keep all embroidery shallow so the needle does not catch the bottle when it is inserted.
- Secure the yarn carefully on the inside of the holder.
Hardware Assembly
- Clip one swivel clasp from the shoulder strap onto the left D-ring.
- Clip the second clasp onto the right D-ring.
- Pull firmly on both attachments before inserting the bottle.
- Check that the D-rings remain upright and that the tabs do not distort the cream upper band.
- If the hardware twists, rotate the D-ring inside its crocheted tab before tightening the final attachment stitches.
- The shoulder strap should detach completely so the holder can also be carried without it.
Final Fit and Shaping
- Insert the empty bottle fully into the carrier.
- Smooth the circular base so it sits flat beneath the bottle.
- Pull both cream drawstrings gently until the upper band fits around the narrowing neck of the bottle.
- Tie the cords into a loose bow at the front.
- Arrange the flower petals outward and lift the leaf tips slightly away from the sage body.
- Attach the strap and lift the empty carrier to check balance.
- Test with the filled bottle only after confirming that both side tabs and hardware are firmly secured.
Finishing
Weave all remaining ends deeply into the dense crochet fabric and trim them only after checking that every flower, leaf, hardware tab, and strap end is secure. Gently steam or damp-block the strap if it twists, but avoid stretching it lengthwise because cotton will naturally relax under the weight of a filled bottle.
Shape the pink petals with your fingers and leave their outer edges slightly raised. The olive leaves should sit partly beneath the flowers with their pointed ends visible. Insert the bottle, tighten the cream cords only enough to stabilize the neck, and tie them into the relaxed front bow shown in the reference.
Tips for Success
- Test the bottle inside the holder every 8-10 body rounds. A difference of only a few stitches can make a cylindrical carrier noticeably too loose once the bottle is full.
- Use mercerized or tightly twisted cotton for the shoulder strap. Soft loosely spun yarn stretches more under the weight of a glass bottle.
- Reinforce each hardware tab across several rounds of the carrier body instead of sewing it only to the top edge.
- Sew the leaves before the flowers. This hides the leaf attachment stitches and creates the layered botanical effect visible in the reference.
- Keep the flower petals and outer leaf tips unattached so the appliqués retain their three-dimensional appearance.
Common Mistakes to Avoid
- Do not make the base larger than the bottle. A wide base causes the loaded carrier to sag and allows the bottle to shift from side to side.
- Avoid making the shoulder strap with loose stitches. If your strap stretches excessively, remake it with a smaller hook or add a non-stretch cotton tape backing.
- Do not attach the D-rings directly through individual body stitches. Concentrated weight can pull those stitches out of shape; always use reinforced crocheted tabs.
- Avoid sewing every flower petal flat. Secure only the center and inner petal bases to preserve the raised floral texture.
- Do not tighten the drawstring aggressively around a glass bottle neck. It is intended to stabilize the bottle rather than suspend its weight.
Ways to Customize This Pattern
- Replace sage with dusty blue, terracotta, lavender, or warm beige while keeping the cream bands for a completely different color palette.
- Make the flowers in cream with mustard centers and dark sage leaves for a neutral botanical version.
- Add a third miniature flower between the two existing blooms for a fuller garden-style arrangement.
- Shorten the strap to approximately 45-55 cm for a hand or shoulder carry version, or lengthen it to 120-130 cm for crossbody use.
- Add a small flat pocket to the back of the holder for a key, tea sachet, or other lightweight item, keeping it away from the structural strap attachments.
Frequently asked questions
Continue the circular base increases in multiples of 6. After 48 stitches, the next increase round is (sc in next 7 sts, inc) 6 times for 54 stitches, followed by (sc in next 8 sts, inc) 6 times for 60 stitches if needed. Once the base matches the bottle, work the body without further increases and distribute the drawstring openings evenly around the new stitch count.
Some stretching is normal with cotton. Dense BLO single crochet, a slightly smaller hook, and reinforced strap edges reduce it considerably. For a heavy glass bottle, sewing cotton webbing to the WS of the finished strap provides additional structural support while preserving the crocheted appearance.
Yes. The pattern uses two swivel lobster clasps attached to the crocheted strap and two reinforced D-rings sewn to opposite sides of the holder. This lets you remove the complete strap without disturbing the body or floral decorations.
The base may be too large, the yarn may be too elastic, or the crochet tension may be too loose. The base should closely match the bottle diameter. If the stitch fabric feels flexible, use a smaller hook and tightly twisted cotton yarn to produce a denser structure.
Remove the detachable shoulder strap first. If the fixed D-rings are washable and corrosion-resistant, gently hand wash the holder in cool water and dry it flat. Avoid prolonged soaking of decorative metal hardware, and always follow the care instructions for the specific yarn and hardware you use.
The finished Floral Crochet Water Bottle Holder Pattern