Olive Green Floral Granny Square Crochet Bedspread – Free Advanced Pattern
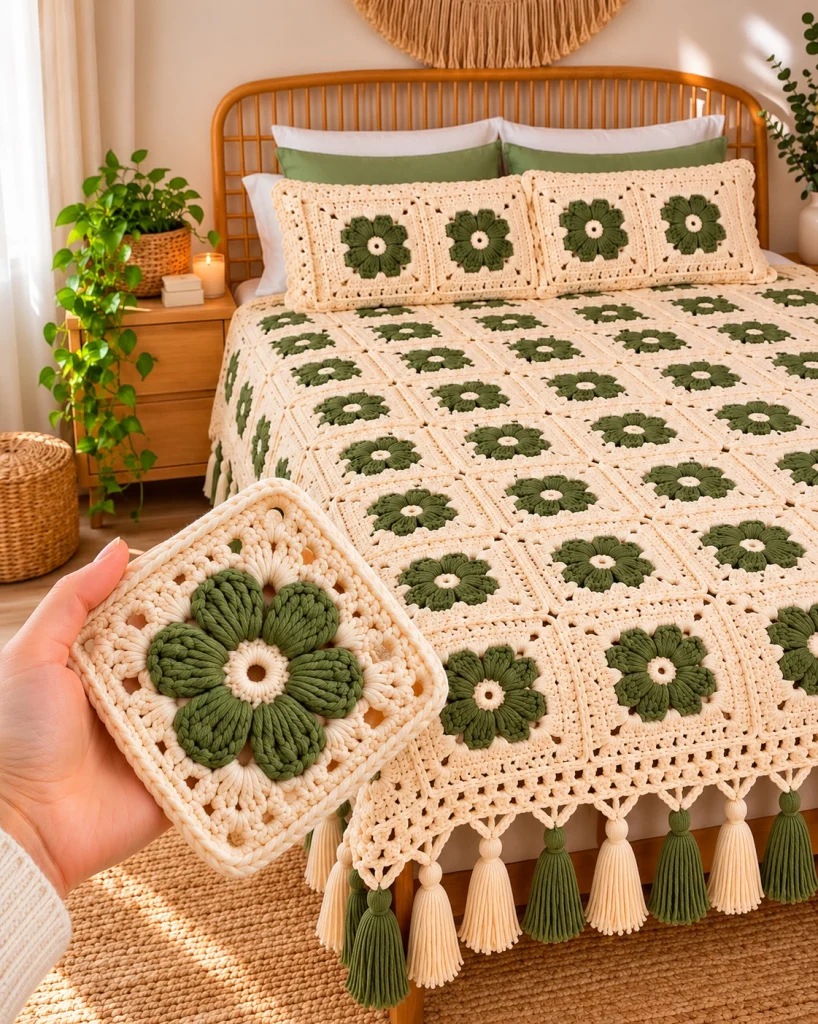
Bring timeless handmade elegance into your bedroom with this beautiful Olive Green Floral Granny Square Crochet Bedspread. Featuring raised olive-green six-petal flowers surrounded by soft ivory square borders, this luxurious crochet blanket combines delicate floral texture with a warm, natural color palette.
The design includes matching floral pillow covers, a decorative lace edging, and alternating olive-green and ivory tassels. Each granny square is individually crocheted and joined to create a sophisticated, coordinated bedding set.
Pattern Information
- Skill Level: Advanced
- Finished Size: Approximately 220 × 240 cm
- Individual Square: Approximately 20 × 20 cm after blocking
- Construction: 11 columns × 12 rows, 132 squares
- Yarn Weight: Worsted-weight cotton or cotton-blend yarn
- Hook Size: 4 mm and 4.5 mm
- Colors: Warm ivory and olive green
- Terminology: US crochet terms
Materials Needed
- Approximately 3,500–4,500 g ivory worsted-weight yarn
- Approximately 1,500–2,000 g olive-green worsted-weight yarn
- 4 mm crochet hook for floral motifs
- 4.5 mm crochet hook for square borders
- Tapestry needle
- Stitch markers
- Scissors
- Measuring tape
- Blocking mats and rustproof pins
- Two rectangular pillow inserts
- Optional buttons for pillow closures
- Cardboard tassel template
Gauge: One completed and blocked floral square should measure approximately 20 × 20 cm. Make a sample square before purchasing the full yarn quantity.
Crochet Abbreviations
- MR: Magic ring
- ch: Chain
- sl st: Slip stitch
- sc: Single crochet
- hdc: Half double crochet
- dc: Double crochet
- tr: Treble crochet
- FPdc: Front post double crochet
- puff: Puff stitch
- inc: Increase
- FO: Fasten off
1. Crochet the Ivory Flower Center
Using ivory yarn and a 4 mm hook:
- Round 1: Make a magic ring, ch 1, work 12 sc into the ring. Join with sl st. (12 sc)
- Round 2: Ch 1, sc in each stitch around. Join. (12 sc)
- Round 3: Ch 1, work 2 sc in each stitch around. Join. (24 sc)
Fasten off, leaving a tail for weaving in.
This small ivory ring forms the contrasting center of the raised olive-green flower.
2. Create the Six Olive-Green Flower Petals
Join olive-green yarn to any stitch of the ivory center.
Petal Foundation
- Round 4: Ch 1, *sc in next stitch, ch 5, skip 3 stitches*. Repeat six times. Join to first sc.
- You should have six evenly spaced chain loops.
Raised Petal Round
- Round 5: Into each ch-5 loop, work 1 sc, 1 hdc, 5 dc, 1 hdc, 1 sc.
- Repeat for all six loops.
- Join with sl st.
Textured Petal Layer
- Round 6: Working into the front loops of each petal, add raised puff stitches across the central dc stitches.
- Work one puff stitch into each of the five central dc positions.
- Secure each puff stitch with ch 1.
- Repeat across all six petals.
Each flower should have six rounded, raised olive-green petals surrounding the ivory center.
Shape the petals gently with your fingers so they sit evenly.
3. Create the Ivory Square Foundation
Join ivory yarn behind the flower using the available back loops from the petal foundation.
- Round 7: Work 3 dc groups into the spaces between the petals, separated by ch-2 spaces.
- Round 8: Establish four corners using (3 dc, ch 2, 3 dc) in each corner space.
- Round 9: Work dc groups evenly along all four sides, repeating the corner increases.
- Round 10: Work one round of dc, maintaining the square shape.
- Round 11: Work alternating dc and ch-1 spaces to create an open decorative border.
- Round 12: Work one round of dc around the entire square.
- Round 13: Work one round of sc for a neat, reinforced edge.
Maintain equal stitch counts on opposite sides and preserve four clearly defined corners.
Continue adding balanced rounds if necessary until the blocked square measures approximately 20 × 20 cm.
4. Add the Raised Ivory Border
To reproduce the structured frame visible around each floral square:
- Join ivory yarn at one corner.
- Work one round of FPdc around the outer square border, using regular dc where needed to maintain corners.
- At each corner, work (2 dc, ch 2, 2 dc).
- Finish with one round of sc.
The raised border creates a subtle dimensional frame around every olive-green flower.
Fasten off and weave in the ends.
5. Make All 132 Granny Squares
For the approximately 220 × 240 cm bedspread, crochet:
- 132 identical olive-green floral granny squares
- 11 squares across
- 12 squares down
Block every square to the same finished measurement before joining.
Use the same yarn tension and hook size throughout the project to ensure the floral motifs remain consistent.
6. Join the Granny Squares
Arrange the squares in 11 columns and 12 rows.
Flat Slip-Stitch Joining Method
- Place two squares side by side, right sides facing upward.
- Insert the hook through the corresponding outer loops of both squares.
- Work slip stitches along the complete edge.
- Keep the joining yarn slightly relaxed to prevent puckering.
- Join all squares horizontally.
- Repeat vertically to complete the bedspread.
Use ivory yarn for all joins to maintain the continuous cream-colored grid visible in the finished blanket.
For a more pronounced raised effect, use a front-facing single crochet join instead.
7. Crochet the Decorative Lace Border
Join ivory yarn at any corner of the completed bedspread.
Round 1 – Foundation
Work sc evenly around all four sides, placing 3 sc in each corner.
Round 2 – Open Lace
Ch 3, *skip 2 stitches, dc in next stitch, ch 2*. Repeat around, adjusting the spacing at corners.
Round 3 – Decorative Fans
Work 5 dc into each alternate chain space, with sc between the fans.
Round 4 – Pointed Lace
Into each fan, work a small picot at its center to create a delicate pointed edge.
Round 5 – Finishing
Work a final round of sc around the upper edge of the lace border, preserving the decorative points.
Block the edging gently to open the lace and define its shape.
8. Create the Alternating Tassels
The bedspread features long decorative tassels in alternating olive green and ivory.
Materials
- Ivory yarn
- Olive-green yarn
- Cardboard measuring approximately 15 cm
- Scissors
- Tapestry needle
Tassel Instructions
- Wrap yarn around the cardboard approximately 35–45 times.
- Slide a separate yarn strand under the wrapped loops and tie tightly at the top.
- Remove the yarn from the cardboard.
- Wrap another strand approximately 2 cm below the top to form the tassel head.
- Cut the bottom loops.
- Trim the tassel evenly.
- Attach the tassel to the lace border using the top tie strands.
Alternate olive-green and ivory tassels at regular intervals along the foot and sides of the bedspread.
For a 220 × 240 cm bedspread, approximately 35–45 tassels may be needed, depending on the spacing.
9. Crochet the Matching Floral Pillow Covers
Create two rectangular pillow covers using the same floral granny-square motif.
Front Panel
- Make eight floral granny squares for each pillow front.
- Arrange the squares in two rows of four.
- Join the squares using the same ivory slip-stitch method.
- Measure the completed panel and adjust the border to match your pillow insert.
Back Panel
- Using ivory yarn, crochet two rectangular panels in hdc.
- Make the panels wide enough to overlap at the center for an envelope-style closure.
- Place the front and back panels together with right sides facing outward.
- Join around the outer edges with sc.
Decorative Pillow Border
Work a small scalloped edging around the front of each pillow.
For a coordinated finish, add a narrow row of ivory picots along the outer border.
10. Optional Matching Cushion
For an additional accent cushion, make four floral granny squares and join them into a 2 × 2 arrangement.
Add a simple ivory crochet back panel and finish with a decorative shell border.
This smaller cushion complements the main bedspread without overpowering the floral design.
11. Final Assembly and Blocking
- Lay the finished bedspread on a clean, flat surface.
- Check that all squares are evenly joined.
- Weave in any remaining yarn ends.
- Lightly dampen the blanket using a spray bottle.
- Pin the outer edges into a straight rectangular shape.
- Allow the bedspread to dry completely.
- Attach the tassels after blocking.
- Insert the pillow forms into their matching crochet covers.
- Arrange the completed bedding set on the bed.
Design Tips for a Professional Finish
- Use the same olive-green yarn for every flower to maintain color consistency.
- Keep the ivory centers small and evenly shaped.
- Maintain identical petal counts across all granny squares.
- Block each square before joining to prevent uneven seams.
- Use a firm but flexible tension for the raised petals.
- Keep tassels uniform in length and thickness.
- Choose washable cotton-blend yarn for a practical, long-lasting bedspread.
Color Variations
- Botanical Cottage: Olive green and warm ivory.
- Vintage Rose: Dusty pink and cream.
- Modern Neutral: Taupe and off-white.
- Coastal Blue: Slate blue and soft white.
- Autumn Garden: Terracotta and oatmeal.
- Elegant Forest: Dark forest green and champagne.
Frequently Asked Questions
Is this crochet bedspread suitable for beginners?
This is an advanced crochet project because it combines raised floral motifs, consistent square construction, lace edging, and a large number of joined pieces.
Can I make the bedspread smaller?
Yes. Reduce the number of squares to suit your bed dimensions. For example, a 9 × 10 arrangement produces approximately 180 × 200 cm before adding the decorative border.
Can I use acrylic yarn instead of cotton?
Yes. Soft, washable acrylic or cotton-acrylic blends can be used. Always make a gauge swatch because yarn choice affects the finished size and drape.
How do I keep the granny squares flat?
Maintain consistent tension, use balanced corner increases, and block every square before assembly.
How should I wash the finished bedspread?
Follow the care instructions for your chosen yarn. For a large handmade blanket, gentle washing and flat drying are recommended to preserve the raised flowers and lace details.
Can I make the flowers in different colors?
Absolutely. The six-petal floral motif works beautifully in sage green, dusty rose, lavender, mustard, or terracotta.
Can I sell finished items made from this pattern?
Yes, you may sell finished handmade bedspreads and pillow covers made using these original instructions.
Final Thoughts
This Olive Green Floral Granny Square Crochet Bedspread is a beautiful combination of traditional crochet craftsmanship and modern botanical style.
The raised olive-green flowers, elegant ivory frames, delicate lace border, and coordinated tassels create a timeless handmade bedding set that adds warmth, texture, and charm to any bedroom.
Whether made as a special gift or a statement piece for your own home, this floral crochet bedspread is a rewarding project for experienced crocheters.
Save this free floral granny square crochet bedspread pattern to Pinterest and share it with your crochet-loving friends!

