Floral Granny Square Crochet Cardigan Pattern
Beginner Friendly
Perfect for those just starting their crochet journey, with clear instructions and simple techniques
Single-Day Project
A satisfying project you can complete in a single afternoon or evening.
Handmade Gift
A beautiful keepsake — free forever. Read online or print at home.
About This Floral Granny Square Crochet Cardigan Pattern
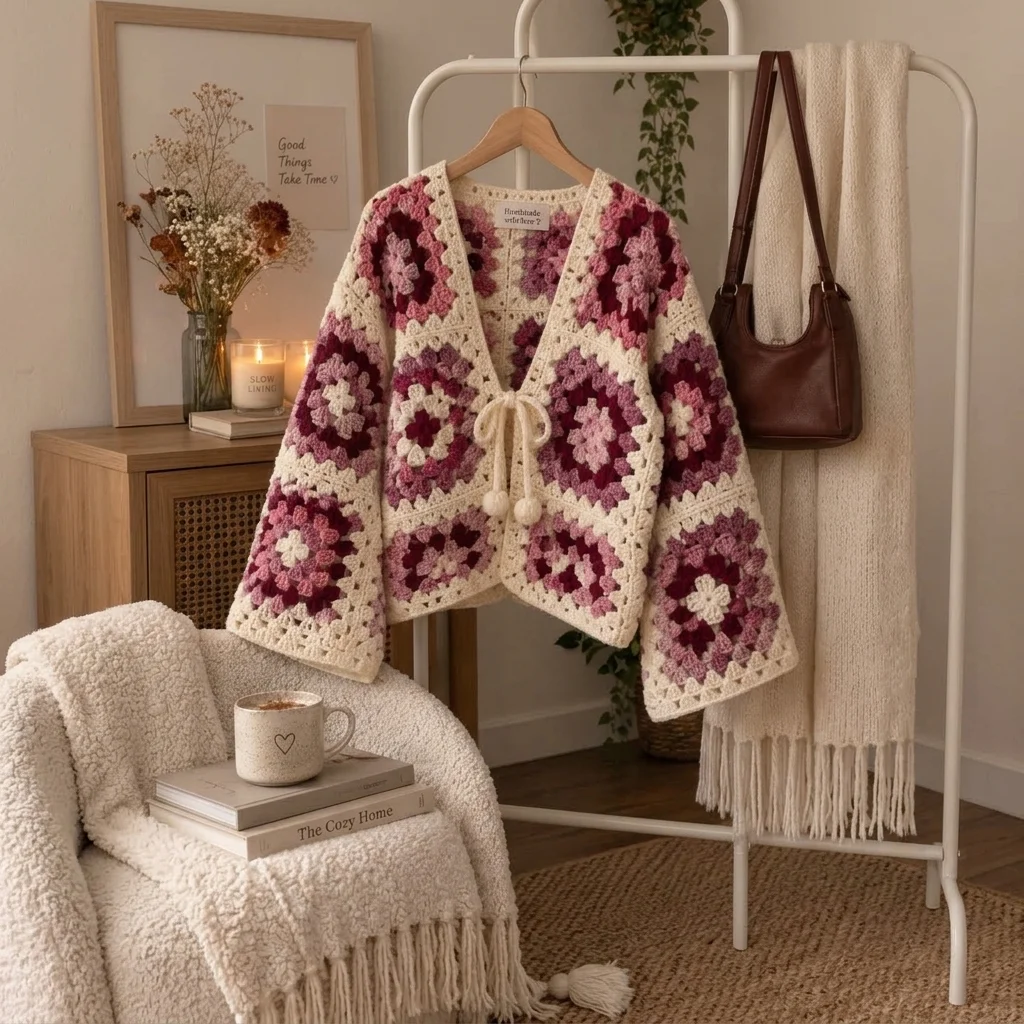
This floral granny square crochet cardigan pattern creates a soft, romantic jacket built from dimensional flower motifs in cream, dusty rose, mauve, and deep burgundy. Cream borders frame each square and form the seams, V-neck opening, hem, cuffs, and front edges, while a crocheted tie with rounded ends closes the cardigan at the waist.
The cardigan is assembled from individually crocheted floral granny squares rather than one continuous fabric. The flower centers and layered color changes give each motif depth, while the granny-style outer rounds keep the fabric flexible enough for a comfortable garment. The slightly dropped shoulders and roomy sleeves recreate the relaxed handmade silhouette shown in the reference.
Allow approximately 20-26 hours for the full cardigan, including motif production, joining, edging, blocking, and finishing. This is an advanced project suited to crocheters comfortable with repeated motifs, frequent color changes, cluster stitches, garment assembly, shaping a V-neck from square units, joining panels, and maintaining consistent gauge across many separate pieces.
Materials
- DK / light worsted yarn in warm cream approximately 900-1000 m
- DK / light worsted yarn in dusty rose approximately 350 m
- DK / light worsted yarn in soft mauve approximately 300 m
- DK / light worsted yarn in deep burgundy approximately 250 m
- DK / light worsted yarn in pale blush approximately 200 m
- 4.0 mm crochet hook main motifs and garment
- 3.5 mm crochet hook front tie and finishing if needed
- Yarn needle 1
- Locking stitch markers 12-16
- Blocking mats for individual squares and finished panels
- Blocking pins approximately 40
- Scissors 1 pair
- Measuring tape 1
Abbreviations
MRmagic ringchchainsl stslip stitchscsingle crochethdchalf double crochetdcdouble crochettrtreble crochetdc-cl3-double-crochet clusterspspaceststitchstsstitchesskskipreprepeatFOfasten offThree-Color Floral Granny Square
- With the first flower color, make MR.
- Round 1: Ch 3, work 11 dc into MR. Join with sl st to top of beginning ch-3. (12 dc)
- Pull MR firmly closed.
- Round 2: Ch 1, (sc, ch 3, 2 dc, ch 3, sc) in same st, sl st in next st; repeat around to form 6 paired dimensional petals. Join with sl st. (6 petals)
- FO first color.
- Join second flower color behind any petal between two Round 1 stitches.
- Round 3: Ch 3, 2 dc in same joining space, ch 2, 3 dc in next space; repeat around. Join with sl st. (12 3-dc groups)
- FO second color.
- Join third flower color in any ch-2 sp.
- Round 4: Ch 3, 2 dc in same sp, ch 1, 3 dc in next ch-2 sp, ch 1; repeat around. Join with sl st. (12 groups)
- FO third color.
Squaring the Flower Motif
- Join cream yarn in any ch-1 sp.
- Round 5: Ch 3, 2 dc in same sp, ch 1.
- Work 3 dc in next sp, ch 1.
- In next sp work (3 dc, ch 2, 3 dc) to form the first corner, ch 1.
- Work 3 dc in each of next 2 spaces with ch 1 between groups.
- Work (3 dc, ch 2, 3 dc) in next sp for second corner.
- Repeat this sequence around until 4 corners have been formed.
- Join with sl st to beginning ch-3.
- Round 6: Sl st to next ch-1 sp, ch 3, 2 dc in same sp, ch 1, 3 dc in each side sp with ch 1 between groups.
- In every ch-2 corner work (3 dc, ch 2, 3 dc).
- Continue around and join with sl st.
- Round 7: Ch 1, sc in every dc and ch-1 sp around; work (sc, ch 1, sc) in each corner ch-2 sp.
- Join with sl st and FO.
- Block square to 14 × 14 cm.
Burgundy Rose Floral Square – Make 8
- Work the Three-Color Floral Granny Square with cream as the flower center.
- Use deep burgundy for Round 3.
- Use dusty rose for Round 4.
- Work Rounds 5-7 in cream.
- Block each finished motif to 14 × 14 cm.
Dusty Rose Floral Square – Make 8
- Work Round 1 in pale blush.
- Work the dimensional petals of Round 2 in dusty rose.
- Work Round 3 in soft mauve.
- Work Round 4 in dusty rose.
- Work Rounds 5-7 in cream.
- Block to 14 × 14 cm.
Mauve and Burgundy Floral Square – Make 8
- Work Round 1 in soft mauve.
- Work Round 2 in pale blush.
- Work Round 3 in deep burgundy.
- Work Round 4 in soft mauve.
- Work Rounds 5-7 in cream.
- Block to 14 × 14 cm.
Cream-Centered Floral Square – Make 8
- Work Round 1 and the flower center in cream.
- Work Round 2 in dusty rose.
- Work Round 3 in deep burgundy.
- Work Round 4 in soft mauve.
- Work Rounds 5-7 in cream.
- Block to 14 × 14 cm.
Back Panel Layout
- Arrange 12 floral squares in a rectangle measuring 3 squares wide × 4 squares tall.
- Alternate the four color combinations so identical squares do not touch whenever possible.
- Place darker burgundy motifs near the shoulders and lower corners to balance the color distribution.
- Pin or photograph the final arrangement before joining.
Joining the Back Panel
- With right sides facing upward, place the first two squares side by side.
- Join cream yarn through corresponding corner spaces.
- Working through both motifs, sl st through corresponding stitches across the complete edge.
- Keep the joining tension relaxed so the seam remains flexible.
- Join all squares into 3 horizontal rows.
- Join the horizontal rows together to create the complete 3 × 4 back panel.
- FO and weave all joining ends into the cream borders.
Left Front Panel
- Arrange 6 squares in a panel 2 squares wide × 3 squares tall.
- For the upper fourth row, place only one square at the outer shoulder edge, leaving the inner position empty to begin the V-neck.
- Join the six lower squares with cream using the same slip-stitch joining method.
- Attach the final shoulder square above the outer column.
- Keep the inner upper edge free for the V-neck edging.
Right Front Panel
- Arrange the motifs as a mirror image of the Left Front Panel.
- Use 6 squares in the lower 2 × 3 arrangement.
- Place one additional square at the upper outer shoulder.
- Join all motifs with cream.
- Leave the upper inner edge open to mirror the V-neck shaping.
Shoulder Assembly
- Lay the back panel flat with the right side facing upward.
- Position both front panels over the back with right sides together.
- Align the outer shoulder squares with the top corners of the back panel.
- Using cream, sl st the left shoulder edge together across one complete square width.
- Repeat for the right shoulder.
- Leave the center back section open as the back neckline.
Side Seams
- Align each front panel with the corresponding side of the back panel.
- Beginning at the lower hem, sl st the front and back edges together in cream.
- Continue upward for approximately 2½ square lengths.
- Leave the upper 1½ square lengths open for the armhole.
- Repeat on the opposite side.
- Try the cardigan body on before making the sleeves to confirm the armhole depth.
Left Sleeve Motifs
- Arrange 6 floral squares in a rectangle 2 squares wide × 3 squares long.
- Alternate darker and lighter motifs down the sleeve.
- Join the two columns vertically using cream sl-st seams.
- Join the three horizontal rows.
- Fold the rectangle lengthwise with right sides together.
- Sl st the long edges together to create a sleeve tube.
- Leave both short ends open.
Right Sleeve Motifs
- Make the second sleeve using the same 2 × 3 motif layout.
- Reverse the color arrangement so the sleeves coordinate without being perfectly identical.
- Join the motifs in cream.
- Fold and seam the long edge to create the second sleeve tube.
Attaching the Sleeves
- Turn the cardigan body inside out.
- Keep each sleeve right side out and insert it into its corresponding armhole.
- Align the sleeve seam with the cardigan side seam.
- Pin the top center of the sleeve to the shoulder seam.
- Distribute the remaining sleeve edge evenly around the armhole.
- With cream, sl st through both layers around the entire armhole.
- Repeat for the second sleeve.
Cream Sleeve Cuffs
- Join cream yarn at the underside of one sleeve opening.
- Round 1: Ch 1, sc evenly around the cuff. Join with sl st.
- Round 2: Ch 3, dc in each st around. Join.
- Round 3: Ch 1, sc in each st around. Join.
- Round 4: Ch 3, (dc in next 3 sts, skip 1 st) around, distributing decreases evenly to narrow the cuff slightly.
- Round 5: Ch 1, sc around.
- FO and weave in ends.
- Repeat on second sleeve.
Bottom Hem
- Join cream yarn at one lower front corner.
- Row 1: Ch 1 and sc evenly across the complete lower edge to the opposite front corner.
- Row 2: Ch 3, turn, dc in each st across.
- Row 3: Ch 1, turn, sc in each st across.
- Row 4: Ch 3, turn, dc across.
- Row 5: Ch 1, turn, sc across.
- FO.
V-Neck and Front Edging
- Join cream yarn at the lower right front corner.
- Round 1: Ch 1 and sc evenly up the right front edge.
- Continue sc along the right V-neck slope.
- Work sc evenly across the back neckline.
- Continue down the left V-neck slope and left front edge.
- Work 2 sc into each outer corner as needed to prevent pulling.
- Turn.
- Row 2: Ch 1, sc in each st along the entire opening.
- Row 3: Ch 2, hdc in each st along the entire opening.
- Row 4: Ch 1, sc in each st along the entire opening.
- FO and weave in the ends.
Front Tie – Make 2
- With cream and 3.5 mm hook, ch 71.
- Beginning in second ch from hook, sl st in each ch across. (70 sl sts)
- Turn and work one additional row of sl sts loosely across for a rounded cord.
- FO leaving a long tail for attachment.
- Repeat for the second tie.
Rounded Tie Ends – Make 2
- With cream, work 6 sc in MR. (6 sts)
- Round 2: Inc in each st around. (12 sts)
- Round 3: (Sc in next st, inc) 6 times. (18 sts)
- Rounds 4-5: Sc around. (18 sts)
- Round 6: (Sc in next st, dec) 6 times. (12 sts)
- Add a very small amount of fiberfill.
- Round 7: Dec around. (6 sts)
- FO leaving a sewing tail.
- Thread the tie cord through the center of the ball and stitch securely.
Attaching the Front Ties
- Lay the cardigan flat with both front edges aligned.
- Mark a point approximately 7-9 cm below the deepest part of the V-neck on each front edge.
- Sew one plain end of each tie securely to the corresponding marked position.
- Pass the yarn through several edging stitches for reinforcement.
- When tied into a bow, the two rounded ends should hang approximately 12-15 cm below the knot.
Optional Dimensional Flower Accents
- With cream, dusty rose, or burgundy, work 6 sc in MR. (6 sts)
- In each st work (sl st, ch 2, 3 dc, ch 2, sl st) to create 6 petals.
- Join with sl st.
- FO leaving a long sewing tail.
- Make 4-6 flowers in mixed colors.
- Sew them over selected granny-square centers on the front panels and sleeves for extra relief similar to the reference.
Garment Blocking
- Before the final block, weave in every yarn end securely.
- Lay the cardigan flat on blocking mats with the front open.
- Pin the back and front motifs into straight vertical and horizontal lines.
- Shape the V-neck symmetrically.
- Extend each sleeve straight outward and match both sleeve lengths.
- Pin the cream hem and cuffs without stretching them.
- Lightly wet or steam block according to the yarn care instructions.
- Allow the garment to dry completely before removing the pins.
Finishing
After blocking, inspect every motif join from both sides of the cardigan. Reinforce any loose corner joins, especially at the underarms and shoulders where the garment carries the most tension. Shape the front edging with your fingers so the V-neck falls evenly on both sides and the two lower front corners sit at the same height.
Arrange the front ties into a loose bow rather than pulling them tightly enough to distort the cardigan. The finished piece should have a relaxed fit, softly dropped shoulders, roomy floral sleeves, and a clear cream frame around the pink and burgundy motifs. The flower squares should remain distinct while the cream joins visually connect the entire garment.
Tips for Success
- Block every granny square to exactly the same dimensions before assembly. Small differences become very noticeable once several motifs are joined into a garment panel.
- Rotate the dusty rose, mauve, cream, and burgundy combinations instead of placing identical motifs next to one another. This creates the scattered floral appearance visible in the reference.
- Keep slip-stitch seams loose. Tight joins can make the shoulders stiff and cause the front panels to pull upward.
- Try the body on before attaching the sleeves. If the armhole feels tight, open several centimeters of the side seam rather than stretching the sleeve motifs.
- Use the same cream yarn for all joining, edging, cuffs, and ties so the many colored motifs read as one cohesive cardigan.
Common Mistakes to Avoid
- Do not assemble unblocked motifs. Uneven squares can twist the cardigan and make the two front panels different lengths.
- Avoid changing yarn weight between colors. Even subtle thickness differences can make some flower squares larger than others.
- Do not pull the V-neck edging too tightly. If the front edges curl inward, remove the edging and work more stitches along the diagonal sections.
- Avoid sewing the sleeves into the armholes without first matching the sleeve seam to the side seam and the sleeve center to the shoulder. Incorrect alignment causes the sleeves to twist.
- Do not make the front tie too short. It needs enough length to form a soft bow without pulling the front panels together under tension.
Ways to Customize This Pattern
- Replace burgundy with sage green for a softer cottage-garden version while keeping the cream and dusty pink flowers.
- Add one extra horizontal row of squares to the body for a longer cardigan that falls below the hips.
- Use solid cream squares across the back while keeping floral motifs on the front and sleeves for a quieter design.
- Replace the crochet tie with two covered buttons and reinforced crochet loops for a more structured closure.
- Use autumn rust, mustard, olive, and cream instead of pink and burgundy to turn the same construction into a fall granny-square cardigan.
Frequently asked questions
The safest method is to adjust motif size before assembly or add motif columns to the body. One additional 14 cm square column adds substantial width, so for smaller adjustments use a slightly larger hook and block each motif 1-2 cm wider. Make a full-size layout before joining to confirm the final measurements.
Frequent color changes and cluster stitches can alter tension. Measure each motif after Round 7 and block every square to 14 × 14 cm. If one color of yarn is noticeably thicker, use a hook 0.5 mm smaller for rounds worked in that yarn.
Curling usually means the edging has fewer stitches than the underlying diagonal edge requires. Work the first sc edging row at a relaxed tension and distribute additional stitches along the V-neck slopes. Blocking will correct minor curling but cannot compensate for an edging that is significantly too tight.
Yes. Instead of using two full motif widths around the sleeve, reduce the width by replacing the inner sleeve column with narrower half motifs or work additional cream shaping rows along one edge before seaming. Keep enough room at the upper sleeve to match the armhole circumference.
Yes. A DK cotton or cotton blend gives the floral motifs excellent definition and creates a cardigan suitable for spring or mild weather. Pure cotton is heavier and has less elasticity than wool or acrylic, so check the weight and drape of a blocked sample square before making all of the motifs.
The finished Floral Granny Square Crochet Cardigan Pattern