Gingerbread Cottage Christmas Lantern Crochet Pattern
Advanced
For experienced crocheters who enjoy complex shaping, fine detail, and ambitious construction
Weekend Project
A satisfying weekend make — start Friday, finish Sunday, enjoy forever.
Handmade Gift
A beautiful keepsake — free forever. Read online or print at home.
About This Gingerbread Cottage Christmas Lantern Crochet Pattern
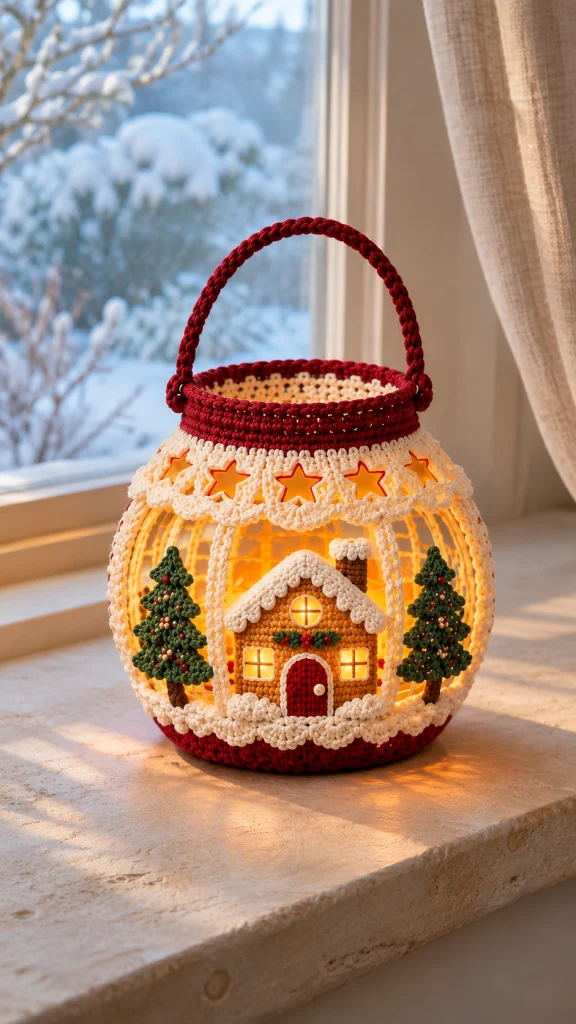
This Christmas lantern amigurumi pattern brings a snowy gingerbread cottage, two layered evergreen trees, and a ring of golden stars together in a burgundy-and-cream lantern. The crochet forms a fitted decorative sleeve around a clear globe vase, allowing warm LED light to shine behind the cottage and through the open sides.
The design combines a shaped circular base, separate structural ribs, scalloped lace, dimensional tree branches, and carefully embroidered windows. A reinforced crochet handle completes the familiar lantern shape. Allow approximately 18–24 hours for the crochet, detailed embroidery, and assembly.
This advanced project suits makers who enjoy working small pieces and adjusting crochet to a firm support. The cottage and trees have lightly padded layers, while the transparent vase supports the lantern itself. The handle is decorative: carry the finished lantern by supporting its base.
Materials
- DK cotton yarn: approximately 100 g burgundy, 125 g ivory, 35 g gingerbread gold, 30 g forest green, 10 g dark brown, and 10 g bright golden yellow.
- Small amounts of orange and red cotton embroidery thread.
- 3 mm crochet hook for the sleeve, ribs, and handle.
- 2.5 mm crochet hook for the cottage, trees, stars, and other small pieces.
- Clear globe vase with a flat base approximately 14 cm across, a maximum body diameter of 18 cm, a mouth approximately 14 cm across, and a height of 18 cm; choose a smooth rim without a flared lip.
- One battery-operated LED puck or short battery-operated LED light string with an accessible switch.
- Small quantity of polyester stuffing for the cottage and tree layers.
- Two lengths of 2 mm craft wire, each approximately 44 cm long, for the decorative handle.
- Floral tape for covering the wire ends.
- Wire cutters and round-nose pliers.
- Strong burgundy sewing thread for securing the handle.
- Ivory and burgundy sewing thread for discreet assembly stitches.
- Tapestry needle and fine embroidery needle.
- Stitch markers, scissors, tape measure, and blocking pins.
- One 5 mm ivory button for the door, or ivory yarn for an embroidered knob.
- Small piece of washable felt for backing the cottage.
Abbreviations
chchainscsingle crochethdchalf double crochetdcdouble crochetsl stslip stitchincwork 2 single crochet in one stitchsc2togsingle crochet two stitches togetherMRmagic ringBLOback loop onlyststitchstsstitchesBurgundy Base Cup
- Round 1: With burgundy and the 3 mm hook, work 6 sc in MR. Tighten the ring. (6 sts)
- Round 2: Inc in each st. (12 sts)
- Round 3: Repeat (sc, inc) 6 times. (18 sts)
- Round 4: Repeat (2 sc, inc) 6 times. (24 sts)
- Round 5: Repeat (3 sc, inc) 6 times. (30 sts)
- Round 6: Repeat (4 sc, inc) 6 times. (36 sts)
- Round 7: Repeat (5 sc, inc) 6 times. (42 sts)
- Round 8: Repeat (6 sc, inc) 6 times. (48 sts)
- Round 9: Repeat (7 sc, inc) 6 times. (54 sts)
- Round 10: Repeat (8 sc, inc) 6 times. (60 sts)
- Round 11: Repeat (9 sc, inc) 6 times. (66 sts)
- Round 12: Repeat (10 sc, inc) 6 times. (72 sts)
- Round 13: Repeat (11 sc, inc) 6 times. (78 sts)
- Round 14: Repeat (12 sc, inc) 6 times. (84 sts)
- Round 15: Repeat (13 sc, inc) 6 times. (90 sts)
- Round 16: Repeat (14 sc, inc) 6 times. Check the diameter against the vase base. (96 sts)
- Round 17: Sc in BLO around to turn the edge upward. (96 sts)
- Round 18: Sc around through both loops. (96 sts)
- Round 19: Sc around. (96 sts)
- Round 20: Sc around. (96 sts)
- Round 21: Sc around. Sl st in the next st and fasten off. Mark every 12th stitch around this edge to establish eight rib positions. Do not stuff the base. (96 sts)
Upper Burgundy Collar
- Foundation: With burgundy and the 3 mm hook, ch 96. Join with a sl st in the first chain without twisting. (96 chains)
- Round 1: Ch 1, sc in each chain; join with a sl st in the first sc. Leave a 20 cm starting tail to close any small gap at the foundation. (96 sts)
- Round 2: Ch 1, sc around; join. (96 sts)
- Round 3: Ch 1, sc around; join. (96 sts)
- Round 4: Ch 1, sc around; join. (96 sts)
- Round 5: Ch 1, sc around; join. (96 sts)
- Round 6: Ch 1, sc around; join. (96 sts)
- Round 7: Ch 1, sc around; join. Fasten off and close the foundation gap with the starting tail. Mark every 12th foundation stitch, matching the eight base markers. The collar should sit just below the vase rim without stretching tightly. (96 sts)
Ivory Star Lace
- Round 1: Turn the collar upside down. Join ivory to an unused side of a foundation chain at the lower edge. Ch 1 and work 1 sc in each foundation chain; join. The lace grows downward from the collar. (96 sts)
- Round 2: Ch 1. Repeat (sc in the next 3 sts, ch 5, skip 5 sts, sc in the next 4 sts) 8 times; join. (56 sc and eight ch-5 spaces)
- Round 3: Ch 1. Repeat (sc in the next 3 sc, 7 sc in the ch-5 space, sc in the next 4 sc) 8 times; join. (112 sts)
- Round 4: Ch 1. Repeat (sc in the next 7 sts, skip 1 st, 5 dc in the next st, skip 1 st, sl st in the next st, skip 1 st, 5 dc in the next st, skip 1 st) 8 times; join to the first sc. Fasten off. Each repeat uses 14 stitches from Round 3. (56 sc, 80 dc, and 8 pattern sl sts; 144 worked sts)
Eight Ivory Support Ribs
- Row 1: Make eight separate ribs. With ivory and the 3 mm hook, ch 35. Sc in the second chain from the hook and each remaining chain. Ch 1, turn. (34 sts)
- Row 2: Sc across. Ch 1, turn. (34 sts)
- Row 3: Sc across. Fasten off with a 30 cm sewing tail. Each rib is approximately 15.5 cm long before gentle stretching. Do not stuff. If your vase needs another length, change the foundation by one chain for each sc added or removed, keeping all eight ribs identical. (34 sts)
Lower Snow Scallop Band
- Foundation: With ivory and the 3 mm hook, ch 96. Join without twisting. (96 chains)
- Round 1: Ch 1, sc in each chain; join. (96 sts)
- Round 2: Ch 1. Repeat (sc in the next st, skip 1 st, 5 dc in the next st, skip 1 st) 24 times; join to the first sc. Fasten off with a long sewing tail. (24 sc and 120 dc; 144 sts)
Gingerbread Cottage Front
- Row 1: With gingerbread gold and the 2.5 mm hook, ch 21. Sc in the second chain from the hook and across. Ch 1, turn. (20 sts)
- Row 2: Sc across. Ch 1, turn. (20 sts)
- Row 3: Sc across. Ch 1, turn. (20 sts)
- Row 4: Sc across. Ch 1, turn. (20 sts)
- Row 5: Sc across. Ch 1, turn. (20 sts)
- Row 6: Sc across. Ch 1, turn. (20 sts)
- Row 7: Sc across. Ch 1, turn. (20 sts)
- Row 8: Sc across. Ch 1, turn. (20 sts)
- Row 9: Sc across. Ch 1, turn. (20 sts)
- Row 10: Sc across. Ch 1, turn. (20 sts)
- Row 11: Sc2tog, 16 sc, sc2tog. Ch 1, turn. (18 sts)
- Row 12: Sc2tog, 14 sc, sc2tog. Ch 1, turn. (16 sts)
- Row 13: Sc2tog, 12 sc, sc2tog. Ch 1, turn. (14 sts)
- Row 14: Sc2tog, 10 sc, sc2tog. Ch 1, turn. (12 sts)
- Row 15: Sc2tog, 8 sc, sc2tog. Ch 1, turn. (10 sts)
- Row 16: Sc2tog, 6 sc, sc2tog. Ch 1, turn. (8 sts)
- Row 17: Sc2tog, 4 sc, sc2tog. Ch 1, turn. (6 sts)
- Row 18: Sc2tog, 2 sc, sc2tog. Ch 1, turn. (4 sts)
- Row 19: Sc2tog twice. Ch 1, turn. (2 sts)
- Row 20: Sc2tog. Fasten off with a long tail. Cut felt approximately 3 mm smaller than the panel on every edge; set aside for assembly. (1 st)
Two Snowy Roof Strips
- Row 1: Make two. With ivory and the 2.5 mm hook, ch 15. Sc in the second chain from the hook and across. Ch 1, turn. (14 sts)
- Row 2: Sc across. Ch 1, turn. (14 sts)
- Row 3: Repeat (sl st in the next st, 3 hdc in the next st) 7 times. Fasten off with a sewing tail. The scallops face down over the cottage wall. (7 sl sts and 21 hdc; 28 sts)
Chimney and Snow Cap
- Row 1: With dark brown and the 2.5 mm hook, ch 5. Sc in the second chain from the hook and across. Ch 1, turn. (4 sts)
- Row 2: Sc across. Ch 1, turn. (4 sts)
- Row 3: Sc across. Ch 1, turn. (4 sts)
- Row 4: Sc across. Ch 1, turn. (4 sts)
- Row 5: Sc across, changing to ivory on the last pull-through. Ch 1, turn. (4 sts)
- Row 6: Inc in the first st, 2 sc, inc in the last st. Ch 1, turn. (6 sts)
- Row 7: Repeat (sl st in the next st, 2 hdc in the next st) 3 times. Fasten off with a sewing tail. (3 sl sts and 6 hdc; 9 sts)
Arched Burgundy Door
- Row 1: With burgundy and the 2.5 mm hook, ch 7. Sc in the second chain from the hook and across. Ch 1, turn. (6 sts)
- Row 2: Sc across. Ch 1, turn. (6 sts)
- Row 3: Sc across. Ch 1, turn. (6 sts)
- Row 4: Sc across. Ch 1, turn. (6 sts)
- Row 5: Sc across. Ch 1, turn. (6 sts)
- Row 6: Sc2tog, 2 sc, sc2tog. Ch 1, turn. (4 sts)
- Row 7: Sc2tog twice. Fasten off with a sewing tail. Sew an ivory button near the right edge, or embroider a small ivory knob. (2 sts)
- Door icing: With ivory, ch 22 and fasten off. Sew this chain around the two sides and curved top of the attached door, easing the chain around the arch. Leave the bottom edge clear. (22 chains)
Two Square Windows and One Round Window
- Square window Row 1: Make two. With golden yellow and the 2.5 mm hook, ch 5. Sc in the second chain from the hook and across. Ch 1, turn. (4 sts)
- Square window Row 2: Sc across. Ch 1, turn. (4 sts)
- Square window Row 3: Sc across. Ch 1, turn. (4 sts)
- Square window Row 4: Sc across. Fasten off with a sewing tail. (4 sts)
- Round window Round 1: With golden yellow, work 6 sc in MR. (6 sts)
- Round window Round 2: Inc in each st. Sl st in the next st and fasten off with a sewing tail. (12 sts)
- Window finishing: Sew the square windows beside the door and the round window in the gable. Outline each with ivory backstitch and add a vertical and horizontal brown straight stitch for the panes. These are opaque golden appliqués; the LED light glows around the house rather than through these stitches. (3 completed windows)
Two Layered Evergreen Trees
- Bottom tier Row 1: Make two. With forest green and the 2.5 mm hook, ch 14. Sc in the second chain from the hook and across. Ch 1, turn. (13 sts)
- Bottom tier Row 2: Sc2tog, 9 sc, sc2tog. Ch 1, turn. (11 sts)
- Bottom tier Row 3: Sc2tog, 7 sc, sc2tog. Ch 1, turn. (9 sts)
- Bottom tier Row 4: Sc2tog, 5 sc, sc2tog. Ch 1, turn. (7 sts)
- Bottom tier Row 5: Sc2tog, 3 sc, sc2tog. Ch 1, turn. (5 sts)
- Bottom tier Row 6: Sc2tog, sc, sc2tog. Ch 1, turn. (3 sts)
- Bottom tier Row 7: Sc2tog, sc. Ch 1, turn. (2 sts)
- Bottom tier Row 8: Sc2tog. Fasten off with a long tail. (1 st)
- Middle tier Row 1: Make two. With forest green, ch 10. Sc in the second chain from the hook and across. Ch 1, turn. (9 sts)
- Middle tier Row 2: Sc2tog, 5 sc, sc2tog. Ch 1, turn. (7 sts)
- Middle tier Row 3: Sc2tog, 3 sc, sc2tog. Ch 1, turn. (5 sts)
- Middle tier Row 4: Sc2tog, sc, sc2tog. Ch 1, turn. (3 sts)
- Middle tier Row 5: Sc2tog, sc. Ch 1, turn. (2 sts)
- Middle tier Row 6: Sc2tog. Fasten off with a long tail. (1 st)
- Top tier Row 1: Make two. With forest green, ch 6. Sc in the second chain from the hook and across. Ch 1, turn. (5 sts)
- Top tier Row 2: Sc2tog, sc, sc2tog. Ch 1, turn. (3 sts)
- Top tier Row 3: Sc2tog, sc. Ch 1, turn. (2 sts)
- Top tier Row 4: Sc2tog. Fasten off with a long tail. (1 st)
- Trunk Row 1: Make two. With dark brown, ch 4. Sc in the second chain from the hook and across. Ch 1, turn. (3 sts)
- Trunk Row 2: Sc across. Ch 1, turn. (3 sts)
- Trunk Row 3: Sc across. Ch 1, turn. (3 sts)
- Trunk Row 4: Sc across. Ch 1, turn. (3 sts)
- Trunk Row 5: Sc across. Fasten off with a long tail. (3 sts)
- Tree assembly: Place each bottom tier upright. Overlap the middle tier over its upper half, with its tip about 1 cm higher than the bottom-tier tip. Add the top tier in the same way. Sew through the central overlap, leaving the lower edges slightly free. Add a tiny pinch of stuffing beneath each overlap and close its sides. Sew the trunk behind the bottom tier with approximately 1 cm visible. (2 trees)
- Tree embroidery: Add approximately 12 red, 8 yellow, and 6 ivory French knots to each tree. Pass the thread between layers and secure it on the back without drawing the branches flat. (2 decorated trees)
Eight Golden Stars
- Round 1: Make eight. With golden yellow and the 2.5 mm hook, work 5 sc in MR. Tighten the ring. (5 sts)
- Round 2: Repeat the following five times: ch 4, sl st in the second chain from the hook, sc in the next chain, hdc in the last chain, then sl st in the next sc of Round 1. Each repeat forms one point and uses one base stitch. Fasten off with a sewing tail. (5 points; 20 worked sts and 20 chains)
- Star finishing: Damp-block the points flat. With orange thread, backstitch just inside the outline of each star. Sew one star centrally behind each ch-5 lace opening, catching the star tips to the surrounding ivory stitches. (8 attached stars)
Cottage Garland and Snowdrifts
- Garland foundation: With forest green and the 2.5 mm hook, ch 13. (13 chains)
- Garland Row 1: Sl st in the second chain from the hook. Repeat (ch 3, sl st in the second chain from the hook, sc in the next chain, sl st in the next foundation chain) 11 times. Fasten off with a sewing tail. Sew above the door and add five red French-knot berries. (11 leaf points and 12 foundation sl sts)
- Small snowdrift Row 1: Make two. With ivory, ch 7. Sc in the second chain from the hook and across. Ch 1, turn. (6 sts)
- Small snowdrift Row 2: Repeat (sl st in the next st, 3 hdc in the next st) 3 times. Fasten off with a sewing tail. (3 sl sts and 9 hdc; 12 sts)
- Wide snowdrift Row 1: With ivory, ch 11. Sc in the second chain from the hook and across. Ch 1, turn. (10 sts)
- Wide snowdrift Row 2: Repeat (sl st in the next st, 3 hdc in the next st) 5 times. Fasten off with a sewing tail. (5 sl sts and 15 hdc; 20 sts)
Reinforced Burgundy Handle
- Row 1: With burgundy and the 3 mm hook, ch 85. Sc in the second chain from the hook and across. Ch 1, turn. (84 sts)
- Row 2: Sc across. Ch 1, turn. (84 sts)
- Row 3: Sc across. Ch 1, turn. (84 sts)
- Row 4: Sc across. Fasten off with a 100 cm sewing tail. (84 sts)
- Reinforcement: Bend a closed loop at both ends of each wire. Cover the loops with floral tape. Lay the two wires side by side along the center of the crochet strip; the crochet should extend beyond the covered wire ends. Fold the strip lengthwise and whipstitch the long edges together, then close both ends. (1 enclosed handle)
- Shaping: Bend the handle into an arch approximately 14 cm wide and 13 cm high above the collar. Sew 2 cm of each end vertically against opposite sides of the collar, aligned with two opposing ribs. Use burgundy thread to stitch through several collar rows and both layers of each flattened handle end. (2 secured handle ends)
Finishing
Weave in the small-piece ends and lightly block the lace and roof strips. Place the vase inside the base cup. Position the collar just below its rim, with the lace hanging down. Align the eight collar markers with the eight base markers. Pin one rib between each matching pair, keeping the ribs against the vase and applying only enough tension to remove slack.
Sew each rib’s lower short edge across three stitches at the top of the base cup. Sew its upper short edge to the collar foundation behind the lace. Check the fit after attaching the first two opposing ribs, then attach the other six. Remove the vase while sewing whenever the needle needs to pass behind the fabric. The completed sleeve must slide off the vase without forcing it.
Sew the lower snow band around the base cup’s upper edge, covering the rib attachments and allowing the scallops to overlap the burgundy. Keep the band level. Set the decorated cottage between two front ribs, spanning their edges if needed. Attach the chimney behind the right roof slope, then sew both roof strips along the gable slopes with their scallops hanging down.
Whipstitch the felt backing to the cottage’s wrong side, adding a thin layer of stuffing before closing the final edge. Keep the house flexible enough to follow the vase curve. Sew the house’s lower edge to the snow band and its side edges to the two front ribs. Use small stitches through the roof backing to secure its upper corners to those ribs. Avoid stitching through unsupported empty space.
Attach a tree on each side of the cottage. Sew each trunk to the snow band and secure the tree’s back center to a nearby rib. Add the two small snowdrifts beside the door and the wide snowdrift along the cottage base, with their scallops facing up. Secure all loose branch layers and decorative pieces without flattening their texture.
Attach the handle after the sleeve fit is settled. Insert the LED light into the vase, keeping its switch and battery compartment reachable through the open top. Place the vase back into the sleeve and arrange the light behind the cottage. Display the lantern on a stable surface and support the base whenever moving it. This is a decorative display piece with enclosed wire and small parts.
Tips for Success
- Fit the base, collar, and two opposing ribs before completing assembly; these pieces determine whether the sleeve sits evenly.
- Keep the front collar join at the back so the cottage is centered beneath an uninterrupted section of lace.
- Embroider the windows and trees before mounting them; the backs remain accessible and knots stay concealed.
- Use very little stuffing in the cottage and branches. A shallow padded layer follows the vase and preserves open space for the light.
- Spread the LED string around the lower interior instead of bunching it directly behind one window area.
Common Mistakes to Avoid
- A base that cups before Round 17 usually indicates tight tension or missed increases. Count each round and adjust the hook if the finished disk is too small.
- A twisted collar foundation makes the lace spiral. Lay the entire chain flat before joining it.
- Overtight ribs pull the collar downward and distort the stars. Lengthen all ribs equally if the collar cannot remain below the rim without strain.
- Attaching heavy trees only to the lace makes the upper edge sag. Anchor the trunks to the lower band and the tree backs to the ribs.
- Pulling embroidery too tightly puckers the windows. Leave each pane stitch resting on the surface before securing its thread.
Ways to Customize This Pattern
- Replace burgundy with deep cranberry or navy while keeping the ivory snow and gold cottage for clear contrast.
- Work the cottage in pale biscuit yarn and embroider extra brown horizontal lines to suggest gingerbread layers.
- Add a second cottage to the back, attaching it to two rear ribs and the lower band using the same construction.
- Omit the reinforced handle for a tabletop-only lantern; finish the collar normally and leave the top fully accessible.
- For a wider vase, increase the base to a multiple of 24 stitches and use that same multiple for the collar and snow band; the 12-stitch lace repeat and 4-stitch scallop repeat will still fit. Recalculate rib spacing and check the new diameter before proceeding.
Frequently asked questions
No. Use only a battery-operated LED light. Yarn, stuffing, felt, and the decorative handle must be kept away from flames and heat sources.
The clear vase supplies the rounded shape and stability. The crochet sleeve is intentionally open and flexible, so it needs the support in place for display.
Measure the base diameter and rim circumference first. At the stated gauge, 96 stitches give approximately 43.6 cm of circumference. Choose a support close to the listed dimensions or recalculate the base and collar together. Rib length depends on the curved distance between the base cup and collar, measured along the vase surface.
The enclosed wire shapes the decorative handle, but the crochet attachments are not rated to carry the vase. Display this version on a shelf or table and lift it from underneath.
Remove the vase and LED light, then spot-clean the crochet with a lightly damp cloth. Avoid soaking the wire handle. Let the sleeve dry completely before reassembling the lantern.
The finished Gingerbread Cottage Christmas Lantern Crochet Pattern

