Gingerbread Garden Crochet Christmas Centerpiece
Advanced
For experienced crocheters who enjoy complex shaping, fine detail, and ambitious construction
Single-Day Project
A satisfying project you can complete in a single afternoon or evening.
Handmade Gift
A beautiful keepsake — free forever. Read online or print at home.
About This Gingerbread Garden Crochet Christmas Centerpiece
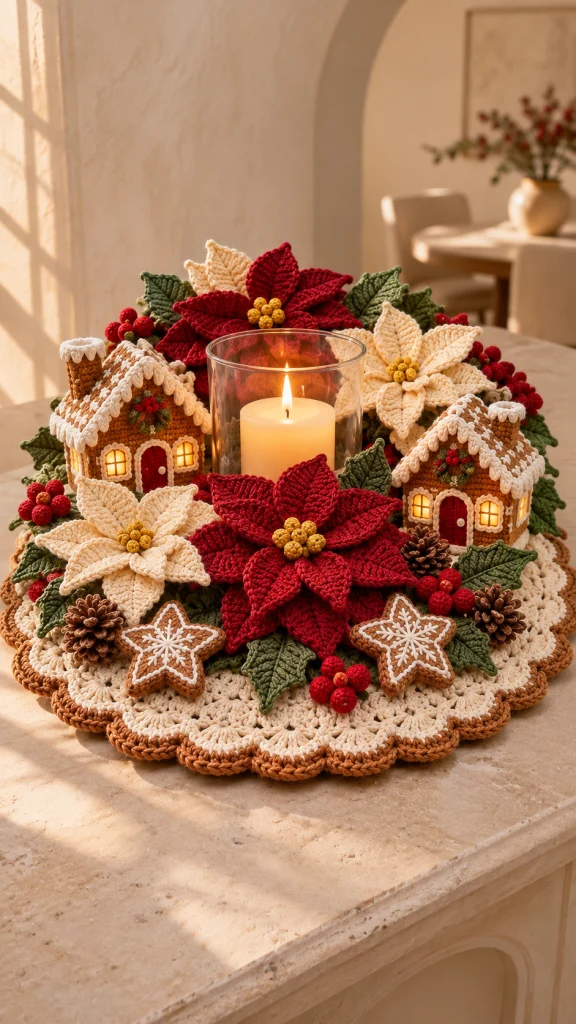
This crochet Christmas centerpiece pattern brings gingerbread cottages, deep red and ivory poinsettias, holly leaves and iced cookie stars together on a scalloped cream mat. A clear cylinder filled with a battery-operated candle sits in the center, surrounded by dimensional crochet decorations.
The design uses separately shaped cottage panels, embroidered details, layered pointed petals and textured pinecones. Cinnamon brown edging frames the arrangement, while mustard flower centers and bright red berries add small touches of color. The finished display measures approximately 48 cm across, with two cottages standing approximately 13 cm tall.
Allow approximately 40–55 hours for crocheting, embroidery and assembly. This advanced project suits makers comfortable with working into both sides of a foundation chain, matching shaped panels, sewing small structures and adjusting placement before the final stitches. The instructions below are an original interpretation of the pictured centerpiece.
Materials
- DK cotton yarn: approximately 300 g ivory, 150 g cinnamon brown, 150 g deep red, 125 g dark olive green, 25 g mustard yellow and 20 g dark brown; quantities assume approximately 110 m per 50 g and include a working allowance.
- 3.5 mm crochet hook for the mat; 3 mm hook for all decorative pieces.
- Small amounts of cream and brown embroidery thread for cottage details and cookie embroidery.
- Polyester stuffing for berries, pinecones and lightly padded cookie stars.
- Approximately 40 × 60 cm of firm plastic canvas for two cottage structures; trim all cut edges smooth.
- Ivory and pale gold felt scraps for cottage windows and door knobs.
- A rigid round display board approximately 46 cm across, covered in ivory felt.
- A clear glass cylinder approximately 12 cm across, with a battery-operated LED pillar candle that fits inside it.
- Tapestry needle, embroidery needle, scissors, stitch markers, ruler and sewing pins.
- Strong matching sewing thread for securing the cottage structures and decorations.
Abbreviations
chchainsl stslip stitchscsingle crochethdchalf double crochetdcdouble crochettrtreble crochetinc2 single crochet in one stitchsc2togsingle crochet 2 stitches togetherMRmagic ringFLOfront loop onlyBLOback loop onlyRSright sideststitchRound Mat and Scalloped Border
- With ivory and the 3.5 mm hook, Round 1: make 12 dc in an MR; join. Tighten and secure the ring. 12 dc.
- Round 2: ch 2, work 2 dc in every st; join. 24 dc.
- Rounds 3–20: for each round number n, ch 2, repeat [dc in the next n − 2 sts, 2 dc in the next st] 12 times; join. Work each numbered round once. Counts are 36, 48, 60, 72, 84, 96, 108, 120, 132, 144, 156, 168, 180, 192, 204, 216, 228 and 240 dc respectively. Move the beginning of the increase sequence by a few stitches on alternate rounds, keeping 12 equally spaced increases.
- Round 21: ch 1, repeat [sc in the next st, skip 2 sts, 7 dc in the next st, skip 2 sts] 40 times; join to the first sc. 40 scallops, with 40 sc and 280 dc.
- Round 22: change to cinnamon brown, ch 1, repeat [sl st in the next sc, sc in each of the next 3 dc, 3 sc in the next dc, sc in each of the next 3 dc] 40 times; join to the first sl st. 360 sc and 40 sl sts. Fasten off.
- Block flat to approximately 48 cm across. The plain circular area should measure approximately 40 cm across before the border. Let dry completely before attaching decorations.
Cottage Front and Back Panels — Make Four
- Each cottage needs two gabled panels, two side panels, two roof panels and one floor. Use cinnamon brown and the 3 mm hook. For each front or back, ch 19.
- Row 1: sc in the second ch from the hook and each remaining ch. 18 sc.
- Rows 2–16: ch 1, turn, sc in every st. 18 sc per row.
- Row 17: ch 1, turn, sc2tog, sc in the next 14 sts, sc2tog. 16 sc.
- Row 18: ch 1, turn, sc2tog, sc in the next 12 sts, sc2tog. 14 sc.
- Row 19: ch 1, turn, sc2tog, sc in the next 10 sts, sc2tog. 12 sc.
- Row 20: ch 1, turn, sc2tog, sc in the next 8 sts, sc2tog. 10 sc.
- Row 21: ch 1, turn, sc2tog, sc in the next 6 sts, sc2tog. 8 sc.
- Row 22: ch 1, turn, sc2tog, sc in the next 4 sts, sc2tog. 6 sc.
- Row 23: ch 1, turn, sc2tog, sc in the next 2 sts, sc2tog. 4 sc.
- Row 24: ch 1, turn, sc2tog twice. 2 sc.
- Row 25: ch 1, turn, sc2tog. 1 sc. Fasten off, leaving a sewing tail. Each panel measures approximately 8.2 cm wide, with a 6.7 cm straight wall and a 3.8 cm gable.
Cottage Sides, Floors and Roofs
- Side panels: make four in cinnamon brown. Ch 16; Row 1: sc in the second ch from the hook and across. 15 sc.
- Side Rows 2–16: ch 1, turn, sc in every st. 15 sc per row. Fasten off with a sewing tail. Each side measures approximately 6.8 × 6.7 cm.
- Floors: make two in cinnamon brown. Ch 19; Row 1: sc in the second ch from the hook and across. 18 sc.
- Floor Rows 2–16: ch 1, turn, sc in every st. 18 sc per row. Fasten off. Each floor measures approximately 8.2 × 6.7 cm.
- Roof panels: make four in cinnamon brown. Ch 20; Row 1: sc in the second ch from the hook and across. 19 sc.
- Roof Rows 2–15: ch 1, turn, sc in every st. 19 sc per row. Fasten off. Each panel measures approximately 8.6 cm along the ridge and 6.25 cm from ridge to eave.
- Roof snow: with ivory, embroider three broken lines of long stitches across each roof panel, parallel to its 19-st edges. Leave spaces of brown visible between the snowy marks.
- For each roof panel, identify one 19-st edge as the eave. With its RS facing, join ivory at the first eave stitch. Repeat [sl st in the next st, ch 4, sl st in the second ch from the hook and next 2 ch] 19 times. Fasten off. This makes 19 narrow icing drops attached along the eave.
- Along each short roof edge, join ivory and work 15 sc, one into each row end. Fasten off after each edge. Do not edge the ridge until the roof is assembled.
Doors, Windows, Wreaths and Chimneys
- Doors: make two in deep red. Ch 7; Row 1: sc in the second ch from the hook and across. 6 sc.
- Door Rows 2–8: ch 1, turn, sc in every st. 6 sc per row.
- Door Row 9: ch 1, turn, sc2tog, sc in the next 2 sts, sc2tog. 4 sc.
- Door Row 10: ch 1, turn, sc2tog twice. 2 sc. Fasten off. Sew one door to each front panel, its bottom level with the wall base and centered horizontally.
- Door icing: couch a length of ivory yarn around each door, securing it with small sewing stitches. Add a 4 mm pale gold felt knob.
- Windows: cut eight pale gold felt rectangles, each 1.4 × 1.8 cm. Round their upper corners. Sew two beside each front door and two to one outward-facing side of each cottage. Embroider ivory outlines and a vertical and horizontal window bar on every window. These windows suggest a warm glow without internal lighting.
- Wreaths: make two in green. Ch 8, join into a ring without twisting; ch 1, work 12 sc into the ring; join. Fasten off and sew one above each door. Add three small red French knots and two short green straight stitches at the lower edge of each wreath.
- Chimneys: make two in cinnamon brown. Ch 12 and join without twisting. Round 1: ch 1, sc in each ch; join. 12 sc.
- Chimney Rounds 2–7: ch 1, sc in every st; join. 12 sc per round.
- Chimney Round 8: change to ivory; ch 1, repeat [sc in the next st, ch 2] 12 times; join to the first sc. 12 sc and 12 ch-2 loops. Fasten off. Leave the chimney hollow.
Build the Two Cottages
- Block the panels lightly. Cut plastic canvas inserts to the actual blocked dimensions, approximately 3 mm smaller on every edge: four gables, four side rectangles, two floors and four roof rectangles.
- On the wrong side of each crochet panel, stitch its insert securely around the perimeter with matching thread. Keep all plastic edges inside the crochet. Attach inserts after completing the front embroidery.
- For each cottage, hold a side and front together with wrong sides inward. Whipstitch the 16 straight wall rows together, matching row ends. Join the second side to the opposite front edge, then add the back to form a rectangular wall structure.
- Sew in the floor: match its two 18-st edges to the front and back foundations, and its 16 row ends to the side foundations, easing the row ends evenly against the 15 side stitches.
- Place the two roof panels over the gables. Join their untrimmed 19-st edges together along the ridge. Center the roof front to back so it overhangs both gables by approximately 8 mm.
- Sew each roof to both gable slopes and the corresponding side wall top. The lower roof edges should overhang the side walls. Add an ivory chain of surface slip stitches along the ridge, working through the seam spaces.
- Sew a chimney to one roof slope near the back of each cottage. Flatten its lower opening against the roof and use small anchoring stitches all around; adjust the opening to follow the roof angle. Finished cottage height, including chimney, is approximately 13 cm.
Pointed Poinsettia Petals
- Make four flowers: two deep red and two ivory. Each flower uses six large outer petals and five small inner petals. Totals: 12 large red, 10 small red, 12 large ivory and 10 small ivory petals. Use the 3 mm hook.
- Large petal foundation: ch 15. First side: sc in the second ch from the hook, hdc in the next 2 ch, dc in the next 3 ch, tr in the next 3 ch, dc in the next 3 ch, hdc in the next ch, then work [sc, ch 3, sc] in the last ch.
- Large petal second side: rotate to work into the unused loops of the foundation. Hdc in the next ch, dc in the next 3 ch, tr in the next 3 ch, dc in the next 3 ch, hdc in the next 2 ch, sc in the last ch; join to the first sc. 28 stitches plus the ch-3 tip. Fasten off with a long sewing tail.
- Small petal foundation: ch 12. First side: sc in the second ch from the hook, hdc in the next ch, dc in the next 2 ch, tr in the next 3 ch, dc in the next 2 ch, hdc in the next ch, then [sc, ch 3, sc] in the last ch.
- Small petal second side: hdc in the next ch, dc in the next 2 ch, tr in the next 3 ch, dc in the next 2 ch, hdc in the next ch, sc in the last ch; join to the first sc. 22 stitches plus the ch-3 tip. Fasten off with a sewing tail.
- With matching yarn, surface slip stitch from the base to the tip along each petal’s foundation chain. Keep the ridge relaxed enough for the petal to curve slightly. Block large petals to approximately 8 × 3.5 cm and small petals to approximately 6.5 × 3 cm.
- Flower backing discs: make four in the appropriate flower color. Round 1: 6 sc in an MR. Round 2: inc in every st. 12 sc. Round 3: repeat [sc in the next st, inc] 6 times. 18 sc. Sl st in the next st and fasten off.
- For each flower, overlap the bases of six large petals around the backing disc and stitch through the lowest 1 cm of each petal. Add five small petals above, distributing them evenly and offsetting their tips from the outer layer. Keep the tips free.
Golden Flower Centers and Red Berry Clusters
- Golden centers: make 28 in mustard yellow, seven for each flower. Round 1: 6 sc in an MR.
- Center Round 2: sc in every st. 6 sc.
- Center Round 3: sc2tog 3 times. 3 sc. Thread the tail through the remaining stitches and close. Use the starting tail as the tiny amount of internal padding.
- Sew seven centers to each flower: one in the middle and six around it. Pass the sewing yarn through the petal bases and backing disc so the layers are held together. Finished flowers should measure approximately 15–17 cm across.
- Red berries: make 30. Round 1: 6 sc in an MR.
- Berry Round 2: inc in every st. 12 sc.
- Berry Rounds 3–4: sc in every st. 12 sc per round. Add a small amount of stuffing.
- Berry Round 5: sc2tog 6 times. 6 sc. Fasten off and draw the opening closed.
- Make six clusters of five berries. For each cluster, stitch three berries together as a base, then add two above them. Keep long tails for attaching clusters to the arrangement.
Veined Holly Leaves — Make Twenty
- With green and the 3 mm hook, ch 13. Sc in the second ch from the hook, hdc in the next ch, dc in the next 2 ch, tr in the next 3 ch, dc in the next 3 ch, hdc in the next ch, then [sc, ch 3, sc] in the last ch.
- Rotate around the foundation: hdc in the next ch, dc in the next 3 ch, tr in the next 3 ch, dc in the next 2 ch, hdc in the next ch, sc in the last ch; join to the first sc. 24 stitches plus the ch-3 tip.
- Serrated edge, first side: ch 1, repeat [sc in each of the next 2 sts, sc in the next st, ch 3, sl st in the third ch from the hook] 4 times. This uses the 12 stitches on the first side and makes four small points.
- At the tip, work [sc, ch 3, sl st in the third ch from the hook, sc] into the ch-3 space.
- Serrated edge, second side: repeat [sc in the next st, ch 3, sl st in the third ch from the hook, sc in each of the next 2 sts] 4 times; join to the first sc. The completed edge has 26 sc and nine small chain points. Fasten off.
- Surface slip stitch a central vein along the foundation chain. With a tapestry needle and matching green yarn, add three diagonal straight-stitch veins on either side. Block each leaf to approximately 7.5 × 4 cm.
Embroidered Gingerbread Stars — Make Two
- Make four flat star faces in cinnamon brown. Round 1: 5 sc in an MR; join.
- Round 2: ch 1, work 3 sc in every st; join. 15 sc.
- Round 3: repeat [ch 5, sc in the second ch from the hook, hdc in the next ch, dc in the next ch, tr in the last ch, skip 2 stitches of Round 2, sl st in the next st] 5 times. 5 points, each with four return stitches. Fasten off.
- Block the four faces to matching shapes, approximately 8–9 cm across. On two faces, couch ivory yarn around the outline approximately 3 mm inside the edge, following every tip and valley.
- Embroider a snowflake on each outlined face: make five long straight stitches from the center toward the points, then add two short diagonal branches on each side of every spoke.
- Pair each embroidered face with a plain face, wrong sides together. Whipstitch the outlines together in brown, matching all points and valleys. Add a thin layer of stuffing before closing the last two points. Keep the cookie flat rather than rounded.
Textured Pinecones — Make Three
- With dark brown and the 3 mm hook, Round 1: 6 sc in an MR.
- Round 2: inc in every st. 12 sc.
- Round 3: repeat [sc in the next st, inc] 6 times. 18 sc.
- Rounds 4–8: working in BLO, sc in every st. 18 sc per round. Leave the front loops exposed for scales.
- Round 9: repeat [sc in the next st, sc2tog] 6 times. 12 sc. Stuff lightly.
- Round 10: sc2tog 6 times. 6 sc. Fasten off and close the opening.
- Scale tier 1: hold the closed narrow end upward. Join dark brown to an exposed front loop from Round 4. Repeat [sl st in the next exposed loop, 3 hdc in the next exposed loop, sl st in the next exposed loop] 6 times. 6 scales, using all 18 loops. Fasten off.
- Scale tier 2: repeat the same six-scale sequence in the exposed loops of Round 6. Fasten off.
- Scale tier 3: repeat the same six-scale sequence in the exposed loops of Round 8. Fasten off. Shape the scales outward gently and weave in all ends.
Arrange and Secure the Centerpiece
- Place the blocked mat on its felt-covered board. Mark the center and a 15 cm clear central circle with removable thread. Set the glass cylinder inside this circle while planning the arrangement, then remove it before sewing.
- Position one cottage at approximately 10 o’clock and the other at 2 o’clock, with doors facing the front. Keep both buildings outside the central circle. Sew each floor to the mat at all four corners and at the middle of each edge.
- Set one red poinsettia at 6 o’clock and the second at 12 o’clock. Place the ivory flowers at approximately 8 o’clock and 3 o’clock. Overlap neighboring petals slightly while keeping their tips free. Sew each backing disc to the mat at six evenly spaced points.
- Arrange the twenty leaves in ten pairs beneath flowers and beside cottages. Point their tips outward, with several visible at the front edge. Secure the lower third of each leaf to the mat and, where needed, to the neighboring flower backing.
- Place the two embroidered stars at approximately 5 and 7 o’clock, outside the front red flower. Sew their undersides to the mat at three points each, keeping the embroidery visible.
- Add the three pinecones near the front and side edges, between flowers and stars. Stitch each through its lower body to the mat at three points.
- Distribute the six berry clusters around the outer greenery. Secure each cluster through at least three berries so it cannot pivot on a single thread.
- Check the underside for loose tails, remove the central marking thread and return the glass cylinder and LED candle to the clear center. Keep all petals outside the cylinder.
Finishing
Weave every tail through several stitches on the underside, changing direction once before trimming. Check the cottage seams with a gentle squeeze, and add stitches wherever a roof or wall lifts away from its support. Arrange the petal tips by hand so the flowers open toward the viewer.
Set the finished mat on its covered board and lift the whole display by the board when moving it. Remove the glass and candle first. Dust with a soft brush; spot-clean the assembled decorations with a lightly damp cloth and allow them to dry fully before storage.
Tips for Success
- Make and block one large petal before producing the full set. Its length determines how comfortably the flowers fit around the central cylinder.
- Cut the cottage supports from the blocked crochet panels, since small gauge differences affect the roof angle and wall height.
- Keep the surface slip-stitch veins loose. Tight veins shorten the leaves and curl the poinsettia tips sharply.
- Photograph the pinned layout from above before sewing. This makes it easier to restore the spacing as individual pieces are lifted.
- Use several short attachment seams beneath each flower instead of sewing down every petal, preserving the layered shape.
Common Mistakes to Avoid
- A ruffled mat usually means the stitches are too wide for the round height. Check gauge, try a smaller hook and block the plain circle before adding its border.
- A cupped mat can result from tight stitches or missed increases. Confirm that Round 20 has exactly 240 dc before continuing.
- Working a petal’s second side into new chains changes its outline. Rotate the foundation and use its remaining loops.
- Cutting inserts right up to the crochet edges makes seams bulky and can expose the plastic. Leave approximately 3 mm of clearance on every edge.
- Attaching decorations before checking the cylinder space can crowd the candle. Keep the marked 15 cm circle clear throughout assembly.
Ways to Customize This Pattern
- Use burgundy in place of deep red and sage in place of olive, keeping the ivory petals and cinnamon cottages for contrast.
- Make a larger mat by adding complete increase rounds before the border. Round n has 12 × n dc; the six-stitch scallop repeat fits every such round. Recalculate the board diameter from the blocked mat.
- For a lower display, omit the chimneys and place the cookie stars closer to the cottage fronts. Keep the supported walls and roofs unchanged.
- Make flowers removable by sewing small fabric ties beneath their backing discs and threading the ties through the mat. Untie them before cleaning or packing.
- Replace the central cylinder with a plain vase of dried stems, provided its base fits the clear central circle and the display remains balanced.
Frequently asked questions
Use a battery-operated LED candle only. The crochet, felt, stuffing and plastic supports surround the cylinder closely, and the arrangement is designed for a cool light source.
The written pattern uses pale gold felt with embroidered window bars to suggest lit windows. It does not include electrical fittings or an internal light source.
The completed supported arrangement is best spot-cleaned. If you want to wash the mat separately, attach all decorations with removable fabric ties and take out the board, glass and candle first.
The extra length creates the front and back roof overhangs. Their depth also exceeds the gable slope slightly, leaving room for the icing drops to hang below the eaves.
No. The stitch counts and construction have been reviewed in writing. Make a gauge swatch and sample-check the mat, one petal and one cottage before committing to the complete set.
The finished Gingerbread Garden Crochet Christmas Centerpiece

