Gingerbread Village Crochet Christmas Centerpiece
Advanced
For experienced crocheters who enjoy complex shaping, fine detail, and ambitious construction
Single-Day Project
A satisfying project you can complete in a single afternoon or evening.
Handmade Gift
A beautiful keepsake — free forever. Read online or print at home.
About This Gingerbread Village Crochet Christmas Centerpiece
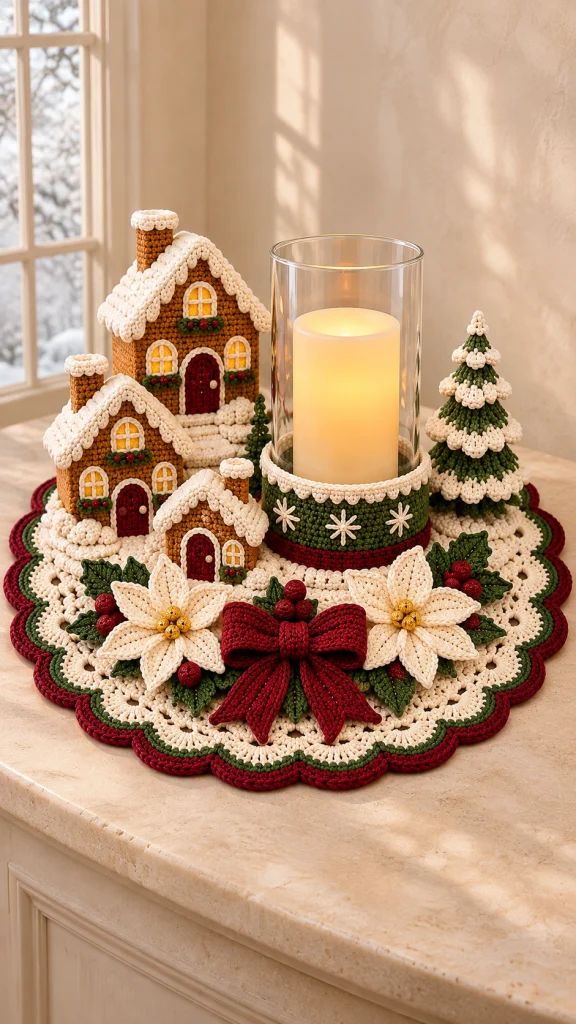
This Crochet Christmas centerpiece pattern brings together three snowy gingerbread houses, a tiered evergreen, ivory poinsettias, and a generous burgundy bow on a scalloped circular mat. A removable green sleeve surrounds a clear glass cylinder at the center, creating the warm focal point of a miniature winter village.
The houses are constructed from shaped front and back panels, separate walls, fitted floors, and pitched roofs. Embroidered windows, layered snow trims, holly leaves, and tiny berries give the arrangement its character. The finished piece measures approximately 50–54 cm across, with a tallest house around 20 cm high.
Allow approximately 40–55 hours for this advanced project. It suits crocheters comfortable with shaping, working around foundations, surface crochet, embroidery, and assembling supported decorative structures. Use a battery-operated LED candle inside the glass cylinder.
Materials
- DK cotton yarn: approximately 350 g ivory, 150 g gingerbread brown, 150 g forest green, 100 g burgundy, 25 g golden yellow, and a small amount of olive green; quantities assume approximately 110 m per 50 g.
- 3 mm crochet hook for structures, sleeve, and embellishments.
- 3.5 mm crochet hook for the circular mat.
- Clear glass cylinder approximately 12 cm outside diameter, with straight sides and a stable base.
- Battery-operated LED pillar candle sized to fit inside the cylinder.
- Washable polyester stuffing for the tree, chimneys, and berries.
- Approximately one A3 sheet of firm plastic canvas for removable house supports; cut edges must be smooth.
- Tapestry needle, embroidery needle, scissors, stitch markers, ruler, blocking mat, and rustproof pins.
- Ivory sewing thread for discreet assembly and optional small gold beads for flower centers.
- Optional thin felt for wrapping plastic-canvas supports.
Abbreviations
chchainsl stslip stitchscsingle crochethdchalf double crochetdcdouble crochettrtreble crochetsc2togsingle crochet two stitches togetherincwork 2 single crochet in one stitchMRmagic ringst / stsstitch / stitchesRSright sideBLOback loop onlyIvory Circular Mat
- With ivory and the 3.5 mm hook, Round 1: work 12 dc in an MR; join. Tighten the center. 12 sts.
- Round 2: ch 2, work 2 dc in each stitch; join. 24 sts.
- Rounds 3–16: begin each round with ch 2. On round n, repeat [dc in the next n minus 2 stitches, 2 dc in the next stitch] 12 times; join. Work each numbered round once. Counts are 36, 48, 60, 72, 84, 96, 108, 120, 132, 144, 156, 168, 180, and 192 sts respectively.
- Round 17: ch 1, repeat [sc in the next stitch, ch 5, skip 3 stitches] 48 times; join to the first sc. 48 sc and 48 chain spaces.
- Round 18: sl st into the first chain space, ch 1, sc in that space; repeat [ch 5, sc in the next chain space] 47 times, ch 5; join to the first sc. 48 sc and 48 chain spaces.
- Round 19: sl st into the first chain space, ch 1, sc in that space; repeat [ch 6, sc in the next chain space] 47 times, ch 6; join. 48 sc and 48 chain spaces.
- Round 20: sl st into the first chain space, ch 1; repeat [sc in the current chain space, ch 3, 7 dc in the next chain space, ch 3] 24 times, advancing to the next unused chain space for each repeat; join to the first sc. 24 sc, 24 seven-dc shells, and 48 ch-3 spaces.
- Round 21: join green at any sc, ch 1; repeat [sc in sc, 3 sc in the next chain space, sc in each of the next 7 dc, 3 sc in the next chain space] 24 times; join. 336 sc.
- Round 22: join burgundy at the first stitch of a repeat, ch 1; repeat [sc in the next 7 stitches, inc, sc in the next 6 stitches] 24 times; join. 360 sc.
- Round 23: ch 1, sc in every stitch; join. 360 sc. Fasten off. Wet-block with the 24 scallops evenly spaced; allow to dry completely.
Three Gingerbread Houses: Front and Back Panels
- Make two brown panels for each house. Large house: foundation width W = 24 stitches and wall height H = 28 rows. Medium: W = 18, H = 21. Small: W = 12, H = 14. Measurements before roofing are approximately 12 × 20 cm, 9 × 15 cm, and 6 × 10 cm.
- Row 1: ch W + 1, sc in the second chain from the hook and each remaining chain. W sts.
- Rows 2–H: ch 1, turn, sc across. Work 27 additional rows for large, 20 for medium, or 13 for small. Counts remain 24, 18, or 12 sts.
- First gable row: ch 1, turn, sc2tog, sc to the final 2 stitches, sc2tog. Counts: large 22, medium 16, small 10.
- Repeat the gable row until 2 stitches remain. Large gable counts: 22, 20, 18, 16, 14, 12, 10, 8, 6, 4, 2. Medium: 16, 14, 12, 10, 8, 6, 4, 2. Small: 10, 8, 6, 4, 2.
- Final gable row: ch 1, turn, sc2tog. 1 stitch. Fasten off. Each panel has 40, 30, or 20 total rows, including the gable.
- Block matching panels together, keeping the lower walls rectangular and both roof slopes equal.
House Walls, Floors, and Roofs
- Side walls: make two brown rectangles per house. Ch 7; Row 1: sc in the second chain and across. 6 sts. Rows 2–H: ch 1, turn, sc across. Make 28 rows for large, 21 for medium, or 14 for small. All houses are approximately 3 cm deep.
- Floors: make one brown rectangle per house. Ch W + 1; Row 1: sc in the second chain and across. W sts. Rows 2–6: ch 1, turn, sc across. Finish with 24 × 6, 18 × 6, or 12 × 6 stitches and rows.
- Roof halves: make two ivory rectangles per house. Ch 11; Row 1: sc in the second chain and across. 10 sts. Work every following row with ch 1, turn, sc across. Large: 20 total rows; medium: 16 total rows; small: 11 total rows. Each panel spans the house depth with overhang; its row length runs from ridge to eave.
- With RS outward, sew the two roof halves together across their 10-stitch starting edges to form the ridge. The remaining short edges become the eaves.
- Along each front and back sloping roof edge, join ivory at the ridge. Work one sc into each row end; turn. Work [sl st in the next sc, ch 3, 2 dc in that same sc, skip the next sc] along the edge. If one sc remains, sl st in it. Fasten off. Repeat for all four slopes.
- Along each eave, join ivory and repeat [sl st in the next stitch, ch 3, 2 dc in that stitch, skip the next stitch] 5 times across the 10-stitch edge. Fasten off.
- Cut one plastic-canvas insert for each front, back, side wall, and floor, approximately 3 mm smaller on every edge than its blocked crochet piece. Cover with thin felt if desired. Keep inserts separate from the fabric seams.
- Sew the front and back panels to the two side walls along the straight wall sections. Sew on the floor, matching each long floor edge to a house panel and each short edge to a side wall. Insert the supports.
- Set the roof over the open top. Tack it to the gable slopes and upper side-wall edges, leaving the back eave accessible so the roof can be lifted and the supports removed. Maintain approximately 1 cm overhang at front and back.
Doors, Windows, and Window Boxes
- Large door: with burgundy, ch 8. Row 1: sc in the second chain and across. 7 sts. Rows 2–10: ch 1, turn, sc across. Row 11: ch 1, turn, sc2tog, sc 3, sc2tog. 5 sts. Row 12: ch 1, turn, sc2tog, sc 1, sc2tog. 3 sts. Fasten off.
- Medium door: ch 6. Row 1: sc in the second chain and across. 5 sts. Rows 2–8: ch 1, turn, sc across. Row 9: ch 1, turn, sc2tog, sc 1, sc2tog. 3 sts. Fasten off.
- Small door: ch 5. Row 1: sc in the second chain and across. 4 sts. Rows 2–6: ch 1, turn, sc across. Row 7: ch 1, turn, sc2tog twice. 2 sts. Fasten off.
- Make seven golden-yellow windows: three for large, three for medium, and one for small. For each, ch 5. Row 1: sc in the second chain and across. 4 sts. Rows 2–4: ch 1, turn, sc across. Row 5: ch 1, turn, sc2tog twice. 2 sts. Fasten off.
- Sew each door centrally to its front panel, with its lower edge at the floor. Couch an ivory chain around the two sides and rounded top, making the chain to fit the stitched outline. Add a small ivory French-knot handle on the viewer’s right.
- Sew one window into each gable, leaving at least one brown row visible below the roof. Place two additional windows beside the large and medium doors. Outline each with ivory couched chain and embroider one vertical and one horizontal ivory bar.
- For each window box, with green ch 6; sc in the second chain and across. 5 sts. Fasten off and sew below the window. Add three burgundy French knots across each box.
Chimneys and Snowbanks
- Make three chimneys with brown. Round 1: 6 sc in an MR. Round 2: inc in each stitch. 12 sts. Round 3: sc around in BLO. 12 sts.
- Large chimney: work Rounds 4–10 even. Medium: Rounds 4–8 even. Small: Rounds 4–6 even. Each round has 12 sc. Stuff lightly.
- Snow rim: join ivory at the next stitch and repeat [sl st in the next stitch, ch 2, hdc in that same stitch, skip the next stitch] 6 times. Fasten off. Sew each open chimney end to a rear roof slope, positioning it so it stands upright.
- Make nine snowbanks, three per house. With ivory, ch 9. Work 3 sc in the second chain, sc in the next 6 chains, 3 sc in the last chain; work along the opposite side, sc in the next 6 chains; join. 18 sts.
- Next round: ch 1, repeat [sc in the next 2 stitches, inc] 6 times; join. 24 sts. Fasten off. Fold each oval loosely into a low mound and tack around a house base without obscuring the door.
Tiered Evergreen Tree
- With green, Round 1: 6 sc in an MR. Rounds 2–4: sc around. 6 sts each round.
- Round 5: inc in each stitch. 12 sts. Rounds 6–8: sc around. 12 sts each round.
- Round 9: repeat [sc 1, inc] 6 times. 18 sts. Rounds 10–12: sc around. 18 sts each round.
- Round 13: repeat [sc 2, inc] 6 times. 24 sts. Rounds 14–16: sc around. 24 sts each round.
- Round 17: repeat [sc 3, inc] 6 times. 30 sts. Rounds 18–20: sc around. 30 sts each round.
- Round 21: repeat [sc 4, inc] 6 times. 36 sts. Rounds 22–24: sc around. 36 sts each round.
- Round 25: repeat [sc 5, inc] 6 times. 42 sts. Rounds 26–28: sc around. 42 sts each round. Fasten off, leaving a sewing tail.
- For each snowy tier, hold the tree upright and join ivory with a surface sl st around one stitch post in the specified round. Work a surface sl st around every post of that round, closing the ring. Make rings on Rounds 9, 17, and 25, containing 18, 30, and 42 surface stitches.
- Into each surface ring, repeat [sl st in the next stitch, skip 1, 5 dc in the next stitch, skip 1, sl st in the next stitch, sl st in the next stitch] around. This gives 3, 5, and 7 snow scallops respectively. Fasten off.
- Snow tip: with ivory, work 6 sc in an MR, then one round of 6 sc. Fasten off, gather the open edge slightly, and sew over the tree tip.
- Base disk: with green, work 6 sc in an MR. Rounds 2–7: increase 6 stitches evenly each round using [sc in the next n minus 2 stitches, inc] 6 times for round n. Counts: 12, 18, 24, 30, 36, 42. Stuff the tree firmly enough to stand without stretching; sew the disk to the 42-stitch opening.
Removable Glass Sleeve
- Measure the glass circumference. At structural gauge, choose the nearest multiple of 8 stitches that produces a sleeve approximately 0.5–1 cm larger than the glass circumference. The sample specification uses 80 stitches, approximately 40 cm around. Verify fit after three rounds.
- With burgundy, ch 80, or your calculated multiple of 8; join without twisting. Round 1: ch 1, sc in each chain; join. 80 sts for the stated size.
- Rounds 2–4: ch 1, sc around; join. 80 sts each round.
- Change to green. Rounds 5–16: ch 1, sc around; join. 80 sts each round. Fasten off. The sleeve is approximately 8 cm high.
- Top snow trim: join ivory, ch 1, sc around; join. 80 sts. Next round: repeat [sl st in the next stitch, ch 3, 2 dc in that stitch, skip the next stitch] 40 times; join and fasten off. For an adjusted sleeve, work half as many scallops as foundation stitches.
- Embroider three evenly spaced ivory snowflakes across the front half. For each snowflake, make one vertical, one horizontal, and two diagonal straight stitches crossing at a common center, each approximately 2 cm long. Secure ends inside.
- Slide the sleeve around the lower glass wall. The glass base must rest directly and evenly on the mat; keep the sleeve free of the glass underside.
Ivory Poinsettias
- Make twelve petals, six per flower. With ivory, ch 10. Beginning in the second chain, work sc, hdc, dc, tr, tr, dc, hdc, sc, then 3 sc in the last chain. Along the opposite side, work sc, hdc, dc, tr, tr, dc, hdc, sc. Join to the first sc. 19 sts.
- Petal edging: ch 1, sc in each of the first 9 stitches, work [sc, ch 2, sc] in the next stitch, sc in each of the final 9 stitches; join. 20 sc and one ch-2 point. Fasten off with a sewing tail.
- For each flower, arrange three petals with their foundation starting ends touching at the center. Sew these ends together. Add three more petals above, offset between the first three; stitch only the inner 1 cm so the points remain free.
- Make ten golden-yellow centers, five per flower. For each, work 5 sc in an MR, then one round of 5 sc. Fasten off, gather the opening, and sew at the flower center. Alternatively, securely sew five small gold beads to each center.
Holly Leaves and Berries
- Make twelve leaves in forest or olive green. Ch 10. Beginning in the second chain, work sc, hdc, dc, dc, tr, dc, dc, hdc, then 3 sc in the last chain. Along the opposite side, work hdc, dc, dc, tr, dc, dc, hdc, sc. Join. 19 sts.
- Leaf edging: ch 1, sc in each stitch around, adding a ch-3 picot after stitches 3, 6, 10, 14, and 17. Form each picot with ch 3, sl st in the first of those chains. Join. 19 sc and 5 picots. Fasten off.
- Embroider a central vein from base to tip with a slightly lighter green yarn. Leave the outer edges flexible.
- Make fifteen burgundy berries. Round 1: 6 sc in an MR. Round 2: inc in each stitch. 12 sts. Round 3: sc around. 12 sts. Round 4: sc2tog 6 times. 6 sts. Add a tiny amount of stuffing, fasten off, and draw the remaining stitches closed.
- Arrange the leaves in five clusters: two clusters beneath the flowers, one above the bow, and one toward each front side. Sew three berries to each cluster.
Burgundy Bow
- Bow band: ch 19. Row 1: sc in the second chain and across. 18 sts. Rows 2–50: ch 1, turn, sc across. 18 sts each row. Fasten off.
- Sew the foundation edge to the final row to form a loop. Flatten with the seam at the back center, then gather the middle with several firm wraps of burgundy yarn. The flattened bow is approximately 12.5 cm wide.
- Center wrap: ch 7. Row 1: sc in the second chain and across. 6 sts. Rows 2–12: ch 1, turn, sc across. 6 sts. Wrap around the gathered bow and sew its short ends together at the back.
- Make two tails. Ch 11. Row 1: sc in the second chain and across. 10 sts. Rows 2–18: ch 1, turn, sc across. 10 sts.
- Tail Row 19: ch 1, turn, sc2tog, sc 6, sc2tog. 8 sts. Row 20: ch 1, turn, sc2tog, sc 4, sc2tog. 6 sts. Row 21: ch 1, turn, sc2tog, sc 2, sc2tog. 4 sts. Row 22: ch 1, turn, sc2tog twice. 2 sts. Row 23: ch 1, turn, sc2tog. 1 stitch. Fasten off.
- Sew the straight top ends of both tails behind the center wrap, angled outward. Tack the inner edges discreetly to the mat during final assembly.
Finishing and Village Assembly
Let the blocked mat dry fully before arranging the village. Complete the embroidery and house details before securing the buildings, and weave every loose end into the matching fabric.
- Set the sleeved glass near the center, slightly toward the back. Keep its entire footprint on the solid central portion of the mat.
- Arrange the large house behind the glass to one side, the medium house farther forward on that same side, and the small house near the front. Place the evergreen on the opposite side to balance the village. Leave the candle removable from above.
- Mark the positions, lift away the glass, and sew each house floor to the solid mat with four small anchoring stitches, one near each corner. Tack the tree base at three evenly spaced points. Avoid drawing the mat into puckers.
- Place one poinsettia on either side of the front center. Position the bow between them, with the tails pointing toward the outer edge. Add the leaf-and-berry clusters beneath and around these focal pieces.
- Sew flowers through their centers and inner petal bases. Secure leaves at their bases and central veins, keeping the pointed edges loose. Attach the bow through its back center and lightly tack the tail tips.
- Return the glass and LED candle to the center. Check that the mat lies flat, the glass sits steadily, and no decoration presses against the candle controls.
The finished arrangement should feel full around the front while leaving clear space around the glass opening. For cleaning, remove the glass and house supports, then gently spot-clean the crochet and dry it flat.
Tips for Success
- Count each gable row before fastening off; matching slopes make the pitched roofs sit evenly.
- Block roof halves before adding their snow edging so both eaves finish at the same height.
- Test the sleeve on the actual glass after three rounds; adjust the foundation by multiples of eight if needed.
- Pin the full village layout before sewing, reserving the lace border for lightweight flowers, leaves, and bow tails.
- Use small, distributed anchoring stitches so the houses stay upright without pulling the mat inward.
Common Mistakes to Avoid
- Counting the turning chain as a stitch widens the house panels. Work only into the stated stitch count.
- Putting roof length across the ridge reverses the roof proportions. The 10-stitch edges form the ridge and eaves; row ends form the slopes.
- Skipping a chain space in the lace changes the scallop count. Mark every sixth space and confirm 48 spaces before Round 20.
- Overstuffing the evergreen spreads its base and distorts the tiers. Add small amounts and keep the closing disk flat.
- Using a real flame near the yarn creates a fire hazard. Fit a battery-operated LED candle inside the cylinder.
Ways to Customize This Pattern
- Replace burgundy with cranberry and forest green with deep teal while retaining the ivory snow and brown houses.
- Embroider small initials on the back house panels before installing the supports.
- Make a second tree using the same instructions and place it behind the medium house if the solid mat has sufficient space.
- Use crocheted golden centers instead of beads for an entirely yarn-based floral finish.
- Make the village removable by omitting the final mat anchoring stitches and storing each supported building separately.
Frequently asked questions
Yes. Measure its outside circumference and calculate the sleeve foundation at two stitches per centimeter, adding approximately 0.5–1 cm of circumference for clearance. Round to a multiple of eight. A substantially wider cylinder may require a larger mat and a revised village layout.
The supports keep the flat walls square and hold the roofline upright without heavy stuffing. Cut them only after blocking the panels, and make every insert slightly smaller than its fabric covering.
First confirm the round counts and wet-block the mat. If pronounced waves remain, rework the lace with a smaller hook while retaining the written counts. If the border cups, try a larger hook for the lace instead.
Remove the glass, LED candle, and house supports first. Spot-cleaning is the easiest option for the assembled village. If the yarn requires a full wash, hand-wash gently, avoid wringing, and reshape all pieces while drying flat.
The finished Gingerbread Village Crochet Christmas Centerpiece

