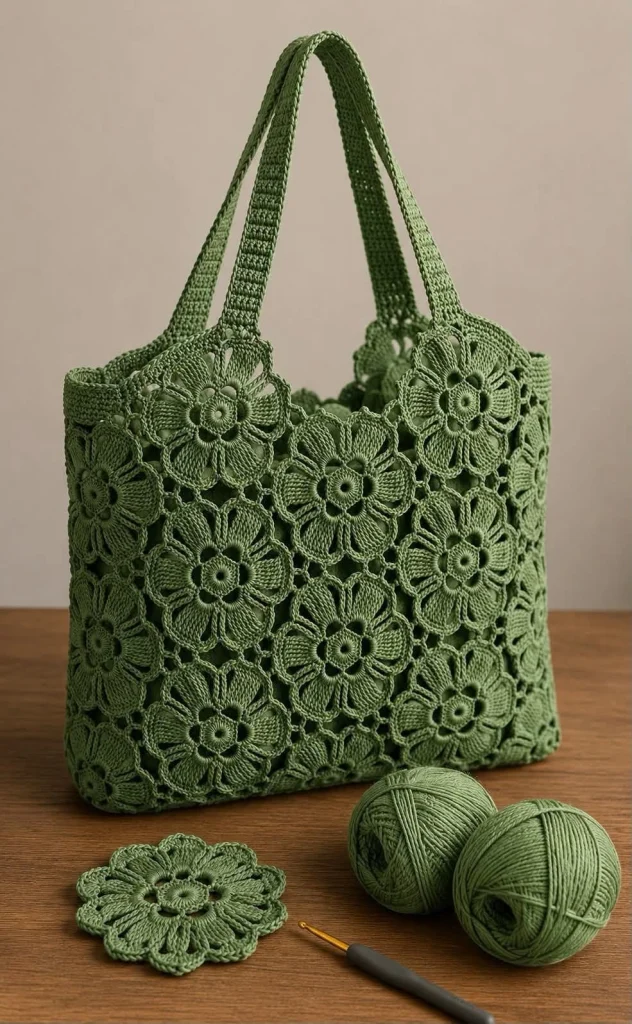
Green Floral Crochet Tote Bag Pattern – Elegant Flower Motif Bag
Beginner Friendly
Perfect for those just starting their crochet journey, with clear instructions and simple techniques
Single-Day Project
A satisfying project you can complete in a single afternoon or evening.
Handmade Gift
A beautiful keepsake — free forever. Read online or print at home.
About This Green Floral Crochet Tote Bag Pattern – Elegant Flower Motif Bag
This floral crochet tote bag is built from beautiful dimensional flower motifs joined together with delicate openwork crochet. Worked in one elegant sage-green shade, the texture of the flowers becomes the main feature of the design.
The finished bag has a structured rectangular shape, roomy interior, reinforced lower edge and two long crochet handles. Each floral motif is made separately and then joined into front, back and side panels, making this a satisfying project that can easily be customized in size or color.
Materials
- Sage green cotton or cotton-blend yarn 450–550 g
- 3.0–3.5 mm crochet hook 1
- Yarn needle 1
- Scissors 1 pair
- Stitch markers 4–6
- Optional cotton fabric lining approx. 50 × 80 cm
- Optional magnetic snap 1
Abbreviations – US Terms
MRmagic ringchchainsl stslip stitchscsingle crochethdchalf double crochetdcdouble crochettrtreble crochetspspaceFOfasten offFinished Size
Approximately 36 cm wide × 30 cm high × 10 cm deep, excluding handles.
Each finished flower motif should measure approximately 9–10 cm across.
The handles measure approximately 55–60 cm from attachment point to attachment point.
Part 1 – Flower Center
Begin with a magic ring.
Round 1: Ch 1, work 12 sc into MR. Pull ring closed and join with sl st to first sc. (12 sc)
Round 2: Ch 1, 2 sc in each stitch around. Join. (24 sc)
This creates the firm circular center of the flower.
Part 2 – Small Inner Petals
The small raised petals form the first dimensional layer around the flower center.
*Sl st in next st, ch 4, 2 dc in same st, ch 4, sl st in next st.*
Repeat around to create 6 small inner petals.
Keep these petals compact so they sit slightly raised above the larger outer petals.
Part 3 – Back Loops for Large Petals
Turn the flower slightly so you can work behind the first petal layer.
*Ch 5, anchor with sc between the next two inner petals.*
Repeat around.
You should have 6 chain loops positioned behind the small petals.
Part 4 – Large Outer Petals
Work into each ch-5 loop:
(sc, hdc, 3 dc, 2 tr, 3 dc, hdc, sc).
Repeat in every loop around.
This creates six broad outer petals with a gently pointed shape.
Part 5 – Lengthen the Petals
To reproduce the elongated floral appearance, work an additional shaping row around each large petal.
Sl st to the side of the first petal.
Work sc along the lower edge, hdc toward the middle, dc across the widest section, then hdc and sc down the opposite side.
At the petal tip, work (dc, ch 2, dc) to create a subtle point.
Part 6 – Petal Definition
Surface crochet a narrow line from the flower center toward the tip of each large petal.
Use slip stitches and keep the tension relaxed.
This creates the raised central ridge visible on each petal and gives the motif a more sculpted appearance.
Part 7 – Outer Joining Round
Join yarn at the outer edge of one petal.
Work:
Ch 3, sc at next petal tip, ch 5, sc between petals, ch 5, sc at next petal tip.
Continue around the flower.
The chain spaces create the delicate openwork surrounding each floral motif.
Part 8 – Shape the Motif for Joining
On the final round, use combinations of sc, ch 3 and ch 5 spaces to create approximately straight joining edges around the flower.
The flower itself remains round, while the surrounding chain mesh provides flexible points for connecting neighboring motifs.
Part 9 – Number of Flower Motifs
For a tote approximately the size shown, make approximately 24–28 complete floral motifs.
A suggested arrangement is:
- Front panel: 9 motifs
- Back panel: 9 motifs
- Left side: 3–4 motifs
- Right side: 3–4 motifs
- Optional extra motifs for bottom corners or size adjustment
Part 10 – Arrange the Front Panel
Lay nine motifs flat in a 3 × 3 arrangement.
Rotate individual flowers slightly if necessary so the joining spaces align naturally.
The petals should remain clearly visible while the open mesh between flowers forms small decorative gaps.
Part 11 – Join the Flowers
Place two motifs side by side.
Using the working yarn, join corresponding chain spaces with slip stitches or single crochet.
Join only through the outer mesh rather than sewing through the flower petals.
This keeps the dimensional flowers free and prevents them from becoming flattened.
Part 12 – Join-As-You-Go Option
If preferred, connect motifs while crocheting the final mesh round.
At each joining point:
Ch half of the required chain, sl st into the corresponding chain space of the neighboring motif, then complete the remaining chains.
This produces a clean and flexible join with fewer yarn ends.
Part 13 – Complete the Front Panel
Join the three motifs of each row first.
Then connect the three rows vertically.
Check frequently that the panel remains rectangular.
Do not pull the joins too tightly because this can cause the flowers to buckle.
Part 14 – Back Panel
Make the back panel exactly like the front panel.
Lay both finished panels together and compare their measurements before continuing.
If one panel is slightly smaller, gently block it to match the other.
Part 15 – Side Panels
For each side, join 3–4 flower motifs vertically.
The finished side panel should measure approximately 9–10 cm wide.
Make two identical side panels.
Part 16 – Crochet the Bottom Base
Ch until the foundation measures approximately 9–10 cm.
Row 1: sc in 2nd ch from hook and across. Ch 1, turn.
Following rows: sc across.
Continue until the base measures the same width as the front panel, approximately 34–36 cm.
FO leaving a long joining tail.
Part 17 – Reinforce the Base
For a stronger tote, make a second identical base rectangle.
Place both pieces together and sc around the outside edges.
This creates a double-thickness bottom that will resist stretching when the bag is filled.
Part 18 – Attach Front to Base
Align the lower edge of the front floral panel with one long edge of the base.
Join using sc or a neat whip stitch.
Distribute the stitches evenly so the flower panel does not gather.
Part 19 – Attach Back to Base
Repeat along the opposite long edge of the base.
The front and back panels should now stand opposite each other with the rectangular base between them.
Part 20 – Attach the Side Panels
Position one narrow floral strip between the front and back panels.
Join down one side of the front panel, across the short edge of the base and up the back panel.
Repeat for the second side.
Turn the bag upright and check its shape.
Part 21 – Top Stabilizing Round
Join yarn at one side seam.
Work one complete round of sc around the entire upper opening.
Where the floral mesh creates large gaps, work enough stitches into the chain spaces to keep the edge smooth.
Join with sl st.
Part 22 – Upper Band
Rounds 2–5: Ch 1, sc in every stitch around. Join.
This creates the firm crochet band visible around the top of the bag.
If you want a stronger edge, work one additional round of reverse single crochet.
Part 23 – First Handle
Mark two attachment points approximately 18–20 cm apart on the front upper edge.
Join yarn at the first marker.
Ch 90–110, depending on your preferred handle length.
Attach the chain at the second marker with sl st.
Part 24 – Build the Handle
Turn and work sc into every chain back toward the first attachment point.
Work approximately 5–7 rows of sc along the handle.
This creates a wide flat strap rather than a thin cord.
Keep your tension firm and consistent.
Part 25 – Reinforce the Handle
Work one row of slip stitches along each long side of the handle.
This reduces stretching and gives the strap a clean finished edge.
Sew the first and last 4–5 cm of the handle securely to the upper bag band.
Part 26 – Second Handle
Repeat the same process on the back panel.
Before finishing, place both handles together and confirm that they are exactly the same length.
Adjust if necessary before weaving in the ends.
Part 27 – Strengthen Handle Attachments
Using a yarn needle and matching yarn, sew a small rectangle through each handle attachment.
Add a diagonal stitch through the rectangle for extra strength.
This reinforcement is especially useful if the bag will carry books, groceries or other heavier items.
Part 28 – Optional Fabric Lining
Cut two fabric rectangles slightly larger than the front and back panels.
Sew the side and bottom seams with right sides together.
Fold the upper raw edge inward.
Insert the lining into the crochet bag and hand stitch it just below the upper crochet band.
Part 29 – Optional Closure
Add a magnetic snap to the lining before sewing it permanently into the bag.
Alternatively, crochet a small button loop at the center back and sew a decorative button to the center front.
Part 30 – Final Flower Shaping
Once the bag is assembled, use your fingers to gently separate the petals.
Pull the smaller center petals slightly forward.
Allow the larger petals to sit flatter against the bag while keeping their central ridges visible.
This creates the layered floral appearance seen throughout the finished tote.
Color Ideas
Sage Garden: use one muted sage-green shade throughout for the elegant monochromatic appearance shown here.
Vintage Cream: ivory flowers with a warm beige joining mesh.
Autumn Floral: rust, mustard, olive and cream motifs with a brown base and handles.
Soft Romantic: dusty rose, cream and muted mauve.
Summer Garden: alternating butter yellow, soft blue, peach and sage flowers.
Making a Smaller Bag
For a smaller handbag, use a 2 × 3 flower arrangement for the front and back instead of 3 × 3.
Shorten the base and side panels to match.
For short hand-carry handles, make the chains approximately 35–45 cm long before adding the reinforcing rows.
Making a Larger Tote
For a roomy market or beach tote, use 4 motifs across × 3 motifs high for each main panel.
Add another motif to each side panel and enlarge the bottom rectangle accordingly.
For a larger bag, a fabric lining is strongly recommended to reduce stretching.
Frequently Asked Questions
Cotton or a cotton-blend yarn is ideal because it gives the flower petals definition and helps the finished bag hold its shape better than a very soft yarn.
Approximately 24–28 motifs work well for a medium tote, depending on your motif size and the depth you want for the sides.
Yes. A single shade works especially well for this design because the dimensional petals, openwork joins and raised flower centers provide plenty of visual texture.
A lining is optional for light use, but recommended if you plan to carry small objects or heavier items. It also prevents items from slipping through the open spaces between the floral motifs.
Use cotton yarn, crochet the straps firmly, add slip-stitch reinforcement along both edges and securely sew several centimeters of each handle onto the upper bag band.
Yes. The construction remains exactly the same. You can create a colorful garden-style tote or use two or three coordinated shades while keeping the base and handles neutral.
Follow the care instructions for your yarn. Hand washing in cool water and drying the bag flat is generally the safest way to preserve the dimensional flower shapes.
Avoid flattening the motifs during blocking. Shape the petals individually and only secure the joining mesh, leaving the main petal surfaces free to retain their three-dimensional texture.
The finished Green Floral Crochet Tote Bag Pattern – Elegant Flower Motif Bag

