Halloween Dragon Crochet Wreath Pattern
Beginner Friendly
Perfect for those just starting their crochet journey, with clear instructions and simple techniques
Single-Day Project
A satisfying project you can complete in a single afternoon or evening.
Handmade Gift
A beautiful keepsake — free forever. Read online or print at home.
About This Halloween Dragon Crochet Wreath Pattern
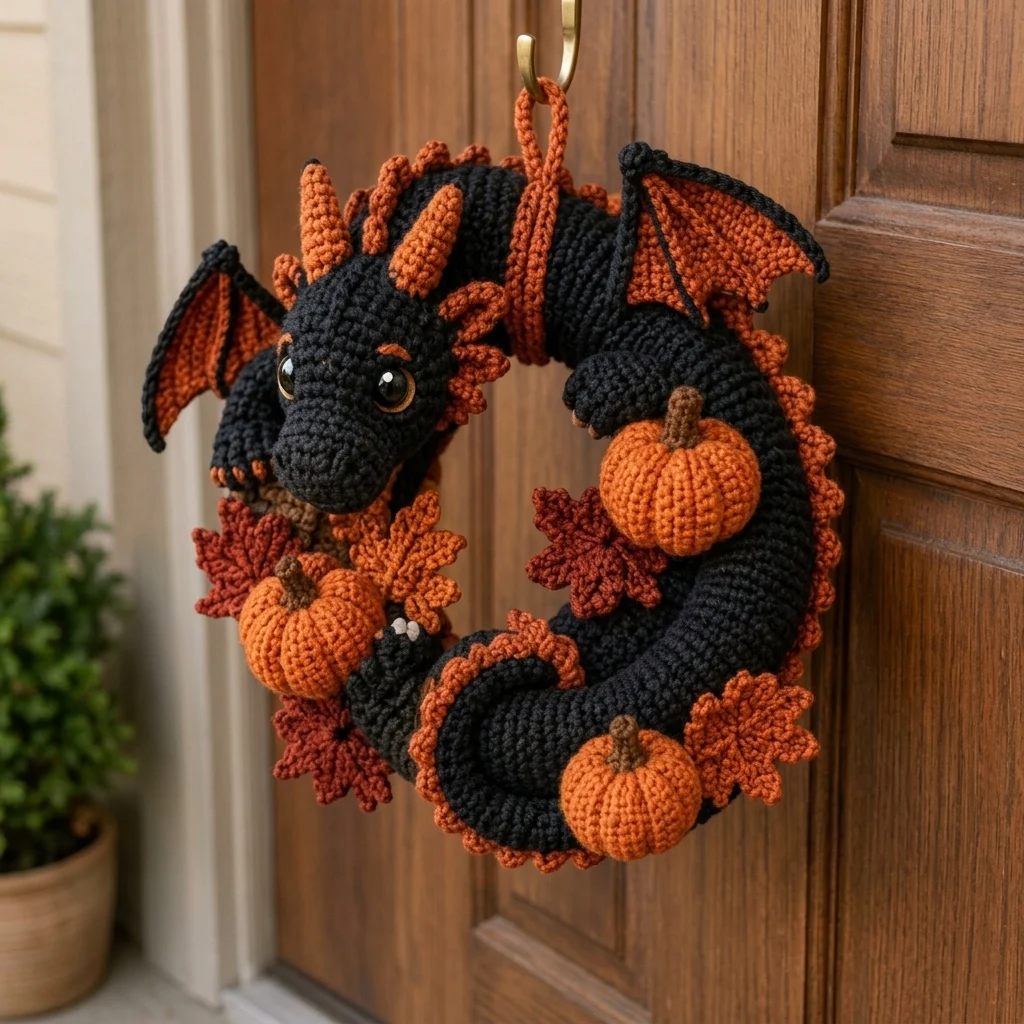
This Halloween dragon crochet wreath pattern creates a dramatic black amigurumi dragon curled into a circular door decoration with burnt-orange horns, wings, dorsal spikes, pumpkins, and autumn leaves. Instead of attaching a small dragon to a separate wreath, the dragon’s long stuffed body forms most of the wreath itself, giving the finished piece the sculptural appearance shown in the reference.
The design combines several advanced constructions. The body is shaped as a long curved tube, the head has a broad stuffed muzzle and large safety eyes, the wings are built from shaped panels with contrasting black edging, and separate horns and dorsal spikes run from the head down the dragon’s back. Three ribbed pumpkins and layered maple-style leaves fill the lower and side sections without hiding the dragon.
Plan approximately 18-24 hours for crocheting, assembly, shaping, and finishing. This pattern is intended for experienced crocheters comfortable with amigurumi shaping, invisible decreases, short shaping sections, color changes, sewing multiple three-dimensional pieces, surface details, and carefully positioning components on a decorative structure.
Materials
- Worsted / aran yarn in matte black approximately 600-700 m
- Worsted / aran yarn in burnt orange approximately 300 m
- Worsted / aran yarn in deep rust approximately 100 m
- Worsted / aran yarn in dark brown approximately 50 m
- Worsted yarn in cream or light gray small amount for claws
- 4.0 mm crochet hook main body and decorations
- 3.5 mm crochet hook horns, spikes and tighter details
- 18 mm safety eyes in glossy black 2
- Polyester fiberfill approximately 300-350 g
- Plastic canvas or flexible craft mesh optional internal wing support
- Craft wire optional, approximately 150 cm for additional wreath shaping
- Yarn needle 1
- Stitch markers 8
- Scissors 1 pair
- Rust-resistant hanging ring optional
Abbreviations
MRmagic ringchchainsl stslip stitchscsingle crochethdchalf double crochetdcdouble crochettrtreble crochetinc2 sc in same stitchdecinvisible single crochet decreaseBLOback loop onlyFLOfront loop onlyststitchstsstitchesFOfasten offDragon Head
- With black yarn, work 6 sc in MR. (6 sts)
- Round 2: Inc around. (12 sts)
- Round 3: (Sc, inc) 6 times. (18 sts)
- Round 4: (2 sc, inc) 6 times. (24 sts)
- Round 5: (3 sc, inc) 6 times. (30 sts)
- Round 6: (4 sc, inc) 6 times. (36 sts)
- Rounds 7-11: Sc around. (36 sts)
- Round 12: 12 sc, (inc, sc) 6 times, 12 sc. (42 sts)
- Rounds 13-16: Sc around. (42 sts)
- Place the safety eyes between Rounds 10 and 11, approximately 10 stitches apart.
- Round 17: (5 sc, dec) 6 times. (36 sts)
- Round 18: (4 sc, dec) 6 times. (30 sts)
- Begin stuffing firmly, shaping the head broad through the cheeks.
- Round 19: (3 sc, dec) 6 times. (24 sts)
- Round 20: (2 sc, dec) 6 times. (18 sts)
- Do not close. Leave the 18-st opening for attachment to the neck.
Dragon Muzzle
- With black, work 6 sc in MR. (6 sts)
- Round 2: Inc around. (12 sts)
- Round 3: (Sc, inc) 6 times. (18 sts)
- Round 4: (2 sc, inc) 6 times. (24 sts)
- Rounds 5-7: Sc around. (24 sts)
- Round 8: (2 sc, dec) 6 times. (18 sts)
- Stuff lightly so the muzzle remains broad and slightly flattened.
- FO leaving a long sewing tail.
- Sew across the lower front of the head between approximately Rounds 7 and 15.
Nostrils and Brow Details
- With burnt orange, embroider two small horizontal nostril stitches near the upper front of the muzzle.
- Make each nostril approximately 2 stitches wide.
- Above each eye, embroider a slightly curved burnt-orange brow approximately 4 stitches long.
- Keep the brows angled gently toward the center to give the dragon the expressive look of the reference.
- Secure all embroidery tails inside the head.
Main Dragon Body and Neck
- With black yarn, work 6 sc in MR. (6 sts)
- Round 2: Inc around. (12 sts)
- Round 3: (Sc, inc) 6 times. (18 sts)
- Round 4: (2 sc, inc) 6 times. (24 sts)
- Round 5: (3 sc, inc) 6 times. (30 sts)
- Rounds 6-20: Sc around. (30 sts)
- Stuff firmly as you work.
- Rounds 21-55: Sc around. (30 sts)
- Every 8-10 rounds, bend the stuffed tube gently into a curve.
- Rounds 56-70: Sc around. (30 sts)
- Continue stuffing and curve the body into a broad C shape.
- Round 71: (3 sc, dec) 6 times. (24 sts)
- Rounds 72-82: Sc around. (24 sts)
- Round 83: (2 sc, dec) 6 times. (18 sts)
- Rounds 84-94: Sc around. (18 sts)
- Round 95: (Sc, dec) 6 times. (12 sts)
- Rounds 96-104: Sc around. (12 sts)
- Finish stuffing the narrowing tail section.
- Round 105: Dec around. (6 sts)
- FO, close the remaining opening, and weave in the tail.
Shaping the Dragon Wreath
- Curve the body so the thicker neck section forms the upper-left portion of the wreath and the tapered tail curls across the lower center.
- Bring the upper body toward the opposite side to create a circular opening approximately 20-23 cm across.
- Use black yarn to make several hidden anchoring stitches where sections of the curved body touch.
- Do not completely flatten the overlapping areas; maintain a sculptural three-dimensional ring.
- Position the head so it projects slightly forward from the upper-left section.
Large Head Horns – Make 2
- With burnt orange and 3.5 mm hook, work 4 sc in MR. (4 sts)
- Round 2: Sc around. (4 sts)
- Round 3: (Sc, inc) twice. (6 sts)
- Rounds 4-5: Sc around. (6 sts)
- Round 6: (2 sc, inc) twice. (8 sts)
- Rounds 7-10: Sc around. (8 sts)
- Round 11: (3 sc, inc) twice. (10 sts)
- Rounds 12-13: Sc around. (10 sts)
- Stuff very lightly.
- FO leaving a long sewing tail.
Small Facial Horns – Make 4
- With burnt orange, work 4 sc in MR. (4 sts)
- Rounds 2-3: Sc around. (4 sts)
- Round 4: (Sc, inc) twice. (6 sts)
- Rounds 5-6: Sc around. (6 sts)
- FO leaving a sewing tail.
- Do not stuff.
Dorsal Spikes – Make 16
- With burnt orange, work 4 sc in MR. (4 sts)
- Round 2: Sc around. (4 sts)
- Round 3: (Sc, inc) twice. (6 sts)
- Round 4: Sc around. (6 sts)
- Round 5: (2 sc, inc) twice. (8 sts)
- Rounds 6-7: Sc around. (8 sts)
- Flatten the piece without stuffing.
- FO leaving a long tail.
- For 6 of the spikes, add one extra round of 8 sc to create larger spikes for the upper back.
Attaching Horns and Spikes
- Sew the two large horns to the upper head approximately 6 stitches apart.
- Angle both horns slightly backward.
- Place two small horns behind the large pair and two near the sides of the head.
- Begin the dorsal spike line immediately behind the head.
- Use the larger spikes along the neck and upper body.
- Gradually transition to smaller spikes along the lower body and tail.
- Sew each flattened base firmly to the black body.
Dragon Ear – Make 2
- With burnt orange, ch 9.
- Row 1: Sc in second ch from hook, hdc in next 2 ch, dc in next 3 ch, hdc in next ch, 3 sc in final ch.
- Continue along opposite side of foundation chain: hdc, dc in next 3 ch, hdc in next 2 ch, sc in final ch.
- FO leaving a long tail.
- Pinch the lower edge together to form a pointed ear.
- Sew behind the outer horns on each side of the head.
Front Legs – Make 2
- With black, work 6 sc in MR. (6 sts)
- Round 2: Inc around. (12 sts)
- Round 3: (Sc, inc) 6 times. (18 sts)
- Rounds 4-7: Sc around. (18 sts)
- Round 8: (Sc, dec) 6 times. (12 sts)
- Rounds 9-18: Sc around. (12 sts)
- Stuff the lower paw firmly and upper leg lightly.
- Flatten the upper opening.
- FO leaving a long sewing tail.
Hind Legs – Make 2
- With black, work 6 sc in MR. (6 sts)
- Round 2: Inc around. (12 sts)
- Round 3: (Sc, inc) 6 times. (18 sts)
- Round 4: (2 sc, inc) 6 times. (24 sts)
- Rounds 5-8: Sc around. (24 sts)
- Round 9: (2 sc, dec) 6 times. (18 sts)
- Rounds 10-14: Sc around. (18 sts)
- Round 15: (Sc, dec) 6 times. (12 sts)
- Rounds 16-19: Sc around. (12 sts)
- Stuff firmly at the paw and thigh, lightly near the attachment edge.
- Flatten and FO leaving a long tail.
Claws
- Thread cream or light gray yarn onto a needle.
- On each visible paw, make three short vertical stitches over the final 2 rounds.
- Pull each stitch just firmly enough to define individual toes.
- Add a tiny burnt-orange stitch at the tip of each toe if you want stronger contrast.
- Secure all tails inside the paw.
Left Wing
- With burnt orange, ch 19.
- Row 1: Sc in second ch from hook and across. Turn. (18 sts)
- Row 2: Ch 1, sc across. Turn. (18 sts)
- Row 3: Ch 1, dec, 14 sc, dec. Turn. (16 sts)
- Row 4: Ch 1, sc across. Turn. (16 sts)
- Row 5: Ch 1, dec, 12 sc, dec. Turn. (14 sts)
- Row 6: Ch 1, sc across. Turn. (14 sts)
- Row 7: Ch 1, dec, 10 sc, dec. Turn. (12 sts)
- Row 8: Ch 1, sc across. Turn. (12 sts)
- Row 9: Ch 1, dec, 8 sc, dec. Turn. (10 sts)
- Row 10: Ch 1, sc across. Turn. (10 sts)
- Row 11: Ch 1, dec, 6 sc, dec. Turn. (8 sts)
- Row 12: Ch 1, sc across. (8 sts)
- FO orange.
Left Wing Membrane Shaping
- Join black yarn at the broad upper corner of the orange wing.
- Sc evenly along the first outer edge.
- At the lower edge work (sc, ch 3, sc) at three evenly spaced positions to emphasize the bat-wing points.
- Continue sc along the remaining edges.
- Join with sl st.
- Surface sl st three black diagonal lines from the wing base toward the lower points to imitate wing bones.
- FO and weave ends into the back.
Right Wing
- Repeat the Left Wing instructions exactly.
- During blocking, shape this wing as a mirror image.
- Add the same black perimeter and three black surface lines.
- If using plastic canvas, cut a slightly smaller triangular support and sew it discreetly behind the orange panel.
Attaching the Wings
- Position one wing behind each side of the upper dragon body.
- The wing bases should sit approximately 8-10 cm behind the head.
- Sew the inner 5-7 cm of each wing firmly to the body.
- Leave the outer wing edges free.
- Angle the wings outward and slightly upward so they remain visible against the black body.
Large Pumpkin – Make 2
- With burnt orange, work 6 sc in MR. (6 sts)
- Round 2: Inc around. (12 sts)
- Round 3: (Sc, inc) 6 times. (18 sts)
- Round 4: (2 sc, inc) 6 times. (24 sts)
- Round 5: (3 sc, inc) 6 times. (30 sts)
- Round 6: (4 sc, inc) 6 times. (36 sts)
- Rounds 7-12: Sc around. (36 sts)
- Round 13: (4 sc, dec) 6 times. (30 sts)
- Round 14: (3 sc, dec) 6 times. (24 sts)
- Stuff firmly but keep the shape slightly flattened.
- Round 15: (2 sc, dec) 6 times. (18 sts)
- Round 16: (Sc, dec) 6 times. (12 sts)
- Round 17: Dec around. (6 sts)
- FO leaving a very long tail and close the opening.
Small Pumpkin
- With burnt orange, work 6 sc in MR. (6 sts)
- Round 2: Inc around. (12 sts)
- Round 3: (Sc, inc) 6 times. (18 sts)
- Round 4: (2 sc, inc) 6 times. (24 sts)
- Rounds 5-9: Sc around. (24 sts)
- Round 10: (2 sc, dec) 6 times. (18 sts)
- Stuff firmly.
- Round 11: (Sc, dec) 6 times. (12 sts)
- Round 12: Dec around. (6 sts)
- FO leaving a long tail and close.
Pumpkin Sculpting
- Thread the long orange tail through the center of a pumpkin.
- Wrap the yarn around the outside and pass it through the center again.
- Pull firmly to create the first indentation.
- Repeat at evenly spaced intervals to divide each pumpkin into 6 sections.
- Pass through the center once more and secure underneath.
- Shape each section with your fingers so the pumpkin remains round but visibly ribbed.
Pumpkin Stems – Make 3
- With dark brown, work 5 sc in MR. (5 sts)
- Rounds 2-6: Sc around. (5 sts)
- Round 7: Inc in each st around. (10 sts)
- FO leaving a sewing tail.
- Do not stuff.
- Insert the narrow section into the top center indentation of each pumpkin and sew the 10-st base securely in place.
Large Rust Maple Leaf – Make 3
- With deep rust, ch 11.
- Beginning in second ch from hook work sl st, sc, hdc, dc, tr, tr, dc, hdc, sc, sl st.
- Ch 2.
- Work along the opposite side of the foundation: sl st, sc, hdc, dc, tr, tr, dc, hdc, sc, sl st.
- Join with sl st at the base.
- Ch 5, sl st in second ch, sc, hdc, dc; anchor to the leaf edge with sl st.
- Ch 7, sl st in second ch, sc, hdc, dc, tr, tr; anchor with sl st to form a long side lobe.
- Ch 9, sl st in second ch, sc, hdc, dc, tr, tr, dc, hdc; anchor at the top to form the center point.
- Mirror with ch 7 and ch 5 lobes down the opposite side.
- FO leaving a long sewing tail.
Orange Maple Leaf – Make 4
- Repeat the Large Rust Maple Leaf instructions using burnt-orange yarn.
- For two leaves, omit one stitch from each lobe chain to create slightly smaller motifs.
- Block each leaf with the points clearly separated.
- Leave a long sewing tail on every motif.
Leaf Veins
- Thread dark brown or a darker rust yarn onto a yarn needle.
- Embroider one straight line from the leaf base to the center point.
- Add two or three short diagonal veins on each side.
- Keep the embroidery tension relaxed so the leaf does not curl.
- Secure the ends on the back of the leaf.
Top Hanging Loop
- With burnt orange and 3.5 mm hook, ch 41.
- Sl st in second ch from hook and each ch across. (40 sl sts)
- FO leaving two long tails.
- Fold the cord in half to form a loop.
- Sew both ends deeply through the upper dragon body at the balance point of the wreath.
- Reinforce with several passes of yarn so the weight is carried by the stuffed body rather than a single crochet stitch.
Wreath Assembly
- Lay the curved dragon body flat and confirm that it forms a balanced circle before attaching decorations.
- Sew the head securely to the upper-left neck opening.
- Position the front legs so one paw appears to rest near the lower-left pumpkin and the other curves toward the center.
- Position the hind legs along the lower and right sections of the wreath.
- Attach one large pumpkin on the lower-left section.
- Attach the second large pumpkin on the right side beneath the raised foreleg.
- Attach the small pumpkin at the lower-right section.
- Arrange rust and orange maple leaves around the pumpkins, under the paws, and along the lower wreath.
- Keep the head, eyes, wings, and most dorsal spikes unobstructed.
- Sew all motifs with several hidden stitches through the dragon body.
Final Structural Reinforcement
- Hold the wreath upright by its hanging loop.
- Check whether the lower body stretches or twists under the weight of the pumpkins.
- If necessary, sew the overlapping lower body and tail together at two additional hidden points.
- Reinforce the head-to-neck seam from underneath.
- Check both wings and add extra stitches at their bases if they droop.
- Confirm that no craft wire or support material can be felt through an exposed opening.
Finishing
Shape the completed dragon wreath while it is lying flat. Curve the neck and tail until the center opening is nearly circular, then arrange the head so it leans slightly toward the center. Lift the wings away from the body, straighten the orange horns, and separate the dorsal spikes with your fingers so each detail remains visible against the black crochet.
Adjust the pumpkins so their stems point naturally upward and leave the outer tips of the autumn leaves slightly raised rather than sewing every point flat. When the wreath is hung, the dragon should remain the dominant element: its black curled body creates the circular silhouette while the burnt-orange details and fall decorations provide the contrast seen in the reference.
Tips for Success
- Shape the body into a curve while stuffing every 8-10 rounds. A fully stuffed straight tube is much harder to bend into a smooth wreath afterward.
- Use strong sewing yarn or doubled black yarn at the head, hanging loop, and body overlap because these areas carry most of the finished weight.
- Stuff the muzzle less firmly than the head so you can flatten and shape it into the broad dragon snout shown in the reference.
- Block the wing membranes before attaching them. Crisp triangular edges make the black wing-bone embroidery much more visible.
- Pin every pumpkin and leaf to the dragon before sewing. Check the wreath vertically, not only flat on a table, because gravity changes the final arrangement.
Common Mistakes to Avoid
- Do not overstuff the long body. An extremely firm tube will resist bending and may create an angular rather than circular wreath.
- Avoid placing the pumpkins before the dragon’s limbs. The paws need to overlap some decorations naturally, so position the dragon anatomy first.
- Do not sew every leaf point flat. Attach the center and a few lobes while leaving the tips free for the layered autumn effect.
- Avoid positioning both wings at identical flat angles. Slightly different angles make the dragon appear more natural and dimensional.
- Do not rely on the decorative hanging cord alone. Stitch it deeply through several rounds of the stuffed body and test the finished wreath before hanging it on a door.
Ways to Customize This Pattern
- Replace burnt orange with deep purple for a stronger Halloween dragon while keeping the pumpkins orange.
- Add small crocheted acorns between the maple leaves for a more detailed woodland fall wreath.
- Use dark forest green for the dragon and mustard-gold spikes to create a harvest dragon rather than a Halloween version.
- Add a small cream crochet sign reading “Hello Fall” inside the lower center opening, keeping it light enough not to distort the wreath.
- Make miniature pumpkins in cream, sage, and orange instead of using three matching orange pumpkins for a softer farmhouse palette.
Frequently asked questions
Shape the body continuously while stuffing and use hidden black stitches wherever curved sections touch. For a firmer decorative wreath, flexible craft wire can be inserted through the body before the final rounds, but all wire ends must be bent, covered, and secured so they cannot work through the crochet fabric.
The pumpkins and head create concentrated weight. Reinforce the lower body overlap with hidden stitches, attach the hanging loop through several body rounds, and make sure the body is stuffed firmly enough to support itself. A lightweight internal wire support can also help a display wreath hold its circle.
Yes. Firm stuffing combined with several hidden joins between touching sections of the curled body can hold the circular shape. A wire-free version will remain softer, so it is especially important to test the wreath vertically and reinforce any section that stretches.
Yes. Using bulky yarn with a hook appropriate for that yarn is the easiest way to enlarge the entire design proportionally. If you keep worsted yarn, add rounds to the 30-stitch main body section, but remember that the wings, head, pumpkins, and spikes will also need to be enlarged to maintain the same proportions.
It is best used on an indoor door or a well-sheltered porch. Fiberfill and ordinary yarn can absorb moisture, while prolonged sunlight may fade the black and orange colors. For protected outdoor display, choose washable synthetic yarn and bring the wreath inside during rain or severe weather.
The finished Halloween Dragon Crochet Wreath Pattern