Halloween Skeleton & Cauldron Crochet Pattern
Beginner Friendly
Perfect for those just starting their crochet journey, with clear instructions and simple techniques
Single-Day Project
A satisfying project you can complete in a single afternoon or evening.
Handmade Gift
A beautiful keepsake — free forever. Read online or print at home.
About This Halloween Skeleton & Cauldron Crochet Pattern
Halloween Skeleton & Cauldron Crochet Pattern – Spooky Amigurumi Tutorial
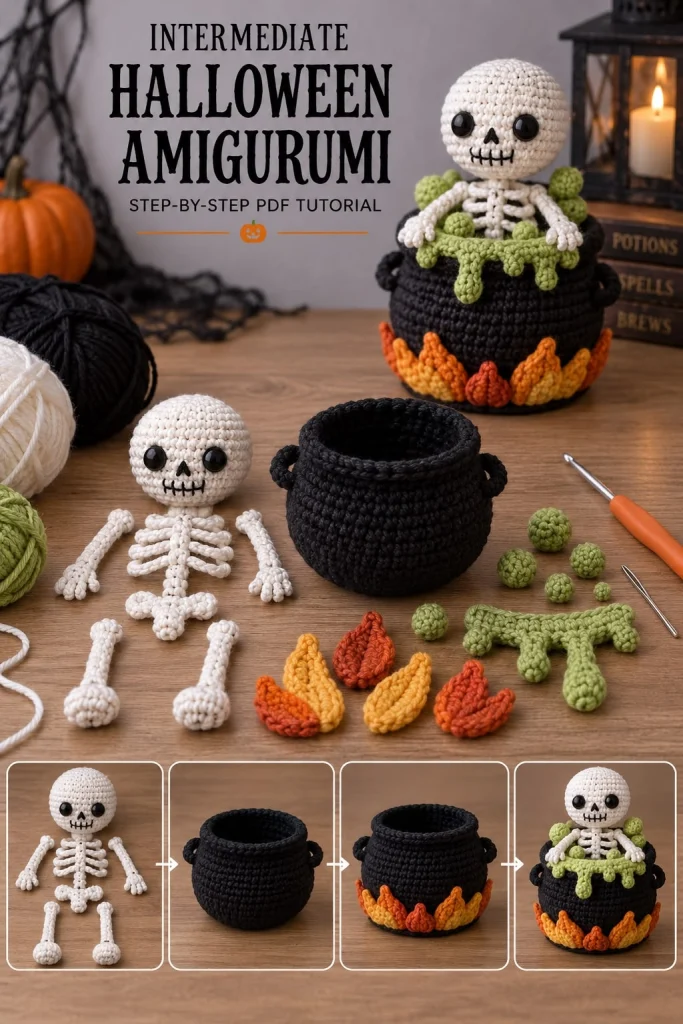
Looking for a Halloween crochet project that’s spooky, adorable, and full of personality? This Halloween skeleton and cauldron crochet pattern combines a tiny skeleton, a bubbling witch’s cauldron, bright orange flames, and dripping green potion into one charming handmade decoration!
Perfect for Halloween lovers and amigurumi enthusiasts, this playful design makes a wonderful addition to your seasonal decorations. Display it on a mantel, bookshelf, entryway table, or alongside your favorite handmade pumpkins.
In this tutorial, we’ll create the skeleton, crochet the black cauldron, add colorful flames, and finish everything with a bubbling green potion effect.
Materials You’ll Need
- White or ivory cotton yarn for the skeleton
- Black cotton yarn for the cauldron
- Light-green yarn for the potion
- Orange yarn for the flames
- Golden-yellow yarn for the flames
- Rust-orange yarn for additional flames
- Black embroidery thread
- Two black safety eyes, approximately 8 mm
- 3 mm crochet hook
- 3.5 mm crochet hook
- Polyester fiberfill stuffing
- Yarn needle
- Stitch markers
- Scissors
- Optional craft wire for posing the skeleton
Skill Level: Intermediate
Estimated Time: 7–10 hours
Finished Size: Approximately 18–23 cm tall, depending on yarn and tension
Crochet Abbreviations – US Terms
- MR – Magic ring
- ch – Chain
- sc – Single crochet
- hdc – Half double crochet
- dc – Double crochet
- sl st – Slip stitch
- inc – Increase
- dec – Invisible decrease
- BLO – Back loop only
- FLO – Front loop only
- FO – Fasten off
Pattern Note: This is an original, adaptable crochet interpretation of the pictured design, not an exact tested reproduction of the PDF shown in the image. Work in continuous rounds unless otherwise indicated. Use a stitch marker to identify the beginning of each round.
Part 1 – Crochet the Skeleton’s Skull
Using ivory yarn and a 3 mm crochet hook:
R1: 6 sc in MR. (6)
R2: Inc around. (12)
R3: (1 sc, inc) × 6. (18)
R4: (2 sc, inc) × 6. (24)
R5: (3 sc, inc) × 6. (30)
R6: (4 sc, inc) × 6. (36)
R7: (5 sc, inc) × 6. (42)
R8–R14: Sc around. (42)
R15: (5 sc, dec) × 6. (36)
R16: (4 sc, dec) × 6. (30)
R17: (3 sc, dec) × 6. (24)
R18: (2 sc, dec) × 6. (18)
Insert the safety eyes between R10 and R11, approximately 8 stitches apart.
Stuff the skull firmly while maintaining its rounded shape.
R19: (1 sc, dec) × 6. (12)
R20: Dec around. (6)
Close the opening and weave in the yarn tail.
Part 2 – Create the Skeleton’s Face
Using black embroidery thread:
Embroider a small upside-down triangle between and slightly below the eyes to create the nose.
Below the nose, stitch a gently curved horizontal mouth.
Add several short vertical stitches across the mouth to imitate tiny skeleton teeth.
Keep the expression cute rather than frightening.
Part 3 – Crochet the Skeleton’s Neck
Using ivory yarn:
R1: 6 sc in MR. (6)
R2–R5: Sc around. (6)
Fasten off, leaving a long tail.
Stuff lightly if necessary and sew the neck securely to the underside of the skull.
Part 4 – Crochet the Spine
Using ivory yarn:
R1: 6 sc in MR. (6)
R2–R16: Sc around. (6)
Fasten off, leaving a long tail.
This narrow tube forms the main vertical spine of the skeleton.
To create the appearance of individual vertebrae, wrap matching yarn around the tube at regular intervals.
Part 5 – Crochet the Ribcage Center
Using ivory yarn:
Ch 15.
Starting in the second chain from the hook, work 14 sc.
Ch 1, turn.
Work another 14 sc.
Fasten off.
This strip creates the central support for the ribcage.
Part 6 – Crochet the Ribs
Make 10 curved rib pieces using ivory yarn.
For each rib:
Ch 14.
Starting in the second chain from the hook, work:
3 sl st, 5 sc, 3 hdc, 2 sc.
Fasten off, leaving a long sewing tail.
Gently curve each rib into a semicircular shape.
Arrange five ribs on each side of the spine.
Sew their inner ends to the spine and their front ends to the ribcage center.
Keep the ribs evenly spaced.
Part 7 – Crochet the Pelvis
Using ivory yarn:
R1: 6 sc in MR. (6)
R2: Inc around. (12)
R3: (1 sc, inc) × 6. (18)
R4: Sc around. (18)
Fasten off.
Flatten the piece slightly to form the center of the pelvis.
For the two curved hip bones, crochet two small curved strips:
Ch 12, then work 11 sc back along the chain.
Attach the strips to either side of the pelvis center.
Part 8 – Crochet the Upper Arms
Make two using ivory yarn:
R1: 5 sc in MR. (5)
R2–R10: Sc around. (5)
Fasten off, leaving a sewing tail.
Stuff very lightly or leave unstuffed for flexibility.
Part 9 – Crochet the Forearms
Make two:
R1: 5 sc in MR. (5)
R2–R9: Sc around. (5)
Fasten off.
Join the forearms to the upper arms with flexible yarn stitches.
Part 10 – Crochet the Hands
Using ivory yarn:
Make a small palm:
R1: 6 sc in MR. (6)
R2: Sc around. (6)
Fasten off.
For each finger, ch 5 and sl st back along the chain.
Make four fingers and one shorter thumb.
Attach them to the palm.
Repeat for the second hand.
Part 11 – Crochet the Legs
Make two upper-leg bones:
R1: 6 sc in MR. (6)
R2–R12: Sc around. (6)
Fasten off.
Make two lower-leg bones:
R1: 5 sc in MR. (5)
R2–R12: Sc around. (5)
Fasten off.
Connect the upper and lower legs with yarn stitches, leaving the knee joints slightly flexible.
Part 12 – Crochet the Feet
Using ivory yarn:
R1: Ch 7.
R2: Starting in the second chain, work 5 sc, 3 sc in the final chain, continue along the opposite side with 4 sc, then inc in the final stitch. (14)
R3: Sc around. (14)
Fasten off.
Flatten slightly and attach each foot to a lower leg.
Part 13 – Assemble the Skeleton
Attach the skull and neck to the top of the spine.
Sew the ribcage around the upper spine.
Attach the pelvis to the bottom of the spine.
Position the arms at shoulder height.
Attach the legs beneath the pelvis.
Adjust the skeleton into a seated position.
Use strong yarn stitches to reinforce the joints.
Part 14 – Crochet the Cauldron Base
Using black yarn and a 3.5 mm hook:
R1: 6 sc in MR. (6)
R2: Inc around. (12)
R3: (1 sc, inc) × 6. (18)
R4: (2 sc, inc) × 6. (24)
R5: (3 sc, inc) × 6. (30)
R6: (4 sc, inc) × 6. (36)
R7: (5 sc, inc) × 6. (42)
R8: (6 sc, inc) × 6. (48)
This forms the round bottom of the cauldron.
Part 15 – Build the Cauldron Walls
R9: Sc around in BLO. (48)
R10–R16: Sc around. (48)
R17: (6 sc, dec) × 6. (42)
R18–R20: Sc around. (42)
Keep the cauldron open at the top.
For additional stability, use firm cotton yarn or insert a removable circular plastic canvas base.
Part 16 – Create the Thick Cauldron Rim
Using black yarn:
Join yarn to the top edge.
Work two rounds of sc.
For the final round, work reverse single crochet or a decorative raised edge.
Fasten off and weave in the ends.
The thick rim gives the cauldron its classic witch’s-pot appearance.
Part 17 – Crochet the Cauldron Handles
Make two using black yarn:
Ch 16.
Sl st back along the chain.
Fasten off, leaving sewing tails.
Form each strip into a small loop and attach one to each side of the cauldron.
Reinforce securely.
Part 18 – Crochet the Orange Flames
Using orange yarn:
Ch 11.
Starting in the second chain from the hook, work:
2 sl st, 2 sc, 2 hdc, 2 dc, 2 hdc.
Fasten off.
Make approximately four orange flame pieces.
Part 19 – Crochet the Yellow Flames
Using golden-yellow yarn:
Ch 9.
Starting in the second chain, work:
2 sl st, 2 sc, 2 hdc, 2 dc.
Fasten off.
Make approximately four yellow flame pieces.
Part 20 – Crochet the Rust-Orange Flames
Using rust-orange yarn:
Ch 8.
Starting in the second chain, work:
2 sl st, 2 sc, 2 hdc, 1 dc.
Fasten off.
Make three or four smaller flames.
Part 21 – Attach the Flames to the Cauldron
Arrange the flame pieces around the lower outside edge of the cauldron.
Alternate yellow, orange and rust-orange shades.
Position the pointed tips upward.
Overlap the bases slightly to create a continuous ring of flames.
Sew securely in place.
Part 22 – Crochet the Green Potion Surface
Using light-green yarn:
R1: 6 sc in MR. (6)
R2: Inc around. (12)
R3: (1 sc, inc) × 6. (18)
R4: (2 sc, inc) × 6. (24)
R5: (3 sc, inc) × 6. (30)
R6: (4 sc, inc) × 6. (36)
R7: (5 sc, inc) × 6. (42)
Fasten off, leaving a long tail.
This flat green circle forms the potion surface inside the cauldron.
Part 23 – Create the Dripping Potion Effect
Using light-green yarn:
Attach yarn along the outer edge of the potion circle.
For a short drip:
Ch 5, sl st back along the chain, then sl st into the next stitch on the circle.
For a medium drip:
Ch 8, sl st back along the chain, then attach to the next stitch.
For a long drip:
Ch 12, sl st back along the chain, then attach to the next stitch.
Repeat around the circle, alternating drip lengths.
Leave some sections without drips for a more natural bubbling appearance.
Part 24 – Crochet the Potion Bubbles
Using light-green yarn:
R1: 6 sc in MR. (6)
R2: Inc around. (12)
R3–R4: Sc around. (12)
R5: Dec around. (6)
Stuff lightly and close.
Make several bubbles in different sizes.
For smaller bubbles, use only 6 sc in the magic ring and one additional round before closing.
Part 25 – Attach the Potion to the Cauldron
Place the green potion circle inside the cauldron near the upper rim.
Sew its edge to the inner cauldron wall.
Allow the decorative drips to fall over the outside rim.
Position the green bubbles around the skeleton to create a bubbling potion effect.
Part 26 – Position the Skeleton Inside the Cauldron
Place the completed skeleton into the cauldron.
Position the pelvis and lower spine inside the pot.
Allow the skull, shoulders, ribcage and arms to remain visible above the rim.
Rest the skeleton’s hands on the front edge of the cauldron.
Sew the lower spine securely to the potion surface and cauldron interior.
Adjust the pose so the skeleton appears to be popping out of the bubbling potion.
Part 27 – Final Assembly and Finishing
Check that the skeleton sits securely inside the cauldron.
Adjust the green potion drips.
Spread the orange and yellow flames evenly around the base.
Position the bubbles naturally around the skeleton.
Weave in all loose ends and reinforce any weak attachment points.
Your adorable Halloween skeleton cauldron is complete!
Creative Halloween Color Variations
Classic Witch’s Cauldron: Black cauldron, neon-green potion, orange flames and ivory skeleton.
Pastel Halloween: Lavender cauldron, mint-green potion, peach flames and cream skeleton.
Haunted Forest: Charcoal cauldron, moss-green potion, deep-red flames and beige skeleton.
Midnight Magic: Dark-purple cauldron, turquoise potion, violet flames and white skeleton.
Candy Halloween: Orange cauldron, pink potion, yellow flames and cream skeleton.
Halloween Decorating Ideas
Display your handmade skeleton cauldron on a wooden shelf surrounded by miniature pumpkins, candles and Halloween-themed books.
Place it near a lantern for a cozy spooky atmosphere.
Combine it with crochet ghosts, bats, pumpkins and spiders to create a complete handmade Halloween collection.
For a charming tabletop display, add small yarn balls and a crochet hook beside the finished decoration.
Care Instructions
- Spot clean gently with a damp cloth.
- Avoid soaking the stuffed skeleton.
- Keep away from open flames.
- Do not place real candles inside the crochet cauldron.
- Store in a dry container between Halloween seasons.
- Reshape the skeleton and potion drips when unpacking.
Frequently Asked Questions
Is this Halloween crochet pattern suitable for beginners?
This project is designed for intermediate crocheters because it includes several small amigurumi components, detailed assembly and decorative shaping.
Can I make the skeleton larger?
Yes! Use thicker yarn and a larger crochet hook to increase the finished size.
Can I make the cauldron without the skeleton?
Absolutely. The cauldron can be used as a decorative crochet container or as the base for another Halloween amigurumi character.
How can I make the skeleton stand more securely?
Use firm stuffing in the skull and reinforce the spine with tightly stitched joints. For a decorative piece intended only for adults, carefully enclosed craft wire can also provide support.
Can I replace the green potion with purple?
Yes! Purple, turquoise, pink and neon-green yarn all create fun magical potion effects.
Is this crochet decoration safe for young children?
The decorative version contains small components and safety eyes, which can present choking hazards. For a child-friendly adaptation, embroider the eyes, avoid detachable pieces and omit craft wire.
Final Thoughts
This Halloween skeleton and cauldron crochet pattern is a playful combination of spooky charm and handmade creativity. From the tiny embroidered skeleton face to the bubbling green potion and colorful flames, every detail adds personality to this unique Halloween decoration.
Whether you’re making it for your seasonal home decor, gifting it to a Halloween-loving friend, or adding it to your handmade amigurumi collection, this little skeleton is sure to bring plenty of smiles.
Happy crocheting, and have a wonderfully spooky Halloween! 🎃💀
The finished Halloween Skeleton & Cauldron Crochet Pattern

