Heirloom Christmas Crochet Centerpiece Pattern
Advanced
For experienced crocheters who enjoy complex shaping, fine detail, and ambitious construction
Single-Day Project
A satisfying project you can complete in a single afternoon or evening.
Handmade Gift
A beautiful keepsake — free forever. Read online or print at home.
About This Heirloom Christmas Crochet Centerpiece Pattern
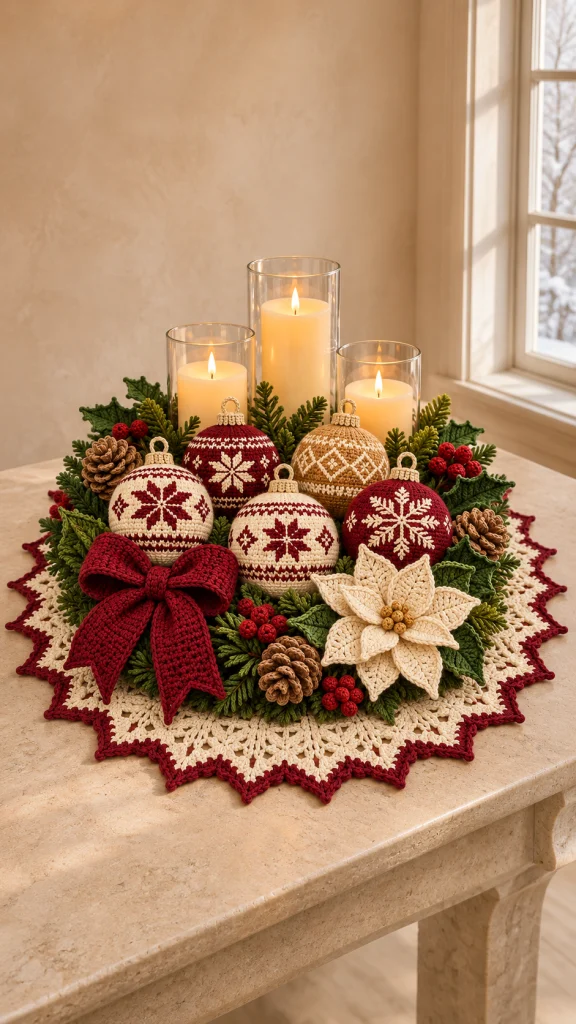
This Christmas crochet centerpiece pattern brings together a pointed ivory mat, a full evergreen wreath, and five embroidered baubles in burgundy, cream, and warm gold. A generous red bow, layered ivory poinsettia, crocheted pinecones, and small berry clusters give the arrangement its traditional holiday character.
The centerpiece is home decor built from separate crochet components attached to a covered wreath form. Its ornaments use dense single crochet, while the mat combines expanding double-crochet rounds with eyelet bands. Snowflakes and geometric embroidery add the fine detail without requiring stranded colorwork over a curved surface.
Allow approximately 40–55 hours, plus time for blocking. This advanced project suits crocheters comfortable with shaping, working into both sides of a foundation chain, surface embroidery, and careful assembly. Use three battery-operated LED pillar candles in glass cylinders to complete the display.
Materials
- DK cotton yarn in ivory: approximately 650 m.
- DK cotton yarn in burgundy: approximately 400 m.
- DK cotton yarn in forest green: approximately 450 m.
- DK cotton yarn in olive green: approximately 200 m.
- DK cotton yarn in warm gold: approximately 100 m.
- DK cotton yarn in medium brown: approximately 100 m.
- DK cotton yarn in light tan: approximately 50 m.
- 3.0 mm hook for baubles, berries, and ornament caps.
- 3.5 mm hook for the wreath cover, foliage, flower, pinecones, and bow.
- 4.0 mm hook for the mat.
- Closed foam wreath form measuring 35 cm outside diameter, 25 cm inside diameter, and approximately 5 cm across its circular cross-section.
- Polyester filling: approximately 100 g.
- Tapestry needle and a fine embroidery needle with an eye suitable for the yarn.
- Stitch markers, scissors, rustproof blocking pins, and a blocking surface.
- Strong green sewing thread and a sewing needle for discreet structural attachment.
- Three battery-operated LED pillar candles and three stable glass cylinders that fit inside the wreath opening.
- A rigid display tray large enough to support the complete arrangement if it will be moved.
Abbreviations
chchainsl stslip stitchscsingle crochethdchalf double crochetdcdouble crochettrtreble crochetinc2 single crochet in one stitchdecinvisible single-crochet decrease over 2 stitchessc2togsingle crochet 2 stitches togetherMRmagic ringststitchRSright sideIvory Mat: Foundation and Eyelet Bands
- Round 1: With ivory and the 4.0 mm hook, make an MR, ch 2, and work 12 dc into the ring. Close the ring and join. Count: 12 dc.
- Round 2: Work 2 dc in every st; join. Count: 24 dc.
- Round 3: Repeat (dc in next st, 2 dc in next st) 12 times; join. Count: 36 dc.
- Round 4: Repeat (dc in next 2 sts, 2 dc in next st) 12 times; join. Count: 48 dc.
- Round 5: Repeat (dc in next 3 sts, 2 dc in next st) 12 times; join. Count: 60 dc.
- Round 6: Repeat (dc in next 4 sts, 2 dc in next st) 12 times; join. Count: 72 dc.
- Round 7: Repeat (dc in next 5 sts, 2 dc in next st) 12 times; join. Count: 84 dc.
- Round 8: Repeat (dc in next 3 sts, ch 3, skip 3 sts, 2 dc in next st) 12 times; join. Count: 60 dc and 12 ch-3 spaces, equivalent to 96 stitch positions.
- Round 9: Repeat (dc in next 7 positions, 2 dc in next position) 12 times; join. Work into each individual chain of the previous round. Count: 108 dc.
- Round 10: Repeat (dc in next 8 sts, 2 dc in next st) 12 times; join. Count: 120 dc.
- Round 11: Repeat (dc in next 6 sts, ch 3, skip 3 sts, 2 dc in next st) 12 times; join. Count: 96 dc and 12 ch-3 spaces, equivalent to 132 stitch positions.
- Round 12: Repeat (dc in next 10 positions, 2 dc in next position) 12 times; join. Work each chain separately. Count: 144 dc.
- Round 13: Repeat (dc in next 11 sts, 2 dc in next st) 12 times; join. Count: 156 dc.
- Round 14: Repeat (dc in next 9 sts, ch 3, skip 3 sts, 2 dc in next st) 12 times; join. Count: 132 dc and 12 ch-3 spaces, equivalent to 168 stitch positions.
- Round 15: Repeat (dc in next 13 positions, 2 dc in next position) 12 times; join. Work each chain separately. Count: 180 dc.
- Round 16: Repeat (dc in next 14 sts, 2 dc in next st) 12 times; join. Count: 192 dc.
- Round 17: Repeat (dc in next 12 sts, ch 3, skip 3 sts, 2 dc in next st) 12 times; join. Count: 168 dc and 12 ch-3 spaces, equivalent to 204 stitch positions.
- Round 18: Repeat (dc in next 16 positions, 2 dc in next position) 12 times; join. Work each chain separately. Count: 216 dc.
- Round 19: Repeat (dc in next 17 sts, 2 dc in next st) 12 times; join. Count: 228 dc.
- Round 20: Repeat (dc in next 15 sts, ch 3, skip 3 sts, 2 dc in next st) 12 times; join. Count: 204 dc and 12 ch-3 spaces, equivalent to 240 stitch positions.
- Round 21: Repeat (dc in next 19 positions, 2 dc in next position) 12 times; join. Work each chain separately. Count: 252 dc.
- Round 22: Repeat (dc in next 20 sts, 2 dc in next st) 12 times; join. Count: 264 dc.
- Round 23: Repeat (dc in next 18 sts, ch 3, skip 3 sts, 2 dc in next st) 12 times; join. Count: 240 dc and 12 ch-3 spaces, equivalent to 276 stitch positions.
- Round 24: Repeat (dc in next 22 positions, 2 dc in next position) 12 times; join. Work each chain separately. Count: 288 dc. Fasten off.
Pointed Mat Border
- Round 25: Join ivory in any st. Repeat the following over each group of 12 base stitches: sc, hdc, dc, tr, tr, (2 tr, ch 2, 2 tr) in the next st, tr, tr, dc, hdc, sc, sl st. Repeat 24 times in total; join to the first sc. Count: 24 points, each containing 15 stitches and one ch-2 tip. Fasten off.
- Round 26: Join burgundy in the first sc of any point. Ch 1. Sc in every stitch, including each valley sl st, and work (sc, ch 2, sc) into each tip space. Join to the first sc. Count: 408 sc and 24 ch-2 tip spaces. Fasten off.
- Blocking: Soak, press out moisture, and pin the mat into a flat circle approximately 50 cm across, measuring between opposite tips. Space all 24 tips evenly and let dry completely.
Wreath Cover
- Row 1: With forest green and the 3.5 mm hook, ch 33. Sc in the second ch from the hook and each remaining ch. Count: 32 sc.
- Rows 2–226: Ch 1, turn, and sc in all 32 sts. Count: 32 sc per row. The panel should measure approximately 16 × 94 cm.
- Fit check: Wrap the panel width around the foam cross-section and its length around the ring’s centerline. The long edges should meet with gentle tension. If your actual ring differs, adjust the width to its cross-section circumference and the length to its centerline circumference before seaming.
- Ring seam: Place the panel around the form with the RS outward. Sew the foundation edge to the final row, matching all 32 stitches.
- Long seam: Bring the two long edges together along the underside of the form. Whipstitch corresponding row ends together around the complete ring. Secure and hide the ends.
Five Crochet Baubles
- Color plan: Make two ivory baubles, two burgundy baubles, and one warm-gold bauble with the 3.0 mm hook. Each finishes approximately 8 cm across, depending on gauge and filling.
- Round 1: Work 6 sc in an MR. Count: 6 sc.
- Round 2: Inc 6 times. Count: 12 sc.
- Round 3: Repeat (sc, inc) 6 times. Count: 18 sc.
- Round 4: Repeat (sc in next 2 sts, inc) 6 times. Count: 24 sc.
- Round 5: Repeat (sc in next 3 sts, inc) 6 times. Count: 30 sc.
- Round 6: Repeat (sc in next 4 sts, inc) 6 times. Count: 36 sc.
- Round 7: Repeat (sc in next 5 sts, inc) 6 times. Count: 42 sc.
- Round 8: Repeat (sc in next 6 sts, inc) 6 times. Count: 48 sc.
- Rounds 9–18: Sc in every st. Count: 48 sc per round.
- Embroidery preparation: Before decreasing, mark the front at stitch 13 of Round 14. Place a folded cloth inside the open sphere while embroidering so the needle cannot catch the opposite wall. Follow the separate embroidery section, then remove the cloth.
- Round 19: Repeat (sc in next 6 sts, dec) 6 times. Count: 42 sc.
- Round 20: Repeat (sc in next 5 sts, dec) 6 times. Count: 36 sc.
- Round 21: Repeat (sc in next 4 sts, dec) 6 times. Count: 30 sc. Begin stuffing evenly.
- Round 22: Repeat (sc in next 3 sts, dec) 6 times. Count: 24 sc.
- Round 23: Repeat (sc in next 2 sts, dec) 6 times. Count: 18 sc. Add filling until firm but without visible gaps.
- Round 24: Repeat (sc, dec) 6 times. Count: 12 sc.
- Round 25: Dec 6 times. Count: 6 sc. Fasten off, pass the tail through the front loops of the remaining stitches, and draw closed. Treat this closure as the bottom of the ornament.
Bauble Embroidery and Gold Caps
- Embroidery coordinates: Use Round 14, stitch 13 as the front center. A coordinate of (+3, −2) means three stitch columns to the right and two rounds toward the starting ring. Negative horizontal coordinates move left. Work short straight stitches across one or two stitch intervals at a time, sharing endpoints to make continuous lines. Keep the fabric relaxed.
- Snowflake framework: On both ivory baubles use burgundy; on both burgundy baubles use ivory. From the center, stitch eight rays ending at (0, −5), (+4, −4), (+5, 0), (+4, +4), (0, +5), (−4, +4), (−5, 0), and (−4, −4).
- Snowflake branches: On the upward ray, add branches from (0, −3) to (−1, −4) and (+1, −4). On the right ray, add branches from (+3, 0) to (+4, −1) and (+4, +1). Mirror these branches on the downward and left rays. On each diagonal ray, connect its point three steps from the center to the two adjacent points one step closer to that ray’s endpoint; for example, connect (+3, −3) to (+2, −4) and (+4, −2). Repeat this construction in the other three diagonal directions.
- Small side diamonds: On the ivory baubles, outline a diamond centered nine columns to either side of the main motif. Each diamond has its top and bottom two rounds from its center and its side points one column from its center.
- Gold bauble diamonds: With ivory, outline three diamonds centered at stitch columns 5, 13, and 21 of Round 14. Each diamond has points four rounds above and below its center and three columns to either side. Add a small cross at each center using one vertical and one horizontal stitch, each spanning two stitch intervals.
- Decorative bands: On every bauble, use the contrasting embroidery color to work a running-stitch band around Rounds 8 and 19. Bring the needle over one stitch and under one stitch, repeating 24 times around each band. Secure all embroidery tails inside before finishing the sphere.
- Cap Round 1: With warm gold and the 3.0 mm hook, work 6 sc in an MR. Count: 6 sc.
- Cap Round 2: Inc 6 times. Count: 12 sc.
- Cap Round 3: Sc in the back loop only of every st. Count: 12 sc.
- Cap Round 4: Sc in every st. Count: 12 sc. Sl st in the next st and fasten off with a sewing tail. Make five caps.
- Hanging loops: For each cap, join gold at one side of its top, ch 10, and sl st to the opposite side. Fasten off and secure. Sew the cap over the bauble’s starting ring, with the open edge against the sphere. The loop is decorative; support the bauble itself when attaching it to the wreath.
Evergreen Sprigs
- Quantity: Make 24 sprigs in forest green and 12 in olive with the 3.5 mm hook. Each sprig has a central chain backbone with 21 short needle branches.
- Foundation: Ch 23. Sl st in the second ch from the hook. This forms the top of the stem.
- Branch repeat: Ch 5, sl st in the second ch from the hook and the next 3 ch, then sl st in the next unused foundation ch. Repeat this complete instruction 21 times. All 22 available foundation chains are now worked, including the first stem stitch.
- Shaping: Fasten off with a 20 cm tail. Lay the backbone flat and arrange successive branches alternately to the left and right. Secure their roots with tiny matching stitches if they spring back to the same side. Keep the branch tips free.
Holly Leaves
- Quantity: Make 16 leaves in forest green with the 3.5 mm hook.
- Leaf foundation: Ch 13. Starting in the second ch, work sc, hdc, dc in next 2 ch, tr in next 4 ch, dc in next 2 ch, hdc in next ch, and (sc, ch 2, sc) in the final ch. Rotate to work along the unused side of the foundation. Work hdc, dc in next 2 ch, tr in next 4 ch, dc in next 2 ch, hdc, and sc. Count: 24 stitches and one ch-2 tip space.
- Serrated edge: Ch 1 and turn. Sc in the first st. Repeat (ch 3, sl st in the third ch from the hook, sc in next 2 sts) 5 times, then sc in the next st. Work (sc, ch 2, sc) in the tip space. On the other side, sc in the next st, repeat (ch 3, sl st in the third ch from the hook, sc in next 2 sts) 5 times, and sc in the final st. Count: 26 sc, 10 small edge points, and one ch-2 tip space.
- Central vein: Fasten off with a sewing tail. With olive, make a line of surface sl st along the foundation chain from base to tip. Keep the vein loose enough that the leaf stays gently cupped.
Berry Clusters and Flower Centers
- Berry Round 1: With burgundy and the 3.0 mm hook, work 6 sc in an MR. Count: 6 sc.
- Berry Round 2: Repeat (sc, inc) 3 times. Count: 9 sc.
- Berry Round 3: Sc in every st. Count: 9 sc.
- Berry Round 4: Repeat (sc, dec) 3 times. Count: 6 sc. Add a tiny pinch of filling.
- Berry Round 5: Dec 3 times. Count: 3 sc. Fasten off and draw the remaining loops closed. Make 30 burgundy berries and sew them into six clusters of five, securing each berry to at least two neighbors.
- Gold flower centers: Repeat Berry Rounds 1–5 in warm gold seven times. Leave a sewing tail on each center.
Three Layered Pinecones
- Core Round 1: With medium brown and the 3.5 mm hook, work 6 sc in an MR. Count: 6 sc.
- Core Round 2: Inc 6 times. Count: 12 sc.
- Core Rounds 3–7: Sc in every st. Count: 12 sc per round. Add a small amount of filling.
- Core Round 8: Dec 6 times. Count: 6 sc. Fasten off and close. Make three cores.
- Scale strip Row 1: With medium brown, ch 37. Sc in the second ch and every remaining ch. Count: 36 sc.
- Scale strip Row 2: Ch 1 and turn. Repeat (sl st in next st, 5 hdc in next st, sl st in next st) 12 times. Count: 12 scales, containing 60 hdc and 24 sl st. Fasten off, leaving a long sewing tail.
- Scale edging: Join light tan at the beginning of the scalloped edge. Sl st loosely in every stitch of Row 2. Count: 84 sl st. Fasten off. Make three scale strips.
- Assembly: Set a core upright with its starting ring at the top. Wind the straight edge of one scale strip around it in a downward spiral, approximately four scales per turn. Stitch the straight edge to the core after every scale, letting the scalloped edges flare outward. Secure the final end beneath the base. Repeat for all three pinecones.
Layered Ivory Poinsettia
- Large petal foundation: With ivory and the 3.5 mm hook, ch 11. Starting in the second ch, work sc, hdc, dc in next 2 ch, tr in next 4 ch, dc, and (hdc, ch 2, hdc) in the last ch. Rotate around the foundation. Work dc, tr in next 4 ch, dc in next 2 ch, hdc, and sc. Count: 20 stitches and one ch-2 tip space. Make four large petals.
- Large petal edge: Ch 1 and turn. Sc in each of the first 10 sts, work (sc, ch 2, sc) into the tip space, and sc in the remaining 10 sts. Count: 22 sc and one ch-2 tip space. Fasten off with a sewing tail.
- Small petal foundation: Ch 9. Starting in the second ch, work sc, hdc, dc, tr in next 2 ch, dc, hdc, and (sc, ch 2, sc) in the last ch. Rotate around the foundation. Work hdc, dc, tr in next 2 ch, dc, hdc, and sc. Count: 16 stitches and one ch-2 tip space. Make four small petals.
- Small petal edge: Ch 1 and turn. Sc in each of the first 8 sts, work (sc, ch 2, sc) into the tip space, and sc in the remaining 8 sts. Count: 18 sc and one ch-2 tip space. Fasten off with a sewing tail.
- Petal shaping: On each petal, sew a loose running stitch along the foundation chain. Draw it up only enough to create a shallow central fold. Secure without curling the petal into a tube.
- Flower assembly: Arrange the four large petals as a cross, overlapping their bases by approximately 1 cm. Sew the overlapping bases together. Add the four small petals above them, placing each between two large petals. Sew securely through both layers.
- Flower center: Sew one gold center in the middle and the other six around it. Stitch through the petal layers so the centers also reinforce the flower’s structure.
Burgundy Bow
- Loop panel Row 1: With burgundy and the 3.5 mm hook, ch 17. Sc in the second ch and every remaining ch. Count: 16 sc.
- Loop panel Rows 2–48: Ch 1, turn, and sc in all 16 sts. Count: 16 sc per row.
- Loop seam: Sew the foundation edge to Row 48, matching all 16 stitches. Flatten the resulting band with its seam at the center back. Gather the center firmly with several wraps of matching yarn.
- Tail Row 1: Ch 9. Sc in the second ch and every remaining ch. Count: 8 sc. Make two tails, following all tail rows below.
- Tail Row 2: Ch 1, turn, inc, sc in next 6 sts, inc. Count: 10 sc.
- Tail Row 3: Ch 1, turn, inc, sc in next 8 sts, inc. Count: 12 sc.
- Tail Row 4: Ch 1, turn, inc, sc in next 10 sts, inc. Count: 14 sc.
- Tail Row 5: Ch 1, turn, inc, sc in next 12 sts, inc. Count: 16 sc.
- Tail Rows 6–22: Ch 1, turn, and sc in all 16 sts. Count: 16 sc per row.
- Tail Row 23: Ch 1, turn, sc2tog, sc in next 12 sts, sc2tog. Count: 14 sc.
- Tail Row 24: Ch 1, turn, sc2tog, sc in next 10 sts, sc2tog. Count: 12 sc.
- Tail Row 25: Ch 1, turn, sc2tog, sc in next 8 sts, sc2tog. Count: 10 sc.
- Tail Row 26: Ch 1, turn, sc2tog, sc in next 6 sts, sc2tog. Count: 8 sc.
- Tail Row 27: Ch 1, turn, sc2tog, sc in next 4 sts, sc2tog. Count: 6 sc.
- Tail Row 28: Ch 1, turn, sc2tog, sc in next 2 sts, sc2tog. Count: 4 sc.
- Tail Row 29: Ch 1, turn, sc2tog twice. Count: 2 sc.
- Tail Row 30: Ch 1, turn, sc2tog. Count: 1 sc. Fasten off.
- Center wrap Row 1: Ch 6. Sc in the second ch and every remaining ch. Count: 5 sc.
- Center wrap Rows 2–16: Ch 1, turn, and sc in all 5 sts. Count: 5 sc per row. Fasten off with a sewing tail.
- Bow assembly: Place the narrow foundation ends of both tails behind the gathered loop panel, angling the tails apart. Sew through the tail tops and gathered center. Wrap the small panel around all layers and sew its short edges together at the back.
Centerpiece Layout and Attachment
- Orient the wreath: Lay the covered ring flat with its seam underneath. Treat the back as 12 o’clock and the front as 6 o’clock. Place it centrally on the dry mat, leaving an approximately even border visible.
- First foliage layer: Arrange 24 forest-green sprigs around the ring in eight groups of three. Overlap the stem bases and angle the tips outward, keeping the center opening clear. Sew each stem to the cover at its base and midpoint.
- Second foliage layer: Add the 12 olive sprigs in the gaps, directing some tips upward and some outward. Sew their stems down at two points.
- Holly layout: Place two holly leaves in each of the eight foliage groups. Sew the lower third of each leaf to the cover, leaving the pointed ends free.
- Bauble layout: Position one burgundy bauble at approximately 11 o’clock and the gold bauble at 1 o’clock. Place the ivory baubles at 8 and 6 o’clock and the remaining burgundy bauble at 4 o’clock. Turn the embroidered fronts outward. Sew each sphere to the cover at three points across its lower quarter, with the cap upright.
- Feature pieces: Sew the bow at approximately 7 o’clock and the poinsettia at 5 o’clock. Stitch through their firm central sections into the cover, leaving loops, tails, and petals free to hold their shape.
- Pinecones: Sew one pinecone at 9 o’clock, one at 3 o’clock, and one between 5 and 6 o’clock. Catch the core as well as the scale strip when attaching each cone.
- Berries: Place the six berry clusters at approximately 10, 2, 3, 5, 6, and 8 o’clock, shifting them slightly where needed to keep the main embroidery visible. Sew through the cluster bases and wreath cover.
- Candle placement: Position the three glass cylinders inside the opening, tallest at the back and two shorter cylinders forward. Each cylinder must stand directly on the flat mat or tray, independently of the wreath. Add battery-operated LED candles and check that the cylinders remain upright.
Finishing
Turn the wreath over gently and secure every attachment tail inside the green cover. Reinforce any component that shifts when touched, then return the arrangement to its display position. Open the bow loops with your fingers and spread the poinsettia petals so the smaller layer sits clearly above the larger one.
Keep the wreath separate from the mat so both are easier to store and clean. Remove the glass cylinders before moving the display, and lift the decorated wreath from underneath with both hands. Dust the finished arrangement gently; wash the removable mat by hand and dry it flat. Store the wreath in a roomy box without compressing the bow or flower.
Tips for Success
- Place markers between the mat’s 12 increase repeats. Count both stitches and chains in eyelet rounds before moving a marker.
- Embroider the baubles while their openings are wide. Short connected stitches follow the curve more neatly than long yarn floats.
- Fit the cover to the actual foam form before sewing. A snug cover gives the decorative pieces a stable attachment surface.
- Photograph the loose arrangement from above before sewing it down. Check that the bow and flower balance each other and all five baubles remain visible.
- Use the darker sprigs as the base layer and lighter sprigs as accents to give the greenery depth.
Common Mistakes to Avoid
- Working several dc into an eyelet space during the following round changes the count. Work into its three individual chains as instructed.
- Pulling embroidery tight dents the baubles. Leave each stitch resting on the surface and add filling gradually after embroidery.
- Sewing only through loose leaf tips or pinecone scales creates weak attachments. Anchor through stems, petal bases, and pinecone cores.
- Forcing a rippled mat flat hides a gauge problem. Check the 12 increases per round and adjust hook size after swatching if necessary.
- Resting cylinders on foliage makes them unstable. Clear the center opening and place each cylinder on the flat supporting surface.
Ways to Customize This Pattern
- Replace burgundy with deep navy while keeping ivory embroidery and warm-gold caps for a cooler winter palette.
- Use the diamond embroidery on additional baubles, maintaining the same sphere stitch counts and motif dimensions.
- Make a removable arrangement by stitching the decorations to small crocheted tabs, then tying those tabs around the covered ring with matching yarn.
- For a different foam size, calculate cover width from the form’s cross-section circumference and cover length from its centerline circumference. Convert both measurements using your measured sc gauge.
- Display the wreath without candles by placing a low bowl of unbreakable ornaments in the opening, supported directly by the tray.
Frequently asked questions
Use battery-operated LED candles only. Glass cylinders do not make open flames safe beside crochet yarn, foam, and filling.
The spheres are crocheted in one color, then embroidered before closing. This keeps their shaping consistent and lets you position each snowflake on the outward-facing side.
Check your dc gauge and block gently. If your stitches are substantially smaller, remake the mat with a larger hook after checking a sample. Keep the stated counts so the 24-point border fits correctly.
The written cover and attachment layout depend on a rigid ring. A stuffed crochet tube will behave differently and needs a separate structural sample, particularly beneath the five baubles and large bow.
No. The written stitch counts have been checked arithmetically, but the mat, wreath cover, and shaped components should be sample-checked before producing the complete arrangement.
The finished Heirloom Christmas Crochet Centerpiece Pattern

