Heirloom Poinsettia Crochet Christmas Tree
Advanced
For experienced crocheters who enjoy complex shaping, fine detail, and ambitious construction
Single-Day Project
A satisfying project you can complete in a single afternoon or evening.
Handmade Gift
A beautiful keepsake — free forever. Read online or print at home.
About This Heirloom Poinsettia Crochet Christmas Tree
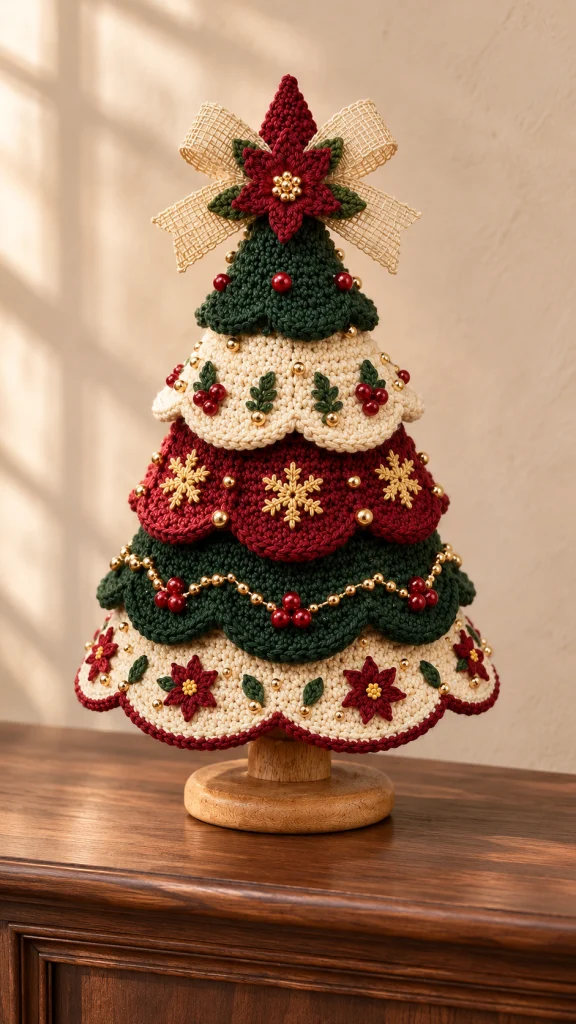
This crochet Christmas tree pattern creates a standing holiday decoration with five overlapping skirts in forest green, warm ivory, and burgundy. Scalloped edges, embroidered snowflakes, tiny poinsettias, and gold bead garlands give the tree its richly decorated finish.
The construction uses a fitted crochet sleeve over a firm cone, with separately worked circular skirts sewn to the sleeve. A burgundy point, layered flower, and open-weave ribbon finish the top. This is decorative home decor, supported by a cone and wooden stand.
Allow approximately 25–35 hours, plus blocking and drying. The project suits experienced crocheters who enjoy counted shaping, small appliqués, embroidery, and careful assembly. All instructions use US crochet terminology.
Materials
- Sport-weight cotton: approximately 350 m forest green, 250 m ivory, and 220 m burgundy.
- Fine gold embroidery thread, approximately 15 m.
- 3 mm crochet hook for sleeve and skirts.
- 2 mm crochet hook for flowers and leaves.
- Firm craft cone measuring approximately 25 cm vertically, with an 18 cm base diameter; choose a cone with a flat base and narrow tip.
- Wooden display stand with a base approximately 12–14 cm wide and an exposed trunk approximately 5 cm tall.
- Approximately 70 gold beads, 3–4 mm, plus 12 gold beads approximately 5 mm wide.
- Approximately 36 burgundy beads, 5–6 mm wide.
- Approximately 80 cm of 4 cm-wide ivory open-weave ribbon.
- Strong matching sewing thread and beading needle.
- Tapestry needle, embroidery needle, scissors, stitch markers, measuring tape, and blocking pins.
- Adhesive suitable for the chosen cone and wooden stand, used according to its label.
Abbreviations
chchainsl stslip stitchscsingle crochethdchalf double crochetdcdouble crochettrtreble crochetinc2 single crochet in the same stitchMRmagic ringststitchFitted Cone Sleeve
- Work in a continuous spiral with forest green and the 3 mm hook. Place a marker in the first stitch of every round. Round 1: 6 sc in MR. Tighten the center. (6 sts)
- Round 2: sc in every stitch. (6 sts)
- Round 3: inc in every stitch. (12 sts)
- Rounds 4–5: sc in every stitch. (12 sts each round)
- Rounds 6–60: work the following exact three-round cycle 19 times. On the first round of cycle k, repeat [sc in the next k stitches, inc] six times; on each of the next two rounds, sc in every stitch. Use k = 1 for rounds 6–8, k = 2 for rounds 9–11, increasing k by one per cycle through k = 19 for rounds 60–62. For this section, stop after round 60, the increase round of the final cycle. Round 60 has 126 sts.
- Checkpoints after increase rounds: round 12 has 30 sts; round 24 has 54 sts; round 36 has 78 sts; round 48 has 102 sts; round 60 has 126 sts. The intervening rounds retain the preceding increase-round count.
- Round 61: sc in every stitch. (126 sts) Slip stitch in the next stitch and fasten off. The sleeve should measure approximately 25 cm along its vertical axis when fitted to the cone.
- Slide the sleeve over the cone. Ease it evenly without pulling the tip sideways. Secure the lower edge to the underside of the cone with small stitches through a fabric covering, or small dots of suitable adhesive. Keep the sleeve accessible for sewing on the skirts.
Five Shaped Skirts
- Make five skirts using the 3 mm hook: top skirt in green with foundation count N = 24; second skirt in ivory with N = 48; middle skirt in burgundy with N = 72; fourth skirt in green with N = 96; bottom skirt in ivory with N = 120. All skirts use the same eight shaping rounds below.
- For each skirt, chain N loosely and join with a slip stitch to the first chain without twisting. Leave a 60 cm sewing tail. Work joined rounds; ch 1 at the start does not count as a stitch, and join each round to its first sc.
- Round 1: sc in every chain. (N sts) Place markers to divide the round into six equal sectors.
- Round 2: repeat [sc in the next N ÷ 6 − 1 stitches, inc] six times. (N + 6 sts)
- Round 3: sc in every stitch. (N + 6 sts)
- Round 4: repeat [sc in the next N ÷ 6 stitches, inc] six times. (N + 12 sts)
- Round 5: sc in every stitch. (N + 12 sts)
- Round 6: repeat [sc in the next N ÷ 6 + 1 stitches, inc] six times. (N + 18 sts)
- Round 7: sc in every stitch. (N + 18 sts)
- Round 8: repeat [sc in the next N ÷ 6 + 2 stitches, inc] six times. (N + 24 sts)
- Verify the five round-8 counts, from smallest to largest: 48, 72, 96, 120, and 144 sts. Each marked sector now contains 8, 12, 16, 20, or 24 sts respectively.
- Round 9, scallops: let S equal the number of stitches in one sector. Repeat [sl st in next stitch, sc in next stitch, hdc in next stitch, dc in next stitch, tr in each of the next S − 8 stitches, dc in next stitch, hdc in next stitch, sc in next stitch, sl st in next stitch] six times. For the smallest skirt, S − 8 is zero, so omit the tr stitches. Each stitch receives exactly one stitch; counts remain 48, 72, 96, 120, and 144.
- Round 10, edging: on the bottom ivory skirt, change to burgundy; keep the existing color on all others. Ch 1, sc in each stitch around, join, and fasten off. Counts remain unchanged.
- Block each skirt over a shallow bowl or curved support, keeping the upper opening circular and shaping six distinct scallops. Do not stretch the top opening larger.
Burgundy Tree Point
- With burgundy and the 3 mm hook, work in a continuous spiral. Round 1: 6 sc in MR. (6 sts)
- Rounds 2–3: sc in every stitch. (6 sts each round)
- Round 4: repeat [sc in next stitch, inc] three times. (9 sts)
- Rounds 5–6: sc in every stitch. (9 sts each round)
- Round 7: repeat [sc in next 2 stitches, inc] three times. (12 sts)
- Rounds 8–9: sc in every stitch. (12 sts each round)
- Round 10: repeat [sc in next 3 stitches, inc] three times. (15 sts)
- Rounds 11–12: sc in every stitch. (15 sts each round)
- Round 13: repeat [sc in next 4 stitches, inc] three times. (18 sts)
- Round 14: sc in every stitch. (18 sts) Slip stitch in the next stitch and fasten off with a sewing tail. Leave the base open; this cap fits over the sleeve tip without stuffing.
Poinsettias and Leaves
- Make six small burgundy flowers for the bottom skirt, using the 2 mm hook. For each flower, work 6 sc in MR and join to the first sc. (6 sts)
- Small flower petal: repeat [ch 5; starting in the second chain from the hook, work sl st, sc, hdc, dc along the four chains; sl st in the next center stitch] six times. The final attachment returns to the first center stitch. Fasten off with a sewing tail. (6 petals)
- Make two larger burgundy flowers for the topper. For each, work 6 sc in MR and join. Repeat [ch 7; starting in the second chain from the hook, work sl st, sc, hdc, dc, dc, tr along the six chains; sl st in the next center stitch] six times. Fasten off. (6 petals per flower)
- Make 16 green leaves. For each leaf, ch 7. Starting in the second chain from the hook, work sl st, sc, hdc, dc, hdc, then 3 sc in the last chain. Rotate to the unused side of the foundation chain; work hdc, dc, hdc, sc, sl st across the remaining five chains. Fasten off with a sewing tail. (13 sts around the chain)
- Block the flowers and leaves flat. Stack the two large flowers with their petals offset and sew through their centers. Reserve four leaves for this topper and twelve leaves for the lower ivory skirt.
- Sew three small gold beads into the center of each small flower. Sew seven small gold beads into the topper center, securing each bead separately.
Embroidery and Beaded Decorations
- Decorate the bottom ivory skirt before assembly. Center one small poinsettia on each scallop, approximately 1.5 cm above the edge. Sew through the petal bases, leaving the pointed tips free. Add two green leaves beside each flower.
- On the second ivory skirt, embroider one green sprig on each scallop. Make a 1.5 cm straight-stitch stem, then add three pairs of detached-chain leaves, working upward from the base. On alternating scallops, sew three burgundy beads at the stem base; on the other scallops, add one gold bead.
- On the burgundy skirt, embroider one gold snowflake per scallop. Form three intersecting straight stitches, each approximately 2 cm long, to create six arms. Add two short diagonal stitches near the end of each arm. Keep the underside loose enough that the fabric remains flexible.
- On the fourth, green skirt, mark six shallow garland arcs, one across each scallop. Backstitch small gold beads along each arc with strong sewing thread, securing after every third bead. Place a cluster of three burgundy beads at each arc’s lowest point.
- On the top green skirt, sew one burgundy bead near the center of each scallop. Add the remaining gold beads sparingly across the skirts, keeping them clear of the upper sewing edges.
- Secure every bead with at least two thread passes and bury the thread ends on the underside. This beaded decoration is intended for display away from young children and pets.
Layer Placement and Topper Assembly
- Fit all five skirts over the cone before sewing. Slide the largest skirt down first, followed by the fourth, middle, second, and top skirts. Keep all upper edges underneath the skirt above.
- Pin the bottom skirt’s foundation edge around sleeve round 56; the fourth skirt around round 44; the middle skirt around round 32; the second skirt around round 20; and the top skirt around round 8. These sleeve rounds contain 114, 90, 66, 42, and 18 sts respectively, providing six fewer sleeve stitches than each corresponding skirt opening.
- For each attachment, divide both the skirt opening and its sleeve attachment line into six equal sectors. In each sector, sew the first two skirt stitches to the same sleeve stitch, then sew each remaining skirt stitch to the next sleeve stitch. This distributes the six extra skirt stitches evenly.
- Sew from the lowest skirt upward with the saved tails, catching sleeve stitches without piercing the cone. Keep the scallops free. Rotate adjacent skirts by approximately half a scallop so the valleys overlap the centers below.
- If the blocked skirts leave a visible gap, move the higher skirt’s attachment line down by one or two sleeve rounds and redistribute its opening evenly. Pin the entire arrangement again before making permanent stitches.
- Fit the burgundy point over the sleeve tip. Sew its open edge around sleeve round 9, matching its 18 stitches to the sleeve’s 18 stitches. Keep the point upright.
- Fold the ribbon into two loops with two downward tails, keeping its overall width approximately 12 cm. Sew the center securely to the front of the tree immediately below the burgundy point.
- Sew the four reserved leaves behind the large poinsettia. Attach the flower through its center and petal bases over the ribbon knot, leaving the burgundy tip visible above it.
Finishing
- Attach the cone securely to the wooden stand using the support’s intended fitting or an adhesive suitable for both materials. Allow the bond to cure fully before moving the tree.
- Weave in all remaining yarn tails and trim hidden thread ends. Check the underside of every skirt for loose bead threads.
- Set the tree on a level surface. Shape the six scallops of each skirt with your fingers, turning the decorated side forward and ensuring the lowest edging clears the stand.
Your finished tree should feel balanced, with the green, ivory, and burgundy layers overlapping softly. Give the ribbon loops a final adjustment and lift any flattened flower petals with the tip of a tapestry needle.
Dust with a soft brush. Because the finished piece combines a rigid support, wood, ribbon, and beads, clean small marks locally and avoid immersing the assembled tree.
Tips for Success
- Make the smallest skirt first to check whether the scallop edging holds its curve with your cotton and hook.
- Keep a marker at every sector boundary; each increase round adds exactly one stitch to each sector.
- Complete embroidery while the skirts are separate so the thread remains accessible and the sleeve stays smooth.
- Use a snug sleeve as the sewing foundation; a loose sleeve allows the decorated tiers to sag.
- Check the tree from the side while pinning so each skirt projects evenly around the cone.
Common Mistakes to Avoid
- Twisting a foundation chain creates a distorted skirt. Lay the chain flat and check it before joining.
- Counting the joining slip stitch as a stitch shifts the increases. Count only the worked stitches in each round.
- Pulling bead thread tightly puckers the scallops. Leave the thread resting against the fabric and secure short sections separately.
- Sewing through the lower scallop edges prevents the layers from draping. Attach only the foundation edge of each skirt.
- Using a cone with a different slope changes every attachment position. Compare the sleeve and all pinned skirts before permanent assembly.
Ways to Customize This Pattern
- Replace gold beads with French knots in gold thread while retaining the same decoration placement.
- Use burgundy edging on both ivory skirts for a stronger repeated outline; stitch counts remain unchanged.
- Replace the ribbon with two sewn fabric loops of the same finished width to preserve the topper’s proportions.
- For a coordinated smaller tree, use finer yarn and a smaller hook throughout, then choose a cone that fits the completed sleeve rather than retaining the original support measurements.
Frequently asked questions
No. A rigid cone supports the crochet sleeve and layered skirts. The burgundy point is an open cap fitted over the cone tip.
The instructions use separate skirts so you can block, embroider, and bead them before assembly. Sewing them on also lets you adjust the overlap and alternate the scallop positions.
Each opening has six extra stitches, distributed as one extra stitch per sector. This gentle ease helps the skirt stand away from the sleeve without gathering into folds.
Yes, but the sleeve diameter and skirt depth will change. Work the sleeve first, find a support that fits it, and pin all five skirts before choosing final attachment positions.
The finished Heirloom Poinsettia Crochet Christmas Tree

