Heirloom Ribbon Crochet Christmas Tree
Advanced
For experienced crocheters who enjoy complex shaping, fine detail, and ambitious construction
Weekend Project
A satisfying weekend make — start Friday, finish Sunday, enjoy forever.
Handmade Gift
A beautiful keepsake — free forever. Read online or print at home.
About This Heirloom Ribbon Crochet Christmas Tree
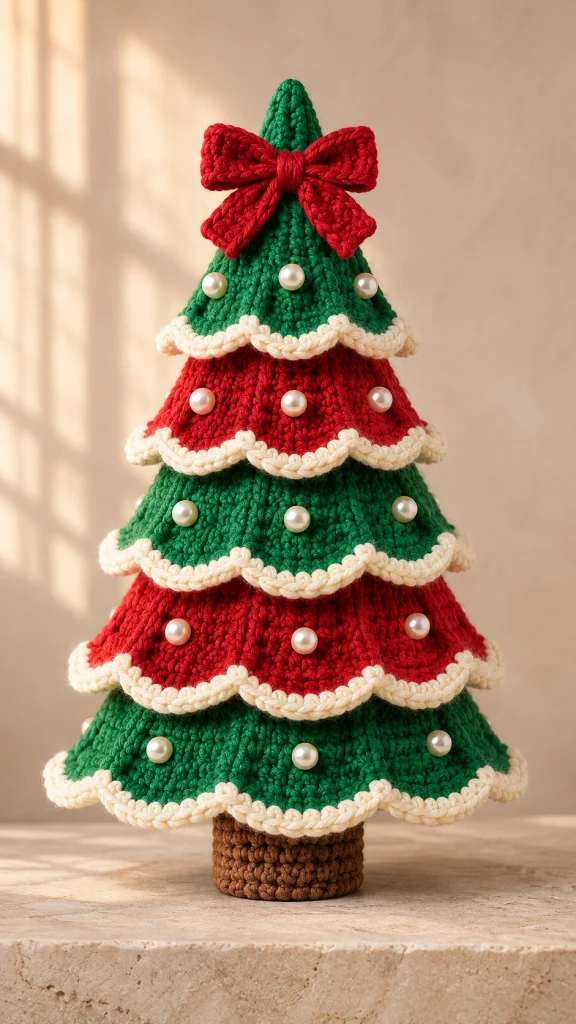
This crochet Christmas tree pattern creates a freestanding tabletop decoration with five overlapping tiers in evergreen and Christmas red. Raised ribs give the branches definition, cream scallops soften each edge, and a generous bow finishes the narrow crown.
The tree is built around a covered foam cone, with separate shaped skirts sewn to marked rounds on the cover. A brown crocheted pedestal forms the trunk, while sewn pearl beads add the ornament detail seen across the branches. This is home decor intended for display.
Allow approximately 16–22 hours for crocheting, blocking, and assembly. The project suits experienced crocheters who enjoy counted shaping, post stitches, precise placement, and structured finishing. Instructions use US crochet terminology.
Materials
- DK cotton or cotton-blend yarn: approximately 150 g evergreen, 110 g Christmas red, 60 g cream, and 25 g brown; estimates assume approximately 120 m per 50 g.
- 3.0 mm hook for the cone cover, trunk, and bow.
- 3.5 mm hook for the tier skirts and scallops.
- Firm craft foam cone approximately 29 cm tall with a 13 cm base diameter; trim or shape to fit the crocheted cover.
- Fifteen sew-through pearl beads, approximately 10–12 mm diameter.
- Strong matching sewing thread and a fine needle for the beads.
- Tapestry needle.
- Six removable stitch markers plus five contrasting marking threads.
- Rustproof blocking pins and a blocking mat.
- Two rigid craft discs, each 5 cm in diameter, for the trunk.
- A small amount of polyester filling for the trunk.
- Approximately 100 g of clean craft weighting pellets in a securely sewn fabric pouch.
- Scissors and measuring tape.
Abbreviations
chchainsl stslip stitchscsingle crochethdchalf double crochetdcdouble crochetFPhdcfront post half double crochetincwork 2 single crochet in one stitchhdc-incwork 2 half double crochet in one stitchsc2togsingle crochet 2 stitches togetherMRmagic ringBLOback loop onlyststitchGreen Cone Cover
- Use evergreen and the 3.0 mm hook. Work in a continuous spiral with the right side facing outward. Mark the first stitch of each round.
- Round 1: Work 6 sc in MR. Tighten the ring. Count: 6 st.
- Rounds 2–4: Sc in every stitch. Count: 6 st each round.
- Round 5: Inc in each stitch. Count: 12 st. Run a loose contrasting thread through this round to mark the first skirt attachment.
- Rounds 6–8: Sc in every stitch. Count: 12 st each round.
- Round 9: Repeat (sc in next stitch, inc) 6 times. Count: 18 st.
- Rounds 10–12: Sc in every stitch. Count: 18 st each round.
- Round 13: Repeat (sc in next 2 stitches, inc) 6 times. Count: 24 st.
- Rounds 14–16: Sc in every stitch. Count: 24 st each round.
- Round 17: Repeat (sc in next 3 stitches, inc) 6 times. Count: 30 st. Mark this round for the second skirt.
- Rounds 18–20: Sc in every stitch. Count: 30 st each round.
- Round 21: Repeat (sc in next 4 stitches, inc) 6 times. Count: 36 st.
- Rounds 22–24: Sc in every stitch. Count: 36 st each round.
- Round 25: Repeat (sc in next 5 stitches, inc) 6 times. Count: 42 st.
- Rounds 26–28: Sc in every stitch. Count: 42 st each round.
- Round 29: Repeat (sc in next 6 stitches, inc) 6 times. Count: 48 st. Mark this round for the third skirt.
- Rounds 30–32: Sc in every stitch. Count: 48 st each round.
- Round 33: Repeat (sc in next 7 stitches, inc) 6 times. Count: 54 st.
- Rounds 34–36: Sc in every stitch. Count: 54 st each round.
- Round 37: Repeat (sc in next 8 stitches, inc) 6 times. Count: 60 st.
- Rounds 38–40: Sc in every stitch. Count: 60 st each round.
- Round 41: Repeat (sc in next 9 stitches, inc) 6 times. Count: 66 st. Mark this round for the fourth skirt.
- Rounds 42–44: Sc in every stitch. Count: 66 st each round.
- Round 45: Repeat (sc in next 10 stitches, inc) 6 times. Count: 72 st.
- Rounds 46–48: Sc in every stitch. Count: 72 st each round.
- Round 49: Repeat (sc in next 11 stitches, inc) 6 times. Count: 78 st.
- Rounds 50–52: Sc in every stitch. Count: 78 st each round.
- Round 53: Repeat (sc in next 12 stitches, inc) 6 times. Count: 84 st. Mark this round for the fifth skirt.
- Rounds 54–56: Sc in every stitch. Count: 84 st each round.
- Round 57: Repeat (sc in next 13 stitches, inc) 6 times. Count: 90 st.
- Rounds 58–65: Sc in every stitch. Count: 90 st each round. Sl st in the next stitch and fasten off, leaving a sewing tail. The cover measures approximately 29.5 cm from tip to lower edge.
Five Ribbed Tier Skirts
- Use the 3.5 mm hook. Make five skirts using the same nine-round sequence. Read all count lists in top-to-bottom order: skirt 1, skirt 2, skirt 3, skirt 4, skirt 5. Colors are evergreen, red, evergreen, red, evergreen.
- Set the starting sector size n to 2, 5, 8, 11, or 14 respectively. Chain 12, 30, 48, 66, or 84 respectively. Join with sl st to the first chain without twisting. Leave a 60 cm starting tail for attachment.
- Round 1: Ch 1, hdc in every chain; join with sl st to the first hdc. Count: 12 / 30 / 48 / 66 / 84 st. Place a marker in the first stitch of each of six equal sectors, each containing n stitches.
- Round 2: Ch 1. In each sector, FPhdc around its first stitch, hdc in the next n minus 2 stitches, and hdc-inc in its final stitch. Join. Omit the middle plain stitches when their number is zero. Count: 18 / 36 / 54 / 72 / 90 st.
- Round 3: Ch 1. In each sector, FPhdc around its first stitch, hdc in the next n minus 1 stitches, and hdc-inc in its final stitch. Join. Count: 24 / 42 / 60 / 78 / 96 st.
- Round 4: Ch 1. In each sector, FPhdc around its first stitch, hdc in the next n stitches, and hdc-inc in its final stitch. Join. Count: 30 / 48 / 66 / 84 / 102 st.
- Round 5: Ch 1. In each sector, FPhdc around its first stitch and hdc in the next n plus 3 stitches. Join. Count: 30 / 48 / 66 / 84 / 102 st.
- Round 6: Ch 1. In each sector, FPhdc around its first stitch, hdc in the next n plus 1 stitches, and hdc-inc in its final stitch. Join. Count: 36 / 54 / 72 / 90 / 108 st.
- Round 7: Ch 1. In each sector, FPhdc around its first stitch, hdc in the next n plus 2 stitches, and hdc-inc in its final stitch. Join. Count: 42 / 60 / 78 / 96 / 114 st.
- Round 8: Ch 1. In each sector, FPhdc around its first stitch, hdc in the next n plus 3 stitches, and hdc-inc in its final stitch. Join. Count: 48 / 66 / 84 / 102 / 120 st.
- Round 9: Ch 1. In each sector, FPhdc around its first stitch and hdc in the next n plus 6 stitches. Join and fasten off. Count: 48 / 66 / 84 / 102 / 120 st.
- Throughout rounds 2–9, move each sector marker into the new FPhdc. A post stitch replaces the stitch at the marked position: do not also work into that stitch’s top loops. Beginning chains and joining slip stitches never count as stitches.
Cream Scalloped Edges
- Edging round 1: With the right side facing, join cream in any stitch at the back of a skirt. Ch 1 and sc in every stitch; join to the first sc. Count: 48 / 66 / 84 / 102 / 120 st.
- Edging round 2: Ch 1. Repeat (sc in next stitch, skip 1 stitch, 5 dc in next stitch, skip 1 stitch, sc in next stitch, sl st in next stitch) around. Join to the first sc and fasten off. Each repeat consumes exactly 6 base stitches. Make 8 / 11 / 14 / 17 / 20 scallops respectively.
- Block each skirt separately with its neck held at its natural circumference. Pin the scallop peaks gently and let the fabric dry fully. Preserve the raised ribs; do not press them flat.
Covered Base Disc
- Use evergreen and the 3.0 mm hook. Work in a continuous spiral.
- Round 1: Work 6 sc in MR. Count: 6 st.
- Round 2: Inc in every stitch. Count: 12 st.
- Round 3: Repeat (sc in next stitch, inc) 6 times. Count: 18 st.
- Round 4: Repeat (sc in next 2 stitches, inc) 6 times. Count: 24 st.
- Round 5: Repeat (sc in next 3 stitches, inc) 6 times. Count: 30 st.
- Rounds 6–15: For each round number r, repeat (sc in next r minus 2 stitches, inc) 6 times. Counts for rounds 6 through 15 are 36, 42, 48, 54, 60, 66, 72, 78, 84, and 90 st respectively.
- Sl st in the next stitch and fasten off with a 100 cm tail. The disc should measure approximately 13 cm across. Check it against the cone base before assembly.
Brown Pedestal Trunk
- Use brown and the 3.0 mm hook. Work in a continuous spiral.
- Round 1: Work 6 sc in MR. Count: 6 st.
- Round 2: Inc in every stitch. Count: 12 st.
- Round 3: Repeat (sc in next stitch, inc) 6 times. Count: 18 st.
- Round 4: Repeat (sc in next 2 stitches, inc) 6 times. Count: 24 st.
- Round 5: Repeat (sc in next 3 stitches, inc) 6 times. Count: 30 st.
- Round 6: Sc in BLO around. Count: 30 st. Insert one 5 cm craft disc against the inside of the base.
- Rounds 7–12: Sc in every stitch. Count: 30 st each round.
- Insert the sealed weight pouch. Add small amounts of filling around it to keep the trunk cylindrical. Place the second craft disc horizontally above the pouch, just below the opening.
- Round 13: Working in BLO, repeat (sc in next 3 stitches, sc2tog) 6 times. Count: 24 st.
- Round 14: Repeat (sc in next 2 stitches, sc2tog) 6 times. Count: 18 st.
- Round 15: Repeat (sc in next stitch, sc2tog) 6 times. Count: 12 st.
- Round 16: Sc2tog 6 times. Count: 6 st. Fasten off, draw the tail through the remaining front loops, and close the opening. Keep the unused front loops of round 12 accessible for attachment.
Red Bow and Tails
- Bow strip, row 1: With red and the 3.0 mm hook, ch 31. Sc in the second chain from the hook and each remaining chain. Count: 30 st.
- Rows 2–7: Ch 1, turn, sc in BLO across. Count: 30 st each row. Fasten off with a 40 cm tail.
- Join the two short ends with a flat whipstitch, matching all 7 row ends. Position this seam at the center back and flatten the resulting ring into two equal loops.
- First tail, row 1: Ch 7. Sc in the second chain from the hook and each remaining chain. Count: 6 st.
- Rows 2–10: Ch 1, turn, sc in BLO across. Count: 6 st each row.
- Row 11: Ch 1, turn, sc2tog, sc in next 2 stitches, sc2tog. Count: 4 st.
- Row 12: Ch 1, turn, sc2tog twice. Count: 2 st.
- Row 13: Ch 1, turn, sc2tog. Count: 1 st. Fasten off and weave in this end. Make a second identical tail.
- Center band, row 1: Ch 5. Sc in the second chain from the hook and each remaining chain. Count: 4 st.
- Rows 2–10: Ch 1, turn, sc in BLO across. Count: 4 st each row. Fasten off with a 50 cm tail.
- Pinch the bow ring at its center, place the straight ends of the two tails behind the pinch, and wrap the center band around all layers. Sew the band ends together at the back. Secure through the hidden layers so the tails cannot slide out.
Tree Assembly and Pearl Placement
- With the cone cover still empty, slide skirt 5 over its tip and down to marked round 53. Match its 84 neck stitches to the 84 stitches of that cover round. Sew one-to-one through the foundation edge and the cover stitches. Keep the tier’s joining seam at the back.
- Slide skirt 4 into position at round 41. Sew its 66 neck stitches one-to-one to that round.
- Slide skirt 3 into position at round 29. Sew its 48 neck stitches one-to-one to that round.
- Slide skirt 2 into position at round 17. Sew its 30 neck stitches one-to-one to that round.
- Slide skirt 1 into position at round 5. Sew its 12 neck stitches one-to-one to that round. Remove all marking threads. Let every skirt hang downward with its scallops free.
- Arrange three pearl beads across the visible front half of each tier: one at center front and one on either side. Place each approximately 2 cm above its cream edge, between raised ribs. Sew each bead through the skirt fabric with at least four passes of strong thread and secure the ends on the wrong side. Total: 15 beads.
- Sew the bow center to the front of the cover approximately 3 cm below the tip, catching the cover and the top skirt’s neck seam. Add a small hidden tack behind each bow loop to hold the bow upright.
- Insert the foam cone through the lower opening. Its tip must reach the cover tip. Shape or trim the foam so the cover sits smoothly and its lower edge meets the foam base.
- Center the trunk beneath the green base disc. Sew the unused front loops of trunk round 12 to a matching circular path on the disc, approximately 5 cm in diameter. Make a second pass around this seam for strength.
- Place the disc beneath the foam, with the trunk pointing downward. Match its 90 edge stitches to the cover’s 90 lower-edge stitches. Whipstitch one-to-one around the full circumference and secure the tail inside the seam.
Finishing
Set the tree on a level table and let the tiers settle. Spread each skirt evenly around the cone, keeping the cream edges clear of the tier beneath. The overlapping layers should conceal all five neck seams.
Weave remaining tails securely into matching fabric. Shape the bow loops by hand and angle its tails outward. Check every pearl attachment and the trunk seam before placing the tree on display.
If a scallop curls, dampen that edge lightly and pin it into shape while the tree lies supported on its side. Let it dry completely before standing it upright. Keep the finished decoration away from flames and heat sources; spot-clean the assembled piece.
Tips for Success
- Move all six sector markers after every skirt round. The markers keep the raised ribs aligned while the increases widen each panel.
- Check skirt neck counts before adding the cream edging; every neck must match its designated cover round exactly.
- Keep skirt attachment stitches relaxed enough to preserve the cone’s taper.
- Fit the foam before closing the base. Smooth shaping depends on a snug cover without compressed or buckled fabric.
- Keep the weight centered inside the trunk and test the tree on its intended display surface.
Common Mistakes to Avoid
- Working into both the post and top loops at a rib adds unwanted stitches. Use the FPhdc as the sole stitch for that position.
- Increasing on rounds 5 or 9 makes the skirts too wide. Both rounds maintain the previous stitch count.
- Skipping the slip stitch at the end of each scallop repeat disrupts the spacing. Every repeat consumes six base stitches.
- Sewing down the scalloped hems removes the layered effect. Attach each skirt only at its neck.
- Closing the base before checking the foam fit makes corrections difficult. Fit the cone and confirm tier overlap first.
Ways to Customize This Pattern
- Work all five skirts in evergreen for a traditional tree while retaining the red bow and cream edging.
- Replace the pearl beads with embroidered cream French knots, completing the embroidery before inserting the foam.
- Use gold-colored yarn for the scallops after swatching it with the skirt yarn to confirm compatible thickness and drape.
- Make a larger version by increasing yarn and hook sizes together, then select a cone and trunk discs to match the resulting crochet measurements.
Frequently asked questions
This is structured tabletop Christmas decor. A foam cone supports the crocheted cover and separate branch skirts; only the small pedestal contains filling.
Separate skirts create visible overlapping edges and allow each cream border to hang freely. Their neck counts match specific rounds of the cover for precise attachment.
Check both gauges before assembly. Each skirt body should be about 6 cm deep, while successive attachment rounds are about 5.5 cm apart. A shorter hdc row gauge can expose the neck seams; adjust the skirt hook size and remake the swatch before continuing.
Spot-clean it with a lightly damp cloth. The foam, enclosed weight pouch, and rigid trunk discs make soaking or machine washing unsuitable.
Display it out of reach. The beads, internal support, and weighted pedestal are intended for decorative use. Embroidered ornaments remove the beads but do not turn the tree into a toy.
The finished Heirloom Ribbon Crochet Christmas Tree

