Heirloom Sage and Blue Crochet Bedspread
Advanced
For experienced crocheters who enjoy complex shaping, fine detail, and ambitious construction
Single-Day Project
A satisfying project you can complete in a single afternoon or evening.
Handmade Gift
A beautiful keepsake — free forever. Read online or print at home.
About This Heirloom Sage and Blue Crochet Bedspread
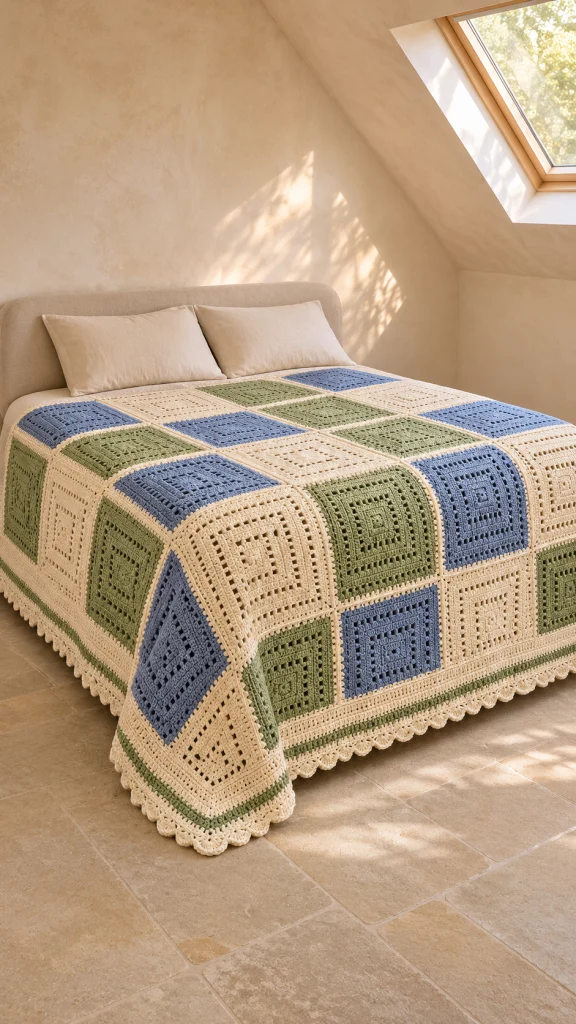
This Heirloom crochet bedspread pattern brings together sage green, dusty blue and warm cream in generously sized squares. Concentric eyelet bands and raised stitches give each motif definition, while cream seams and a scalloped border unite the patchwork.
The bedspread uses 42 individually worked squares arranged in six columns and seven rows. Each square stays one color through its textured center, then receives a cream edging. The finished piece measures approximately 90 × 104 inches, including the border; check the intended bed and desired drop before choosing your layout.
Allow approximately 100–140 hours, plus drying time. This advanced project suits crocheters who enjoy precise stitch placement, front-post texture, careful blocking and counted assembly. The instructions are an original interpretation of the photographed bedspread, and have not been physically tested.
Materials
- DK / light weight 3 yarn in warm cream: approximately 4,000 m, including cream motifs, all motif edgings, seams and border.
- Matching yarn in dusty blue: approximately 1,900 m.
- Matching yarn in sage green: approximately 1,900 m.
- Choose the same yarn range for all colors; a cotton blend with good stitch definition is suitable. The total allowance of 7,800 m includes sampling and a working margin.
- 4 mm crochet hook, or size needed for gauge.
- Tapestry needle for seams and ends.
- Four locking stitch markers per working motif.
- Scissors and measuring tape.
- Blocking mats and rustproof pins.
Abbreviations
chchainsl stslip stitchscsingle crochetdcdouble crochetfpdcfront-post double crochetststitchspspaceUS crochet terminology is used. To make fpdc, yarn over, insert the hook from front to back to front around the post of the indicated stitch, then complete a dc. Do not also work into the top of that stitch.
Textured Square Motif — Make 42
- Make 14 squares in cream, 14 in dusty blue and 14 in sage. Use the chosen motif color for Rounds 1–12. Start with ch 4 and sl st into the first ch to form a ring.
- Round 1: Ch 3, counting as the first dc. Work 2 dc into the ring, ch 2; work (3 dc, ch 2) three times into the ring. Join with sl st to the top of the beginning ch 3. There are 3 dc on each side and four corner ch-2 spaces.
- Round setup: Before every subsequent round, sl st to the next corner ch-2 sp. Begin a dc corner with ch 3, counting as its first dc. At the end, join to the top of that ch 3. For the sc edging, ch 1 does not count as a stitch; join to the first sc. Slip stitches used to reach a corner never count.
- Round 2: Work (2 dc, ch 2, 2 dc) in each corner sp and 1 dc in each of the 3 stitches between corners. There are 7 dc per side, 28 dc total and four corner spaces.
- Round 3: Work (2 dc, ch 2, 2 dc) in each corner. Between corners, dc in the first st, then (ch 1, skip 1 st, dc in the next st) three times. Each side has 8 dc and three ch-1 spaces: 11 positions. There are 32 dc and 12 ch-1 spaces overall, plus four corners.
- Round 4: Work (2 dc, ch 2, 2 dc) in each corner and 1 dc in every stitch and every ch-1 sp between corners. There are 15 dc per side, 60 dc total.
- Round 5: Work (2 dc, ch 2, 2 dc) in each corner and fpdc around each of the 15 dc posts between corners. There are 19 stitches per side: 15 fpdc and 4 corner dc; 76 stitches overall.
- Round 6: Work (2 dc, ch 2, 2 dc) in each corner. Between corners, dc in the first st, then (ch 1, skip 1 st, dc in the next st) nine times. Each side has 14 dc and nine ch-1 spaces: 23 positions. There are 56 dc and 36 ch-1 spaces overall.
- Round 7: Work (2 dc, ch 2, 2 dc) in each corner and 1 dc in every stitch and ch-1 sp between corners. There are 27 dc per side, 108 dc total.
- Round 8: Work (2 dc, ch 2, 2 dc) in each corner and 1 dc in each stitch between corners. There are 31 dc per side, 124 dc total.
- Round 9: Work (2 dc, ch 2, 2 dc) in each corner. Between corners, dc in the first st, then (ch 1, skip 1 st, dc in the next st) fifteen times. Each side has 20 dc and fifteen ch-1 spaces: 35 positions. There are 80 dc and 60 ch-1 spaces overall.
- Round 10: Work (2 dc, ch 2, 2 dc) in each corner and 1 dc in every stitch and ch-1 sp between corners. There are 39 dc per side, 156 dc total.
- Round 11: Work (2 dc, ch 2, 2 dc) in each corner and fpdc around each of the 39 dc posts between corners. There are 43 stitches per side: 39 fpdc and 4 corner dc; 172 stitches overall.
- Round 12: Work (2 dc, ch 2, 2 dc) in each corner and 1 dc in each stitch between corners. There are 47 dc per side, 188 dc total. Fasten off.
- Round 13: Join cream in any corner sp. Work (sc, ch 2, sc) in each corner and 1 sc in each stitch between corners. There are 49 sc per side, 196 sc total and four corner ch-2 spaces. Join and fasten off.
- Block each square to 14 × 14 inches. Pin the corners square and ease the sides straight without stretching the eyelets into long slots. Let dry completely.
Color Layout and Sizing
- Arrange the squares with right sides facing up, six columns across and seven rows from the head toward the foot of the bed. The following color names refer to the centers; all squares have cream edges.
- Row 1: blue, cream, sage, blue, cream, sage.
- Row 2: cream, sage, blue, cream, sage, blue.
- Row 3: sage, blue, cream, sage, blue, cream.
- Row 4: blue, cream, sage, blue, cream, sage.
- Row 5: cream, sage, blue, cream, sage, blue.
- Row 6: sage, blue, cream, sage, blue, cream.
- Row 7: blue, cream, sage, blue, cream, sage.
- The joined center measures approximately 84 × 98 inches. The border adds approximately 3 inches to each edge, giving a finished size near 90 × 104 inches.
- For another size, use whole blocked motifs: width equals 14 inches × column count + approximately 6 inches; length equals 14 inches × row count + approximately 6 inches. Multiply columns by rows for the motif quantity. Border scallop spacing must be recalculated if the layout changes.
Joining the Squares
- Check that every joining edge has 49 sc. Lay two neighboring squares side by side with right sides up and cream yarn threaded on a tapestry needle.
- Use a flat mattress seam: pass under the two top loops of the first sc on one square, then under the two top loops of its matching sc on the other square. Repeat across all 49 paired stitches, drawing the yarn snug enough to close the gap while keeping the seam flat.
- At each end, secure the adjoining corner ch-2 spaces together with one small stitch through the spaces. Keep their outward-facing portions available for the border where they meet an outside edge.
- Join all six squares in each row. Then join the seven completed rows, matching each pair of 49-stitch edges and securing each four-square intersection without bunching.
- At each junction on the outside perimeter, mark the paired corner spaces as one pickup location. There are five junctions on each six-square edge and six junctions on each seven-square edge.
Cream and Sage Border
- Border setup: Keep the right side facing. The six-square edges are the short edges; the seven-square edges are the long edges. All side counts exclude the four corner ch-2 spaces. For Rounds 2–6, move to a corner as for the motifs, join each round, and keep the right side facing.
- Round 1, cream: Join at an outside corner sp and ch 1. Work 1 sc in each of the 49 sc along each exposed motif edge. At every internal junction between motifs, work 1 additional sc through the paired corner spaces together. At each of the four outside corners, ch 2 and proceed directly to the next side; do not add a corner sc. Join to the first sc. There are 299 sc on each short side and 349 sc on each long side: 1,296 sc overall.
- Round 2, cream: Work (2 dc, ch 2, 2 dc) in each corner sp and 1 dc in each sc between corners. There are 303 dc per short side and 353 dc per long side: 1,312 dc overall.
- Round 3, cream: Work (2 dc, ch 2, 2 dc) in each corner. Across each short side, dc in the first st, then (ch 1, skip 1 st, dc in the next st) 151 times. Across each long side, dc in the first st, then repeat that sequence 176 times. Each short side has 156 dc and 151 ch-1 spaces, totaling 307 positions. Each long side has 181 dc and 176 ch-1 spaces, totaling 357 positions.
- Round 4, cream: Work (2 dc, ch 2, 2 dc) in each corner and 1 dc in every stitch and ch-1 sp between corners. There are 311 dc per short side and 361 dc per long side: 1,344 dc overall. Fasten off.
- Round 5, sage: Join in a corner, ch 1, and work (sc, ch 2, sc) in each corner and 1 sc in each stitch between corners. There are 313 sc per short side and 363 sc per long side: 1,352 sc overall. Join and fasten off.
- Round 6, cream: Join in a corner. Work (2 dc, ch 2, 2 dc) in each corner and 1 dc in each stitch between corners. There are 317 dc per short side and 367 dc per long side: 1,368 dc overall.
- Round 7, scallops: Join cream with a sl st in the first stitch immediately after a corner sp and ch 1. Across each short side, sc in the first 2 stitches; work (skip 2 stitches, 5 dc in the next stitch, skip 2 stitches, sc in the next stitch) 52 times; sc in the final 3 stitches. Across each long side, sc in the first 2 stitches; work the same six-stitch repeat 60 times; sc in the final 5 stitches. Work 7 dc in each corner ch-2 sp. After completing all four sides and corners, join to the first sc and fasten off. There are 224 side shells and four corner fans; the round contains 1,392 stitches.
Finishing
- Weave each yarn end through several stitches on the wrong side, reverse direction, and trim only after the end holds securely. Check the seam intersections and border joins for loose loops.
- Wash according to the yarn label. Support the whole wet bedspread when moving it, then spread it flat and ease the joined center square. Shape each scallop gently without pulling the border wider than the fabric.
- Let the bedspread dry completely before placing it on the bed. Measure the finished width and length and record the result with your yarn and hook details.
The cream seams should settle into a quiet grid, with the blue and sage squares carrying the color. Smooth the bedspread across the mattress and let the scallops fall freely around the sides and foot.
Tips for Success
- Mark the four corner spaces and count each side before joining every motif round.
- On a solid round after eyelets, place exactly one dc in each ch-1 space. Extra stitches will make the square ripple.
- Keep fpdc slightly relaxed so the raised bands do not pull the corners inward.
- Block motifs in batches to the same 14-inch template before assembling them.
- Place a marker at every perimeter seam junction before working the first border round.
Common Mistakes to Avoid
- Counting corner chains as side stitches: exclude every corner ch-2 space from the stated side counts.
- Working both a fpdc and a stitch into its top: use the post only on texture rounds, or the motif will gain stitches.
- Missing the first stitch after a corner: identify it before beginning the side, especially after moving with slip stitches.
- Pulling mattress seams too tightly: ease the seam open as you work so the joined center retains its planned dimensions.
- Using identical scallop counts on all sides: the short sides need 52 repeats and the long sides need 60, with the specified plain stitches at their ends.
Ways to Customize This Pattern
- Make a 4 × 5 motif throw using the same squares. Its approximate finished size is 62 × 76 inches; recalculate border counts and scallop spacing.
- Keep the cream edging and replace dusty blue with muted lavender for a softer palette.
- Work every motif center in cream for a monochrome bedspread whose eyelets and raised bands supply the contrast.
- For a straight edge, omit the scallop round and work a final sc round with (sc, ch 2, sc) in each corner. The border will finish slightly narrower.
Frequently asked questions
After washing and blocking. One complete 13-round motif must measure 14 inches square. Make the full sample because the front-post rounds can change the fabric tension.
Yes, but make a complete sample first. Larger motifs increase both bedspread dimensions, and heavier yarn makes a substantially heavier cover. Use your measured motif size in the sizing formula and measure the new border depth separately.
The single pickup through each paired set of corner spaces bridges the small gap between adjacent motif edges. These pickups are included in the first border round: five per short side and six per long side.
No. These instructions make the bedspread. The motif count, yarn allowances and finishing directions all refer to the bedspread alone.
The finished Heirloom Sage and Blue Crochet Bedspread

