Holly and Plaid Christmas Crochet Mobile Pattern
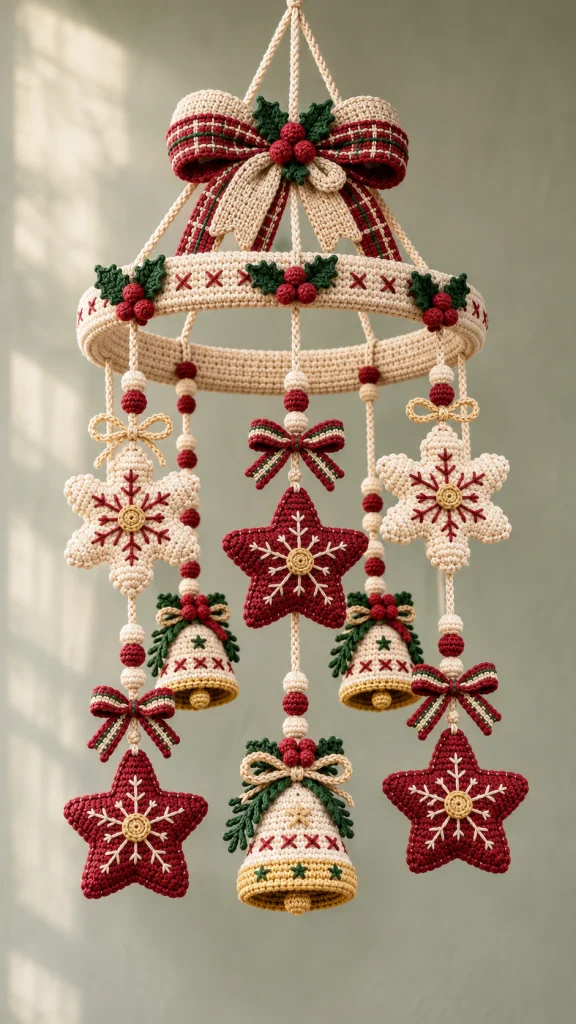
Advanced
For experienced crocheters who enjoy complex shaping, fine detail, and ambitious construction
Single-Day Project
A satisfying project you can complete in a single afternoon or evening.
Handmade Gift
A beautiful keepsake — free forever. Read online or print at home.
About This Holly and Plaid Christmas Crochet Mobile Pattern
This Christmas crochet mobile pattern brings cream snowflakes, cranberry stars, and golden-edged bells together beneath a holly-trimmed hoop. A generous plaid bow crowns the hanging decoration, while embroidered branches and small covered beads give the individual ornaments a coordinated finish.
The construction combines a fitted hoop sleeve, double-layer shaped ornaments, open-bottom bells, surface embroidery, and carefully balanced suspension cords. Three stars, two snowflakes, and three bells hang at staggered heights to create the full, tiered silhouette. The snowflakes use six tapered points, and the stars use five longer points.
Allow approximately 35–45 hours for this advanced project, including embroidery and assembly. It suits confident crocheters who enjoy precise shaping and decorative finishing. This is an indoor seasonal decoration; hang it securely away from children, pets, candles, and moving air.
Materials
- Sport-weight cotton: approximately 250 g cream, 150 g cranberry, 75 g forest green, and 50 g muted gold; quantities assume about 125 m per 50 g.
- 2.5 mm crochet hook, or size needed for the stated gauge.
- One rigid, smooth 35 cm / 14 in hoop, approximately 8–10 mm thick.
- Small quantity of polyester filling for flat ornaments, berries, and covered beads.
- Approximately 25 m of strong, low-stretch 2 mm cotton cord for suspension, pendant cores, and small tied bows.
- Tapestry needle and a finer blunt embroidery needle.
- Stitch markers, scissors, measuring tape, blocking mat, and rustproof pins.
- Strong matching sewing thread for securing embellishments and cord junctions.
- One closed metal hanging ring, approximately 30 mm across, and a suitably rated ceiling fixing.
Abbreviations
chchainsl stslip stitchscsingle crochethdchalf double crochetdcdouble crochetinc2 single crochet in one stitchsc2togsingle crochet 2 stitches togetherMRmagic ringBLOback loop onlyst / stsstitch / stitchesRSright sideHoop sleeve
- With cream, ch 19. Row 1: sc in the second ch from the hook and each remaining ch; turn. 18 sts.
- Rows 2–264: ch 1, sc in all 18 sts; turn after each row. Turning chains throughout this pattern do not count as stitches. The strip measures approximately 7.5 × 101.5 cm.
- Wrap the strip lengthwise around the hoop so its long edges meet on the inner underside. The strip’s short ends meet around the hoop circumference. Add or remove rows until the sleeve fits snugly without stretching the hoop out of shape.
- With the hoop enclosed, mattress-stitch the two long edges together, matching rows. Join the short ends edge to edge without twisting the sleeve. Secure all ends inside the cover.
- Embroider cranberry crosses around the outward-facing band. Each cross spans approximately 3 sts and 3 rows, with centers approximately 10 sleeve rows apart. Leave the four suspension positions free of bulky embroidery.
Cranberry stars: make three
- Make two panels per star. With cranberry, Round 1: work 6 sc in MR. 6 sts. Work disk rounds in a spiral, marking the first stitch.
- Round 2: inc in each st. 12 sts.
- Round 3: repeat (sc, inc) 6 times. 18 sts.
- Round 4: repeat (2 sc, inc) 6 times. 24 sts.
- Round 5: repeat (3 sc, inc) 6 times. 30 sts. Fasten off. Mark five consecutive groups of 6 sts around the disk.
- First point, Row 1: join cranberry to the first st of one unused group, ch 1, sc in its 6 sts; turn. Leave the other disk stitches unworked. 6 sts.
- Point Row 2: ch 1, sc in each st; turn. 6 sts.
- Point Row 3: ch 1, sc2tog, 2 sc, sc2tog; turn. 4 sts.
- Point Row 4: ch 1, sc in each st; turn. 4 sts.
- Point Row 5: ch 1, sc2tog twice; turn. 2 sts.
- Point Row 6: ch 1, sc in both sts; turn. 2 sts.
- Point Row 7: ch 1, sc2tog. 1 st. Fasten off.
- Repeat point Rows 1–7 on each of the other four marked groups. All 30 disk stitches are used once. Complete six panels in total and block each to approximately 15–17 cm from point to point.
- Embroider the front panel before joining: make five cream straight-stitch spokes from the center toward the tips, ending about 1 cm short of each tip. Add three pairs of short diagonal branches along each spoke. Keep the reverse panel plain or embroider it to match.
- Place two panels with wrong sides together and points aligned. Join cranberry through both layers at a valley. Along each point, work 1 sc through each paired row-end on the first side, 3 sc through the paired tip stitch, and 1 sc through each paired row-end on the second side. There are 6 row-end positions per side, excluding the tip: 15 edging sts per point, 75 around the star. Do not add stitches in the valleys.
- Pause before closing the last point and add a thin, even layer of filling. Complete the edging, sl st to the first sc, and fasten off. The star should remain flat enough for its embroidery to show clearly.
Cream snowflakes: make two
- Make two panels per snowflake. With cream, Round 1: 6 sc in MR. 6 sts.
- Round 2: inc in each st. 12 sts.
- Round 3: repeat (sc, inc) 6 times. 18 sts.
- Round 4: repeat (2 sc, inc) 6 times. 24 sts.
- Round 5: repeat (3 sc, inc) 6 times. 30 sts.
- Round 6: repeat (4 sc, inc) 6 times. 36 sts. Fasten off and mark six consecutive groups of 6 sts.
- First point, Row 1: join cream to the first st of an unused group, ch 1, sc in its 6 sts; turn. 6 sts.
- Point Row 2: ch 1, sc in all sts; turn. 6 sts.
- Point Row 3: ch 1, sc2tog, 2 sc, sc2tog; turn. 4 sts.
- Point Row 4: ch 1, sc in all sts; turn. 4 sts.
- Point Row 5: ch 1, sc2tog twice; turn. 2 sts.
- Point Row 6: ch 1, sc2tog. 1 st. Fasten off.
- Repeat point Rows 1–6 on the five remaining groups, using every disk stitch once. Complete four panels and block to approximately 15–16 cm across opposing points.
- Embroider six cranberry spokes on each front panel, running from the center into the points. Add two or three pairs of short diagonal branches to each spoke.
- Place matching panels with wrong sides together. Join cream at a valley and work through both layers: 1 sc in each of 5 paired row-end positions up the first side, 3 sc through the paired tip, and 1 sc in each of 5 paired row-end positions down the other side. Repeat for all six points: 13 edging sts per point, 78 sts total. Add no stitches in the valleys.
- Add a little filling before closing the final point. Complete the edging, sl st to the first sc, and fasten off.
Embroidered center medallions
- Make five gold medallions, one for each star and snowflake. Round 1: 6 sc in MR. 6 sts.
- Round 2: inc in each st. 12 sts.
- Round 3: repeat (sc, inc) 6 times. 18 sts. Sl st to the next st and fasten off with a sewing tail.
- Sew one medallion flat over each ornament’s embroidery junction. With gold yarn, couch a loose spiral across the medallion using small matching thread stitches; keep it flat and do not pull the disk inward.
Open-bottom bells: make three
- With cream, Round 1: 6 sc in MR. 6 sts. Work in a spiral unless directed otherwise.
- Round 2: inc in each st. 12 sts.
- Round 3: repeat (sc, inc) 6 times. 18 sts.
- Rounds 4–5: sc in each st. 18 sts each round.
- Round 6: repeat (2 sc, inc) 6 times. 24 sts.
- Rounds 7–8: sc in each st. 24 sts each round.
- Round 9: repeat (3 sc, inc) 6 times. 30 sts.
- Rounds 10–11: sc in each st. 30 sts each round.
- Round 12: repeat (4 sc, inc) 6 times. 36 sts.
- Rounds 13–14: sc in each st. 36 sts each round.
- Round 15: repeat (5 sc, inc) 6 times. 42 sts.
- Round 16: repeat (6 sc, inc) 6 times. 48 sts. Change to gold on the final pull-through.
- Round 17: sc in BLO of each st. 48 sts. This defines the upper edge of the gold rim.
- Rounds 18–20: sc in each st. 48 sts each round.
- Round 21: sl st loosely in each st. 48 sl sts. Fasten off. Leave the bottom open and do not stuff. Each bell is approximately 8 cm high and 6–7 cm across the opening.
- Embroider six cranberry crosses evenly around Rounds 12–14, placing their centers 6 sts apart on the 36-st section. Add a green six-spoke star above the front cross. On the lowest bell, add six small green stars spaced 8 sts apart around the gold band.
- Make one gold clapper per bell: Round 1, 6 sc in MR; Round 2, inc in each st, 12 sts; Round 3, sc in each st, 12 sts; Round 4, sc2tog 6 times, 6 sts. Stuff lightly, fasten off, and draw the opening closed.
- Sew the clapper to a short length of structural cord secured inside the bell crown. Adjust it so approximately half the clapper shows below the rim. Block the bell over a suitably sized dry form, keeping the opening round.
Holly leaves and berries
- Make 18 green holly leaves: two for each of four hoop clusters, four for the large bow, and two for each bell crown.
- For each leaf, ch 11. Working down the chain, sc in the second ch, hdc in the next ch, dc in each of the next 6 ch, hdc in the next ch, and 3 sc in the last ch. Rotate to work along the unused chain loops: hdc in the next loop, dc in each of the next 6 loops, hdc in the next loop, and sc in the last loop. Sl st to the first sc. 21 perimeter sts.
- Leaf edge: ch 1, sc in each of the 21 sts. After stitches 3, 6, 9, 13, 16, and 19, make a picot by chaining 3 and slip stitching into the first of those 3 chains. Sl st to the first sc and fasten off with a sewing tail. The picots do not change the 21-st base count.
- Make 24 cranberry berries, three for each of four hoop clusters, the large bow, and three bell crowns. Berry Round 1: 6 sc in MR. 6 sts.
- Berry Round 2: repeat (sc, inc) 3 times. 9 sts.
- Berry Round 3: sc in each st. 9 sts.
- Berry Round 4: repeat (sc, sc2tog) 3 times. 6 sts. Add a little filling, fasten off, and draw closed.
- Arrange two leaves and three berries into each hoop cluster. Sew the leaves at their bases and again near their outer thirds; sew each berry through its base several times. Assemble the bow cluster with four leaves and three berries in the same way.
Bell greenery sprays
- Make two green sprays per bell, six sprays total. Ch 16. Sl st in the second ch from the hook and each remaining ch. 15 sl sts form the central stem.
- Work back along one side of the stem. In each of the first 6 stem positions, make a branch: ch 6, sl st in the second ch and next 4 ch, then sl st into the next stem position. Each branch has 5 sl sts.
- Sl st along the remaining stem positions to the opposite end. Rotate and make 6 branches along the opposite side in the same manner. Fasten off, leaving a sewing tail. Each spray has 12 branches.
- Sew two sprays to each bell crown so the branches fall down its sides. Add two holly leaves and three berries at the crown, keeping the cord exit clear.
Large plaid bow
- Make the loop strip in rows. With cream, ch 13. Row 1: sc in the second ch and each remaining ch; turn. 12 sts.
- Rows 2–6: ch 1, sc in each st; turn. 12 sts each row.
- Rows 7–78: repeat this 12-row color sequence 6 times: 4 rows cranberry, 1 row cream, 2 rows cranberry, 1 row green, and 4 rows cranberry. Work 12 sc in every row and turn after every row.
- Rows 79–84: with cream, ch 1, sc in each st; turn. 12 sts each row. Fasten off. The strip measures approximately 5 × 32 cm.
- Embroider three lengthwise gold running-stitch lines down the strip between columns 3–4, 6–7, and 9–10. Take short, even stitches without tightening the fabric.
- Bring the short ends together at the back center to form a flattened loop. Sew the ends together, then pinch the midpoint through all layers to make two bow loops. Secure the pinch with matching yarn.
- Make two plaid tails. With cranberry, ch 11. Row 1: sc in the second ch and each remaining ch; turn. 10 sts.
- Rows 2–30: ch 1, sc in all 10 sts; turn. Use cream for Rows 7, 15, and 23; green for Rows 11, 19, and 27; and cranberry for all other rows. 10 sts each row.
- Tail Row 31: ch 1, sc2tog, 6 sc, sc2tog; turn. 8 sts.
- Tail Row 32: ch 1, sc2tog, 4 sc, sc2tog; turn. 6 sts.
- Tail Row 33: ch 1, sc2tog, 2 sc, sc2tog; turn. 4 sts.
- Tail Row 34: ch 1, sc2tog twice; turn. 2 sts.
- Tail Row 35: ch 1, sc2tog. 1 st. Fasten off. Add two lengthwise gold running-stitch lines to each tail.
- Make two cream overlay tails. Ch 8. Row 1: sc in the second ch and each remaining ch; turn. 7 sts.
- Rows 2–22: ch 1, sc in each st; turn. 7 sts each row.
- Overlay Row 23: ch 1, sc2tog, 3 sc, sc2tog; turn. 5 sts.
- Overlay Row 24: ch 1, sc2tog, sc, sc2tog; turn. 3 sts.
- Overlay Row 25: ch 1, sc2tog, sc; turn. 2 sts.
- Overlay Row 26: ch 1, sc2tog. 1 st. Fasten off.
- Sew both plaid tails behind the bow center, then place the shorter cream tails over them. Secure the four-leaf holly cluster at the center. Reserve the bow for attachment to the suspension cords.
Three small striped bows
- Make one bow for each star strand. With cranberry, ch 43. Row 1: sc in the second ch and each remaining ch; turn. 42 sts.
- Row 2: with cream, ch 1, sc in each st; turn. 42 sts.
- Row 3: with green, ch 1, sc in each st; turn. 42 sts.
- Row 4: with cranberry, ch 1, sc in each st. 42 sts. Fasten off and weave in the ends.
- Cross the strip ends over the center to form two loops and two tails. Keep approximately 4 cm for each tail. Bind the crossing firmly with cranberry yarn and cover the binding with several green wraps. Sew through the center to lock the shape.
Covered beads and cream cord bows
- Make 24 covered beads: 16 cream and 8 cranberry. Round 1: 6 sc in MR. 6 sts. Leave a small central passage for the pendant cord.
- Round 2: inc in each st. 12 sts.
- Rounds 3–4: sc in each st. 12 sts each round.
- Round 5: sc2tog 6 times. 6 sts. Add a little filling around the central passage. Fasten off and draw the opening nearly closed, keeping room for the cord to pass through.
- For each strand, thread three beads onto its structural cord in cream, cranberry, cream order. Their positions are set during assembly; stitch each bead to the cord so it cannot slide.
- Cut five 45 cm lengths of cotton cord. Tie two into small bows for the snowflake strands and three into bows for the bell crowns. Trim the tails evenly and secure the knots with matching sewing thread.
Suspension and pendant layout
- Mark eight equally spaced positions around the covered hoop, numbered 1–8 clockwise. Positions 1, 3, 5, and 7 also carry the four upper suspension cords.
- Cut four 80 cm suspension cords. Secure one around the hoop at each marked upper position with a firm knot beneath the sleeve seam. Bring their other ends together through the closed metal ring. Adjust until the hoop hangs level, with the ring approximately 30 cm above it. Knot securely and sew through each knot with strong thread.
- Cut eight pendant cords, each 90 cm long. Attach one securely around the hoop at each numbered position. The excess allows for knots, beads, and adjustments.
- Position 1: hang the first star with its top point 18 cm below the hoop. Position its small striped bow approximately 3 cm above the star tip.
- Position 2: hang the first snowflake with its upper tip 10 cm below the hoop. Place a cream cord bow immediately above it.
- Position 3: hang the first bell with its crown 27 cm below the hoop.
- Position 4: hang the second star with its top point 35 cm below the hoop. Place its striped bow approximately 3 cm above the tip.
- Position 5: hang the third bell with its crown 43 cm below the hoop. This is the lowest bell.
- Position 6: hang the third star with its top point 35 cm below the hoop. Place its striped bow approximately 3 cm above the tip.
- Position 7: hang the second bell with its crown 27 cm below the hoop.
- Position 8: hang the second snowflake with its upper tip 10 cm below the hoop. Add its cream cord bow immediately above it.
- On each pendant cord, place the first cream bead with its center 4 cm below the hoop and the cranberry bead 7 cm below the hoop. Place the final cream bead 10 cm below the hoop on star and bell strands; on snowflake strands, place it 2 cm below the cranberry bead so it clears the ornament.
- For stars and snowflakes, pass the cord through both fabric layers about 1 cm below the upper tip, turn it back upward, and knot it around itself. Sew the return end to the standing cord. Conceal the attachment behind the tip or bow.
- For bells, pass the cord through the crown and secure it inside with a knot and several stitches through the crown fabric. Add the clapper cord separately so the bell’s weight does not depend on the clapper attachment.
- Secure a holly cluster over each upper suspension attachment on the hoop. Sew the large bow across the two front upper cords approximately 8–10 cm above the hoop, fastening its center and both loop backs. Keep the structural cords continuous behind the bow.
- Hang temporarily and rotate each ornament to face outward. Adjust cord knots to level the hoop, then secure all knots with thread and trim excess cord only after the arrangement is balanced.
Finishing
Steam lightly from a distance suitable for your yarn, or damp-block the separate pieces before final assembly. Shape the bow loops with your fingers and spread the greenery so the bell embroidery remains visible. Let every component dry completely.
Weave all yarn ends into their own pieces, then check every ornament, berry, leaf, and bow attachment with a gentle tug. Add a few discreet stitches wherever an edge lifts. The hanging ring and structural cords should carry the complete decoration without relying on a decorative yarn wrap.
Install the finished mobile from a secure fixing and check its clearance from nearby furniture. This piece is decorative home decor and must not be suspended over a cot, bed, or play area. Store it flat in a roomy box, supporting the bell openings and bow loops with plain tissue.
Tips for Success
- Mark every 6-stitch disk group before beginning points; this keeps the star and snowflake bases evenly divided.
- Embroider ornament fronts while they are flat, and leave the stitches relaxed so the panels retain their shape.
- Use very little filling in the stars and snowflakes. Overfilling rounds the valleys and hides the pointed silhouettes.
- Block all three bells over the same form so their rims match.
- Balance the hoop with every ornament attached before permanently stitching the suspension knots.
Common Mistakes to Avoid
- Counting turning chains as stitches widens the bow strips and points. Work only into the stated stitches.
- Working an extra edging stitch in each valley makes the ornaments ripple. Move directly from one point’s final side stitch to the next point’s first side stitch.
- Pulling the plaid embroidery tight shortens the bow strip. Lay it flat after every few running stitches.
- Stuffing the bells removes their open silhouette. Shape them by blocking and retain the open bottom.
- Hanging the mobile by the large bow can distort it. Attach the ceiling ring to the four structural cords.
Ways to Customize This Pattern
- Replace cranberry with navy and green with slate while keeping cream and muted gold for the embroidery.
- Use the same ornament patterns as individual tree decorations, attaching each to its own secure hanging loop.
- For a shorter display, reduce every pendant drop by 5 cm except the snowflake drops; reposition beads and bows to maintain clearance.
- Embroider both faces of the stars and snowflakes if the mobile will hang where it can be viewed from every side.
- Use a different hoop diameter by fitting the sleeve length directly around it; retain eight equally spaced pendant positions and check that adjacent ornaments have room to move.
Frequently asked questions
No. It is a Christmas hanging decoration with long cords and small embellishments. Display it away from children and never above a cot or play area.
Thicker yarn makes larger, heavier ornaments and changes the sleeve fit. Swatch first, measure a completed ornament, and choose a larger hoop if needed. Recalculate the sleeve rows from its actual length and reassess the suspension strength.
First check that all four upper suspension cords have equal working lengths. Then move heavier ornaments slightly around the hoop or shorten their drops. Balance with every bead and bow attached before locking the knots.
Use firm cotton fabric and block each bell over a form that supports its rim. Let it dry fully before removing it. If the fabric still collapses, use a smaller hook for the bells and make another gauge sample.
No. The written shaping and stitch counts have been checked arithmetically, but a complete sample should be made to confirm gauge, ornament proportions, sleeve fit, and suspension balance before publication.
The finished Holly and Plaid Christmas Crochet Mobile Pattern

