Holly Glow Christmas Lantern Crochet Pattern
Advanced
For experienced crocheters who enjoy complex shaping, fine detail, and ambitious construction
Weekend Project
A satisfying weekend make — start Friday, finish Sunday, enjoy forever.
Handmade Gift
A beautiful keepsake — free forever. Read online or print at home.
About This Holly Glow Christmas Lantern Crochet Pattern
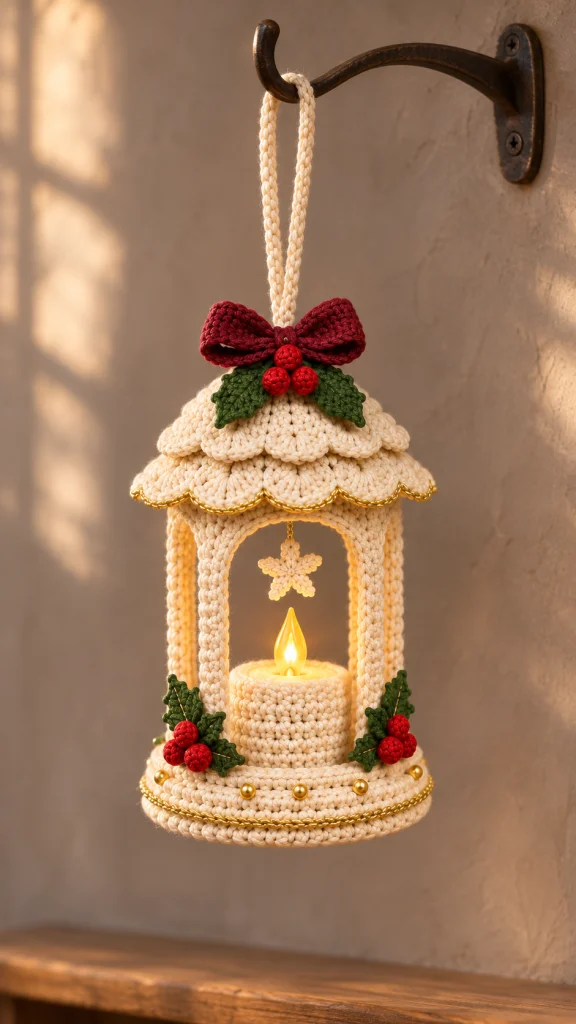
This Christmas lantern crochet pattern creates a hanging holiday decoration with an ivory frame, overlapping scalloped roof tiers, a burgundy bow, and clusters of green holly and red berries. A small crochet star hangs above a removable battery LED candle, while fine gold edging catches the light around the roof and base.
The lantern combines a reinforced circular base, four covered supports, curved window trims, and two separately shaped roof layers. Its open sides keep the candle accessible and let the warm light show through. Allow approximately 16–22 hours of crochet and assembly, plus drying time after blocking.
This advanced project suits crocheters who enjoy precise finishing and building decorative objects around a supporting frame. The instructions make one ivory lantern; the same construction can be worked in burgundy or forest green with an ivory roof.
Materials
- DK cotton yarn in ivory: approximately 220 m.
- DK cotton yarn in burgundy: approximately 30 m.
- DK cotton yarn in forest green: approximately 30 m.
- DK cotton yarn in bright red: approximately 15 m.
- Fine gold metallic crochet thread: approximately 20 m, used for surface accents.
- 3.0 mm crochet hook for the structure and roof.
- 2.5 mm crochet hook for the leaves, berries, and star.
- Two rigid metal craft rings, each 12 cm outside diameter and approximately 2–3 mm thick.
- One smooth plastic canvas or polypropylene base disc, approximately 11.5 cm diameter, trimmed to fit inside the lower ring.
- Four smooth wooden dowels, approximately 6–8 mm diameter, cut to suit the finished post sleeves; begin with lengths of 13 cm and shorten as needed.
- Four lengths of strong, low-stretch braided cord, each 80 cm long and approximately 1 mm thick, for the internal suspension.
- One battery LED pillar candle, approximately 5 cm diameter × 6 cm high, with an accessible on/off switch and enclosed battery compartment.
- Ten gold beads, approximately 6 mm diameter, plus strong matching sewing thread.
- A small amount of polyester stuffing for the berries.
- Tapestry needle, sewing needle, stitch markers, scissors, ruler, blocking mat, and rustproof pins.
Abbreviations
chchainsl stslip stitchscsingle crochethdchalf double crochetdcdouble crochettrtreble crochetinc2 single crochet in one stitchsc2togsingle crochet 2 stitches togetherMRmagic ringBLOback loop onlyst / stsstitch / stitchesBase Circles — Make Two
- With ivory and the main hook, work in a continuous spiral. Mark the first stitch of each round. Round 1: 6 sc in MR. Tighten the center. (6 sts)
- Round 2: Inc in every stitch. (12 sts)
- Round 3: Repeat [sc in next st, inc] 6 times. (18 sts)
- Round 4: Repeat [sc in next 2 sts, inc] 6 times. (24 sts)
- Round 5: Repeat [sc in next 3 sts, inc] 6 times. (30 sts)
- Round 6: Repeat [sc in next 4 sts, inc] 6 times. (36 sts)
- Round 7: Repeat [sc in next 5 sts, inc] 6 times. (42 sts)
- Round 8: Repeat [sc in next 6 sts, inc] 6 times. (48 sts)
- Round 9: Repeat [sc in next 7 sts, inc] 6 times. (54 sts)
- Round 10: Repeat [sc in next 8 sts, inc] 6 times. Sl st in the next stitch and fasten off. (60 sts)
- Block both circles to 12 cm diameter. Allow them to dry completely. Designate one circle the underside and the other the upper surface.
Base Reinforcement and Raised Rim
- Place the underside circle with its right side facing down. Center the plastic disc above it and place the lower metal ring around the disc. Lay the upper circle over both, right side facing up. Match all 60 outer stitches.
- Joining round: With ivory, work 1 sc through both layers at each matched pair of stitches, enclosing the metal ring within the edge seam. Join with a sl st to the first sc. (60 sts)
- Mark joining-round stitches 1, 16, 31, and 46 as the four post positions. The intervals between markers are each 15 stitches.
- Rim round 1: Ch 1, sc in the BLO of every joining-round stitch. Join to the first sc. The unused front loops remain available for the gold trim. (60 sts)
- Rim round 2: Ch 1, sc in every stitch. Join and fasten off. (60 sts)
- Gold trim: Holding the metallic thread loosely, surface sl st once around the 60 exposed front loops of the joining round. Fasten off without tightening the base edge.
- Sew ten gold beads evenly around the outside of the rim, placing one bead every 6 stitches. Secure each bead with several passes of sewing thread.
Post Sleeves — Make Four
- With ivory and the main hook, work Round 1: 4 sc in MR. Close the center firmly. (4 sts)
- Rounds 2–25: Sc in every stitch, working in a continuous spiral. Each of these 24 rounds has 4 sts. Leave a 25 cm sewing tail after Round 25.
- The sleeve should measure approximately 14 cm. Check that a dowel fits inside without forcing the stitches apart. Cut the dowel approximately 5 mm shorter than the usable sleeve interior, smooth both ends, and insert it. The fabric must cover both ends completely.
- Flatten the last round gently and stitch its opposite edges together with the tail. Keep the remainder of the tail for attachment. Mark the boundary between Rounds 17 and 18 on every sleeve; these marks locate the lower ends of the window arches.
Upper Ring and Structural Suspension
- With ivory and the main hook, attach yarn around the second metal ring. Ch 1 and work 60 sc around the ring itself, distributing them evenly. Join to the first sc and fasten off. Mark stitches 1, 16, 31, and 46. (60 sts)
- Attach the closed bottom of each post sleeve to the base at one marked post position. Sew through the sleeve and several neighboring base stitches, keeping the four posts upright and equally spaced.
- Place the covered upper ring on the post tops. Sew each top securely to its corresponding marked stitch and the two stitches on either side. Keep the upper ring level and parallel to the base.
- Fold each 80 cm structural cord in half. At each post position, pass the folded midpoint around the lower metal ring through a small opening in the crochet seam; pass both free ends through the fold and tighten the resulting lark’s head knot. Do not pierce or cut the crochet.
- Run each pair of cord ends up the inward-facing side of its post. Secure the pair around the upper metal ring with a firm knot, leaving the remaining ends free above the ring. Tack the vertical cord lightly to the sleeve with ivory yarn so it stays hidden.
- Temporarily gather all eight free cord ends above the center of the upper ring. Leave them unknotted until the roof layers have been fitted. The four paired cords should carry equal tension when the base is lifted.
Curved Window Trims — Make Four
- With ivory and the main hook, ch 20. Row 1: Sc in the second chain from the hook and in each remaining chain. (19 sts)
- Row 2: Ch 1, turn, sc in every stitch. (19 sts)
- Row 3: Ch 1, turn, sc in every stitch. Fasten off, leaving a long sewing tail. (19 sts)
- Shape the strip into an inverted U between two neighboring posts. Sew the two short ends to the marked boundaries between post Rounds 17 and 18, with the strip lying in the plane of that window.
- Center the strip’s middle stitch, stitch 10, at the midpoint of the corresponding upper-ring quarter. Sew that stitch and its immediate neighbors to the underside of the covered ring. Ease the remaining strip into a smooth curve and tack it to the post sides where they touch.
- Repeat the placement for all four windows. Check that the four arches reach the same height and leave the center of each window open.
Lower Scalloped Roof
- Use ivory and the main hook. Work joined rounds; beginning ch 1 never counts as a stitch. Round 1: 6 hdc in MR. Join to the first hdc. Leave the center opening approximately 5 mm wide for the suspension cords. (6 sts)
- Round 2: Ch 1, work 2 hdc in every stitch. Join. (12 sts)
- Round 3: Ch 1, repeat [hdc in next st, 2 hdc in next st] 6 times. Join. (18 sts)
- Round 4: Ch 1, repeat [hdc in next 2 sts, 2 hdc in next st] 6 times. Join. (24 sts)
- Round 5: Ch 1, repeat [hdc in next 3 sts, 2 hdc in next st] 6 times. Join. (30 sts)
- Round 6: Ch 1, repeat [hdc in next 4 sts, 2 hdc in next st] 6 times. Join. (36 sts)
- Round 7: Ch 1, repeat [hdc in next 5 sts, 2 hdc in next st] 6 times. Join. (42 sts)
- Round 8: Ch 1, repeat [hdc in next 6 sts, 2 hdc in next st] 6 times. Join. (48 sts)
- Round 9: Ch 1, repeat [hdc in next 7 sts, 2 hdc in next st] 6 times. Join. (54 sts)
- Round 10: Ch 1, repeat [hdc in next 8 sts, 2 hdc in next st] 6 times. Join. (60 sts)
- Round 11: Ch 1, repeat [sc in next st, skip next 2 sts, 7 dc in next st, skip next 2 sts] 10 times. Join to the first sc and fasten off. Each repeat consumes 6 stitches. (10 shells; 80 worked sts)
- With gold thread and the smaller hook, join in any sc of Round 11. Sl st loosely in each of the 80 stitches around the scalloped edge. Join and fasten off. The gold line must follow the shells without drawing them inward.
- Block over a shallow rounded form, keeping the center raised and the shells spread evenly. Aim for a lower roof edge approximately 15 cm across.
Upper Scalloped Roof
- With ivory and the main hook, Round 1: 6 hdc in MR. Join to the first hdc, leaving a 5 mm center opening. Beginning ch 1 does not count as a stitch. (6 sts)
- Round 2: Ch 1, work 2 hdc in every stitch. Join. (12 sts)
- Round 3: Ch 1, repeat [hdc in next st, 2 hdc in next st] 6 times. Join. (18 sts)
- Round 4: Ch 1, repeat [hdc in next 2 sts, 2 hdc in next st] 6 times. Join. (24 sts)
- Round 5: Ch 1, repeat [hdc in next 3 sts, 2 hdc in next st] 6 times. Join. (30 sts)
- Round 6: Ch 1, repeat [hdc in next 4 sts, 2 hdc in next st] 6 times. Join. (36 sts)
- Round 7: Ch 1, repeat [hdc in next 5 sts, 2 hdc in next st] 6 times. Join. (42 sts)
- Round 8: Ch 1, repeat [sc in next st, skip next 2 sts, 7 dc in next st, skip next 2 sts] 7 times. Join and fasten off. (7 shells; 56 worked sts)
- Block into a shallow cone approximately 11 cm across the scalloped edge. Leave this tier ivory so the gold-edged lower tier remains distinct.
Roof Attachment and Hanging Loop
- Pass all eight free structural cord ends through the center opening of the lower roof. Set the roof over the upper ring. Align the boundary between roof Rounds 10 and 11 with the ring so the shells extend beyond it.
- Using ivory, whipstitch the covered upper ring to the underside of the lower roof at the base of Round 11. Take one small stitch at each of the 60 ring stitches, matching the corresponding Round 10 stitches. Keep the scallops free.
- Pass the cords through the upper roof center and settle that tier over the lower cone. Align the two apex openings. Sew the upper tier to the lower roof around upper-tier Round 5 with small, spaced stitches; leave its shells free to overlap.
- Adjust the cords until the lantern hangs level. Gather all eight strands immediately above the roof apex and tie a secure overhand knot. Measure 18 cm upward along the bundle, fold it back to the apex, and tie the returning strands firmly to the standing bundle to form a long hanging loop. Secure and conceal the cut ends beneath the bow position.
- With ivory and the main hook, work sc around the entire structural cord loop, sliding the stitches together until no cord shows. Work approximately 100 sc, adjusting the quantity to cover the actual loop without compressing it. Join and fasten off.
- Lift the lantern gently by the cord loop over a padded surface. Check that the base stays level and that the structural cords, rather than the roof fabric, take the weight.
Burgundy Bow
- With burgundy and the main hook, ch 31. Row 1: Sc in the second chain from the hook and in each remaining chain. (30 sts)
- Rows 2–8: Ch 1, turn, sc in every stitch. Each row has 30 sts. Fasten off after Row 8, leaving a long tail.
- Bring the two short ends together and whipstitch corresponding row ends to form a wide fabric loop. Place this seam at the center back. Flatten the loop and pinch its center into three folds.
- Center band: Ch 5. Row 1: Sc in the second chain from the hook and in each remaining chain. (4 sts)
- Rows 2–8: Ch 1, turn, sc in every stitch. Each row has 4 sts. Fasten off with a long tail.
- Wrap the band around the pinched bow center and sew its short ends together at the back. Sew the bow to the front roof apex and the base of the covered hanging loop, keeping the two bow loops open.
Holly Leaves — Make Six
- With green and the smaller hook, ch 10. Work along one side of the chain: sl st in the second chain from the hook, sc in next ch, hdc in next ch, dc in next 2 ch, hdc in next ch, sc in next ch, sl st in next ch, and 3 sc in the final ch. (11 sts)
- Continue along the unused underside of the chain: sl st in next ch, sc in next ch, hdc in next ch, dc in next 2 ch, hdc in next ch, sc in next ch, sl st in final ch. Join to the first sl st. (19 perimeter sts total)
- Pointed edging: Ch 1, sc in each of the first 4 perimeter stitches; ch 3 and sl st in the third chain from the hook to form a picot. Sc in each of the next 5 stitches and make another picot. Sc in each of the next 5 stitches and make another picot. Sc in each of the final 5 stitches and make another picot. Join to the first sc and fasten off with a sewing tail. (19 sc and 4 picots)
- Pin each leaf into a pointed oval and damp-block. With gold sewing thread or a separated strand of metallic thread, add a loose running-stitch vein down the center. Keep the thread relaxed so the leaf stays flat.
- Arrange the leaves in three pairs: one beneath the bow and one at each front base corner. Angle each pair outward and sew only the lower third of each leaf to the lantern.
Red Berries — Make Nine
- With red and the smaller hook, work Round 1: 6 sc in MR. Work in a continuous spiral. (6 sts)
- Round 2: Inc in every stitch. (12 sts)
- Round 3: Sc in every stitch. (12 sts)
- Round 4: Sc2tog 6 times. Add a small pinch of stuffing before closing. (6 sts)
- Fasten off with a sewing tail. Thread the tail through the front loops of the remaining 6 stitches and pull closed. Secure the closure.
- Sew three berries over each pair of leaves. At the roof, place one berry above two berries. At each base corner, arrange the three berries compactly without covering the window opening.
Hanging Star
- With ivory and the smaller hook, work 10 sc in MR. Join to the first sc. (10 sts)
- Point round: Repeat [sl st in next center st, ch 4, sl st in second chain from hook, sc in next chain, hdc in final chain, sl st in next center st] 5 times. Each repeat uses 2 center stitches. Join and fasten off. (5 points)
- Block the star flat with all five points spread evenly. It should measure approximately 3–4 cm across.
- Attach a doubled gold thread to the top point. Sew the other end to the inside roof apex so the star hangs centrally, approximately 2 cm above the LED candle flame tip. Adjust the thread length to suit the actual candle height.
Removable Candle Sleeve
- Measure the candle around its widest straight section. With ivory and the main hook, ch 26 for a candle approximately 5 cm in diameter. Join with a sl st without twisting. The chain should fit snugly without stretching the candle casing. (26 chains)
- Round 1: Ch 1, sc in every chain. Join to the first sc. (26 sts)
- Rounds 2–8: Ch 1, sc in every stitch, join to the first sc. Each round has 26 sts. Fasten off after Round 8. The sleeve is an open tube approximately 4.5 cm high.
- If the candle circumference differs, use a chain count equal to its circumference in centimeters multiplied by 1.6, rounded to the nearest whole stitch. Work that same number of sc in every round. No stitch multiple is required.
- Slide the sleeve onto the candle, keeping it below the manufacturer’s light-emitting area and clear of any controls. Leave the underside open so the candle can be lifted out for switching and battery access.
Finishing
- Weave in all yarn ends, keeping them clear of the star’s hanging thread and the candle compartment. Use the remaining sewing tails to reinforce the bow, foliage clusters, and post attachments.
- Set the sleeved LED candle in the center of the base. Check that it sits flat, remains removable through a window, and does not touch the suspended star.
- Hang the finished lantern from a secure indoor hook. Rotate the hanging loop until the bow and two decorated base corners face forward. Check the cord knots and frame connections once more with the candle installed.
Smooth the scallops with your fingers and spread the bow loops into soft folds. The roof should sit evenly above the four windows, with the star visible in the center and the holly framing the light.
Remove the candle before storing the lantern. Support the base and roof with tissue, and keep the decoration dry so the frame and shaped trims retain their form.
Tips for Success
- Label one post as the front-left corner before assembly; this keeps the bow, star, and two base clusters aligned.
- Block the roof tiers before attaching them. Their free shell edges are much easier to shape while separate.
- Use a temporary thread across each pair of opposite ring markers to check that the four posts form an even square.
- Keep metallic slip stitches loose. A tight gold edge can cup the shells and reduce the roof’s overhang.
- Balance the structural cords with the LED candle sitting on the base, since the candle changes the hanging weight.
Common Mistakes to Avoid
- Counting the joining slip stitch or beginning ch 1 as a roof stitch adds unintended stitches. Count only the hdc stitches before starting each shell round.
- Using a dowel that reaches beyond its sleeve can distort the rings. Shorten and smooth the dowel before closing the sleeve.
- Pulling the suspension cords through the roof unevenly tilts the base. Adjust all four paired cords before tying the final loop.
- Sewing the upper roof scallops flat removes the layered effect. Attach around upper-tier Round 5 and leave the outer edge loose.
- Closing the candle sleeve underneath blocks access to many battery switches. Keep both ends of the tube open.
Ways to Customize This Pattern
- Work the base, posts, and arches in burgundy or forest green while keeping both roof tiers ivory.
- Replace the gold beads and thread with silver accents, keeping the same bead spacing and edging stitch counts.
- Omit the beads for a quieter finish; the raised rim and metallic surface stitches still define the base.
- Use a shorter LED candle and lengthen the star’s hanging thread to maintain approximately 2 cm of clearance above its flame tip.
- For a tabletop version, omit the long hanging loop and retain the reinforced rings, posts, and roof attachments. Finish the short structural cord ends securely beneath the bow.
Frequently asked questions
No. Use a battery LED candle only. Cotton, metallic thread, plastic reinforcement, and decorative components must stay away from flames and heat sources.
The specified construction relies on two rigid rings, four dowels, a reinforced base, and structural suspension cords. Omitting those supports changes the shape and makes the hanging construction unreliable.
Block a circle and measure it before assembling anything. If it cannot lie flat at 12 cm diameter, adjust the main hook and remake the circles with the same 60-stitch outer count. Check the roof fit with that hook as well.
Remove the LED candle and dust the lantern with a soft brush. Spot-clean the crochet sparingly with a damp cloth. Do not immerse the assembled frame or soak the beads and metallic trim.
The finished Holly Glow Christmas Lantern Crochet Pattern

