Holly Glow Crochet Christmas Lantern Pattern
Advanced
For experienced crocheters who enjoy complex shaping, fine detail, and ambitious construction
Weekend Project
A satisfying weekend make — start Friday, finish Sunday, enjoy forever.
Handmade Gift
A beautiful keepsake — free forever. Read online or print at home.
About This Holly Glow Crochet Christmas Lantern Pattern
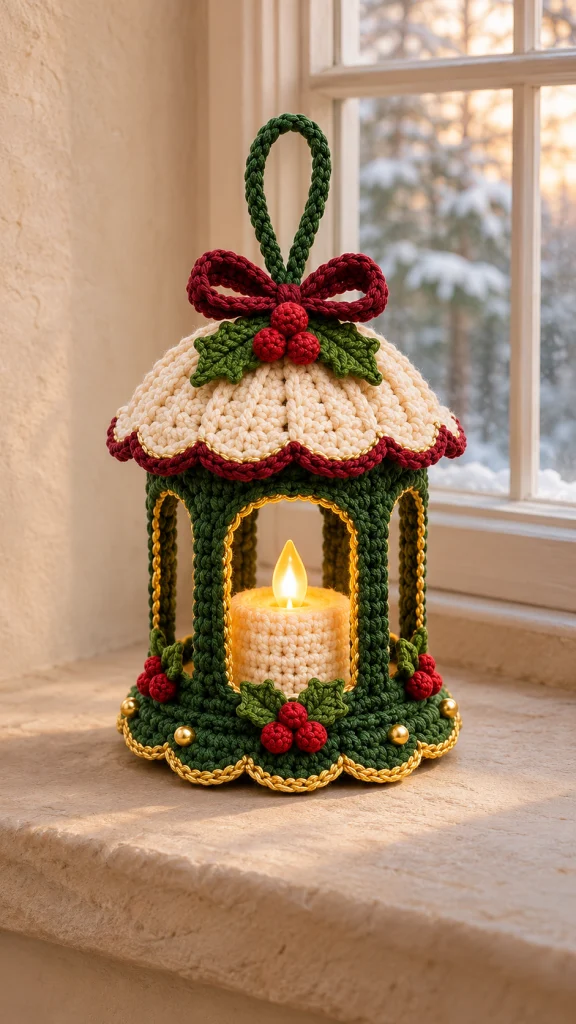
This crochet Christmas lantern pattern creates a structured holiday decoration with a forest-green frame, a cream scalloped roof, burgundy ribbon, and clusters of crocheted holly. Fine gold edging outlines the windows and scallops, while a battery-operated LED pillar gives the center a warm glow.
The lantern is built around two rigid hoops and six covered posts, with a reinforced circular base and a removable roof. Its open windows, layered trim, and small botanical details make this an advanced project suited to crocheters comfortable with precise assembly, surface stitching, and working around structural supports.
Allow approximately 18–24 hours of hands-on work, plus drying time. The finished lantern measures about 19 cm across and 23 cm high before the decorative loop. Use it standing on a shelf or table; the yarn loop is decorative and is not a load-bearing handle.
Materials
- DK cotton yarn: approximately 160 g forest green, 90 g cream, 30 g burgundy, and 20 g olive green; quantities assume approximately 120 m per 50 g.
- Fine metallic gold crochet thread, approximately 60 m.
- 3 mm crochet hook for main pieces and 2.5 mm hook for berries and gold edging.
- Two rigid craft hoops, each approximately 12.7 cm outside diameter; choose hoops with a narrow, sewable or lashable profile.
- Six smooth wooden dowels, each 10.5 cm long and 6 mm in diameter, with sanded ends.
- One rigid plastic canvas disk, approximately 16.5 cm in diameter, with smooth edges.
- One flexible plastic canvas disk, approximately 17 cm in diameter, for the roof former.
- Strong polyester sewing thread and a hand-sewing needle for securing the frame.
- Tapestry needle, stitch markers, scissors, ruler, and blocking pins.
- A small amount of polyester filling for nine berries.
- Six optional 8 mm gold beads, securely sewn to the base.
- One battery-operated LED pillar candle, approximately 5–6 cm wide and 7–8 cm tall, with an accessible battery compartment.
Abbreviations
chchainsl stslip stitchscsingle crochethdchalf double crochetdcdouble crochettrtreble crochetincwork 2 sc in one stitchdecsingle crochet 2 stitches togetherMRmagic ringststitchReinforced Base Disks — Make Two
- With forest green and the main hook, work in a continuous spiral. Round 1: 6 sc in MR. Place a marker in the first stitch. (6 sts)
- Round 2: Inc in each stitch. (12 sts)
- Round 3: Repeat [sc in next st, inc] 6 times. (18 sts)
- Round 4: Repeat [sc in next 2 sts, inc] 6 times. (24 sts)
- Round 5: Repeat [sc in next 3 sts, inc] 6 times. (30 sts)
- Round 6: Repeat [sc in next 4 sts, inc] 6 times. (36 sts)
- Round 7: Repeat [sc in next 5 sts, inc] 6 times. (42 sts)
- Round 8: Repeat [sc in next 6 sts, inc] 6 times. (48 sts)
- Round 9: Repeat [sc in next 7 sts, inc] 6 times. (54 sts)
- Round 10: Repeat [sc in next 8 sts, inc] 6 times. (60 sts)
- Round 11: Repeat [sc in next 9 sts, inc] 6 times. (66 sts)
- Round 12: Repeat [sc in next 10 sts, inc] 6 times. Mark this round on the disk selected as the upper disk. (72 sts)
- Round 13: Repeat [sc in next 11 sts, inc] 6 times. (78 sts)
- Round 14: Repeat [sc in next 12 sts, inc] 6 times. (84 sts)
- Round 15: Repeat [sc in next 13 sts, inc] 6 times. (90 sts)
- Round 16: Repeat [sc in next 14 sts, inc] 6 times. Sl st in next stitch and fasten off. Each disk should measure approximately 17 cm across before the border. (96 sts)
- Layer the disks with wrong sides together and the rigid plastic disk enclosed. Match all 96 outer stitches. Join forest green through both layers and sc through each matched pair; join with sl st. (96 sts)
- Scallop round: Ch 1. Repeat [sc in next st, hdc in next st, dc in next st, 3 tr in next st, dc in next st, hdc in next st, sc in next st, sl st in next st] 12 times. Each repeat consumes 8 stitches and produces 10 stitches. Fasten off. (12 scallops; 120 sts)
- With gold thread and the smaller hook, join at a scallop valley. Sl st loosely in each of the 120 border stitches; join and fasten off. Keep the thread relaxed so the scallops remain flat.
Covered Hoops — Make Two
- With forest green and the main hook, secure yarn around one hoop. Work 72 sc around the hoop itself, distributing them evenly; join with sl st. Mark every 12th stitch, beginning with stitch 1, to identify six post positions. (72 sts)
- Round 2: Ch 1, sc in each stitch; join with sl st. Fasten off with a long sewing tail. Repeat for the second hoop. (72 sts per hoop)
- Center the lower covered hoop on the upper base disk over the marked Round 12. Sew its lower edge to the disk with small stitches around the entire circumference. Keep the six position markers visible.
Post Sleeves and Structural Frame
- Make six sleeves with forest green and the main hook. Round 1: Work 6 sc in MR without pulling the center completely closed; leave a small opening for the dowel. Work in a spiral. (6 sts)
- Rounds 2–24: Sc in each stitch for 23 rounds. Fasten off with a 25 cm tail. The unstretched sleeve should be approximately 10.5 cm long. (6 sts per round)
- Slide one dowel into each sleeve. Compress the fabric gently along the dowel if needed, keeping both ends of the wood covered by the surrounding hoop fabric during assembly.
- Stand one post at each of the six marked lower-hoop positions. Using strong sewing thread, lash the lower 5 mm of each dowel and its sleeve firmly to the hoop. Stitch through the sleeve and around the hoop repeatedly until the post cannot rock independently.
- Place the upper hoop over the posts with its six markers aligned directly above the lower markers. Lash every post top to its matching position. Adjust the assembly until the hoops are parallel and every post is upright.
- Use each sleeve’s green yarn tail to cover its upper lashing with close sewing stitches. Use separate green yarn lengths to conceal the lower lashings. The six spaces between posts form the lantern windows.
Arched Window Headers and Gold Trim
- Make six headers with forest green. Row 1: Ch 13, sc in second chain from hook and each remaining chain; turn. (12 sts)
- Row 2: Ch 1, sc in next 2 sts, hdc in next 2 sts, dc in next 4 sts, hdc in next 2 sts, sc in final 2 sts. Fasten off with a sewing tail. (12 sts)
- Sew the foundation-chain edge of one header along each 12-stitch upper-hoop segment, between neighboring posts. Let the shaped edge hang downward. Sew the short ends to the post sleeves. Its taller center stitches create the curved top of the window opening.
- For each window, join gold thread at its lower left corner. Surface sl st upward through the exposed inner edge of the left sleeve, placing one stitch per sleeve round. Continue across all 12 stitches of the header’s shaped edge, then downward along the right sleeve, again using one stitch per round. Fasten off at the lower right corner.
- Repeat the gold edging around all six windows. Work lightly into the surface of each sleeve so the trim does not draw the posts inward.
Cream Roof and Burgundy Scallops
- With cream and the main hook, work joined rounds without turning. Round 1: 12 sc in MR; join with sl st. (12 sts)
- Round 2: Ch 1, inc in each stitch; join. (24 sts)
- Round 3: Ch 2, repeat [dc in next st, 2 dc in next st] 12 times; join. (36 sts)
- Round 4: Ch 2, repeat [dc in next 2 sts, 2 dc in next st] 12 times; join. (48 sts)
- Round 5: Ch 2, repeat [dc in next 3 sts, 2 dc in next st] 12 times; join. (60 sts)
- Round 6: Ch 2, repeat [dc in next 4 sts, 2 dc in next st] 12 times; join. Mark the underside of this round as the roof’s seating line. (72 sts)
- Round 7: Ch 2, repeat [dc in next 5 sts, 2 dc in next st] 12 times; join. (84 sts)
- Round 8: Ch 2, repeat [dc in next 6 sts, 2 dc in next st] 12 times; join. (96 sts)
- Round 9: Ch 1. Repeat [sc in next st, hdc in next st, dc in next st, 3 tr in next st, dc in next st, hdc in next st, sc in next st, sl st in next st] 12 times; join and fasten off. (12 scallops; 120 sts)
- Round 10: Join burgundy at any valley, ch 1, sc in each stitch around; join and fasten off. (120 sts)
- Gold detail: With gold thread, surface sl st along the junction between the cream scallops and burgundy edging, placing one stitch at the base of each burgundy sc. Complete the circuit and fasten off. (120 surface stitches)
- Shape the roof over a shallow bowl or padded former approximately 17 cm across and 5–6 cm high. Pin each scallop separately and allow the roof to dry completely.
- Prepare the flexible roof former: Cut one radial slit from the edge of the 17 cm plastic canvas disk to its center. Overlap the cut edges until it forms a shallow cone that fits inside the blocked roof without stretching it. Sew the overlapping plastic edges together.
- Insert the former and tack it to the roof underside at 12 evenly spaced points just inside Round 8. Cover any exposed plastic edge with cream whipstitches. Keep the scallops free.
Roof Ties, Bow, and Decorative Loop
- Make three roof ties in forest green. For each tie, ch 31, sl st in second chain from hook and each remaining chain; fasten off. (30 sl sts per tie)
- Fold each tie in half and sew its midpoint to the roof underside at Round 6. Space the three ties evenly, 24 stitches apart. The two ends of each tie will fasten around the upper hoop.
- Bow strip, Row 1: With burgundy, ch 49, sc in second chain from hook and each remaining chain; turn. (48 sts)
- Rows 2–3: Ch 1, sc in each stitch; turn after Row 2. Fasten off after Row 3. (48 sts per row)
- Sew the short ends together without twisting, forming a flat ring. Place the seam at the center back, flatten the ring, and pinch its midpoint to create two equal bow loops.
- Bow center, Row 1: Ch 9, sc in second chain from hook and each remaining chain; turn. (8 sts)
- Row 2: Ch 1, sc in each stitch. Fasten off. Wrap this small strip around the pinched bow center and sew its short ends together at the back. (8 sts)
- Decorative loop: With forest green, ch 51, sl st in second chain from hook and each remaining chain. Fasten off. (50 sl sts)
- Bring the loop ends together and sew them securely to the roof apex through the crochet fabric. Sew the bow over this attachment with its loops spread horizontally. The resulting loop rises approximately 13 cm above the roof and is for decoration only.
Pointed Holly Leaves — Make Nine
- With olive green and the main hook, ch 11. Working along the chain, sc in second chain from hook, hdc in next chain, dc in next 6 chains, hdc in next chain, and 3 sc in final chain. Rotate to work along the unused side of the foundation chain: hdc in next chain, dc in next 6 chains, hdc in next chain, and sc in final chain. Join with sl st to first sc. (21 sts)
- Edging: Ch 1, repeat [sc in next 2 sts, picot] 3 times, sc in next 4 sts, picot, sc in next 4 sts, repeat [picot, sc in next 2 sts] 3 times, sc in final st; join and fasten off with a sewing tail. Each picot is ch 3, then sl st in the first of those 3 chains. This edging consumes all 21 leaf stitches and adds seven points.
- With a separate olive strand, surface sl st from the leaf base to its far tip along the foundation chain, making a raised central vein. Fasten off and gently pinch the leaf lengthwise.
Red Berries — Make Nine
- With burgundy and the smaller hook, work in a continuous spiral. Round 1: 6 sc in MR. (6 sts)
- Round 2: Inc in each stitch. (12 sts)
- Round 3: Sc in each stitch. (12 sts)
- Round 4: Dec 6 times. Add a small pinch of filling before closing. (6 sts)
- Cut yarn with a 20 cm tail. Thread the tail through the front loops of all 6 remaining stitches, draw closed, and secure. Retain the tail for attachment.
Finishing
- Arrange three leaves below the roof bow, with their bases overlapping and their tips pointing outward. Sew through the leaf bases and central veins, leaving the pointed edges slightly raised. Attach three berries over the overlapping bases in a triangular cluster.
- Make two additional clusters, each using three leaves and three berries. Sew one to the front of the base and the other to the rear, positioning them between post attachments and keeping the candle platform clear.
- If using beads, sew one to the base above every second scallop valley, making six evenly spaced accents. Pass the sewing thread through the reinforced base several times for each bead.
- Place the LED candle in the center of the base. Lower the roof onto the frame so its marked Round 6 rests above the upper hoop. Tie the three pairs of roof-tie ends around the hoop in small bows underneath the eaves.
- Check the lantern on a flat surface. Adjust the ties until the roof sits level and its scallops overhang evenly. Weave in all remaining yarn ends and check every frame lashing.
The roof lifts away after its three ties are undone, giving easy access to the candle switch and battery compartment. Leave the LED pillar uncovered so its controls and ventilation remain accessible.
Display the finished lantern standing upright on a stable surface. Lift it with both hands beneath the base, and keep the decorative top loop relaxed.
Tips for Success
- Fit one covered hoop and one post sleeve before crocheting the remaining structural pieces; yarn thickness changes the fit around rigid supports.
- Use the same marked stitch positions on both hoops to prevent the six posts from spiraling around the frame.
- Block the roof with all twelve scallops evenly spaced before fitting its plastic former.
- Keep the gold window edging loose enough that each post remains straight after the thread is secured.
- Turn the base as you attach each holly cluster so the leaves sit above the scalloped border rather than dragging below it.
Common Mistakes to Avoid
- A rocking frame usually means one post is tilted or a lashing is loose. Level the hoops and retighten the thread before concealing the joins.
- A cupped base indicates tight tension or a disk that is too large for the crochet. Block both disks flat and trim the insert to fit inside their joining round.
- A roof that slides sideways needs its ties positioned at the seating line. Move the tie attachment points to Round 6 and retie them evenly.
- Curled scallops often come from tight gold edging. Remove that edging and remake it with a looser hand.
- Do not stitch holly leaves across the removable roof ties; keep the tie ends clear so the roof can be opened.
Ways to Customize This Pattern
- Make a burgundy frame with a cream roof, keeping all counts and structural dimensions unchanged.
- Use deep green for the leaf veins and olive for the leaf bodies to emphasize the holly shaping.
- Replace gold beads with small embroidered gold knots for a softer finish without changing the base border.
- Add a third three-leaf, three-berry cluster to one side of the base by making three additional leaves and berries.
- Use matte gold cotton thread instead of metallic thread when you want a quieter edge; check that its thickness does not tighten the scallops.
Frequently asked questions
No. Use only a battery-operated LED candle that stays cool during operation. Yarn, sewing thread, and plastic supports must be kept away from flame and heat.
The loop is decorative. This construction is designed to stand on its reinforced base, and the roof ties are intended to hold the roof in position during display.
Undo the three ties beneath the roof, lift the roof away, and remove the candle through the top of the frame. Replace the roof and retie it after servicing the candle.
Measure their outside circumference and make a 72-stitch test round that matches it. Adjust the main hook size to achieve that fit, then check the base, roof seating line, and sleeve length before completing the project.
Remove the LED candle and roof, then dust with a soft brush. Spot-clean the yarn sparingly and let every part dry completely. Store upright in a box with tissue supporting the roof and bow.
The finished Holly Glow Crochet Christmas Lantern Pattern

