Ivory and Black Crochet Tote Bag Pattern
Advanced
For experienced crocheters who enjoy complex shaping, fine detail, and ambitious construction
Single-Day Project
A satisfying project you can complete in a single afternoon or evening.
Handmade Gift
A beautiful keepsake — free forever. Read online or print at home.
About This Ivory and Black Crochet Tote Bag Pattern
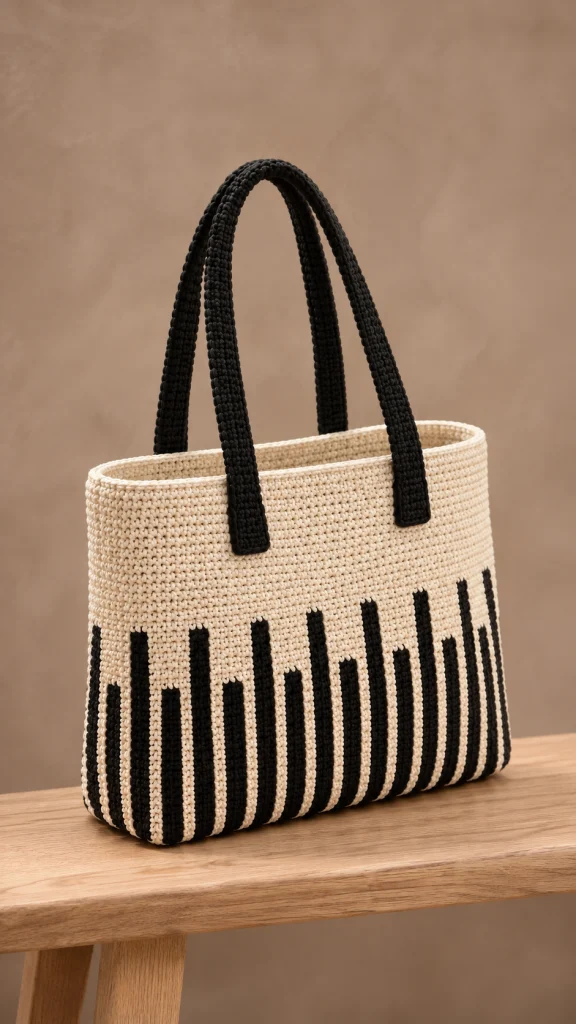
This Ivory and Black Crochet Tote Bag Pattern combines a clean ivory upper body with staggered black stripes that rise from the bottom edge. Two broad black shoulder straps frame the graphic panels, while a narrow gusset gives the bag useful depth without making it bulky.
The tote is constructed from two matching intarsia panels, two side gussets, and a separate bottom. A fitted fabric lining and concealed strap reinforcement support the finished shape. The alternating stripe heights give the lower body its distinctive rhythm, with an uninterrupted ivory section above.
Allow approximately 24–32 hours for crocheting, assembly, and lining. This advanced project suits makers who are comfortable managing several yarn bobbins, maintaining firm single crochet tension, and sewing accurately through dense crochet fabric.
Materials
- Category 4 medium-weight, firmly plied cotton: approximately 750 m ivory, color A.
- Matching cotton: approximately 650 m black, color B. Quantities include a working allowance; buy by meterage.
- 3.5 mm crochet hook, or size needed to achieve the stated gauge.
- Fourteen small yarn bobbins or yarn butterflies for panel colorwork.
- Locking stitch markers.
- Tapestry needle and sharp scissors.
- Approximately 60 × 110 cm medium-weight woven cotton for the lining, prewashed.
- Two lengths of 25 mm cotton webbing, each 65 cm long, for strap reinforcement.
- Matching sewing thread, sewing needle, pins or clips, measuring tape, and a sewing machine if preferred.
- Blocking mat and rustproof pins.
Abbreviations
Aivory yarnBblack yarnchchainscsingle crochet, US terminologysl stslip stitchststitchRSright sideWSwrong sideGauge, Orientation, and Color Changes
- Make a swatch at least 24 stitches wide and 28 rows high, including adjoining ivory and black sections. Measure the central 20 stitches and 24 rows after washing and drying flat; they should measure 10 × 10 cm.
- Work all crochet pieces flat. At the end of every row except the final row, ch 1 and turn. Turning chains never count as stitches. Row 1 is an RS row.
- For each color change, work the last single crochet of the old color until two loops remain, then draw through both loops with the new color. Keep inactive yarn and color joins on the WS.
- At each boundary, bring the new strand underneath the strand just used to link the sections. Do not knot the yarns together. Use a separate supply for each active section, allowing adjacent ivory sections to merge when a short black stripe ends.
- The color sequences are written in working order. Read the odd-row sequence on RS rows and the even-row sequence on WS rows so the black columns remain aligned.
Front and Back Intarsia Panels — Make Two
- Foundation: With B, ch 81. Leave a 20 cm tail. The finished panel contains 80 stitches across.
- Row 1, RS: Starting in the second chain from the hook, repeat this sequence eight times: 3 sc in B, 2 sc in A, 3 sc in B, 2 sc in A. Use separate bobbins at color boundaries. Total: 80 stitches.
- Row 2, WS: Repeat this sequence eight times: 2 sc in A, 3 sc in B, 2 sc in A, 3 sc in B. Total: 80 stitches.
- Rows 3–30: On every odd row, repeat 3 sc in B, 2 sc in A, 3 sc in B, 2 sc in A eight times. On every even row, repeat 2 sc in A, 3 sc in B, 2 sc in A, 3 sc in B eight times. Total: 80 stitches per row. All sixteen black columns now measure 30 rows high.
- Row 31, RS: Repeat 3 sc in B, 7 sc in A eight times. Cut the eight B strands belonging to the short columns, leaving 15 cm tails; continue the other eight black columns. Total: 80 stitches.
- Row 32, WS: Repeat 7 sc in A, 3 sc in B eight times. Total: 80 stitches.
- Rows 33–42: On every odd row, repeat 3 sc in B, 7 sc in A eight times. On every even row, repeat 7 sc in A, 3 sc in B eight times. Total: 80 stitches per row. The remaining eight black columns now measure 42 rows high.
- Row 43: Cut the remaining B strands, leaving 15 cm tails. With one continuous strand of A, sc in every stitch across. Total: 80 stitches.
- Rows 44–72: With A, sc in every stitch across. Total: 80 stitches per row. Fasten off after Row 72.
- Weave each tail into the matching color on the WS, changing direction once for security. Block each panel to 40 cm wide × 30 cm high, keeping the lower edge straight and both side edges equal.
Side Gussets — Make Two
- Foundation: With A, ch 13.
- Row 1: Sc in the second chain from the hook and in each remaining chain. Total: 12 stitches.
- Rows 2–72: Sc in every stitch across. Total: 12 stitches per row. Fasten off after Row 72, leaving a 90 cm sewing tail.
- Block each side gusset to 6 cm wide × 30 cm high. Mark the bottom edge so all pieces are assembled with their foundation edges downward.
Bottom Panel — Make One
- Foundation: With A, ch 81.
- Row 1: Sc in the second chain from the hook and in each remaining chain. Total: 80 stitches.
- Rows 2–14: Sc in every stitch across. Total: 80 stitches per row. Fasten off after Row 14, leaving a 150 cm sewing tail.
- Block the bottom to 40 × 6 cm. Its calculated depth before blocking is approximately 5.8 cm; ease it gently to 6 cm without stretching its length.
Body Assembly and Upper Edge
- Place the bottom panel horizontally, with its RS facing downward. Arrange the front and back foundation edges against its two long edges, and the side-gusset foundation edges against its short edges. Keep all WS surfaces toward the future bag interior.
- Sew each 80-stitch panel foundation edge to one 80-stitch long edge of the bottom, matching stitches one for one. Use a small whipstitch through the outer edge loops so the seam sits at the fold. Each long seam joins 80 stitch positions.
- Sew each 12-stitch side-gusset foundation edge to one 14-row short edge of the bottom. Divide both edges into four equal sections and distribute 12 small seam stitches evenly across the 14 row ends. Keep the corners square.
- Sew the four vertical seams, matching one row end of a main panel to one row end of a side gusset. Each seam joins 72 row-end pairs. Close any corner gaps with a separate small stitch without gathering the fabric.
- Upper-edge round 1: With the RS facing outward, join A at the back-side corner. Ch 1, then sc across the back 80 stitches, first side 12 stitches, front 80 stitches, and second side 12 stitches. Join with a sl st to the first sc. Total: 184 stitches. Do not add corner stitches.
- Upper-edge round 2: Ch 1, sc in each stitch around, and join with a sl st to the first sc. Total: 184 stitches. Fasten off and weave in the ends. These two rounds add approximately 0.8 cm to the body height.
Reinforced Shoulder Straps — Make Two
- Foundation: With B, ch 9.
- Row 1: Sc in the second chain from the hook and in each remaining chain. Total: 8 stitches.
- Rows 2–156: Sc in every stitch across. Total: 8 stitches per row. Fasten off after Row 156, leaving a 100 cm sewing tail.
- Block each strap to approximately 4 × 65 cm. Keep both straps identical in length.
- Center one 65 cm webbing length on the WS of each strap. Turn under 1 cm at each webbing end, giving a finished reinforcement length of 63 cm, and position it 1 cm from each crochet end.
- Stitch both long webbing edges to the crochet with small backstitches, catching the backs of stitches so the thread remains discreet on the RS. Secure the folded webbing ends across their width. The webbing stays on the inside of each handle.
- On the front panel, count stitches from its left edge as viewed from the RS. Position the first strap end over stitches 15–22 and the second end over stitches 59–66. Place each lower strap end 8 cm below the finished upper edge. Keep the strap untwisted.
- Sew each overlapping strap end through its crochet and webbing into the bag panel, using a rectangle with two crossing diagonals. Secure the full 8 cm overlap. Repeat on the back with the second strap, matching the front positions. The free strap length is approximately 49 cm, producing a handle drop of about 24 cm.
Fitted Fabric Lining
- Cut two lining rectangles measuring 42 cm wide × 35 cm high. These dimensions include 1 cm side and bottom seam allowances, a 2 cm upper hem, and fabric for the boxed base.
- Place the rectangles with their right sides together. Sew both side seams and the bottom seam with a 1 cm allowance. Leave the upper edge open. Press the seams open.
- At one bottom corner, open the fabric so its side seam lies directly over its bottom seam. Flatten the corner into a triangle. Mark a line perpendicular to the seams, exactly 6 cm across, with the seam intersection centered on the line. Sew along this line.
- Repeat the 6 cm boxed-corner seam at the other bottom corner. Trim both triangular seam allowances to 1 cm and finish the raw edges. The lining now has an approximately 34 × 6 cm bottom and a 40 cm flat opening.
- Turn the upper edge 1 cm toward the fabric WS, then another 1 cm, and press. The finished lining height is approximately 29 cm.
- Keep the lining seam allowances facing outward toward the crochet and insert it into the bag. Center the boxed base, match the lining side seams to the centers of the crochet side gussets, and position the hem approximately 1 cm below the crocheted rim.
- Hand-sew the folded lining edge to the inside of the bag with small slip stitches. At the four strap locations, add a second line of stitching through the lining hem and strap reinforcement to help distribute the load.
Finishing
Check the four bottom corners and all vertical seams from inside the bag. Secure loose sewing tails and close any small gaps with matching ivory yarn.
Smooth the lining into the base and sides without pulling it taut. The fabric should settle inside the crochet shell and allow the upper edge to sit level.
Shape the tote gently with folded towels and allow any damp areas to dry completely. Smooth the black straps by hand and check that their attachment rectangles sit at the same height.
Measure the finished bag. Expect approximately 40 cm width, 30–31 cm height, and 6 cm depth, with a handle drop near 24 cm. Place a light everyday load inside and inspect the seams and strap attachments before regular use.
Tips for Success
- Label the sixteen black columns on a paper sketch. After Row 30, retain the first black column in each ten-stitch repeat and end the second.
- Spread the stitches gently after every color change. A tight joining strand can make an otherwise correctly counted panel narrow.
- Work both main panels before blocking so you can compare stripe heights and upper-body depth directly.
- Clip the gussets in place at the bottom, midpoint, and top before sewing the vertical seams.
- Use the webbing reinforcement on both straps; firm cotton crochet still lengthens under a sustained load.
Common Mistakes to Avoid
- Reading every row’s colors in the same direction shifts the columns. Use the separate odd-row and even-row sequences.
- Ending every black column at Row 30 removes the staggered motif. Keep eight columns active through Row 42.
- Working into the turning chain adds stitches. Count 80 stitches on every main-panel row and 12 on every side-gusset row.
- Matching the bottom’s 14 row ends directly to 12 side stitches creates uneven corners. Divide both edges into quarters and ease them evenly.
- Sewing the lining rim too high can make it visible above the crochet. Keep the folded fabric edge approximately 1 cm below the rim.
Ways to Customize This Pattern
- Substitute navy or charcoal for black while retaining ivory and the same two-color chart.
- For longer tall stripes, work Rows 31–48 using the stated alternating long-stripe sequences, then work Rows 49–72 entirely in A. The panel remains 72 rows high.
- For a 45 cm-wide version at the same gauge, use 90 panel stitches, nine ten-stitch repeats, and a 90-stitch bottom. Keep the side gussets unchanged; the upper edge becomes 204 stitches. Cut lining rectangles 47 cm wide and recenter the strap positions.
- Add a lining pocket before sewing the lining side seams. Hem a 16 × 18 cm fabric rectangle, turn under its remaining edges, and stitch its sides and bottom to one lining panel.
- For shorter handles, work 132 rows per strap for approximately 55 cm total length. Keep the 8 cm attachment overlaps and use 55 cm webbing lengths with the same folded ends.
Frequently asked questions
No. The black columns are worked directly into the two main panels using intarsia single crochet. The short columns end after Row 30, and the tall columns end after Row 42.
You can use tapestry crochet, but carrying black behind ivory may show through and will change yarn consumption, thickness, and gauge. Swatch that method separately before using the stated dimensions.
Boxing a 40 cm-wide flat lining by 6 cm produces a bottom approximately 34 × 6 cm. This gives the lining a little room inside the shell while preserving a 40 cm flat opening. Center it inside the bag without stretching the corners.
Follow the care instructions for both the yarn and lining fabric. For washable cotton materials, gently hand-wash in cool water, support the wet bag, reshape it, and dry flat. Avoid hanging it by the handles while wet.
The finished Ivory and Black Crochet Tote Bag Pattern

