Lavender Floral Crochet Market Bag Pattern
Beginner Friendly
Perfect for those just starting their crochet journey, with clear instructions and simple techniques
Single-Day Project
A satisfying project you can complete in a single afternoon or evening.
Handmade Gift
A beautiful keepsake — free forever. Read online or print at home.
About This Lavender Floral Crochet Market Bag Pattern
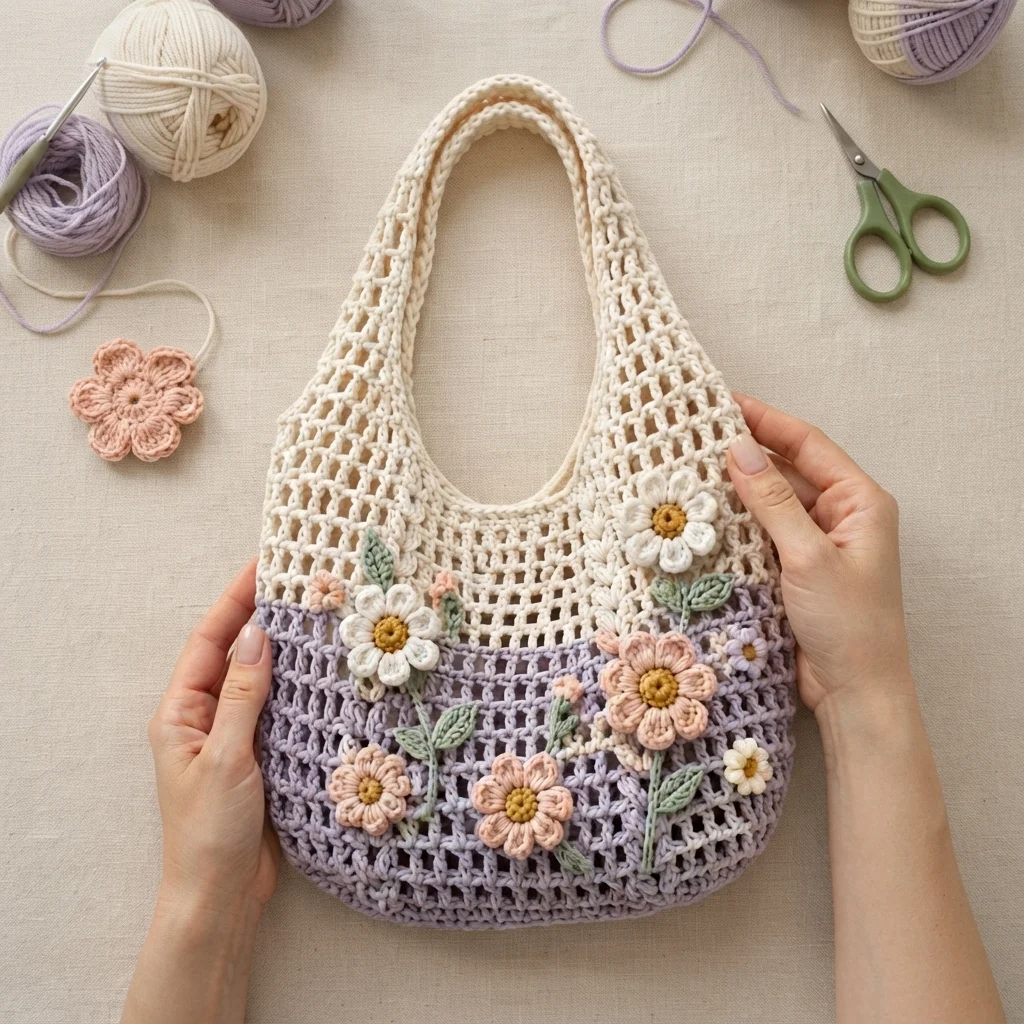
This floral crochet bag pattern creates a soft lavender and cream mesh handbag covered with dimensional daisies, peach flowers, tiny blossoms, embroidered-looking stems, and sage-green leaves. The open mesh body keeps the bag light, while the solid edging and reinforced handles give it enough structure for everyday use.
The most distinctive part of this design is the garden-style surface decoration. Instead of repeating identical appliqués, the flowers are made in several sizes and arranged asymmetrically across the lavender body and cream upper section. Raised petals and separately crocheted leaves give the finished bag the layered, handmade look shown in the reference design.
This is an advanced project and takes approximately 12-16 hours, including the appliqués and assembly. It is best suited to crocheters comfortable with mesh construction, shaping a bag in the round, color changes, working around chain spaces, surface stitching, dimensional flowers, and securely attaching decorative pieces.
Materials
- DK / light worsted cotton yarn in soft lavender approximately 250-300 m
- DK / light worsted cotton yarn in warm cream approximately 200-250 m
- DK cotton yarn in blush peach approximately 50 m for flowers
- DK cotton yarn in mustard gold approximately 20 m for flower centers
- DK cotton yarn in muted sage green approximately 60 m for stems and leaves
- 3.5 mm crochet hook main hook
- 3.0 mm crochet hook optional for firmer appliqués
- Yarn needle for assembly and surface details
- Stitch markers 4 recommended
- Scissors 1 pair
- Blocking mat and rustproof pins recommended
- Cotton lining fabric optional, approximately 40 × 70 cm
- Matching sewing thread optional for reinforcing appliqués
Abbreviations
MRmagic ringchchainsl stslip stitchscsingle crochethdchalf double crochetdcdouble crochettrtreble crochetsc2togsingle crochet 2 stitches togetherststitchstsstitchesspspaceskskipRSright sideWSwrong sideOval Bag Base – Lavender
- Round 1: Ch 41. Work 2 sc in second ch from hook, sc in next 38 ch, 4 sc in last ch. Working along the opposite side of the foundation chain, sc in next 38 ch, then 2 sc in the same chain that held the first 2 sc. Join with sl st. (84 sts)
- Round 2: Ch 1. 2 sc in each of next 2 sts, sc in next 38 sts, 2 sc in each of next 4 sts, sc in next 38 sts, 2 sc in each of last 2 sts. Join. (92 sts)
- Round 3: Ch 1. (Sc in next st, 2 sc in next st) twice, sc in next 38 sts, (sc in next st, 2 sc in next st) 4 times, sc in next 38 sts, (sc in next st, 2 sc in next st) twice. Join. (100 sts)
- Round 4: Ch 1. (Sc in next 2 sts, 2 sc in next st) twice, sc in next 38 sts, (sc in next 2 sts, 2 sc in next st) 4 times, sc in next 38 sts, (sc in next 2 sts, 2 sc in next st) twice. Join. (108 sts)
- Round 5: Ch 1. Sc in each st around. Join with sl st. (108 sts)
- Round 6: Ch 1. Working in back loops only, sc in each st around. Join. (108 sts)
Lavender Mesh Body
- Round 1: Ch 4, sk next st, dc in next st, (ch 1, sk next st, dc in next st) around. Join with sl st to third ch of beginning ch-4. You have 54 mesh spaces.
- Rounds 2-13: Sl st into first ch-1 sp. Ch 4, dc in next dc, then (ch 1, dc in next dc) around. Join to third ch of beginning ch-4. Maintain 54 mesh spaces in every round.
- Round 14: Ch 1. Work 1 sc in each dc and 1 sc in each ch-1 sp around. Join. (108 sc)
- Round 15: Ch 1, sc in each st around. Join. (108 sc)
- Fasten off lavender and join cream yarn at the side of the bag.
Cream Upper Mesh Section
- Round 1: With cream, ch 4, sk next st, dc in next st, then (ch 1, sk next st, dc in next st) around. Join. You have 54 mesh spaces.
- Rounds 2-6: Sl st into first ch-1 sp. Ch 4, dc in next dc, then (ch 1, dc in next dc) around. Join. Maintain 54 mesh spaces.
- Round 7: Ch 1. Work 1 sc in each dc and 1 sc in each ch-1 sp around. Join. (108 sc)
- Round 8: Ch 1, sc in each st around. Join. (108 sc)
Shaping the Handle Openings
- Lay the bag flat and mark the center of the front and back. Count 24 sts to each side of each center point. These markers define the lower edges of the two handles.
- Round 1: Beginning at one side seam, sc to the first front marker. Ch 46, sk the 48 sts across the upper front section, then sc around the first side until reaching the first back marker. Ch 46, sk the corresponding 48 back sts, then sc around the remaining side. Join with sl st.
- Round 2: Ch 1. Sc in every sc and work 1 sc in each of the 46 handle chains. Join. The exact total depends on marker placement, but both handles must contain the same number of stitches.
- Round 3: Ch 1. Sc in each st around both handles and side sections. At each of the four points where a handle meets the bag, work sc2tog once to soften the transition. Join.
- Rounds 4-6: Ch 1, sc in each st around, working one sc2tog at each of the four handle junctions in every round. This gradually creates the curved shoulder shape visible in the reference bag.
- Round 7: Sc evenly around without decreases. Join and fasten off.
Handle Reinforcement – Make 2
- Join cream yarn at the inside base of one handle opening.
- Round 1: Sc evenly around the complete inner edge of the handle opening, placing approximately 1 sc into each row end and each foundation stitch. Join.
- Round 2: Ch 1, sc in each st around. Join.
- Round 3: Ch 1, sc in each st around. Join and fasten off.
- Repeat for the second handle opening. Both reinforced edges should lie flat without twisting.
Large White Daisy – Make 2
- Round 1: With mustard yarn, make 6 sc in MR. Join. (6 sts)
- Round 2: Work 2 sc in each st around. Join. (12 sts)
- Round 3: Working in cream, create the first petal: ch 5, beginning in second ch from hook work sc, hdc, dc, tr; sl st into next stitch of the center. Repeat from the next center stitch until 12 petals have been formed around the center.
- Fasten off with a long sewing tail. Gently shape each petal outward with your fingers.
Large Peach Flower – Make 1
- Round 1: With mustard yarn, make 6 sc in MR. Join. (6 sts)
- Round 2: 2 sc in each st around. Join. (12 sts)
- Round 3: Change to peach. Working in front loops only, (sl st in next st, ch 4, 3 tr in same st, ch 4, sl st in same st) 6 times, using every second stitch as a petal base. You have 6 full raised petals.
- Round 4: Working into the unused back loops from Round 2, (sl st in next available back loop, ch 3, 2 dc in same loop, ch 3, sl st in same loop) 6 times to create a smaller supporting petal layer behind the first.
- Fasten off leaving a long sewing tail.
Medium Peach Flowers – Make 2
- Round 1: With mustard yarn, make 6 sc in MR. Join. (6 sts)
- Round 2: 2 sc in each st around. Join. (12 sts)
- Round 3: Change to peach. (Sl st in next st, ch 3, 2 dc in same st, ch 3, sl st in same st) 6 times, using every second stitch as a petal base. You have 6 petals.
- Fasten off leaving a long tail for sewing.
Small White Flowers – Make 3
- Round 1: With mustard yarn, make 5 sc in MR. Join. (5 sts)
- Round 2: Change to cream. In each of the 5 sts work (sl st, ch 2, 2 dc, ch 2, sl st). You have 5 rounded petals.
- Fasten off with a 20 cm tail for sewing.
Tiny Peach Blossoms – Make 4
- Round 1: With peach yarn, make 5 sc in MR. Join. (5 sts)
- Round 2: In each st work (sl st, ch 2, hdc, ch 2, sl st). Repeat 5 times to form 5 tiny petals.
- Pull the center closed firmly and fasten off with a sewing tail.
Sage Leaves – Make 10
- Row 1: With sage yarn, ch 8. Beginning in second ch from hook work sl st, sc, hdc, dc, hdc, sc, then 3 sc in last ch.
- Continue along the opposite side of the foundation chain: sc, hdc, dc, hdc, sc, sl st. Join at the base of the leaf.
- Surface sl st through the center foundation chain from the base toward the tip to create the raised central vein.
- Fasten off, leaving a long tail for sewing.
Flower Stems – Make 6
- For a short stem, ch 12; for a medium stem, ch 16; for a tall stem, ch 20. Make a mixture of all three lengths so the floral arrangement looks natural.
- Beginning in second ch from hook, sl st in every chain back to the beginning. Fasten off leaving two long tails.
- Stretch each stem gently before sewing so it lies straight against the mesh without pulling the bag fabric inward.
Floral Arrangement and Assembly
- Lay the finished bag flat with the front facing upward. Do not sew any appliqués until the complete arrangement has been pinned in place.
- Position one large white daisy on the upper-right cream section near the transition to lavender. Angle two sage leaves below it.
- Position the second large white daisy slightly left of center, close to the cream-lavender color boundary. Add a short stem and 2 leaves beneath it.
- Place the large peach flower on the upper-right lavender section. Run a tall sage stem downward from the flower and position 2 leaves along the stem.
- Position the two medium peach flowers across the lower lavender section, one toward the left and one near the center. Keep them at slightly different heights rather than placing them in a straight line.
- Add the 3 small white flowers and 4 tiny peach blossoms in open spaces around the larger flowers. Concentrate more decoration on the right side to preserve the asymmetrical garden effect.
- Pin all 10 leaves around the stems, rotating their tips in different directions. Avoid covering too much of the mesh.
- Sew stems first, leaves second, and flowers last. Pass the needle through solid crochet stitches or mesh intersections rather than wrapping thread around loose chain spaces.
- For dimensional flowers, sew only the center and innermost base of each petal. Leave the outer half of the petals free so they remain raised from the bag.
Optional Fabric Lining
- Lay the finished bag flat on doubled cotton fabric and trace the bag body below the handles. Add a 1.5 cm seam allowance to the sides and bottom and 2 cm at the top.
- Cut 2 lining pieces. Place right sides together and sew the side and bottom seams with a 1.5 cm seam allowance.
- Turn the upper allowance toward the WS and press. Insert the lining into the bag with the wrong sides of the lining and crochet touching.
- Position the lining approximately 5 mm below the solid cream top section so no fabric is visible through the handle edging.
- Hand stitch the lining around the inside of the bag using small stitches. Avoid catching the front flower appliqués while sewing.
Finishing
Weave in all remaining ends on the inside of the bag. Check every flower, leaf, and stem individually and reinforce any attachment that moves too freely. The flowers should remain dimensional, but their centers must be firmly secured so they cannot catch and pull away from the mesh.
Lightly wet block or steam the bag body while protecting the raised flowers from excessive pressure. Shape the oval base, straighten the lavender-to-cream transition, and arrange the handles into matching curves. Shape the flower petals and leaves by hand after the bag is completely dry. If you added a lining, check that it supports the mesh without pulling the bag into a smaller shape.
Tips for Success
- Keep every mesh round at 54 openings. Missing even one ch-1 space can gradually pull one side of the bag inward and make the handles appear uneven.
- Use cotton or a cotton-rich yarn for the appliqués. It gives the flower petals and leaves enough definition to remain raised instead of collapsing against the mesh.
- Pin the entire floral arrangement before sewing. The reference design depends on irregular spacing, so moving one large flower can affect the balance of every smaller detail around it.
- Make the handle stitches slightly tighter than the mesh stitches. Handles are the highest-stress part of this design and naturally stretch with use.
- When sewing leaves to the mesh, secure the base and central vein while leaving the outer leaf edges mostly free. This produces the dimensional botanical effect.
Common Mistakes to Avoid
- Do not sew flowers directly to loose chain sections without catching a nearby mesh intersection. The chain can distort under the weight of the appliqué. Anchor each flower through stronger structural points.
- Avoid making the handle chains too loose. If a handle is already floppy before use, undo it and remake the foundation with firmer tension or a smaller hook.
- Do not place every flower at the same height. The design should resemble stems growing naturally across the bag, so stagger both the flowers and leaves.
- Do not stitch every petal flat to the bag. Secure the flower center and inner petal bases only; otherwise the layered flowers lose their dimensional appearance.
- Avoid stretching the lining when sewing it in. A lining that is smaller than the relaxed crochet body will pull the mesh inward and distort the oval base.
Ways to Customize This Pattern
- Create a spring version with sage green mesh, cream handles, yellow daisies, and pale pink accent flowers.
- For a quieter botanical look, use only cream flowers and green leaves while keeping the lavender and cream bag body unchanged.
- Add flowers to both sides of the bag, but use fewer appliqués on the back so it remains comfortable against the body.
- Turn the design into a beach tote by adding 4-6 extra lavender mesh rounds before changing to cream and lengthening both handles.
- Add a small interior pocket to the optional lining for keys, cards, or other items that could otherwise slip through the open mesh.
Frequently asked questions
Use a firm cotton yarn, keep the handle stitches tighter than the body, and add the optional fabric lining if you plan to carry heavier items. The lining supports the contents instead of allowing their weight to pull directly on the mesh.
Use firm tension for the appliqués and avoid sewing the entire petal to the bag. Secure each flower through its center and inner petal bases, then shape the free outer sections of the petals forward with your fingers.
Yes. The lavender and cream mesh construction works as a complete bag on its own. Without the appliqués it will have a simpler market-bag appearance, while the original flowers and leaves create the distinctive cottage-garden finish.
Yes, but the finished bag will be noticeably larger and heavier unless you reduce the stitch count. Use a hook that produces a firm mesh and make a gauge swatch before beginning the oval base. Cotton worsted yarn will generally hold the flower shapes better than a very soft acrylic.
Crochet the handle rounds with a hook 0.5 mm smaller than the main hook, then sew narrow cotton tape to the WS of the uppermost handle section. Keep the reinforcement hidden inside the cream crochet so the outside retains the soft handmade finish.
The finished Lavender Floral Crochet Market Bag Pattern