Midnight Shell Crochet Tote Bag Pattern
Advanced
For experienced crocheters who enjoy complex shaping, fine detail, and ambitious construction
Weekend Project
A satisfying weekend make — start Friday, finish Sunday, enjoy forever.
Handmade Gift
A beautiful keepsake — free forever. Read online or print at home.
About This Midnight Shell Crochet Tote Bag Pattern
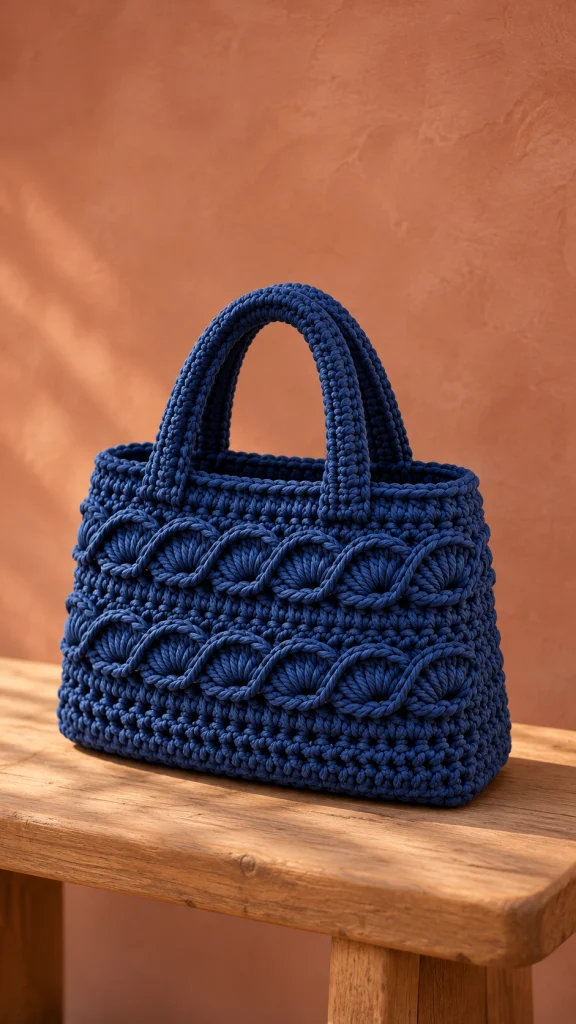
This shell crochet tote bag pattern combines a firm navy body with two bands of raised fans framed by sweeping crochet cords. A rectangular base, separate side panels, and padded handles give the bag its practical shape and distinctive texture.
Allow approximately 18–24 hours for the crochet, decorative work, and assembly. This advanced project suits makers comfortable with precise seaming, tall stitches, applied decoration, and fitting a lining. The finished body measures approximately 30 × 23 × 10 cm, with a handle drop of about 14 cm.
The fans are worked separately and attached to a dense foundation fabric. This construction keeps the tote supportive while allowing the sculpted shell outlines to stand clearly above the surface.
Materials
- Approximately 800–950 g, or 650–800 m, of bulky category 5 cotton cord in deep navy; choose a cord that meets gauge without producing excessively stiff fabric.
- 5 mm crochet hook for panels and fans.
- 4.5 mm crochet hook for edging and decorative cords.
- Tapestry needle suitable for cotton cord.
- Stitch markers, sewing clips, tape measure, and scissors.
- Approximately 60 × 80 cm of sturdy cotton lining fabric.
- Matching sewing thread and sewing needle.
- Two lengths of 10 mm cotton webbing, each 50 cm long, for handle reinforcement.
- Two lengths of soft 6 mm cotton piping cord, each 40 cm long.
- One removable bag-base insert, approximately 28 × 8 cm, with rounded corners.
Abbreviations
chchainscsingle crochetsl stslip stitchtrtreble crochetststitchRSright sideUS crochet terminology is used. Turning ch 1 never counts as a stitch. A beginning ch 4 counts as one tr only where specified.
Front and Back Panels — Make Two
- Foundation: ch 43.
- Row 1: sc in second ch from hook and each remaining ch. Turn. 42 sc.
- Rows 2–36: ch 1, sc in every st across. Turn after each row. 42 sc per row; 36 rows total.
- Fasten off, leaving a generous sewing tail. Each panel should measure approximately 30 cm wide × 22.5 cm high before the top edging.
- Mark the RS of each panel. Mark six vertical decoration spaces, each seven stitches wide, across each panel. Mark horizontal fan foundation lines approximately 5 cm and 14 cm above the lower edge.
Rectangular Base — Make One
- Foundation: ch 43.
- Row 1: sc in second ch from hook and across. Turn. 42 sc.
- Rows 2–16: ch 1, sc across. Turn after each row. 42 sc per row; 16 rows total.
- Fasten off. The base measures approximately 30 × 10 cm. Mark each long edge into six groups of seven stitches.
- Along each short edge, mark 14 evenly spaced sewing positions across the 16 row ends. These positions will receive the 14 stitches of a side panel.
Side Panels — Make Two
- Foundation: ch 15.
- Row 1: sc in second ch from hook and across. Turn. 14 sc.
- Rows 2–36: ch 1, sc across. Turn after each row. 14 sc per row; 36 rows total.
- Fasten off. Each side measures approximately 10 × 22.5 cm. Mark the RS.
Raised Fan Motifs — Make 24
- Foundation: with the main hook, ch 8.
- Row 1: sc in second ch from hook and each remaining ch. Turn. 7 sc.
- Row 2: ch 1, sl st in first sc, skip two sc, work 9 tr in the fourth sc, skip two sc, sl st in the last sc. The row contains nine tall stitches between two anchoring slip stitches and uses all seven foundation stitches.
- Fasten off with a 30 cm sewing tail. Spread the tall stitches into a broad fan without pulling the foundation strip straight.
- Rest the motifs flat. Each should be approximately 5 cm wide and 4–5 cm high. Adjust the fan hook size if needed to fit six motifs across a panel.
- On each body panel, arrange six fans along the lower marked line and six along the upper line. Keep their seven-stitch foundation strips aligned with the corresponding seven-stitch spaces.
- Sew each foundation strip to the panel. Tack the two outer fan tips and the top of the center tr to the fabric, leaving the intervening tall stitches raised. Twelve fans are attached to each panel; 24 fans total.
Sculpted Shell Outlines — Make Four
- Using the smaller hook, ch 2. Work 2 sc into the second ch from the hook.
- Turn without making a turning chain. Work 1 sc into each of the two stitches. Repeat this two-stitch row until the strip is long enough to surround one six-fan band.
- Fit the strip before fastening off: begin at the lower left tip of the first fan, follow its curved outer edge over the tall stitches to its lower right tip, then follow the next fan. Continue across all six fans.
- At the far right, curve the strip beneath the fan foundations and return along their lower edges to the starting point. Allow a small dip beneath each fan center. The required length is approximately 65–80 cm; fit it directly to the motifs.
- Fasten off and sew the strip ends together. Tack the strip securely every 1–1.5 cm with matching yarn or strong matching thread, preserving the rounded profile.
- Repeat for the remaining three bands. Keep the upper and lower outlines touching at each junction between neighboring fans to create the linked shell effect.
Body Assembly and Top Edge
- Place the base and front panel with their wrong sides together. With matching yarn, whipstitch the front panel’s 42 lower stitches to the 42 stitches along one long base edge. Keep the seam narrow and even.
- Join the back panel to the opposite long base edge in the same way: 42 stitches matched to 42 stitches.
- Join each side panel’s 14 lower stitches to the 14 marked positions on a short base edge. Distribute the seam evenly across all 16 base row ends.
- Join all four vertical corners, matching the 36 row ends of each side edge to the 36 row ends of the adjoining front or back edge. Secure the bottom corner junctions with additional stitches.
- Top round 1: with the smaller hook, join yarn at a back corner. Ch 1, work 42 sc across the back, 14 sc across one side, 42 sc across the front, and 14 sc across the remaining side. Join with sl st to first sc. 112 sc. Do not add corner stitches.
- Top round 2: ch 1, sc in each st around; join with sl st. 112 sc.
- Top round 3: work one loose sl st in each st around. 112 sl sts. Fasten off invisibly, keeping the opening flexible.
Padded Handles — Make Two
- Foundation: with the main hook, ch 9.
- Row 1: sc in second ch from hook and across. Turn. 8 sc.
- Rows 2–80: ch 1, sc across. Turn after each row. 8 sc per row; 80 rows total. The strip should measure approximately 50 × 5.7 cm.
- Lay one 50 cm webbing strip along the center of the wrong side. Hand-sew it to the crochet along both long edges, catching the fabric securely without visible stitches on the RS.
- Center one 40 cm piping cord along the webbing, leaving approximately 5 cm at each end free of piping. Fold the crochet strip lengthwise around the cord and whipstitch the long edges together. Flatten the unpadded end sections into attachment tabs.
- On the front panel, center the handle tabs approximately 6 cm and 24 cm from the left edge. Position each tab with 5 cm overlapping the upper body, avoiding the upper fan band.
- Sew each tab through the crochet and webbing with a rectangular seam and crossed diagonal stitches. Catch the dense body fabric beneath the decoration. Repeat on the back panel, aligning both handles.
- Check that each handle has approximately 40 cm of free length between the tops of its attachment tabs. The curved drop should be approximately 14 cm, depending on handle stiffness.
Lining and Base Support
- Measure the assembled bag inside. For the nominal size, cut two lining rectangles 32 × 25 cm, two side rectangles 12 × 25 cm, and one base rectangle 32 × 12 cm. These dimensions include 1 cm seam allowances and a 1.5 cm top turn-under.
- Using 1 cm seams, sew the front and back lining pieces to the long base edges. Sew the side pieces to the short base edges, stopping at the seam intersections.
- Sew the four vertical lining seams. Press allowances toward the side panels and turn the upper edge 1.5 cm to the wrong side.
- Insert the lining with its wrong side against the crochet. Check that it reaches the base without hanging below it; adjust the top fold to fit the actual bag.
- Hand-sew the folded lining edge just below the first top edging round, covering the inside handle attachment stitches.
- Place the rounded base insert inside the lining. Keep it removable for cleaning.
Finishing
- Weave each yarn end through several dense stitches, reverse direction, and trim only after checking that the end cannot pull free.
- Inspect every fan tip, cord junction, handle tab, and bottom corner. Add small securing stitches wherever an edge can lift or catch.
- Shape the empty bag around folded towels and leave it to settle. Follow the cord manufacturer’s care instructions; avoid pressing the raised decoration flat.
Set the tote upright and smooth the two shell bands with your fingers. The firm body should support the sculpted details while the padded handles sit comfortably in the hand.
Before its first outing, add your usual contents and check the handle seams and lining fit. Reinforce any attachment that moves under the intended load.
Tips for Success
- Work both body panels before attaching decoration so you can match their dimensions exactly.
- Pin all six fans in a band before sewing; their outer edges should meet without overlapping the next seven-stitch space.
- Keep the decorative cord relaxed around the fan arches. Tight cord will flatten the tall stitches and pull the panel inward.
- Use the webbing as the handle’s load-bearing core, and stitch through it at both attachment tabs.
- Fit the lining to the assembled crochet instead of relying solely on the nominal cutting measurements.
Common Mistakes to Avoid
- Counting turning chains as sc adds unwanted width. Keep every body row at 42 stitches and every side row at 14.
- Sewing 16 side stitches to the base distorts the depth. Use the 14 marked positions across its 16 row ends.
- Pulling the slip-stitch rim tight narrows the opening. Use a relaxed loop or a larger hook for that round.
- Attaching handles only to the top rim concentrates strain. Sew the full 5 cm tabs through the dense body and webbing.
- Stretching fans to fill a gap produces uneven shells. Adjust motif gauge before making the full set.
Ways to Customize This Pattern
- Use a second color for the outline cords while keeping the body and fans navy.
- For a wider tote, add seven stitches to both body panels and the base for each extra fan per band. Add four fans per extra seven-stitch width: one in each band on each face.
- Increase depth by adding two base rows and adjusting the side-panel stitch count to match the new measured depth at stitch gauge.
- Replace the removable base insert with a fabric-covered insert of the same size for a softer interior finish.
- Add a lining pocket before sewing the lining panels together, keeping its upper edge below the handle attachment area.
Frequently asked questions
They are separate decorative fans sewn onto solid sc panels. This gives the bag a continuous supporting fabric beneath the open spaces between tall stitches.
Yes, if it produces the stated gauge and a manageable bag weight. Check a full fan and a reinforced handle first, because stretchy yarn can change both the shell width and handle drop.
Row gauge and stitch gauge differ. Sixteen rows and 14 stitches each measure approximately 10 cm at the specified gauge, so the base edge is joined using 14 evenly spaced positions.
The lining supports small belongings, covers the handle reinforcement, and reduces snagging behind the decoration. It is included in this design’s construction and is especially useful for everyday use.
The finished Midnight Shell Crochet Tote Bag Pattern

