Mini Crochet Christmas Tree Pattern – Beautiful Handmade Christmas Decorations
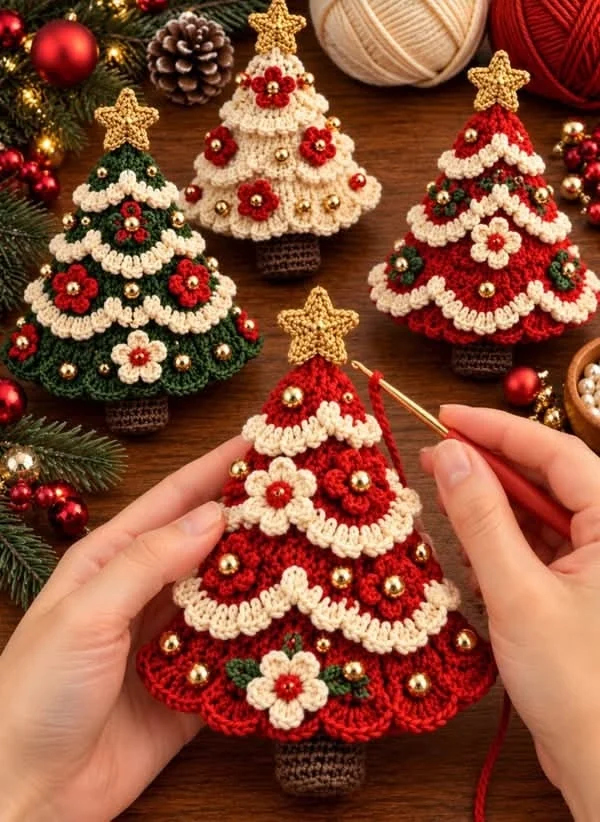
Bring a little handmade magic into your home this holiday season with these adorable mini crochet Christmas trees!
With their layered scalloped branches, delicate cream garlands, tiny red and white flowers, sparkling golden beads, and beautiful star toppers, these miniature trees are the perfect combination of festive charm and traditional crochet craftsmanship.
Make them in classic Christmas red, forest green, or warm winter ivory to create a coordinated collection of handmade decorations.
They’re lovely for decorating a mantel, arranging on a Christmas table, creating handmade gifts, or adding a cozy touch to your holiday displays.
This tutorial explains how to make a small stuffed crochet tree with decorative scalloped layers inspired by the design shown.
Project Overview
- Skill Level: Intermediate
- Project: Miniature crochet Christmas tree
- Finished Height: Approximately 15–18 cm
- Finished Width: Approximately 10–12 cm
- Hook Size: 2.5–3 mm
- Yarn: DK-weight cotton
- Construction: Stuffed cone with decorative scalloped tiers
- Terminology: US crochet terms
Materials You’ll Need
- DK-weight cotton yarn in Christmas red
- DK-weight cotton yarn in forest green
- DK-weight cotton yarn in ivory or cream
- Small amount of brown yarn for the trunk
- Small amount of gold or mustard yarn for the star
- Small amounts of red and white yarn for flowers
- 2.5–3 mm crochet hook
- Polyester fiberfill stuffing
- Yarn needle
- Stitch markers
- Scissors
- Small gold-colored beads, optional
- Optional cardboard or plastic base insert
Safety: Small beads are a choking hazard. Omit them for decorations intended for young children or pets.
Crochet Abbreviations
- MR: Magic ring
- ch: Chain
- sc: Single crochet
- hdc: Half double crochet
- dc: Double crochet
- sl st: Slip stitch
- inc: 2 sc in the same stitch
- dec: Invisible single crochet decrease
- BLO: Back loop only
- FLO: Front loop only
- st: Stitch
- FO: Fasten off
Step 1 – Crochet the Christmas Tree Cone
Begin with your main tree color: red, green, or ivory.
The cone is worked from the top downward in continuous spiral rounds. Use a stitch marker to identify the beginning of each round.
Tree Cone Pattern
Round 1: 6 sc in MR. (6)
Round 2: Sc in each st. (6)
Round 3: (Sc, inc) repeat 3 times. (9)
Round 4: Sc around. (9)
Round 5: (2 sc, inc) repeat 3 times. (12)
Round 6: Sc around. (12)
Round 7: (3 sc, inc) repeat 3 times. (15)
Round 8: Sc around. (15)
Round 9: (4 sc, inc) repeat 3 times. (18)
Round 10: Sc around. (18)
Round 11: (5 sc, inc) repeat 3 times. (21)
Round 12: Sc around. (21)
Round 13: (6 sc, inc) repeat 3 times. (24)
Round 14: Sc around. (24)
Round 15: (7 sc, inc) repeat 3 times. (27)
Round 16: Sc around. (27)
Round 17: (8 sc, inc) repeat 3 times. (30)
Round 18: Sc around. (30)
Round 19: (9 sc, inc) repeat 3 times. (33)
Round 20: Sc around. (33)
Round 21: (10 sc, inc) repeat 3 times. (36)
Round 22: Sc around. (36)
Round 23: (11 sc, inc) repeat 3 times. (39)
Round 24: Sc around. (39)
Round 25: (12 sc, inc) repeat 3 times. (42)
Round 26: Sc around. (42)
Round 27: (13 sc, inc) repeat 3 times. (45)
Round 28: Sc around. (45)
Round 29: (14 sc, inc) repeat 3 times. (48)
Round 30: Sc around. (48)
FO, leaving a long tail for sewing.
Lightly stuff the cone, keeping the pointed top clearly defined.
Step 2 – Crochet the Circular Base
Using the same main color:
Round 1: 6 sc in MR. (6)
Round 2: Inc in each st. (12)
Round 3: (Sc, inc) repeat 6 times. (18)
Round 4: (2 sc, inc) repeat 6 times. (24)
Round 5: (3 sc, inc) repeat 6 times. (30)
Round 6: (4 sc, inc) repeat 6 times. (36)
Round 7: (5 sc, inc) repeat 6 times. (42)
Round 8: (6 sc, inc) repeat 6 times. (48)
FO, leaving a long tail.
Place the circular base underneath the stuffed cone.
Sew the 48 stitches of the base to the 48 stitches of the cone opening.
Add a little more stuffing before closing the final stitches.
Step 3 – Create the Layered Christmas Branches
The beautiful scalloped branches are what give these miniature trees their festive, dimensional appearance.
We’ll create separate decorative tiers and sew them around the stuffed cone.
Small Upper Tier
Using your main tree color, ch 25.
Row 1: Sc in the second chain from the hook and across. (24)
Row 2: Ch 1, turn. Repeat the following sequence across: skip 1 st, work 5 dc in the next st, skip 1 st, sl st in the next st.
This creates six scallops.
FO, leaving a long tail.
Middle Tier
Ch 37.
Row 1: Sc in the second chain from the hook and across. (36)
Row 2: Ch 1, turn. Repeat the same scallop sequence across.
You should have nine scallops.
FO, leaving a long tail.
Lower Tier
Ch 49.
Row 1: Sc in the second chain from the hook and across. (48)
Row 2: Ch 1, turn. Repeat the scallop sequence across.
You should have twelve scallops.
FO, leaving a long tail.
Attach the Layers
- Wrap the smallest tier around the upper section of the cone.
- Position the middle tier below it, allowing the scallops to overlap slightly.
- Place the largest tier around the lower section.
- Sew the upper edge of each tier securely to the cone.
- Keep the scalloped lower edges free to create dimension.
Adjust the spacing to achieve a balanced Christmas tree silhouette.
Step 4 – Crochet the Cream Scalloped Garlands
The ivory garlands add contrast and give the branches a snowy, festive appearance.
Using cream yarn, attach your yarn along the upper edge of a decorative tier.
Repeat the following sequence:
Sl st, skip 1 st, 4 dc in the next st, skip 1 st.
Continue along the decorative edge.
FO and weave in the ends.
Repeat for each tier.
For a delicate look, use a slightly smaller crochet hook for the cream edging.
Step 5 – Make the Tiny Crochet Flowers
The miniature red and cream flowers give the trees their charming vintage appearance.
Five-Petal Flower Pattern
Using red or cream yarn:
Round 1: Make a MR and work 5 sc into the ring. Join with sl st.
Round 2: In each stitch, work (sl st, ch 2, 2 dc, ch 2, sl st).
Repeat for all five stitches.
FO, leaving a long tail for sewing.
Make several flowers in contrasting colors.
For red trees, create mostly cream flowers with red centers.
For green trees, use red flowers with small cream accents.
For ivory trees, use rich red flowers to create beautiful contrast.
Step 6 – Crochet the Small Flower Centers
Using a contrasting yarn color:
Make a MR and work 5 sc into the ring.
Pull the ring closed and FO.
Sew the small circle to the center of the flower.
Alternatively, embroider a small center using a few satin stitches.
Attach the finished flowers to the Christmas tree branches.
Step 7 – Make the Gold Star Topper
Every Christmas tree deserves a beautiful star!
Using mustard or gold-colored cotton yarn, create a small five-pointed star.
Star Pattern
Make a MR.
Work 10 sc into the ring and join with a sl st.
For each star point:
Ch 4.
Sl st in the second chain from the hook.
Sc in the next chain.
Hdc in the next chain.
Skip 1 stitch on the center ring and sl st into the next stitch.
Repeat until five points are formed.
FO, leaving a long tail.
Gently shape each point with your fingers.
Sew the star securely to the top of the tree.
For extra sparkle, use metallic gold embroidery thread to add a few decorative stitches.
Step 8 – Crochet the Brown Tree Trunk
Using chocolate brown yarn:
Round 1: 6 sc in MR. (6)
Round 2: Inc in each st. (12)
Round 3: Sc in BLO around. (12)
Rounds 4–7: Sc around. (12)
FO, leaving a long tail.
Stuff lightly.
Sew the trunk to the center of the underside of the Christmas tree.
Make sure the trunk is centered so the decoration stands evenly.
Step 9 – Add the Golden Bead Decorations
Small golden beads create the sparkling ornament effect shown in the design.
Choose lightweight beads that complement the size of your crochet tree.
- Arrange the beads across the tree branches.
- Space them evenly between the flowers.
- Sew each bead individually using strong thread.
- Secure the thread ends inside the crochet fabric.
For a child-friendly alternative, embroider small golden French knots instead of attaching beads.
Step 10 – Assemble the Christmas Tree Collection
Now it’s time to bring all the pieces together.
- Check that the stuffed cone is firm and evenly shaped.
- Attach the layered scalloped branches.
- Add the cream decorative garlands.
- Sew the tiny crochet flowers onto the branches.
- Attach the gold star to the top.
- Sew the brown trunk underneath.
- Add the golden beads or embroidered decorations.
- Weave in all remaining yarn ends.
Repeat the process in different colors to create a coordinated Christmas tree collection.
Christmas Tree Color Combinations
Classic Christmas Red
Deep red tree, ivory garlands, cream flowers, golden accents, and a chocolate brown trunk.
Traditional Forest Green
Dark green tree, snowy cream trim, bright red flowers, and gold ornaments.
Vintage Winter Ivory
Warm ivory tree, burgundy flowers, delicate gold accents, and a dark brown trunk.
Blush Christmas
Dusty rose tree, cream garlands, white flowers, and champagne-gold details.
Rustic Woodland
Olive green tree, oatmeal edging, terracotta flowers, and wooden bead accents.
Creative Ways to Display Your Crochet Christmas Trees
- Arrange several trees on a fireplace mantel.
- Create a handmade Christmas table centerpiece.
- Place a miniature tree beside a wrapped gift.
- Decorate a holiday shelf or bookcase.
- Use them as festive photography props.
- Create a coordinated collection in different colors.
- Give them as thoughtful handmade Christmas gifts.
- Display them alongside crochet snowmen and gingerbread houses.
Tips for Beautiful Mini Crochet Christmas Trees
- Use a smaller hook than the yarn label suggests for a firm fabric.
- Stuff the cone gradually to avoid lumps.
- Keep the scalloped tiers evenly spaced.
- Block the star gently if its points curl.
- Choose contrasting colors for the flowers.
- Use consistent tension throughout the project.
- Reinforce the star and trunk attachment points.
- Use embroidered dots instead of beads for safer decorations.
- Make a sample tree before creating a full collection.
- Experiment with different color combinations for a unique holiday display.
Frequently Asked Questions
Are these mini crochet Christmas trees beginner-friendly?
The basic cone uses beginner-friendly stitches, but the decorative scallops, flowers, and assembly are more suitable for intermediate crocheters.
What yarn works best?
DK-weight cotton yarn provides good stitch definition and helps the decorations maintain their shape.
Can I use acrylic yarn?
Yes. Acrylic yarn works well, although cotton generally produces firmer decorative pieces.
How tall will the finished tree be?
Approximately 15–18 cm, depending on your yarn, hook size, and tension.
Can I make a larger Christmas tree?
Yes. Use thicker yarn and a larger hook, or expand the cone and decorative tiers proportionally.
Can I make these without beads?
Absolutely. Embroidered dots, tiny crochet bobbles, or French knots make lovely alternatives.
How do I keep the tree standing upright?
Stuff the cone evenly, center the trunk, and consider adding a lightweight base insert for stability.
Can I turn these into hanging ornaments?
Yes. Add a secure yarn loop to the top and omit the trunk if you prefer a hanging decoration.
Can I wash these decorations?
Follow your yarn’s care instructions. Spot cleaning is recommended when the trees contain beads or metallic decorations.
Are these suitable for handmade gifts?
Yes! They make charming Christmas gifts for friends, family, teachers, and anyone who loves handmade holiday decorations.
Final Thoughts
These Mini Crochet Christmas Trees are a wonderful way to bring festive warmth and handmade beauty into your home.
With their colorful layered branches, tiny flowers, sparkling golden decorations, and adorable star toppers, they’re sure to become treasured pieces of your Christmas decor.
Make one as a special handmade gift or create an entire collection in red, green, and ivory for a magical holiday display.
Happy crocheting, and may your Christmas season be filled with creativity, warmth, and handmade joy! 🎄🧶✨