Nutcracker Christmas Lantern Crochet Pattern
Advanced
For experienced crocheters who enjoy complex shaping, fine detail, and ambitious construction
Single-Day Project
A satisfying project you can complete in a single afternoon or evening.
Handmade Gift
A beautiful keepsake — free forever. Read online or print at home.
About This Nutcracker Christmas Lantern Crochet Pattern
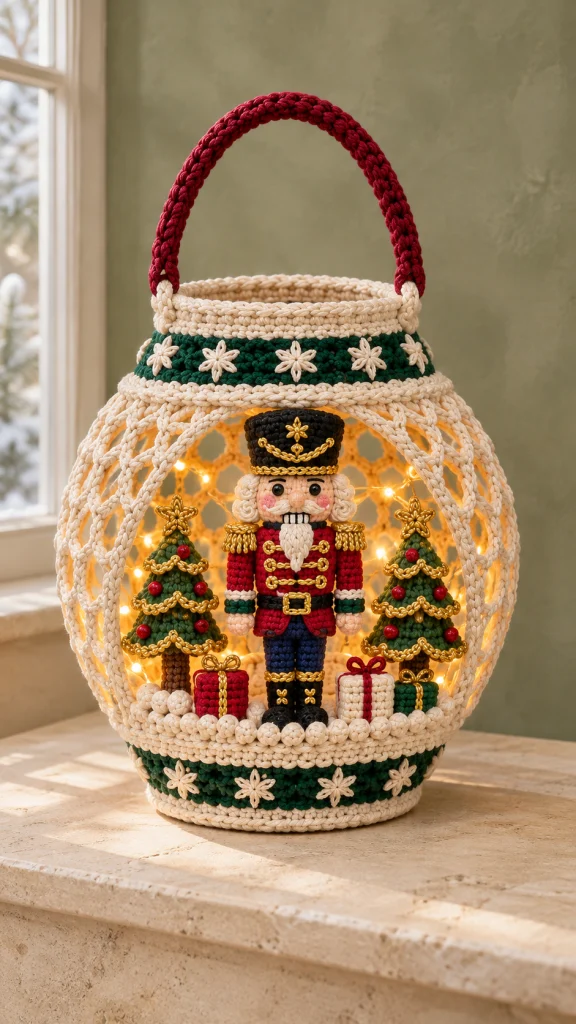
This Christmas lantern crochet pattern creates a framed holiday display with an ivory openwork shell, forest-green bands, embroidered stars, and a deep-red handle. Inside, a miniature nutcracker stands between two decorated trees above a snowy floor. It is a decorative lantern with a supported crochet exterior and a separate miniature scene.
The curved frame gives the lantern its rounded silhouette, while the open front keeps the nutcracker, gold details, and little parcels visible. Warm battery-powered lights sit behind the scene. Allow approximately 35–50 hours for the crochet, embroidery, frame covering, and careful assembly.
This advanced project suits makers comfortable with small-scale shaping, surface embroidery, working around rigid supports, and assembling several pieces accurately. The instructions use US crochet terms. Finished dimensions are approximately 26 cm across and 30 cm high, with a 13 cm handle rise.
Materials
- Worsted cotton: approximately 300 g ivory, 60 g forest green, and 60 g burgundy.
- Sport cotton: approximately 35 g red, 30 g dark green, 25 g black, 20 g ivory, 15 g peach, 15 g navy, and 10 g brown.
- Gold embroidery thread or smooth metallic crochet thread: approximately 35 m; pink and black embroidery thread for facial details.
- 4 mm crochet hook for the lantern and 2.5 mm hook for the miniature pieces.
- Two rigid craft rings: one 20 cm diameter and one 15 cm diameter, measured at the outside edge.
- Five rigid, smooth-ended craft-frame ribs, approximately 34 cm long, shaped to connect the rings at a vertical separation of 28 cm and a maximum outside width of 26 cm.
- One rigid handle arch, approximately 39 cm along its curve, with a 15 cm span and 13 cm rise, plus two small closed attachment rings.
- One 19 cm diameter rigid craft disk for the floor; thin plastic canvas or sealed lightweight board is suitable.
- Small pieces of plastic canvas for the figure’s boot soles and parcel inserts.
- Polyester stuffing, approximately 35 g.
- Warm-white battery-powered micro LED lights with insulated wire and a small battery pack; use a product intended for decorative craft displays.
- Strong matching sewing thread, tapestry needle, fine embroidery needle, stitch markers, pins, scissors, and a ruler.
- Pliers and appropriate frame connectors, or a ready-made frame matching the stated measurements; cover all frame joins and cut ends.
Abbreviations
MRmagic ringchchainsl stslip stitchscsingle crochethdchalf double crochetdcdouble crochetinc2 single crochet in one stitchdecsingle crochet 2 stitches together; use the invisible method on stuffed piecesBLOback loop onlyFLOfront loop onlyststitch or stitchesFrame and working layout
- Place the 20 cm ring horizontally for the floor and the 15 cm ring centrally above it, with 28 cm between ring planes. The crochet bands add approximately 2 cm to the finished height.
- Mark the front center as 0 degrees. Mark rib positions at 60, 120, 180, 240, and 300 degrees on both rings. This leaves a wide, 120-degree front opening and four 60-degree mesh bays around the sides and back.
- Shape and secure one rib between each matching pair of marks. Bow the ribs outward so the maximum frame width is 26 cm near mid-height. Make all five curves identical and confirm that the frame stands level.
- Secure the two closed handle attachment rings at the left and right sides of the upper ring. Fit the rigid handle arch between them. Check that every join is firm and every end is enclosed before covering the frame.
Ivory floor disk
- Use worsted ivory and the 4 mm hook. Work in continuous rounds, marking the first stitch. Round 1: 6 sc in MR. (6 st)
- Round 2: inc in each st. (12 st)
- Round 3: repeat (sc, inc) 6 times. (18 st)
- Round 4: repeat (2 sc, inc) 6 times. (24 st)
- Round 5: repeat (3 sc, inc) 6 times. (30 st)
- Round 6: repeat (4 sc, inc) 6 times. (36 st)
- Round 7: repeat (5 sc, inc) 6 times. (42 st)
- Round 8: repeat (6 sc, inc) 6 times. (48 st)
- Round 9: repeat (7 sc, inc) 6 times. (54 st)
- Round 10: repeat (8 sc, inc) 6 times. (60 st)
- Round 11: repeat (9 sc, inc) 6 times. (66 st)
- Round 12: repeat (10 sc, inc) 6 times. (72 st)
- Round 13: repeat (11 sc, inc) 6 times. (78 st)
- Round 14: repeat (12 sc, inc) 6 times. (84 st)
- Round 15: repeat (13 sc, inc) 6 times. (90 st)
- Round 16: repeat (14 sc, inc) 6 times. (96 st)
- Round 17: sc in each st. Sl st in the next st and fasten off. (96 st) The disk should measure approximately 20 cm across after blocking.
- Place the 19 cm rigid insert underneath the crochet disk. With strong thread, stitch through the crochet around the insert perimeter to retain it, then lash the disk edge to the lower frame ring at 16 evenly spaced points. Keep the floor flat.
Lower green band and snowy rim
- Use worsted ivory. Ch 96 loosely, join with sl st without twisting, and check the chain around the lower ring. Work joined rounds; ch 1 at the start does not count as a stitch, and join to the first sc.
- Round 1: sc in each ch. (96 st)
- Round 2: sc in each st. Change to forest green at the end. (96 st)
- Round 3: sc in each st. (96 st)
- Round 4: sc in each st. (96 st)
- Round 5: sc in each st. (96 st)
- Round 6: sc in each st. Change to ivory at the end. (96 st)
- Round 7: sc in each st. (96 st)
- Round 8: sc in each st. (96 st)
- Round 9: sc in each st. Fasten off. (96 st)
- Slide the band around the lower ring with Round 1 at the bottom and Round 9 level with the floor edge. Sew Round 9 to the floor perimeter, enclosing the ring behind the upper part of the band. Tack the lower edge to the frame lashings.
- For the snowy rim, join ivory to a stitch of Round 9. Repeat (ch 3, work 3 dc in the same stitch, remove hook, insert hook through the top of the first dc and pull the live loop through, ch 1, skip 2 st, sl st in the next st) 32 times around. The final sl st enters the starting stitch. Fasten off. (32 raised snow clusters)
Upper collar
- Use worsted ivory. Ch 72 loosely and join without twisting. Check the chain around the 15 cm upper ring. Use joined rounds as for the lower band.
- Round 1: sc in each ch. (72 st)
- Round 2: sc in each st. Change to forest green. (72 st)
- Round 3: sc in each st. (72 st)
- Round 4: sc in each st. (72 st)
- Round 5: sc in each st. Change to ivory. (72 st)
- Round 6: sc in each st. (72 st)
- Round 7: sc in each st. (72 st)
- Round 8: sc in each st. Fasten off. (72 st)
- Position the collar with Round 1 below the upper frame ring and Round 8 above it. Sew the fabric to the ring through the gap between Rounds 5 and 6. The upper ivory rounds form a short open neck.
- Join ivory at the lower edge and work 72 sl st around the foundation chain. Fasten off. Repeat around the top edge for a firm, braided-looking finish. Do not tighten the slip stitches enough to gather the collar.
Rib coverings and openwork panels
- Make five rib sleeves in worsted ivory. For each sleeve, ch 5. Row 1: sc in the second ch from the hook and each remaining ch, turn. (4 st)
- Rows 2–58: ch 1, sc in each st, turn. (4 st per row) Each strip should measure approximately 34 cm; its length must match the curved rib.
- Wrap one strip lengthwise around each rib and whipstitch its long edges together. Place the seam toward the inside. Sew the ends to the lower band and upper collar. Mark eight attachment levels on each covered rib, dividing the exposed curve between bands into nine equal intervals.
- Work one mesh panel in each of the four narrow bays; leave the wide front bay open. Row 1: join ivory at the first marked level on the left rib, ch 8, sl st to the first marked level on the right rib. This makes one arch.
- Row 2: sl st up the right sleeve to its second mark, ch 5, sc around the center of the previous arch, ch 5, sl st to the second mark on the left sleeve. (2 arches)
- Row 3: sl st up the left sleeve to its third mark, ch 6, sc around the center of the first arch, ch 6, sc around the center of the second arch, ch 6, sl st to the third mark on the right sleeve. (3 arches)
- Row 4: sl st up the right sleeve to its fourth mark, ch 6, sc around the center of the first arch, ch 6, sc around the center of the second arch, ch 6, sc around the center of the third arch, ch 6, sl st to the fourth mark on the left sleeve. (4 arches)
- Row 5: sl st up the left sleeve to its fifth mark, ch 6, sc around the center of each of the four arches with ch 6 between adjacent sc, ch 6, sl st to the fifth mark on the right sleeve. (5 arches)
- Row 6: sl st up the right sleeve to its sixth mark, ch 5, sc around the center of each of the five arches with ch 5 between adjacent sc, ch 5, sl st to the sixth mark on the left sleeve. (6 arches)
- Row 7: sl st up the left sleeve to its seventh mark, ch 4, sc around the center of each of the six arches with ch 4 between adjacent sc, ch 4, sl st to the seventh mark on the right sleeve. (7 arches)
- Row 8: sl st up the right sleeve to its eighth mark, ch 3, sc around the center of each of the seven arches with ch 3 between adjacent sc, ch 3, sl st to the eighth mark on the left sleeve. (8 arches)
- Anchor the panel top by sewing the center of each of its eight final arches to eight evenly spaced points along the collar edge above that bay. Sew the center of the first arch to the lower rim. Fasten off all ends.
- Repeat the complete eight-row panel in each remaining narrow bay. Chains should form relaxed diamonds without pulling the ribs inward. If your frame differs slightly, alter all chains of the same row by the same amount; retain the stated arch counts.
Burgundy handle and embroidered stars
- Use worsted burgundy. Ch 7. Row 1: sc in the second ch from the hook and each remaining ch, turn. (6 st)
- Rows 2–66: ch 1, sc in each st, turn. (6 st per row) The strip should match the approximately 39 cm handle curve.
- Wrap the strip around the rigid handle and sew its long edges together on the underside. Gather each short end around its attachment ring and stitch firmly. Cover the small attachment rings with closely packed ivory blanket stitches.
- Embroider eight ivory eight-point stars around the lower green band, with centers 12 stitches apart. Use four straight stitches crossing at one center, then add a shorter stitch beside each point for a fuller flower-like star.
- Embroider six matching stars around the upper green band, with centers 12 stitches apart. Keep the embroidery within the green rows and bury all ends inside the bands.
Nutcracker boots, legs, and torso
- Use sport yarn and the 2.5 mm hook for all scene pieces. Work continuous rounds unless stated otherwise. Make two boots in black. Round 1: 6 sc in MR. (6 st)
- Round 2: inc in each st. (12 st)
- Round 3: BLO sc in each st. (12 st)
- Round 4: sc in each st. Insert a small oval of plastic canvas into the sole. (12 st)
- Round 5: sc in each st. (12 st)
- Round 6: sc in each st. Change to navy. (12 st)
- Round 7: BLO sc in each st. (12 st)
- Round 8: sc in each st. (12 st)
- Round 9: sc in each st. (12 st)
- Round 10: sc in each st. (12 st)
- Round 11: sc in each st. (12 st)
- Round 12: sc in each st. Stuff the boot firmly and the leg moderately. Fasten off the first leg; leave the second leg attached. (12 st)
- Torso Round 1: from the second leg, ch 3, sc in all 12 st of the first leg, sc in each of the 3 chains, sc in all 12 st of the second leg, sc in the opposite side of each of the 3 chains. (30 st)
- Round 2: sc in each st. Change to red. (30 st)
- Round 3: sc in each st. (30 st)
- Round 4: sc in each st. Change to black. (30 st)
- Round 5: sc in each st. Change to red. (30 st)
- Round 6: sc in each st. (30 st)
- Round 7: sc in each st. (30 st)
- Round 8: sc in each st. (30 st)
- Round 9: sc in each st. (30 st)
- Round 10: repeat (3 sc, dec) 6 times. (24 st)
- Round 11: repeat (2 sc, dec) 6 times. Stuff the torso, leaving the neck slightly softer for sewing. Fasten off with a long tail. (18 st)
- Embroider a gold line around the top of each boot. Add two small gold crossed stitches to each boot front. Embroider a rectangular gold buckle over the black belt at the center front.
- Embroider three horizontal gold jacket bars above the belt, each approximately 1.5 cm long. Add a small gold loop at each end of every bar. Sew the inner leg bridge closed if a small gap remains.
Nutcracker head, face, and hair
- Use sport peach. Round 1: 6 sc in MR. (6 st)
- Round 2: inc in each st. (12 st)
- Round 3: repeat (sc, inc) 6 times. (18 st)
- Round 4: repeat (2 sc, inc) 6 times. (24 st)
- Round 5: repeat (3 sc, inc) 6 times. (30 st)
- Round 6: repeat (4 sc, inc) 6 times. (36 st)
- Round 7: sc in each st. (36 st)
- Round 8: sc in each st. (36 st)
- Round 9: sc in each st. (36 st)
- Round 10: sc in each st. (36 st)
- Round 11: sc in each st. (36 st)
- Round 12: repeat (4 sc, dec) 6 times. (30 st)
- Round 13: repeat (3 sc, dec) 6 times. (24 st)
- Round 14: repeat (2 sc, dec) 6 times. Stuff firmly, shaping a broad face. (18 st)
- Round 15: repeat (sc, dec) 6 times. (12 st)
- Round 16: dec 6 times. Fasten off and close the remaining opening. (6 st)
- Position the head with its starting ring at the crown. Embroider two black oval eyes across Rounds 8–9, leaving six unworked stitch columns between their inner edges. Add one small ivory highlight to each eye and a black eyebrow above each eye.
- For the nose, work 4 sc in a peach MR, then sc in each st for one round. Fasten off, add a tiny pinch of stuffing, and sew between the eyes with its lower edge at Round 11. (4 st per round)
- Embroider a black mouth rectangle, approximately 1.2 cm wide and 0.6 cm high, across Rounds 11–13. Fill with ivory vertical stitches and separate these with four fine black lines to suggest teeth. Add pink cheek stitches beside the mouth.
- Make two ivory hair strips. For each, ch 13. Sc in the second ch from the hook and each remaining ch. (12 st)
- Hair curl row: repeat (ch 7, work 2 sc in each of the 6 chains back toward the strip, sl st in each of the next 2 strip stitches) 6 times. Fasten off. (6 curls per strip)
- Sew one hair strip down each side of the head, from the temple toward the jaw, keeping the eyes clear. Coil each curl loosely and tack its tip in place.
- For the moustache, make two ivory pieces: ch 5, sl st in the second ch from the hook, sc in the next ch, hdc in each of the last 2 ch. Sew their broad ends together under the nose and curve the pointed ends outward.
- For the beard, use ivory and work flat. Row 1: ch 7, sc in the second ch from the hook and each remaining ch, turn. (6 st)
- Row 2: ch 1, sc in each st, turn. (6 st)
- Row 3: ch 1, dec, 2 sc, dec, turn. (4 st)
- Row 4: ch 1, sc in each st, turn. (4 st)
- Row 5: ch 1, dec twice, turn. (2 st)
- Row 6: ch 1, dec. Fasten off. (1 st) Sew the broad edge just below the mouth. Add three loose vertical ivory stitches down the beard for texture.
- Center the head over the 18-stitch neck opening and sew around the opening twice, catching several head stitches with each pass. Keep the face directly above the buckle.
Nutcracker hat, arms, and shoulder trim
- For the hat, use sport black. Round 1: 6 sc in MR. (6 st)
- Round 2: inc in each st. (12 st)
- Round 3: repeat (sc, inc) 6 times. (18 st)
- Round 4: repeat (2 sc, inc) 6 times. (24 st)
- Round 5: repeat (3 sc, inc) 6 times. (30 st)
- Round 6: repeat (4 sc, inc) 6 times. (36 st)
- Round 7: repeat (5 sc, inc) 6 times. (42 st)
- Round 8: BLO sc in each st. (42 st)
- Round 9: sc in each st. (42 st)
- Round 10: sc in each st. (42 st)
- Round 11: sc in each st. (42 st)
- Round 12: sc in each st. (42 st)
- Round 13: repeat (5 sc, dec) 6 times. Fasten off with a sewing tail. (36 st)
- Embroider a gold line around the hat’s lower edge, a shallow gold swag above it, and an eight-point gold star at the front center. Add a thin layer of stuffing under the crown, fit the hat over the head, and sew it in place.
- Make two arms, starting with peach. Round 1: 6 sc in MR. (6 st)
- Round 2: repeat (sc, inc) 3 times. (9 st)
- Round 3: sc in each st. (9 st)
- Round 4: sc in each st. Change to dark green. (9 st)
- Round 5: sc in each st. Change to ivory. (9 st)
- Round 6: sc in each st. Change to red. (9 st)
- Round 7: sc in each st. (9 st)
- Round 8: sc in each st. (9 st)
- Round 9: sc in each st. (9 st)
- Round 10: sc in each st. (9 st)
- Round 11: sc in each st. (9 st)
- Round 12: sc in each st. Stuff the hand lightly, leaving the upper arm soft. Fasten off. (9 st)
- Flatten each arm opening and sew it to the torso just below the neck. Place the hands beside the hips and secure each wrist to the jacket with one hidden stitch.
- For each shoulder cap, use gold thread and ch 5. Work sc in the second ch from the hook, sc in the next 2 ch, and 3 sc in the last ch. Working along the opposite side, sc in the next 2 ch and 2 sc in the last ch. Join. (10 st)
- Along five adjacent outer-edge stitches of each cap, repeat (ch 4, sl st in the next st) 5 times. Fasten off. Sew the caps over the shoulder seams, with the five loops hanging toward the hands.
Christmas trees: make two
- Use sport dark green. Begin at the treetop and work downward. Round 1: 6 sc in MR. (6 st)
- Round 2: sc in each st. (6 st)
- Round 3: inc in each st. (12 st)
- Round 4: BLO sc in each st. (12 st)
- Round 5: sc in each st. (12 st)
- Round 6: repeat (sc, inc) 6 times. (18 st)
- Round 7: BLO sc in each st. (18 st)
- Round 8: sc in each st. (18 st)
- Round 9: repeat (2 sc, inc) 6 times. (24 st)
- Round 10: BLO sc in each st. (24 st)
- Round 11: sc in each st. (24 st)
- Round 12: repeat (3 sc, inc) 6 times. (30 st)
- Round 13: BLO sc in each st. (30 st)
- Round 14: sc in each st. (30 st)
- Round 15: repeat (3 sc, dec) 6 times. Begin stuffing, keeping the cone upright. (24 st)
- Round 16: repeat (2 sc, dec) 6 times. (18 st)
- Round 17: repeat (sc, dec) 6 times. Change to brown. (12 st)
- Round 18: BLO sc in each st. (12 st)
- Round 19: sc in each st. (12 st)
- Round 20: sc in each st. (12 st)
- Round 21: sc in each st. Finish stuffing the trunk. (12 st)
- Round 22: dec 6 times. Fasten off and close the opening. (6 st)
- Join green to the unused front loops of Round 3. Repeat (sl st in the next loop, 3 hdc in the next loop) 6 times. Join and fasten off. (6 scallops)
- Join green to the unused front loops of Round 6. Repeat (sl st in the next loop, 3 hdc in the next loop) 9 times. Join and fasten off. (9 scallops)
- Join green to the unused front loops of Round 9. Repeat (sl st in the next loop, 3 hdc in the next loop) 12 times. Join and fasten off. (12 scallops)
- Join green to the unused front loops of Round 12. Repeat (sl st in the next loop, 3 hdc in the next loop) 15 times. Join and fasten off. (15 scallops)
- Couch gold thread along the outer edge of every scalloped tier, catching it with small matching stitches. Add eight red French-knot ornaments to each tree, distributed between the tiers.
- For each gold star, work 5 sc in MR and join. Repeat (ch 3, sl st in the second ch from the hook, sc in the next ch, sl st in the next ring stitch) 5 times. Fasten off. Stiffen with closely worked embroidery stitches if needed, then sew one star to each treetop.
Miniature gift boxes
- Make one red and one ivory parcel in sport cotton. For each parcel, ch 7. Row 1: sc in the second ch from the hook and each remaining ch, turn. (6 st)
- Rows 2–6: ch 1, sc in each st, turn. (6 st per row) This square is the base.
- Side Round 1: ch 1, work 6 sc across the current edge, 6 sc along the next row-end edge, 6 sc across the foundation edge, and 6 sc along the final row-end edge. Join. Do not add corner increases. (24 st)
- Side Round 2: ch 1, BLO sc in each st, join. (24 st)
- Side Round 3: ch 1, sc in each st, join. (24 st)
- Side Round 4: ch 1, sc in each st, join. (24 st)
- Side Round 5: ch 1, sc in each st, join. Fasten off. (24 st)
- Make a lid by repeating the six-row base square. Place a fitted plastic-canvas insert in the parcel, add a small amount of stuffing, and sew the lid to all four sides with six edge stitches per side.
- Wrap gold thread vertically around the red parcel in two crossing directions. Wrap red yarn around the ivory parcel in the same way. Sew each wrap in place and stitch a small bow to the top.
- For a smaller green parcel, use ch 5 and work a base of 4 sc for 4 rows. Work 4 sc along each base edge for 16 side stitches, then one BLO round and two plain sc rounds. Make a second four-row square for the lid, insert a small support, stuff lightly, and sew closed. Add a gold ribbon and bow.
Finishing and arranging the illuminated scene
- Block the bands and mesh gently while fitted to the frame, keeping moisture away from the lights and battery pack. Let everything dry completely before installing the electrical components.
- Place the nutcracker at the center of the floor, approximately 2 cm behind the front edge. Sew through both boot soles into the crochet floor. Add a hidden thread stay from the back of the jacket to the rear rib so the figure remains upright.
- Place one tree on each side, slightly behind the nutcracker. Sew the trunk bases and the lower back edge of each tree to the floor. Keep their stars below the nutcracker’s hat crown.
- Arrange the red and ivory parcels in front of the trees, with the small green parcel beside the ivory one. Sew their bottom edges to the floor with several small stitches.
- Thread the LED strand around the back and side mesh, making a loose curve behind the nutcracker and trees. Secure only the insulated wire with soft thread loops; keep the lamps uncovered and the front opening clear.
- Place the battery pack behind the rear lower band. Retain it with an ivory chain tie long enough to encircle the pack, tied in a removable bow. Keep its switch and battery compartment accessible.
- Weave in all remaining ends and inspect the frame covering, floor attachment, and scene anchors. Turn on the lights and adjust their spacing so the glow is balanced on both sides.
The finished lantern should feel settled and balanced, with the nutcracker facing forward and the gifts resting naturally in the snow. Take a moment to straighten the beard, open the hair curls, and smooth the embroidered stars before placing it on display.
Lift the finished lantern from beneath its rigid floor. Store it upright with soft tissue around the trees and hat, and remove the batteries before seasonal storage.
Tips for Success
- Fit the 96-stitch lower band and 72-stitch collar to their rings before embroidering. A hook adjustment is easier than correcting a finished band.
- Mark all rib attachment levels at the same time with the frame standing upright; matching levels keep the mesh diamonds balanced.
- Use small amounts of stuffing in the nutcracker’s hands and shoulders so the arms lie close to the jacket.
- Embroider the facial features before attaching the hat and beard, when the head is easier to hold.
- Install the scene before the lights so you can route the wire behind the figures without pulling on their stitches.
Common Mistakes to Avoid
- A wobbly frame makes the scene lean. Check that both rings are parallel and all five ribs have the same curve before adding crochet.
- Overtight mesh can narrow the lantern. Increase every chain span in the affected row equally until the panel rests against the frame without tension.
- Working the tree shaping through both loops removes the attachment points for the branches. Mark the FLO left by Rounds 4, 7, 10, and 13 as you make them.
- Loose boot attachments let the nutcracker tip forward. Sew through both soles at several points and add the concealed jacket stay.
- Placing lights beneath stuffing hides their glow and makes them difficult to inspect. Keep every lamp visible in the open space behind the scene.
Ways to Customize This Pattern
- Replace burgundy with deep red or midnight blue while keeping the ivory shell and gold details for contrast.
- Embroider six-point snowflakes instead of eight-point stars, keeping the same eight lower-band and six collar positions.
- Make a quieter woodland version by omitting the parcels and adding a third tree using the same tree instructions.
- Use matte yellow cotton in place of metallic thread for softer jacket bars, tree edging, and gift ribbons.
- Leave out the LED strand for an unlit tabletop display; the frame and scene assembly stay the same.
Frequently asked questions
The stated shape needs rigid rings, curved ribs, and a supported floor. Stiffened crochet alone will not reliably hold the miniature scene or preserve the wide front opening.
The nutcracker is a small decorative figure sewn into the lantern. Its stitched details, supporting inserts, and attachment stays are designed for this display rather than play.
This pattern is intended for tabletop display. Decorative handle attachments are not specified as suspension hardware. Support the finished lantern under its floor whenever moving it.
A size change requires a matching frame, floor insert, and recalculated band circumferences. Multiply the ring circumference in centimeters by your measured stitches per centimeter, then round to a multiple of 12 to preserve the star spacing. The mesh and scene must be fitted separately.
Remove the lights and battery pack, then dust with a soft brush. Spot-clean the crochet sparingly and dry it upright. Do not immerse the assembled frame, floor insert, or metallic embroidery.
The finished Nutcracker Christmas Lantern Crochet Pattern

