Olive Grove Crochet Shoulder Bag Pattern
Advanced
For experienced crocheters who enjoy complex shaping, fine detail, and ambitious construction
Weekend Project
A satisfying weekend make — start Friday, finish Sunday, enjoy forever.
Handmade Gift
A beautiful keepsake — free forever. Read online or print at home.
About This Olive Grove Crochet Shoulder Bag Pattern
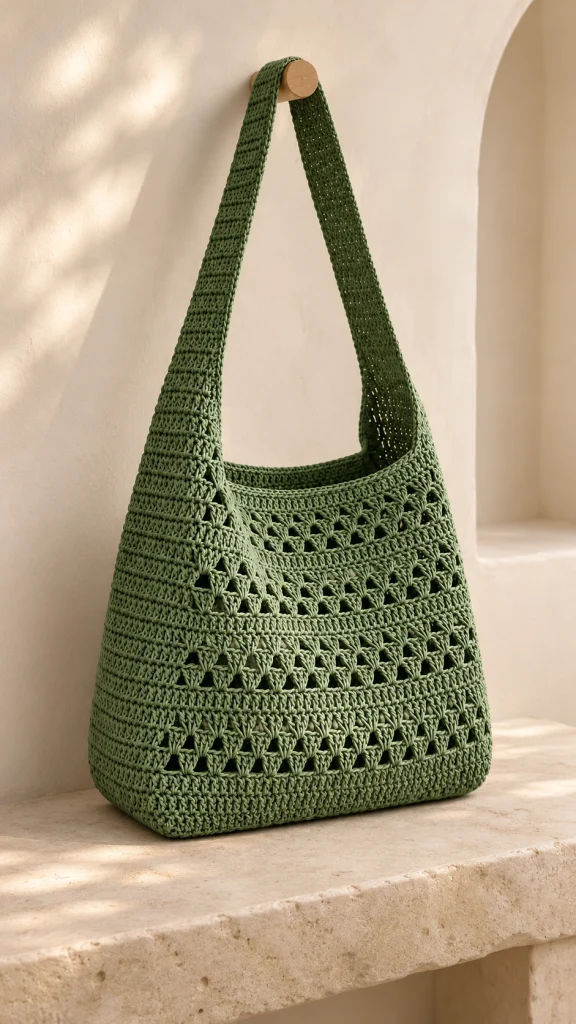
The Olive Grove crochet shoulder bag pattern combines olive cotton, open shell bands, and a broad shoulder strap in a practical everyday bag. Two matching panels form the front and back, while a dense continuous strip creates the sides, base, and strap.
Four airy bands alternate with solid crochet to echo the reference bag’s textured surface. The generous strap and softly squared base give the finished piece its relaxed shape. Allow approximately 18–24 hours, including blocking and careful assembly.
This advanced project suits crocheters comfortable reading stitch groups, maintaining different gauges, and joining edges with different row counts. The instructions include an exact seam map and an optional fabric lining for carrying smaller belongings.
Materials
- Approximately 850–1,000 m of firmly plied DK cotton in olive green; purchase by meterage because ball weights vary.
- 4 mm crochet hook for the panels, or size needed for panel gauge.
- 3.5 mm crochet hook for the gusset and strap, or size needed for dense single crochet gauge.
- Yarn needle for seams and weaving ends.
- At least 12 removable stitch markers.
- Measuring tape, scissors, blocking mat, and rustproof pins.
- Optional: approximately ½ m of cotton lining fabric, sewing thread, and sewing needle.
- Optional: 25 mm cotton webbing, approximately 61 cm long, to reinforce the shoulder strap.
Abbreviations
chchainscsingle crochetdcdouble crochetsl stslip stitchststitchRSright sideWSwrong sideUS crochet terminology is used throughout. A chain space is the opening beneath the indicated chain. Turning chains never count as stitches.
Front and Back Panels — Make Two
- Foundation: With the larger hook, ch 63. Keep the chain relaxed.
- Row 1: Dc in the fourth ch from the hook and each remaining ch. The three skipped chains do not count as a stitch. Turn. 60 dc.
- Foundation correction row: Ch 2, work 2 dc in the first st, then dc in each remaining st. Turn. 61 dc. This is Row 2 of the panel and establishes the required lace width.
- Rows 3–4: Ch 2, dc in each st across. Turn after each row. 61 dc.
- Row 5: Ch 2, dc in the first st; repeat the following ten times: ch 3, skip 3 sts, dc in each of the next 3 sts. Turn. 31 dc and ten ch-3 spaces; 61 stitch positions.
- Rows 6–8: Ch 2, dc in the first st; repeat the following ten times: ch 3, skip the next ch-3 space, skip the first dc of the next three-dc group, work 3 dc in its middle dc, skip its last dc. Turn after each row. 31 dc and ten ch-3 spaces. The three dc worked into one stitch form each small shell.
- Row 9: Ch 2, dc in the first st; repeat the following ten times: work 3 dc into the next ch-3 space, then dc in each of the next 3 dc. Turn. 61 dc.
- Rows 10–12: Ch 2, dc in each st across. Turn after each row. 61 dc.
- Row 13: Repeat Row 5. 31 dc and ten ch-3 spaces.
- Rows 14–16: Repeat the instructions for Rows 6–8. 31 dc and ten ch-3 spaces per row.
- Row 17: Repeat Row 9. 61 dc.
- Rows 18–20: Ch 2, dc in each st across. Turn after each row. 61 dc.
- Row 21: Repeat Row 5. 31 dc and ten ch-3 spaces.
- Rows 22–24: Repeat the instructions for Rows 6–8. 31 dc and ten ch-3 spaces per row.
- Row 25: Repeat Row 9. 61 dc.
- Rows 26–28: Ch 2, dc in each st across. Turn after each row. 61 dc.
- Row 29: Repeat Row 5. 31 dc and ten ch-3 spaces.
- Rows 30–32: Repeat the instructions for Rows 6–8. 31 dc and ten ch-3 spaces per row.
- Row 33: Repeat Row 9. 61 dc.
- Rows 34–36: Ch 2, dc in each st across. Turn after each row. 61 dc. Fasten off after Row 36.
- Block both panels to approximately 12¼ in wide by 12 in tall. Keep the sides straight and the shell openings relaxed. Mark the face you prefer as the RS on both panels.
Continuous Gusset and Shoulder Strap
- Foundation: With the smaller hook, ch 18.
- Row 1: Sc in the second ch from the hook and each remaining ch. Turn. 17 sc.
- Rows 2–72: Ch 1, sc in each st across. Turn after each row. 17 sc per row. This first 12 in segment forms one side.
- Place a marker in each edge at the end of Row 72.
- Rows 73–144: Ch 1, sc in each st across. Turn after each row. 17 sc per row. This second 12 in segment forms the base.
- Place a marker in each edge at the end of Row 144.
- Rows 145–216: Ch 1, sc in each st across. Turn after each row. 17 sc per row. This third 12 in segment forms the opposite side.
- Place a marker in each edge at the end of Row 216. The first 216 rows form the complete U-shaped gusset.
- Rows 217–360: Ch 1, sc in each st across. Turn after each row. 17 sc per row. These 144 rows form the approximately 24 in shoulder strap. Fasten off, leaving a 24 in sewing tail.
- Wash and dry the strip flat. Its target dimensions are approximately 3½ in wide and 60 in long. Check each marked gusset segment separately; do not stretch the strap to reach its measurement.
- Bring the final row to the foundation edge without twisting the strip. Whipstitch the 17 final-row stitches to the 17 foundation positions, working through both loops where available. This closes the continuous loop, with the join at one upper side of the bag.
Panel Assembly and Seam Map
- Lay the loop flat with Rows 1–216 arranged into a U. Keep Rows 217–360 free above it as the strap. The turns between sides and base occur at the markers after Rows 72 and 144.
- Place one panel against one long edge of the U with WS facing inward. Match the panel’s upper corners to the beginning of Row 1 and the end of Row 216. Match its lower corners to the markers after Rows 72 and 144.
- First side seam: Using mattress stitch, join each of the panel’s 36 row ends to two successive gusset row ends. This uses exactly 72 gusset row ends. Take small, consistent bites without pulling the seam tight.
- Base seam: Join the 61 foundation positions to the 72 gusset row ends between the markers. Number the panel foundation positions from 1 to 61 along the seam. At positions 3, 8, 13, 18, 23, 28, 33, 38, 43, 48, and 53, attach that position to two successive gusset row ends. Attach each of the other 50 positions to one gusset row end. Total: 22 + 50 = 72 gusset row ends.
- Second side seam: Join each remaining panel row end to two successive gusset row ends, using Rows 145–216. Keep the top edge free. Secure the seam yarn.
- Attach the second panel to the opposite long edge of the same gusset, repeating the corner placement and all three seam instructions. Both panel RS faces should face outward.
- Set the bag upright and check that the base sits flat. If one seam puckers, redistribute that seam before securing its final ends.
Opening and Strap Edging
- The assembled bag has two separate opening boundaries: each consists of one panel’s top edge and the adjacent long edge of the free strap.
- First boundary, Round 1: With the smaller hook and RS facing, join yarn at a panel top corner. Ch 1, sc in each of the 61 panel top stitches, then work one sc into each of the 144 free strap row ends along the same boundary. Join with a sl st to the first sc. 205 sc.
- First boundary, Round 2: Ch 1, sc in each st around. Join with a sl st to the first sc. 205 sc. Fasten off.
- Second boundary, Rounds 1–2: Repeat the preceding two rounds along the other panel top and the opposite edge of the free strap. 205 sc per round. Fasten off.
- At each panel-to-strap junction, close any small seam gap with the yarn tail. Do not add extra edging stitches at the junctions.
Finishing
- Weave each yarn end through several dense stitches, reverse direction, and trim. Smooth the seam allowances toward the gusset.
- For optional strap reinforcement, turn under the ends of a 24 in length of cotton webbing and stitch it centrally along the underside of the free strap. Attach it with small sewing stitches along both long edges, securing its ends into the dense upper gusset sections.
- For an optional lining, measure the assembled interior. Cut two fabric rectangles matching its front width and height, plus ½ in seam allowance on every edge. Cut one gusset rectangle matching the measured interior depth and the combined length of both sides and base, also adding ½ in seam allowance on every edge.
- Sew one long gusset edge around the sides and base of each lining panel, using ½ in seams. Clip the fabric seam allowance at the lower corners without cutting the stitching. Press the top edge ½ in toward the fabric’s wrong side.
- Insert the lining with its seam allowances facing the crochet. Hand-sew its folded upper edge just below the crochet opening, leaving the shoulder strap free.
Give the completed bag a gentle final steam only if the yarn label permits it, keeping the iron above the cotton. Let it cool completely on a flat surface with a folded towel inside to support the base.
The finished bag should feel softly structured, with clear shell openings and a comfortable, flat strap. Measure the strap again after the first few uses so you can assess how your chosen cotton settles.
Tips for Success
- Mark the middle dc of each three-dc group before the first shell row; every shell must enter that middle stitch.
- Count ten ch-3 spaces at the end of every lace row. Each solid recovery row must return to 61 dc.
- Block both panels together and compare their edges before sewing.
- Baste the four lower corners before completing the seams so the gusset turns stay aligned.
- Use webbing reinforcement when you want the strap length to remain more consistent under load.
Common Mistakes to Avoid
- Counting the turning chain as a dc creates an extra edge stitch. Work only into the actual stitches.
- Working a shell across three separate stitches removes its fan shape. Put all three dc into the middle dc of the previous group.
- Adding stitches into the lace spaces on shell rows fills the openings. Skip each space and work only into the indicated group.
- Joining one gusset row to every panel row shortens the side seam. Use two gusset row ends for each panel row end.
- Twisting the strip before closing its ends makes the strap sit incorrectly. Lay the entire loop flat before sewing the 17-stitch join.
Ways to Customize This Pattern
- Choose sage, forest green, or warm cream cotton while retaining one color throughout to emphasize the shell texture.
- For a deeper bag, increase the gusset foundation by an even number of chains. Keep its row counts unchanged and join equal stitch counts at the strap seam.
- Shorten the strap by removing multiples of six rows from its 144-row section; each six rows removes approximately 1 in. Reduce each opening’s edging count by the same number of rows removed.
- Add a fabric slip pocket to a lining panel before assembling the lining, keeping its top below the bag opening.
- Use a contrasting lining to show through the lace, or a matching olive lining for a quieter finish.
Frequently asked questions
A lining is optional, but the lace openings can let small objects escape. Add one for keys, pens, and everyday essentials, or keep those items in a separate zipped pouch.
The panels use double crochet and open shells for drape. The gusset uses tighter single crochet for support. At the specified gauges, two gusset rows match the height of one panel row.
A blend may work, but it can change the strap length and bag shape. Wash a swatch, hang it briefly with a representative small load, and measure its recovery before committing to the full bag.
No physical sample testing is claimed. Make and block gauge swatches, then check the panel-to-gusset fit and strap behavior before preparing a finished sample for publication.
The finished Olive Grove Crochet Shoulder Bag Pattern

