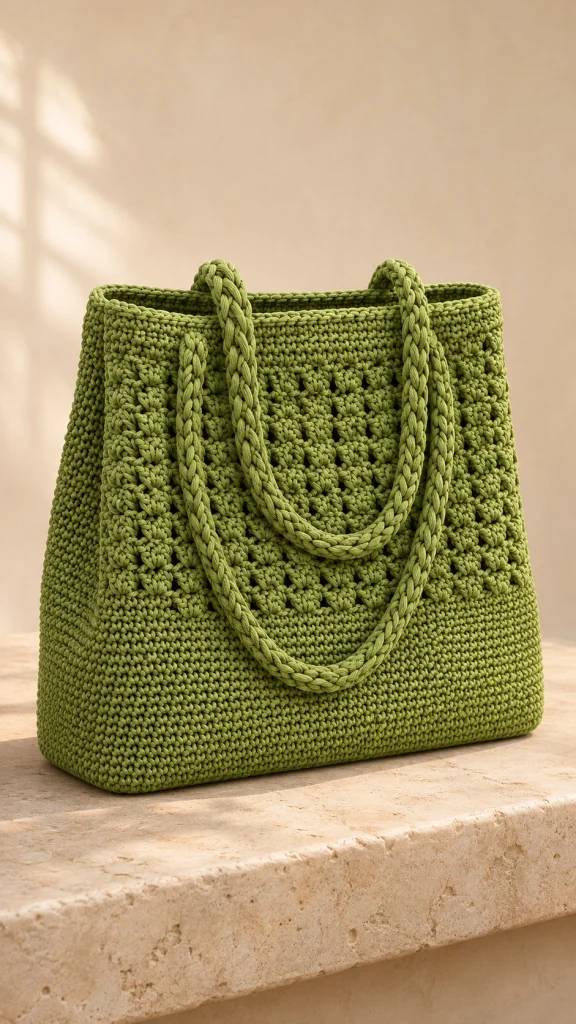
Olive Grove Textured Crochet Tote Bag
Advanced
For experienced crocheters who enjoy complex shaping, fine detail, and ambitious construction
Single-Day Project
A satisfying project you can complete in a single afternoon or evening.
Handmade Gift
A beautiful keepsake — free forever. Read online or print at home.
About This Olive Grove Textured Crochet Tote Bag
This olive crochet tote bag pattern combines a firm rectangular base, staggered bobble panels and substantial braided handles. The fresh olive color and dense lower section give the bag its recognizable garden-inspired look, while smooth side panels keep the silhouette clean and practical.
The bag is assembled from five separate pieces: two matching main panels, two narrow side panels and one rectangular base. Raised bobbles sit above a generous plain band, and a continuous top edging brings the pieces together. A fabric lining, concealed handle reinforcement and a removable base insert help the finished tote hold its shape.
Allow approximately 25–35 hours for the crochet, assembly and sewing. This advanced project suits makers comfortable with consistent dense tension, textured stitch placement, structural seams and hand-sewn finishing.
Materials
- Approximately 1,000–1,200 m of bulky weight 5 cotton cord, approximately 3 mm thick, in olive green; choose a cord with enough flexibility to braid.
- 5 mm crochet hook for panels, base, seams and handle cords, or size needed to obtain gauge.
- 4.5 mm crochet hook for the top edging.
- Six locking stitch markers, plus additional markers for panel corners and handle placement.
- Strong tapestry needle with an eye large enough for the cord.
- Scissors and measuring tape.
- Approximately 0.75 m of medium-weight cotton lining fabric, at least 110 cm wide.
- Four pieces of cotton webbing, each 3 cm wide × 12 cm long, for concealed handle reinforcement.
- Matching strong sewing thread and a hand-sewing needle; a sewing machine is optional.
- One piece of flexible bag-base plastic approximately 39 × 9 cm, with rounded corners.
- Additional lining fabric approximately 44 × 24 cm for a removable base-insert sleeve.
- Blocking mat and rustproof pins.
Abbreviations
chchainscsingle crochetsl stslip stitchBOfive-leg bobble, defined belowRSright side, the outside of the bagWSwrong side, the inside of the bagststitchstsstitchesBobble Stitch and Texture Swatch
- To make one BO: yarn over, insert the hook into the indicated stitch, yarn over and draw up a loop, yarn over and pull through two loops. Repeat this action four more times into the same stitch; six loops remain on the hook. Yarn over and pull through all six loops. Do not add a closing chain. Push the bobble toward the RS.
- Swatch foundation: ch 22. Sc in the second ch from the hook and each remaining ch. Turn. Count: 21 sc.
- Swatch Row 2: ch 1, sc in each st. Turn. Count: 21 sc.
- Swatch Row 3, RS: ch 1, sc in the first 4 sts, work BO in the next st and sc in each of the next 3 sts three times, then sc in the last 5 sts. Turn. Count: 21 sts, including 3 bobbles.
- Swatch Row 4: ch 1, sc in each st, working one sc into the top of every BO. Turn. Count: 21 sc.
- Swatch Row 5, RS: ch 1, sc in the first 6 sts, work BO in the next st and sc in each of the next 3 sts twice, BO in the next st, then sc in the last 6 sts. Turn. Count: 21 sts, including 3 bobbles.
- Swatch Row 6: ch 1, sc in each st. Turn. Count: 21 sc.
- Repeat Rows 3–6 three more times. Fasten off, gently wet-block and let dry flat. Measure the central fabric without stretching it; check that the textured section remains square and does not pull narrower than the plain rows.
Main Panels — Make Two
- Foundation and Row 1, RS: with the main hook, ch 62. Sc in the second ch from the hook and each remaining ch. Turn. Count: 61 sc. Mark this face as the RS.
- Rows 2–22: ch 1, sc in each of the 61 sts; turn after every row. Count: 61 sc per row. This forms the plain lower band.
- Row 23, RS, Texture Row A: ch 1, sc in the first 8 sts; repeat BO in the next st, sc in each of the next 3 sts eleven times; sc in each of the last 9 sts. Turn. Count: 61 sts, including 11 bobbles.
- Row 24, WS: ch 1, sc in each st. Turn. Count: 61 sc.
- Row 25, RS, Texture Row B: ch 1, sc in the first 10 sts; repeat BO in the next st, sc in each of the next 3 sts ten times; BO in the next st; sc in each of the last 10 sts. Turn. Count: 61 sts, including 11 bobbles.
- Row 26, WS: ch 1, sc in each st. Turn. Count: 61 sc.
- Rows 27–54: repeat Rows 23–26 seven more times. Count: 61 sts per row. The completed texture band contains 16 bobble rows and 176 bobbles.
- Rows 55–64: ch 1, sc in each st; turn after every row except the last. Count: 61 sc per row. Fasten off, leaving a 25 cm tail.
- Block both panels to matching rectangles approximately 40.7 cm wide × 37.6 cm high. Keep the bobbles raised and avoid pressing them flat.
Side Panels — Make Two
- Foundation and Row 1: ch 20. Sc in the second ch from the hook and each remaining ch. Turn. Count: 19 sc.
- Rows 2–64: ch 1, sc in each st; turn after every row except the last. Count: 19 sc per row. Fasten off, leaving a 25 cm tail.
- Block each side panel to approximately 12.7 cm wide × 37.6 cm high. The finished depth will be slightly smaller after the raised seams are formed.
- Mark both lower corners and both upper corners of each side panel. The foundation edge is the bottom edge; Row 64 is the opening edge.
Rectangular Base
- Foundation and Row 1: ch 62. Sc in the second ch from the hook and each remaining ch. Turn. Count: 61 sc.
- Rows 2–19: ch 1, sc in each st; turn after every row except the last. Count: 61 sc per row. Fasten off.
- Block to approximately 40.7 cm long × 11.2 cm deep. The two long edges each provide 61 stitch positions; each short edge provides 19 row-end positions.
- Mark all four corners. Match the base length to the main-panel foundation edges. The side-panel foundation edges will ease very slightly onto the shorter base ends during joining.
Structural Seams and Bag Assembly
- Arrange the base with its intended outside facing down. Stand the two main panels along its long edges and the side panels along its short edges, with all RS facing outward. Clip the corners together before joining.
- Join the first main panel to one long base edge with WS together. Insert the hook through the available foundation loops of the main panel and the corresponding loops of the base edge. Join yarn at a corner and work 61 sc through both layers. Fasten off. Keep the seam ridge on the outside.
- Join the second main panel to the opposite long base edge in the same manner. Count: 61 joining sc.
- Join one side-panel foundation edge to one short base edge, working one sc through each of the 19 side-panel foundation positions and its matching base row end. Count: 19 joining sc. Ease the side edge evenly without skipping stitches.
- Join the other side panel to the remaining short base edge. Count: 19 joining sc. Keep the ends of these seams immediately beside the long seams, without adding corner stitches.
- Join the first vertical corner from base to opening, keeping WS together and matching row ends. Work one sc through the paired row ends for each of the 64 rows. Count: 64 joining sc. Fasten off.
- Join each of the remaining three vertical corners individually in the same way. Count: 64 joining sc per corner. At the bottom of each corner, use its yarn tail to close any small gap between the vertical seam and base seams.
Continuous Top Edging
- Round 1: with the smaller hook and RS facing, join yarn in the first top stitch of a main panel. Ch 1, sc in all 61 main-panel sts, all 19 side-panel sts, all 61 opposite main-panel sts and all 19 remaining side-panel sts. Do not work into the vertical seam ridges or add corner stitches. Join with sl st to the first sc. Count: 160 sc.
- Round 2: ch 1, sc in each st around. Join with sl st to the first sc. Count: 160 sc.
- Round 3: work one loose sl st into each st around. Count: 160 sl sts. Keep the opening relaxed; use the larger hook for this round if the edge draws inward. Fasten off and bury the end on the inside.
Braided Handles — Make Two
- Make six identical strips, three for each handle. For each strip, leave a 30 cm starting tail and ch 139. Row 1: sc in the second ch from the hook and each remaining ch. Turn. Count: 138 sc.
- Strip Row 2: ch 1, sc in each st. Count: 138 sc. Fasten off with a 30 cm tail. Each strip should measure approximately 92 cm long before braiding; use the actual measurement to confirm all six match.
- For the first handle, stack the ends of three strips with their RS facing outward as much as possible. Sew through all three strip ends across the first 2 cm, using one yarn tail. Temporarily secure this end to a firm surface.
- Braid the three strips with even tension, folding their narrow edges inward as needed to form a rounded braid. Leave the final 2 cm unbraided and sew these three ends together. Aim for a finished handle length of approximately 78–82 cm. Do not stretch the braid to reach the measurement.
- Make the second handle with the remaining three strips. Match its length to the first handle within 1 cm. Secure all six strip ends firmly and weave unused tails through the braid, keeping two long sewing tails at each handle end.
Handle Placement and Reinforcement
- On each main panel, count its 61 top stitches from left to right while viewing that panel from outside. Mark stitches 12 and 50. These are the centerlines for the two handle ends.
- Position one handle on each main panel, with its ends extending 6 cm down the outside of the bag and its loop rising above the opening. Keep the handle untwisted. The centerlines are approximately 25 cm apart; the resulting handle drop is approximately 27–29 cm.
- Inside the bag, place one 12 cm webbing piece vertically behind each handle end. Position its upper edge immediately below the top edging. Turn its raw ends under by 1 cm and sew around its perimeter with matching thread, taking small stitches into the backs of the crochet stitches.
- Using the cord tails and tapestry needle, sew each handle end to its panel along both sides of the 6 cm overlap. Then add three transverse rows of stitches across the handle end. Take these structural stitches through the crochet panel and webbing, using the sewing needle and strong thread wherever the cord cannot pass through the webbing.
- Check that all four attachments share the load evenly. Cover the lowest raw strip ends with close, neat wrapping stitches, securing the wrapping into the panel rather than around the braid alone.
Fabric Lining and Removable Base Insert
- Measure the assembled bag inside the seams. For the nominal size, cut two lining main panels 42 × 40 cm, two lining side panels 13 × 40 cm and one lining base 42 × 13 cm. These measurements include 1 cm seam allowances and a 1 cm upper turn-under. Adjust the cut sizes to the actual bag before cutting; the lining should sit inside without pulling the crochet.
- With fabric right sides together, sew the two main panels and two side panels into a tube using 1 cm seam allowances. Alternate main and side panels. Stop each vertical seam 1 cm before the lower edge to allow the base corners to turn neatly.
- Pin the lining base into the tube with fabric right sides together. Match its long edges to the main panels and its short edges to the side panels. Sew all four edges with 1 cm seam allowances, pivoting at the marked corners. Trim excess corner bulk without cutting the stitching.
- Turn the lining’s upper raw edge 1 cm toward its wrong side and press. Place the lining inside the bag with its wrong side against the crochet WS. Align the corners and position the folded upper edge approximately 1 cm below the opening.
- Hand-sew the lining around the opening with small slip stitches, catching the backs of the crochet stitches. Let the lining rest on the base so that its upper seam does not carry the contents.
- For the insert sleeve, fold the 44 × 24 cm fabric piece in half to form a 44 × 12 cm rectangle, with right sides together. Sew the long raw edge and one short edge using a 1 cm seam allowance. Turn right side out.
- Slide the rounded 39 × 9 cm plastic insert into the sleeve. Turn the remaining open edge inward by 1 cm and close it with small hand stitches. Place the covered insert flat inside the lined bag; leave it removable for cleaning.
Finishing
- Weave every crochet tail through at least 8 cm of dense fabric, reverse direction once and trim only after the end is secure. Keep seam tails inside the raised seam ridges where possible.
- Shape the empty bag by hand, squaring the base and smoothing the side panels. Lightly dampen any uneven crochet areas and let the bag dry fully with a folded towel inside. Keep the lining and webbing from remaining damp.
- Lay both handles together and check their length, attachment height and freedom from twists. Inspect the four lower corners and close any remaining pinholes with matching cord.
- Place a few light items in the bag and inspect the attachments and base. Reinforce any movement before regular use.
The finished tote should stand with a broad, stable base and softly structured sides. Let the bobbles keep their rounded shape; a little surface relief is part of the design.
Remove the covered base insert before cleaning. Follow the cord and fabric care instructions, reshape the bag while damp and dry it flat with the handles supported.
Tips for Success
- Mark the first and last stitch of every main-panel row so the 61-stitch edges remain straight.
- Push each bobble outward immediately after closing it; check the RS again after the following plain row.
- Clip all four pieces around the base before seaming. This makes it easier to distribute the small difference between stitch width and row height.
- Braid both handles during the same session and compare them before sewing their ends closed.
- Fit the lining to the completed crochet shell. Cord thickness and seam tension can change the internal measurements.
Common Mistakes to Avoid
- Adding a chain after each bobble increases the row count. Close the six loops together and work the next sc directly into the next base stitch.
- Missing the top of a bobble narrows the panel. Work one sc into each bobble on the following WS row and confirm 61 stitches.
- Adding top-edge stitches over the corner seams makes the opening flare. Work only into the 160 panel-top stitches.
- Sewing handles only to the edging concentrates strain at the rim. Secure the full 6 cm overlap through the panel and reinforcement.
- Making the lining too short suspends the contents from its upper seam. Allow its base to rest against the crochet base before sewing around the opening.
Ways to Customize This Pattern
- Use deep moss, warm oat or terracotta cord while retaining one color throughout to emphasize the texture.
- Add a sewn fabric pocket to a lining main panel before joining the lining pieces; keep it clear of the handle reinforcement positions.
- For a taller tote, add four plain rows to both main panels and both side panels before their top bands. Add the same measured height to the lining pieces and work 68 sc along each vertical corner seam.
- For shorter handles, remove the same number of foundation chains from all six strips. Each chain removed also removes one sc from each strip row; measure the completed braids before attaching.
- Add a magnetic closure to reinforced fabric tabs inside the lining, centered between the handles and below the crochet edging.
Frequently asked questions
Yes, if it produces a firm fabric at the stated gauge. Softer spun yarn may give the bag more drape and stretch, especially in the handles. Make both a textured swatch and a short three-strip braid before committing to the full project.
The base depth is formed by 19 rows, while each side-panel width is formed by 19 stitches. At this gauge, rows and stitches have different dimensions. Matching the 19 positions and easing the side foundation onto the base creates a softly rounded lower edge, with the external seams reducing the visible depth.
The crochet shell can be used without a lining, but the lining covers the webbing, keeps small items contained and helps the tote retain its shape. Keep the handle reinforcement even if you omit the lining, and cover each webbing patch with a neatly sewn fabric facing.
All bobble rows are odd-numbered RS rows. After closing each bobble, push it toward the marked RS with your finger. On the next WS row, work into its top without pulling the bobble through to the inside.
A reliable load limit depends on the cord, braid stretch, sewing thread and attachment quality. This pattern has no verified weight rating. Start with light everyday contents and inspect the reinforced handle attachments regularly.
The finished Olive Grove Textured Crochet Tote Bag

