Olive Scroll Crochet Handbag Pattern
Advanced
For experienced crocheters who enjoy complex shaping, fine detail, and ambitious construction
Single-Day Project
A satisfying project you can complete in a single afternoon or evening.
Handmade Gift
A beautiful keepsake — free forever. Read online or print at home.
About This Olive Scroll Crochet Handbag Pattern
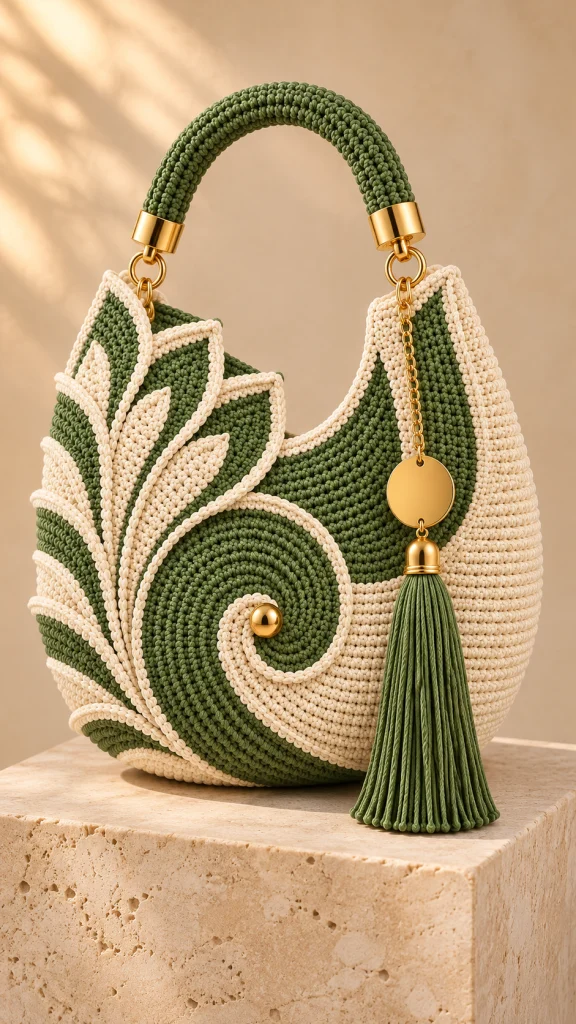
This olive scroll crochet handbag pattern combines a structured cream base, an olive upper body, and layered botanical appliqués around a bold circular scroll. Cream outlines sharpen the leaf shapes, while gold fittings and a long olive tassel give the bag its distinctive finish.
The handbag is worked from an oval base, then divided into shaped upper panels with raised corners and a scooped opening. Separate leaves, a circular medallion, and a curved cream overlay create the dimensional front. Allow approximately 25–35 hours for the crochet, careful placement, lining, and hardware installation.
This advanced project suits makers comfortable with dense crochet, shaped appliqués, surface stitching, and sewing a fitted lining. The instructions create an original interpretation of the pictured handbag; final proportions depend on achieving the stated gauge.
Materials
- Approximately 450 g olive and 350 g cream bulky cotton cord, about 3 mm thick; estimated total length 650–800 m, depending on cord construction.
- 4 mm crochet hook for the body and appliqués.
- 3.5 mm crochet hook for the handle, outlines, and opening edge.
- Four locking stitch markers and additional removable placement markers.
- Blunt yarn needle, strong sewing needle, scissors, and matching heavy polyester thread.
- Two 25 mm internal-diameter closed metal rings and four small screw-pin connectors rated for bag use.
- Two sew-on handle end caps sized to the finished handle diameter, approximately 20–22 mm, each with an attachment eye.
- One 38 cm length of 12–14 mm flexible cotton rope for the handle core.
- One 18–20 mm gold domed shank button for the scroll center.
- One 12 cm gold bag chain, one optional decorative disc, and one tassel cap with a sewing or crimp attachment.
- One 14 mm magnetic bag snap with backing washers.
- Approximately 50 × 80 cm tightly woven lining fabric and matching sewing thread.
- Approximately 35 × 15 cm flexible bag-base stabilizer with rounded corners.
- A 22 cm piece of firm cardboard for winding the tassel.
- Optional small amount of washable fabric stiffener for leaf tips, used according to its label.
Abbreviations
chchainscsingle crochet, US terminologyhdchalf double crochetdcdouble crochetsl stslip stitchinc2 single crochet in one stitchsc2togsingle crochet 2 stitches togetherMRmagic ringststitchRSright sideOval Base
- With cream and the main hook, ch 33. Round 1: sc in the second ch from the hook and the next 30 chains, 3 sc in the last chain; working along the opposite side, sc in the next 30 chains and 2 sc in the final chain, which also holds the first sc. Join with sl st to the first sc. Total: 66 st.
- Mark the three stitches at each rounded end: the final three stitches of the first side and the three stitches spanning the round join at the other end. The remaining two straight sections each contain 30 stitches.
- Round 2: ch 1; work inc in each of the three marked stitches at both ends and sc in every straight-section stitch. Join. Total: 72 st. Each end now contains 6 stitches.
- Round 3: ch 1; across each end work (sc, inc) 3 times; sc across both 30-stitch straight sections. Join. Total: 78 st; 9 stitches at each end.
- Round 4: ch 1; across each end work (2 sc, inc) 3 times; sc across both straight sections. Join. Total: 84 st; 12 stitches at each end.
- Round 5: ch 1; across each end work (3 sc, inc) 3 times; sc across both straight sections. Join. Total: 90 st; 15 stitches at each end.
- Round 6: ch 1; across each end work (4 sc, inc) 3 times; sc across both straight sections. Join. Total: 96 st; 18 stitches at each end.
- Round 7: ch 1; across each end work (5 sc, inc) 3 times; sc across both straight sections. Join. Total: 102 st; 21 stitches at each end. The base should measure approximately 29 × 9 cm.
Lower Body and Olive Upper Body
- Body round 1: ch 1, sc in the back loop only of all 102 stitches; join. This establishes the base fold. Total: 102 st.
- Body rounds 2–18: ch 1, sc in both loops of every stitch; join each round. Work 17 rounds, each containing 102 st.
- Change to olive on the final pull-through of the last cream stitch. Body round 19: ch 1, sc around; join. Total: 102 st.
- Body rounds 20–36: ch 1, sc around; join each round. Work 17 rounds, each containing 102 st. Fasten off. Body height above the base is approximately 18 cm.
- Flatten the bag with the two rounded base ends at the sides. Mark two side division points exactly 51 stitches apart. Label the 51 stitches between them as the front and the remaining 51 as the back. Each stitch belongs to only one panel.
Scooped Front and Back Panels
- Work this entire section once over the front 51 stitches and once over the back 51 stitches. With RS facing, join olive at the first stitch of the selected panel.
- Panel rows 1–6: sc across all 51 stitches, ch 1 and turn between rows. After row 6, fasten off. Each row has 51 st.
- Mark stitches 1–13 as the first wing, stitches 14–38 as the center opening, and stitches 39–51 as the second wing. The 25 center stitches remain unworked during wing shaping.
- First wing, row 1: with RS facing, join olive at stitch 1; sc in the next 11 stitches, sc2tog over the next 2 stitches. Turn. Total: 12 st. The decrease lies at the opening edge.
- First wing, row 2: ch 1, sc2tog, sc in the next 10 stitches. Turn. Total: 11 st.
- First wing, row 3: ch 1, sc in the next 9 stitches, sc2tog. Turn. Total: 10 st.
- First wing, row 4: ch 1, sc2tog, sc in the next 8 stitches. Turn. Total: 9 st.
- First wing, row 5: ch 1, sc in the next 7 stitches, sc2tog. Turn. Total: 8 st.
- First wing, rows 6–12: ch 1, sc across all 8 stitches and turn after each row. Fasten off after row 12. Each row has 8 st.
- Second wing, row 1: with RS facing, join olive at panel stitch 39; sc2tog over stitches 39–40, sc in the next 11 stitches. Turn. Total: 12 st.
- Second wing, row 2: ch 1, sc in the next 10 stitches, sc2tog. Turn. Total: 11 st.
- Second wing, row 3: ch 1, sc2tog, sc in the next 9 stitches. Turn. Total: 10 st.
- Second wing, row 4: ch 1, sc in the next 8 stitches, sc2tog. Turn. Total: 9 st.
- Second wing, row 5: ch 1, sc2tog, sc in the next 7 stitches. Turn. Total: 8 st.
- Second wing, rows 6–12: ch 1, sc across all 8 stitches and turn after each row. Fasten off after row 12. Each row has 8 st.
- After completing both panels, place front and back RS together. At each bag side, sew the matching outer panel edges together from body round 36 through panel row 6 and all 12 wing rows. Use a firm mattress seam, keeping the inner scoop edges and wing tops open. Turn RS out.
Cream Opening Edge and Ring Tabs
- Opening edge round 1: with the smaller hook, join cream at a side seam beside a wing top. Ch 1; work 8 sc across that front wing top, 12 sc down its inner edge, 25 sc across the front center, 12 sc up the opposite inner edge, and 8 sc across that wing top. Continue around the back in the same sequence. Join. Total: 130 st.
- Opening edge round 2: ch 1, sc in each stitch around; join. Total: 130 st. Fasten off. At the four transitions between center stitches and inner wing edges, keep stitches loose enough to lie smoothly.
- Make 2 ring tabs in cream. Ch 7. Row 1: sc in the second chain and each remaining chain. Total: 6 st.
- Tab rows 2–12: ch 1, turn, sc across. Each row has 6 st. Fasten off, leaving a long sewing tail.
- At each side seam, pass one tab through a metal ring and fold the tab in half. Sew its two short ends together over the joined front and back wing tops, overlapping the bag by approximately 2 cm. Stitch through the tab, crocheted body, and a small lining-fabric reinforcement patch. Keep the ring above the opening.
Olive Scroll Medallion
- With olive and the main hook, round 1: work 6 sc in MR. Tighten the ring. Work subsequent rounds continuously and mark the first stitch. Total: 6 st.
- Round 2: inc in every stitch. Total: 12 st.
- Round 3: (sc, inc) 6 times. Total: 18 st.
- Round 4: (2 sc, inc) 6 times. Total: 24 st.
- Round 5: (3 sc, inc) 6 times. Total: 30 st.
- Round 6: (4 sc, inc) 6 times. Total: 36 st.
- Round 7: (5 sc, inc) 6 times. Total: 42 st.
- Round 8: (6 sc, inc) 6 times. Total: 48 st.
- Round 9: (7 sc, inc) 6 times. Total: 54 st.
- Round 10: (8 sc, inc) 6 times. Total: 60 st.
- Round 11: (9 sc, inc) 6 times. Total: 66 st.
- Round 12: (10 sc, inc) 6 times. Total: 72 st.
- Round 13: (11 sc, inc) 6 times. Total: 78 st.
- Round 14: (12 sc, inc) 6 times. Total: 84 st. Sl st in the next stitch and fasten off, leaving a long sewing tail. Diameter is approximately 17–18 cm; rest flat before assembly.
- With cream and the smaller hook, join into one outer stitch and work 1 surface sl st through each of the 84 outer stitches. Keep the working yarn behind the fabric and the hook on the RS. Join and fasten off. This outline does not add a structural round.
Curved Cream Scroll Overlay
- With cream and the main hook, ch 3. Row 1: sc in the second chain and next chain. Total: 2 st.
- Rows 2–7: ch 1, turn, inc in the first stitch, sc to the final stitch, inc in the final stitch. Row totals are 4, 6, 8, 10, 12, and 14 st respectively.
- Rows 8–15: ch 1, turn, sc across. Work 8 rows of 14 st.
- Rows 16–21: ch 1, turn, sc2tog, sc to the final 2 stitches, sc2tog. Row totals are 12, 10, 8, 6, 4, and 2 st respectively.
- Row 22: ch 1, turn, sc2tog. Total: 1 st. Fasten off, leaving a sewing tail.
- Lay the medallion on a flat surface. Pin the narrow starting end of the strip just left of its center. Curve the strip clockwise around the lower half and then up its right side, letting the broad middle extend beyond the medallion onto the cream bag body. Ease the inner edge with small gathers; keep the outer edge smooth.
- Sew both strip edges down with small matching stitches, attaching to the medallion where they overlap and to the bag during final placement elsewhere. The strip is intentionally flexible and forms its crescent through blocking and stitching.
- With cream and the smaller hook, ch 80 and fasten off without tightening the chain. Pin this cord along the strip’s inner curve, then continue it into a loose inward coil near the medallion center. Sew through every second chain; trim only after securing the final position. Sew the domed gold button over the coil’s inner end.
Layered Botanical Leaves
- Make 3 large olive leaves. For each leaf, ch 19. Work into the second chain: sc, then hdc in the next 2 chains, dc in the next 12 chains, hdc in the next 2 chains, and 3 sc in the final chain. Rotate to work along the unused foundation loops: hdc in the next 2, dc in the next 12, hdc in the next 2, and 2 sc in the final foundation position beside the first sc. Join to the first sc. Total: 38 st.
- Large leaf round 2: ch 1, sc in the next 17 stitches, work 3 sc in the next stitch at the far tip, sc in the next 18 stitches, work 3 sc in the next stitch at the near tip, sc in the final stitch. Join. Total: 42 st. Fasten off.
- Large leaf outline: with cream and the smaller hook, join at any stitch and work 1 sl st in each of the 42 stitches. Join loosely and leave a sewing tail.
- Make 3 small olive leaves. Ch 13. Sc in the second chain, hdc in the next 2, dc in the next 6, hdc in the next 2, and 3 sc in the final chain. Along the unused foundation loops work hdc in the next 2, dc in the next 6, hdc in the next 2, and 2 sc in the final foundation position. Join. Total: 26 st.
- Small leaf outline: with cream and the smaller hook, work 1 sl st in each of the 26 stitches. Join and leave a sewing tail.
- Make 6 cream inner leaves. Ch 11. Sc in the second chain, hdc in the next chain, dc in the next 6, hdc in the next chain, and 3 sc in the final chain. Along the unused foundation loops work hdc in the next chain, dc in the next 6, hdc in the next chain, and 2 sc in the final foundation position. Join. Total: 22 st. Fasten off with a sewing tail.
- Center one cream leaf on each olive leaf, aligning the narrow ends. Sew along the cream leaf’s center and around its lower half, leaving the upper edges slightly raised. The olive border remains visible.
- Make the main stem with cream and the smaller hook: ch 58, sl st in the second chain and each remaining chain. Total: 57 sl st. Fasten off with a long sewing tail.
Front Arrangement
- Place the bag front upward and lightly fill it with folded fabric. Position the medallion on the lower front, its center approximately 12 cm above the base and 19 cm from the left side. Its bottom edge should sit approximately 2 cm above the base.
- Pin the cream overlay in its curved position, sweeping toward the lower right. Keep all decoration clear of the base fold so the bag can stand.
- Curve the stem from approximately 6 cm right of the lower left corner toward the upper left wing. Place the three large leaves along its right side, with their tips directed upward and outward. Overlap adjacent bases by approximately 1 cm.
- Place the three small leaves along the left side of the stem, staggered between the larger leaves. Keep their tips inside the bag silhouette or no more than 1 cm beyond it.
- Sew the medallion around its edge and through several internal rounds. Sew the cream overlay to the bag wherever it extends beyond the medallion.
- Sew each olive leaf around its lower two-thirds and along its foundation center. Leave the final 2 cm of each tip free for gentle relief. Sew the stem over the leaf bases, securing every second stitch.
Covered Handle
- With olive and the smaller hook, ch 12 and join without twisting. Round 1: ch 1, sc in each chain; do not join subsequent rounds. Total: 12 st.
- Rounds 2–76: sc in every stitch, working continuously. Each round has 12 st. The tube should measure approximately 38 cm at a handle gauge of 20 rounds per 10 cm. If necessary, add or remove complete 12-stitch rounds to match the rope length.
- Insert the rope through the tube. Sew each tube end closed over the rope end with several passes of strong thread.
- Fit a sew-on end cap over each end. Stitch through every cap sewing hole and through the covered rope, following the hardware maker’s fastening method. Each cap must capture the core securely.
- Use screw-pin connectors to attach each end-cap eye to the corresponding bag ring. Tighten according to the hardware instructions, then check that the handle rotates freely.
Statement Tassel
- Wind olive cord around the 22 cm cardboard 40 times. Slide a separate 30 cm cord beneath the loops at one end and tie tightly with a double knot.
- Cut the loops at the opposite end to create 80 hanging strands. Fold the bundle neatly beneath the top tie.
- Wrap a separate olive cord firmly around the bundle 2 cm below the top, tie securely, and bury its ends through the neck with a needle.
- Fit the tassel cap over the wrapped neck and secure through its sewing attachment or crimp system. Trim the hanging strands evenly to approximately 20 cm below the cap.
- Attach the cap to the chain, with the optional disc between them. Connect the chain to the right bag ring using a screw-pin connector. Check that the tassel hangs clear of the base when the bag is carried.
Lining and Closure
- After completing the outer seams, place the bag flat on paper and trace its outline, including the scoop and raised wings. Mark a horizontal line across the lowest part of the base. Add 1 cm seam allowance around the traced shape.
- Cut two lining pieces using this template. With right sides together, sew the side and bottom edges with 1 cm seams; leave the entire shaped opening unsewn.
- At each bottom corner, align the side seam with the bottom seam. Draw a line 8 cm long perpendicular to the aligned seams, centered on them. Sew along each line to form the boxed base. Trim the excess corner fabric, leaving 1 cm beyond the seam.
- Make a paper oval matching the inside base. Cut the stabilizer 5 mm smaller all around, round its edges, and cover it completely with a scrap-fabric sleeve. Place it inside the crocheted base.
- Fit the lining into the bag with wrong sides together. Adjust the boxed corners and side seams so the lining rests on the base without pulling the opening downward. Turn the opening allowance inward and pin it 5 mm below the cream edge.
- Mark the snap position at the center of the front and back opening, approximately 15 mm below the cream edge. Remove the lining and install the snap through doubled fabric reinforcement patches, with washers and prongs enclosed between lining and crochet.
- Replace the lining and hand-sew its folded edge to the crochet with small stitches. Add a few anchoring stitches at the base corners and side seams. Keep the lining clear of the handle rings and hardware.
Finishing
Weave each cord end through several stitches on the inside, reverse direction, and secure it before trimming. Check the leaf tips, scroll center, and curved overlay for loose sections, adding small hidden stitches where needed.
Shape the handbag over folded towels and lightly dampen the crochet without soaking the hardware. Smooth the cream edges and leaf points, then let everything dry completely. Avoid pressing the dimensional appliqués flat.
Close the snap, inspect the handle fittings, and gradually add the items you expect to carry. Watch the tabs and seams for stretching, reinforce them if needed, and tighten all screw-pin connectors before use.
Tips for Success
- Move end markers after every base round so increases stay within the rounded sections.
- Use removable thread to mark the front center before pinning the scroll; the asymmetric arrangement is easier to balance against a fixed reference.
- Keep cream slip-stitch outlines loose. Tight edging will cup the leaves and shrink the opening.
- Support the handle tabs with woven fabric before installing the lining so carrying force spreads beyond a few crochet stitches.
- Photograph the pinned arrangement before sewing, then remove and attach one piece at a time.
Common Mistakes to Avoid
- Counting the joining slip stitch as a body stitch adds unwanted stitches. Mark the first sc and keep every body round at 102 stitches.
- Decreasing at the outer wing edge distorts the side seam. Place all five wing decreases beside the scoop.
- Sewing the scroll only around its perimeter lets it sag. Add concealed anchoring stitches through several internal rounds.
- Cutting a lining from nominal measurements can produce a poor fit. Trace the completed bag and fit the lining before sewing its upper edge.
- Attaching end caps only to the crochet sleeve can let the core pull free. Fasten through the covered rope using suitable sew-on hardware.
Ways to Customize This Pattern
- Replace olive with deep teal or rust while keeping the cream outlines and the same cord thickness.
- For a quieter front, omit the three small leaves while retaining the large leaf fan, stem, and scroll.
- Add a lining pocket by sewing a hemmed fabric rectangle to one lining panel before joining the lining seams.
- Shorten the tassel by winding it around 16 cm cardboard; keep the same number of wraps for similar fullness.
- Use a purchased rigid handle with compatible ring fittings in place of the covered rope handle.
Frequently asked questions
Yes, if the resulting fabric matches both the gauge and firmness. Hold multiple strands together if necessary and make a substantial swatch. A soft fabric will need additional lining support and may not hold the raised opening well.
A separate tapered strip allows the cream section to sweep across both the olive medallion and the cream body. Pinning and easing it into place creates the curved relief without forcing the main bag fabric into a spiral.
A lining is strongly recommended. It supports the magnetic snap, protects the back of the appliqué stitching, and helps the base retain its shape. The handle tabs still need their own fabric reinforcement.
Detach the tassel when possible and spot-clean the crochet with a damp cloth and mild soap suitable for the cord. Keep metal fittings dry and reshape the bag over towels while it dries.
The finished Olive Scroll Crochet Handbag Pattern

