Penguin Christmas Lantern Crochet Pattern with Holly and Snowflakes
Advanced
For experienced crocheters who enjoy complex shaping, fine detail, and ambitious construction
Single-Day Project
A satisfying project you can complete in a single afternoon or evening.
Handmade Gift
A beautiful keepsake — free forever. Read online or print at home.
About This Penguin Christmas Lantern Crochet Pattern with Holly and Snowflakes
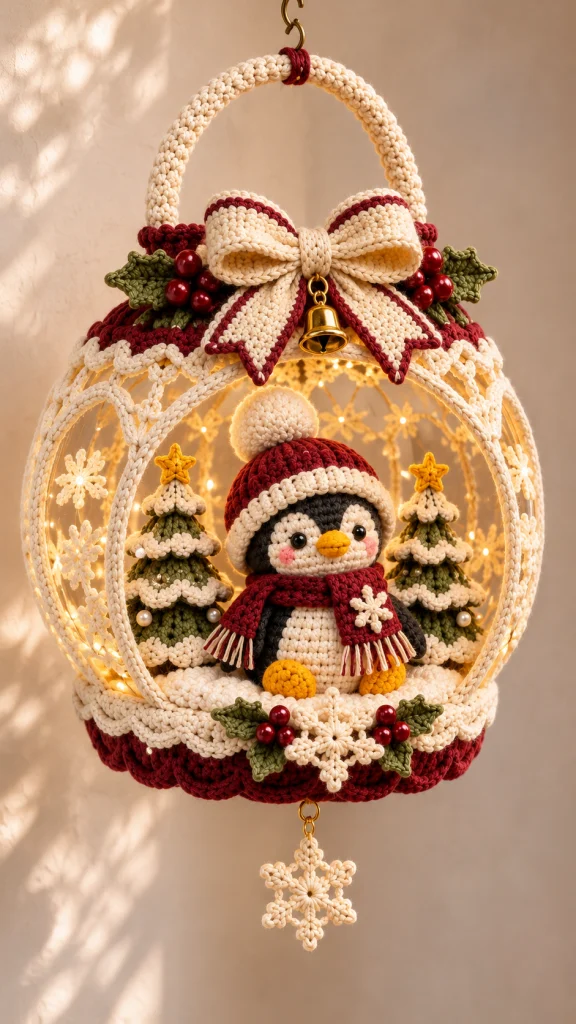
This Penguin Christmas Lantern Crochet Pattern creates a hanging winter display with a rounded open frame, an ivory bow edged in burgundy, snowy evergreen trees, and a small penguin tucked inside. Holly, a gold bell, and suspended snowflakes echo the traditional cream, wine red, olive, and gold palette.
This is a framed home decoration with a removable crochet scene platform. Its shape comes from a rigid lantern frame, while crocheted covers, lace, shaped appliqués, and layered trims provide the soft finish. The penguin and trees are individual components secured inside the display.
Allow approximately 35–45 hours for the crochet, blocking, and assembly. This advanced project suits makers comfortable with shaped rounds, small appliqués, fitted fabric, and careful structural finishing. The instructions are an original interpretation of the pictured design; finished dimensions depend on the specified frame and your gauge.
Materials
- Worsted cotton yarn: approximately 450 g ivory, 150 g burgundy, 90 g olive green, 60 g charcoal, and 20 g golden yellow; quantities assume approximately 150 m per 100 g.
- DK cotton: approximately 25 g ivory and small amounts of olive, yellow, and pink for fine motifs and facial embroidery.
- 4 mm hook for the base, bow, lace, and trims.
- 3.5 mm hook for the penguin, trees, and holly.
- 2.5 mm hook for DK snowflakes and stars.
- A rigid, open-front metal lantern or ornament frame approximately 32 cm wide and 30 cm tall, with a horizontal 24 cm base ring, an approximately 18 cm shoulder ring, side and rear ribs, a front opening at least 24 cm wide × 23 cm tall, and an integral load-bearing hanging eye. Choose the frame before crocheting.
- A 20 cm metal handle ring, two rated metal connecting links, and a hanging hook suitable for the completed display’s weight.
- A smooth 23 cm rigid plastic craft disk, approximately 2–3 mm thick, with eight evenly spaced perimeter holes; use a commercially prepared disk or have the holes made before assembly.
- Approximately 150 g polyester stuffing.
- Two 8 mm black safety eyes with washers, or black embroidery thread for embroidered eyes.
- Twelve 8–10 mm burgundy beads for holly berries and six 6–8 mm ivory pearl beads for tree ornaments.
- One lightweight 25–30 mm gold bell and three small closed metal connecting rings.
- A short battery-powered warm-white LED string with a timer and an accessible battery compartment.
- Strong polyester sewing thread, a blunt yarn needle, stitch markers, scissors, a ruler, and blocking pins.
- Water-based fabric stiffener for the snowflakes and stars.
Abbreviations
chchainsl stslip stitchscsingle crochethdchalf double crochetdcdouble crochettrtreble crochetinc2 single crochet in one stitchdecsingle crochet 2 stitches together; use an invisible decrease on stuffed piecesMRmagic ringBLOback loop onlyFLOfront loop onlyststitch or stitchesIvory Base Covers — Make Two
- With ivory and the 4 mm hook, round 1: 6 sc in MR. Tighten the ring. [6]
- Round 2: inc in each st. [12]
- Round 3: repeat (sc 1, inc) 6 times. [18]
- Round 4: repeat (sc 2, inc) 6 times. [24]
- Round 5: repeat (sc 3, inc) 6 times. [30]
- Round 6: repeat (sc 4, inc) 6 times. [36]
- Round 7: repeat (sc 5, inc) 6 times. [42]
- Round 8: repeat (sc 6, inc) 6 times. [48]
- Round 9: repeat (sc 7, inc) 6 times. [54]
- Round 10: repeat (sc 8, inc) 6 times. [60]
- Round 11: repeat (sc 9, inc) 6 times. [66]
- Round 12: repeat (sc 10, inc) 6 times. [72]
- Round 13: repeat (sc 11, inc) 6 times. [78]
- Round 14: repeat (sc 12, inc) 6 times. [84]
- Round 15: repeat (sc 13, inc) 6 times. [90]
- Round 16: repeat (sc 14, inc) 6 times. [96]
- Round 17: repeat (sc 15, inc) 6 times. [102]
- Round 18: repeat (sc 16, inc) 6 times. [108]
- Round 19: repeat (sc 17, inc) 6 times. [114]
- Round 20: repeat (sc 18, inc) 6 times. [120]
- Round 21: repeat (sc 19, inc) 6 times. [126]
- Round 22: repeat (sc 20, inc) 6 times. Sl st in the next st and fasten off. [132]
- Rotate the position of the six increases slightly between rounds if needed to soften the hexagonal outline, maintaining the stated number of plain stitches and increases.
- Block both covers to 23–24 cm. Place one above and one below the rigid disk with their right sides facing outward. With ivory, sc through corresponding edge stitches of both covers around the disk; join to the first sc. [132 joining sc]
- Pass strong thread through each disk hole and its surrounding crochet, leaving eight temporary attachment loops accessible underneath. These will connect the platform to the frame.
Burgundy Base Skirt and Snow Ruffle
- With the platform upright, join burgundy to the back loop of a joining sc. Round 1: ch 1, sc in BLO around; join. [132]
- Rounds 2–3: ch 1, sc in each st; join each round. [132 per round]
- Round 4: repeat (skip 2 st, 5 dc in the next st, skip 2 st, sl st in the next st) 22 times. Fasten off. [22 shells; all 132 stitches used]
- For the snow ruffle, join ivory to a free front loop of the platform joining round. Round 1: repeat (sc in the next free loop, ch 3, skip the next free loop) 66 times; join to the first sc. [66 sc and 66 arches]
- Round 2: sl st into the first arch; work (sc, hdc, 3 dc, hdc, sc) in each arch around. Join to the first sc and fasten off. [66 small shells]
Frame Covers and Handle
- Fit the covered disk inside the frame’s horizontal base ring. Attach the eight thread loops around the ring with several passes of strong thread, spacing them evenly. The disk must sit level and must not slide through the ring.
- Cover each exposed side and rear rib with closely packed ivory sc worked directly around the metal. Push the stitches together until no metal shows. At welded intersections, finish one section and restart on the far side of the joint.
- Cover the front opening perimeter in the same way. Keep all stitches on the outside of the opening so the clear opening remains as wide as possible.
- Cover the shoulder ring with burgundy sc worked directly around the metal. Distribute the stitches evenly and mark twelve equal sectors with removable thread ties.
- Cover the 20 cm handle ring with closely packed ivory sc. Leave the small areas needed for the metal connectors uncovered.
- Connect the handle ring to the frame’s hanging eye with rated metal hardware. Place the upper hanging hook directly through the handle’s metal ring. Wrap burgundy yarn decoratively over the lower connector after it is closed.
- For a soft braided accent, make two ivory chains long enough to follow the front opening’s curved side edges. Sew one chain to each covered edge, securing every third chain. These chains are decorative.
Rear Diamond Lace Panel
- With ivory and the 4 mm hook, ch 26. Row 1: sc in the second ch from the hook; repeat (ch 5, skip 5 ch, sc in the next ch) 4 times. Turn. [5 sc and 4 arches]
- Row 2: ch 1, sc in the first sc; repeat (ch 5, sc in the next sc) 4 times. Turn. [5 sc and 4 arches]
- Rows 3–12: repeat row 2 for ten more rows. [5 sc and 4 arches per row]
- Fasten off and wet-block the panel to approximately 20 cm wide × 22 cm tall. Pin each arch open without stretching the connecting sc into long gaps.
- Center the panel across the rear of the frame. Sew its lower edge to the rear platform edge, its upper edge to the shoulder ring, and its side edges to the nearest rear ribs. Keep the front opening clear.
- For the shoulder fringe, join ivory to one of the twelve shoulder markers. Ch 9 and sl st at the next marker; repeat around all twelve sectors. [12 arches]
- Work (sc, hdc, 7 dc, hdc, sc) in each shoulder arch. Join and fasten off. [12 scallops]
Penguin Body
- With charcoal and the 3.5 mm hook, round 1: 6 sc in MR. [6]
- Round 2: inc in each st. [12]
- Round 3: repeat (sc 1, inc) 6 times. [18]
- Round 4: repeat (sc 2, inc) 6 times. [24]
- Round 5: repeat (sc 3, inc) 6 times. [30]
- Round 6: repeat (sc 4, inc) 6 times. [36]
- Round 7: repeat (sc 5, inc) 6 times. [42]
- Rounds 8–14: sc in each st for seven rounds. [42 per round]
- Round 15: repeat (sc 5, dec) 6 times. [36]
- Round 16: sc in each st. [36]
- Round 17: repeat (sc 4, dec) 6 times. [30]
- Round 18: sc in each st. Stuff firmly, flattening the underside slightly. [30]
- Round 19: repeat (sc 3, dec) 6 times. [24]
- Round 20: repeat (sc 2, dec) 6 times. [18]
- Round 21: repeat (sc 1, dec) 6 times. Add the final stuffing. [12]
- Round 22: dec 6 times. Fasten off, thread through the six front loops, and close. [6]
Penguin Head
- With charcoal, round 1: 6 sc in MR. [6]
- Round 2: inc in each st. [12]
- Round 3: repeat (sc 1, inc) 6 times. [18]
- Round 4: repeat (sc 2, inc) 6 times. [24]
- Round 5: repeat (sc 3, inc) 6 times. [30]
- Round 6: repeat (sc 4, inc) 6 times. [36]
- Round 7: repeat (sc 5, inc) 6 times. [42]
- Round 8: repeat (sc 6, inc) 6 times. [48]
- Rounds 9–14: sc in each st for six rounds. [48 per round]
- Pause here to make the face patches below. Position their centers between head rounds 10 and 11, eight head stitches apart. Insert each eye through the center of its patch and the head fabric before securing the washer inside. Sew the patch edges to the head.
- Round 15: repeat (sc 6, dec) 6 times. [42]
- Round 16: repeat (sc 5, dec) 6 times. [36]
- Round 17: repeat (sc 4, dec) 6 times. [30]
- Round 18: repeat (sc 3, dec) 6 times. Stuff evenly. [24]
- Round 19: repeat (sc 2, dec) 6 times. [18]
- Round 20: repeat (sc 1, dec) 6 times. [12]
- Round 21: dec 6 times. Close as for the body, leaving a long sewing tail. [6]
Penguin Face, Belly, Beak, Wings, and Feet
- Face patches, make two in ivory: round 1, 6 sc in MR, leaving the center loose enough for an eye post. [6]
- Face patch round 2: inc in each st. [12]
- Face patch round 3: repeat (sc 1, inc) 6 times. Sl st in the next st and fasten off with a sewing tail. [18]
- Belly patch in ivory: round 1, 6 sc in MR. [6]
- Belly round 2: inc in each st. [12]
- Belly round 3: repeat (sc 1, inc) 6 times. [18]
- Belly round 4: repeat (sc 2, inc) 6 times. [24]
- Belly round 5: repeat (sc 3, inc) 6 times. [30]
- Belly round 6: repeat (sc 4, inc) 6 times. Sl st and fasten off. Block into a slightly tall oval, approximately 5 × 6 cm. [36]
- Beak in yellow: round 1, 6 sc in MR. [6]
- Beak round 2: repeat (sc 1, inc) 3 times. [9]
- Beak round 3: sc in each st. Fasten off. Lightly stuff and flatten the opening into a horizontal oval. [9]
- Wings, make two in charcoal: round 1, 6 sc in MR. [6]
- Wing round 2: repeat (sc 1, inc) 3 times. [9]
- Wing round 3: repeat (sc 2, inc) 3 times. [12]
- Wing rounds 4–8: sc in each st for five rounds. [12 per round]
- Wing round 9: repeat (sc 2, dec) 3 times. Leave unstuffed, flatten, and sc through both layers across the opening. Fasten off. [9 before flattening; 4 paired sc, with the final unpaired stitch caught into the last sc]
- Feet, make two in yellow: round 1, 6 sc in MR. [6]
- Foot round 2: inc in each st. [12]
- Foot round 3: repeat (sc 1, inc) 6 times. [18]
- Foot rounds 4–5: sc in each st. [18 per round]
- Foot round 6: repeat (sc 1, dec) 6 times. Lightly stuff. [12]
- Foot round 7: dec 6 times. Close and leave a sewing tail. Flatten into an oval. [6]
- Sew the belly to the body front, centered over rounds 7–17. Sew the head centrally above the body with several passes through both pieces.
- Sew the beak between the face patches, just below eye level. With pink DK cotton, embroider three short cheek stitches below and outside each eye.
- Sew the wings to the body sides at round 15, with their tips pointing downward. Sew the feet to the lower front over rounds 4–6, approximately 2 cm apart.
Burgundy Hat and Fringed Scarf
- Hat, with burgundy and the 3.5 mm hook: round 1, 6 sc in MR. [6]
- Round 2: inc in each st. [12]
- Round 3: repeat (sc 1, inc) 6 times. [18]
- Round 4: repeat (sc 2, inc) 6 times. [24]
- Round 5: repeat (sc 3, inc) 6 times. [30]
- Round 6: repeat (sc 4, inc) 6 times. [36]
- Round 7: repeat (sc 5, inc) 6 times. [42]
- Round 8: repeat (sc 6, inc) 6 times. [48]
- Rounds 9–13: sc in each st. [48 per round]
- Round 14: change to ivory; sc in each st. [48]
- Round 15: repeat (sl st in the next st, 3 hdc in the next st) 24 times. Fasten off. [24 raised brim clusters]
- Pom-pom, in ivory: round 1, 6 sc in MR. [6]
- Pom-pom round 2: inc in each st. [12]
- Pom-pom round 3: repeat (sc 1, inc) 6 times. [18]
- Pom-pom rounds 4–5: sc in each st. [18 per round]
- Pom-pom round 6: repeat (sc 1, dec) 6 times. Stuff. [12]
- Pom-pom round 7: dec 6 times. Close and sew to the hat crown. [6]
- Scarf, in burgundy: ch 61. Row 1: sc in the second ch from the hook and each remaining ch. Turn. [60]
- Rows 2–5: ch 1, sc in each st, turn. Fasten off after row 5. [60 per row]
- Cut twenty 10 cm strands, ten ivory and ten burgundy. Attach ten folded strands to each short end, alternating colors, then trim the fringe to approximately 3 cm.
- Set the hat at a slight angle and sew it to the head around the brim. Wrap the scarf around the neck, cross the ends at the front, and tack the crossing securely.
Snowy Evergreen Trees — Make Two
- With olive and the 3.5 mm hook, round 1: 6 sc in MR. [6]
- Round 2: sc in each st. [6]
- Round 3: inc in each st. [12]
- Round 4: sc in each st. [12]
- Round 5: sc in BLO around, leaving the front loops free for snow. [12]
- Round 6: repeat (sc 1, inc) 6 times. [18]
- Round 7: sc in each st. [18]
- Round 8: sc in BLO around. [18]
- Round 9: repeat (sc 2, inc) 6 times. [24]
- Round 10: sc in each st. [24]
- Round 11: sc in BLO around. [24]
- Round 12: repeat (sc 3, inc) 6 times. [30]
- Round 13: sc in each st. [30]
- Round 14: sc in BLO around. [30]
- Round 15: repeat (sc 4, inc) 6 times. [36]
- Round 16: sc in each st. [36]
- Round 17: sc in BLO around. [36]
- Round 18: sc in each st. [36]
- Round 19: working in BLO, repeat (sc 4, dec) 6 times. The tree now turns inward beneath its base. [30]
- Round 20: repeat (sc 3, dec) 6 times. [24]
- Round 21: repeat (sc 2, dec) 6 times. Stuff the cone evenly, keeping the bottom flat. [18]
- Round 22: repeat (sc 1, dec) 6 times. [12]
- Round 23: dec 6 times. Close and fasten off. [6]
- Snow tier at round 5: with the tree tip pointing upward, join ivory to a free front loop. Repeat (sl st in the next free loop, 3 hdc in the next free loop) 6 times. Join and fasten off. [6 clusters]
- Snow tier at round 8: work the same two-loop repeat 9 times. [9 clusters]
- Snow tier at round 11: work the same repeat 12 times. [12 clusters]
- Snow tier at round 14: work the same repeat 15 times. [15 clusters]
- Snow tier at round 17: work the same repeat 18 times. [18 clusters]
- Sew three ivory pearl beads to each tree, distributing them between the snow tiers. Completed trees should be approximately 11–12 cm tall before their stars.
Small Gold Stars — Make Two
- With yellow DK cotton and the 2.5 mm hook, round 1: 5 sc in MR; join to the first sc. [5]
- Round 2: repeat (ch 3, sl st in the second ch from the hook, sc in the next ch, sl st in the next round-1 sc) 5 times. The final sl st returns to the first base stitch. [5 points]
- Fasten off, block the points, and apply a light coat of stiffener. Let dry completely, then sew one star upright to each tree tip.
Statement Bow
- Loop band, with ivory and the 4 mm hook: ch 19. Row 1: sc in the second ch from the hook and each remaining ch. Turn. [18]
- Rows 2–64: ch 1, sc in each st, turn. [18 per row; approximately 32 cm long]
- Fasten off. Sew the two short edges together to form a ring. Flatten the ring with its seam centered underneath; each side becomes one broad bow loop.
- Join burgundy to either long edge of the ring. Sc once into each row-end around; join and fasten off. Repeat on the other long edge. [64 sc on each edge]
- Tail, make two in ivory: ch 13. Row 1: sc in the second ch from the hook and each remaining ch. Turn. [12]
- Rows 2–18: ch 1, sc in each st, turn. [12 per row]
- Row 19: ch 1, dec, sc 8, dec. Turn. [10]
- Row 20: ch 1, dec, sc 6, dec. Turn. [8]
- Row 21: ch 1, dec, sc 4, dec. Turn. [6]
- Row 22: ch 1, dec, sc 2, dec. Turn. [4]
- Row 23: ch 1, dec twice. Turn. [2]
- Row 24: ch 1, dec. Fasten off. [1]
- Edge each tail in burgundy: work 1 sc into each row-end down the first side, 3 sc into the pointed tip, 1 sc into each row-end up the second side, and 1 sc into each foundation stitch across the top. Join and fasten off. Distribute the side stitches evenly so the tail lies flat.
- Center wrap in ivory: ch 7. Row 1: sc in the second ch from the hook and each remaining ch. Turn. [6]
- Rows 2–18: ch 1, sc in each st, turn. Fasten off. [6 per row]
- Pinch the flattened loop band at its center. Place the tail tops behind the pinch, pointing down and outward. Wrap the center strip around all layers and sew its short ends together at the back.
- Sew the bow center and the rear of each loop securely to the covered shoulder ring, keeping the front opening clear. Attach the bell beneath the center using closed metal rings.
Holly Leaves and Berry Clusters
- Make eight leaves with olive worsted cotton and the 3.5 mm hook. Ch 10. Work along one side of the chain: sc in the second ch from the hook, hdc in the next ch, dc in each of the next 5 ch, hdc in the next ch, and 3 sc in the final ch. [11 stitches]
- Rotate to the unused side of the foundation. Work hdc in the next ch, dc in each of the next 5 ch, hdc in the next ch, and sc in the final ch. Join to the first sc. [19 stitches around the complete leaf]
- Leaf edge: ch 1, sc in the first st; repeat (sc in the next 2 st, ch 2, sl st in the second ch from the hook) 9 times. Join to the first sc. [19 sc and 9 pointed picots]
- Fasten off with a sewing tail. With a separate olive strand, embroider a straight center vein through the foundation chain, drawing it in slightly to cup the leaf.
- Arrange two leaves into each of four clusters. Sew two clusters behind the bow, one on each side, and two clusters at the front base edge.
- Sew three burgundy beads at the center of each cluster using strong thread. Pass through each bead and the supporting fabric at least three times. [12 berries total]
Six-Point Snowflakes — Make Six
- With ivory DK cotton and the 2.5 mm hook, round 1: ch 4 and join with a sl st to make a ring.
- Round 2: ch 1, work 12 sc into the ring; join to the first sc. [12]
- Round 3: repeat (sc in the next st, ch 5, skip the next st) 6 times; join to the first sc. [6 sc and 6 arches]
- Round 4: sl st into the first arch. In each of the six arches work: 2 sc; ch 3 and sl st in the first of those 3 ch; sc; ch 5 and sl st in the first of those 5 ch; sc; ch 3 and sl st in the first of those 3 ch; 2 sc. Join to the first sc and fasten off. [6 arms, each with 6 sc and 3 picots]
- Block each snowflake to approximately 5–6 cm across. Stiffen lightly and dry completely before removing the pins.
- Sew one snowflake to a scarf end, one between the front base holly clusters, and three to the side or rear lace. Keep one for the pendant beneath the base.
- Attach the pendant snowflake’s top point to a closed metal ring. Sew a second closed ring firmly to the underside of the platform front, passing the thread through the disk’s front perimeter hole. Connect the rings with a third ring so the snowflake hangs freely below the skirt.
Snow Cushions — Make Five
- With ivory worsted cotton and the 3.5 mm hook, round 1: 6 sc in MR. [6]
- Round 2: inc in each st. [12]
- Round 3: repeat (sc 1, inc) 6 times. [18]
- Round 4: sc in each st. [18]
- Round 5: repeat (sc 1, dec) 6 times. Add a small amount of stuffing. [12]
- Round 6: dec 6 times. Close, then flatten gently into a low mound. [6]
- Reserve the cushions for filling the spaces around the figures after their positions are fixed.
Finishing
- Place the penguin at the center front of the platform, leaving approximately 1 cm between its feet and the front rim. Set one tree behind each wing, slightly closer to the rear edge. Check that the hat, stars, and bow do not press against one another.
- Sew each figure to the upper base cover with at least four widely spaced attachment points. Take several stitches through each foot and through the penguin’s underside. Secure each tree around its bottom perimeter.
- Arrange the five snow cushions around the figures, covering visible attachment stitches without hiding the feet. Sew each cushion down at three points.
- Thread the LED string around the rear and side ribs, then across the shoulder behind the bow. Secure the wire with loose thread loops, keeping the lights clear of tightly stuffed pieces. Place the battery compartment at the lower rear in a position that remains reachable through the frame.
- Secure all yarn ends, trim loose threads, and check every bead, bell connector, and pendant attachment. Keep the metal hanging eye and load-bearing connectors accessible for inspection.
- Hang the completed display a few centimeters above a padded surface first. Check that the base stays level, the frame remains rigid, and no component shifts. Adjust the figure positions or battery placement before hanging it in its final location.
Let the bow loops sit open and ease the scarf fringe over the snow. A little space between the trees and penguin helps each detail show clearly when the lights are switched on.
Hang the lantern from suitable hardware in a dry indoor spot, away from small children and pets. Remove the battery pack before cleaning, and support the platform when moving the display.
Tips for Success
- Finish and fit the rigid platform first. It establishes the usable scene width and reveals gauge problems before the smaller pieces are made.
- Stuff the penguin firmly enough to hold its head upright, but keep the wing tips and feet soft enough to sit naturally.
- Pin the bow and figures in place together before sewing. The bow should frame the scene without touching the hat pom-pom.
- Block snowflakes with all six arms pinned separately so their points remain distinct after stiffening.
- Place the battery compartment near the rear center to reduce sideways tilt when the display hangs.
Common Mistakes to Avoid
- A rippled base means the fabric is too large for the disk. Reduce the hook size and remake the covers to the specified diameter.
- A loose disk can tip inside the frame. Use all eight structural attachment points and tighten them evenly before adding the figures.
- Working tree rounds through both loops removes the attachment loops for the snow. Mark rounds 5, 8, 11, 14, and 17 as you reach them.
- Eyes attached only to the ivory patches can pull the patches away from the head. Pass eye posts through both patch and head fabric before fitting the washers.
- Overtightening the light-wire ties can damage the wire. Leave each thread loop loose enough for the wire to move slightly.
Ways to Customize This Pattern
- Replace burgundy with deep blue and olive with cool sage, keeping the ivory snow and gold accents for contrast.
- Embroider the eyes and berries instead of using beads or safety eyes; retain the same placement and cluster sizes.
- Make a shorter scarf by starting with ch 49 for 48 sc per row, keeping the five-row width and the same fringe arrangement.
- Omit the bell for a silent display and sew a small crocheted star beneath the bow center instead.
- For a tabletop version, use a frame with a stable integral stand and omit the handle and lower pendant; keep the platform attachments and scene layout unchanged.
Frequently asked questions
The finished project is a hanging Christmas lantern decoration. The small stuffed penguin and trees are components inside its rigid frame; they do not provide the structure or carry the hanging weight.
A single embroidery hoop cannot support this three-dimensional scene. Use a rigid open-front frame with a horizontal base ring, side ribs, and a load-bearing hanging eye. Check its dimensions against the materials list before starting.
Only with a correspondingly larger frame and disk. The base diameter, figure spacing, bow width, and opening clearance must all increase together. For the stated frame, match the specified gauge instead.
Remove the batteries and light string first. Dust with a soft brush and spot-clean the crochet with a lightly damp cloth. Do not immerse the assembled frame, stiffened motifs, hardware, or enclosed platform.
Use battery-powered LEDs only. The yarn, stuffing, and decorative finishes must remain away from flames and heat sources.
The finished Penguin Christmas Lantern Crochet Pattern with Holly and Snowflakes

